이 글에서 다루는 것
"Spring 소스 파헤치기" 시리즈의 일곱 번째 글입니다. 6편에서는 빈 하나가 만들어지는 동안 컨테이너에 끼어드는 자리들(BeanPostProcessor, @PostConstruct 같은 생명주기 콜백)이 어떤 순서로 불리는지 봤습니다. 이번에는 시야를 넓혀 컨테이너 자체가 켜지는 순서를 봅니다. 1편과 2편에서 "refresh() 안에서 열두 단계를 밟는다"고 하고 넘어간 그 메서드를 한 줄씩 엽니다.
답하려는 질문은 네 가지입니다.
refresh()를 부르면 어떤 순서로 무슨 일이 일어나는가. 정말 열두 단계인가ApplicationContext는 3편에서 본BeanFactory위에 무엇을 더하는가- 왜
GenericApplicationContext와AbstractRefreshableApplicationContext의 두 갈래가 있는가 - 켜다가 실패하면, 그리고
close()로 닫으면 무슨 일이 일어나는가
| 항목 | 내용 |
|---|---|
| 기준 소스 | Spring Framework 7.1.0-SNAPSHOT |
| 커밋 | f447f3c310 (2026-10-01, main 브랜치) |
| 주로 읽는 모듈 | spring-context |
| 주로 읽는 클래스 | AbstractApplicationContext, GenericApplicationContext, AbstractRefreshableApplicationContext, ConfigurableApplicationContext |
글에 나오는 줄 번호와 세부 동작은 모두 이 커밋 기준입니다. 다른 버전에서는 줄 번호가 다르고 세부 내용도 달라질 수 있습니다. 같은 커밋의 소스를 받는 방법은 1편에 있습니다.
공부 노트는 단계마다 훨씬 깊이 들어가지만, 이 글은 Spring을 처음 보는 분이 따라올 수 있는 큰 줄기만 골랐습니다. 빼놓은 것은 글 끝의 "더 깊이 들어가면"에 이름만 적어 두었습니다.
먼저 알아 둘 말
빈과 컨테이너는 앞 글들과 같습니다. 빈은 Spring이 대신 만들어 관리하는 객체, 컨테이너는 그 빈을 만들고 보관하는 주체입니다. 컨테이너의 뼈대 인터페이스가 BeanFactory이고(3편), 빈 하나가 만들어지는 과정은 4편에 있습니다.
**ApplicationContext**는 BeanFactory를 확장한 인터페이스입니다. 우리가 코드에서 new AnnotationConfigApplicationContext(...)로 만드는 것이 이것입니다. 빈을 꺼내 주는 일 말고도 설정값 읽기, 이벤트 보내기, 파일 읽기 같은 일을 함께 맡습니다. 1절에서 정확히 무엇을 더하는지 봅니다. 이 글에서 "컨텍스트"라고 하면 ApplicationContext를 뜻합니다.
**refresh()**는 컨텍스트를 실제로 켜는 메서드입니다. 설계도를 읽고, 가공하고, 빈을 만들고, "준비됐다"고 알리는 일이 전부 이 안에서 일어납니다. 이름이 "새로 고침"인 이유는 7절에서 설명합니다.
템플릿 메서드 패턴은 부모 클래스가 전체 순서를 한 메서드에 고정해 두고, 그 가운데 몇 단계만 자식 클래스가 채워 넣게 하는 설계입니다. refresh()가 바로 그 "순서를 고정한 메서드"이고, 자식이 채우는 자리가 몇 군데 있습니다.
이벤트와 리스너: 컨텍스트는 "켜졌다", "닫힌다" 같은 일을 이벤트 객체로 만들어 보내고, ApplicationListener를 구현한 빈이 그것을 받습니다. 이 글에서는 ContextRefreshedEvent와 ContextClosedEvent 두 개만 나옵니다. 이벤트 구조 자체는 12편의 주제입니다.
후처리기는 6편의 주제였습니다. BeanFactoryPostProcessor는 설계도(BeanDefinition)를, BeanPostProcessor는 만들어지고 있는 빈 객체를 손보는 장치입니다. 이 글에서는 둘이 refresh()의 어느 단계에서 불리는지만 봅니다.
1. ApplicationContext는 BeanFactory에 무엇을 더하나
인터페이스 선언 한 줄에 답이 있습니다.
public interface ApplicationContext extends EnvironmentCapable, ListableBeanFactory, HierarchicalBeanFactory,
		MessageSource, ApplicationEventPublisher, ResourcePatternResolver {
spring-context/src/main/java/org/springframework/context/ApplicationContext.java 59–60행
여섯 인터페이스를 한데 묶은 것입니다. 둘은 3편에서 본 BeanFactory 계열이고, 넷이 새로 더해진 것입니다.
| 인터페이스 | 더해 주는 일 | 어디서 왔나 |
|---|---|---|
ListableBeanFactory |
빈을 이름 하나씩이 아니라 목록으로 조회 | spring-beans (3편) |
HierarchicalBeanFactory |
부모 컨테이너를 둘 수 있다 | spring-beans (3편) |
EnvironmentCapable |
설정값과 프로파일(Environment)을 가진다 |
spring-core |
MessageSource |
다국어 메시지를 찾아 준다 | spring-context |
ApplicationEventPublisher |
이벤트를 보낸다(publishEvent) |
spring-context |
ResourcePatternResolver |
파일·클래스패스 자원을 패턴으로 읽는다 | spring-core |
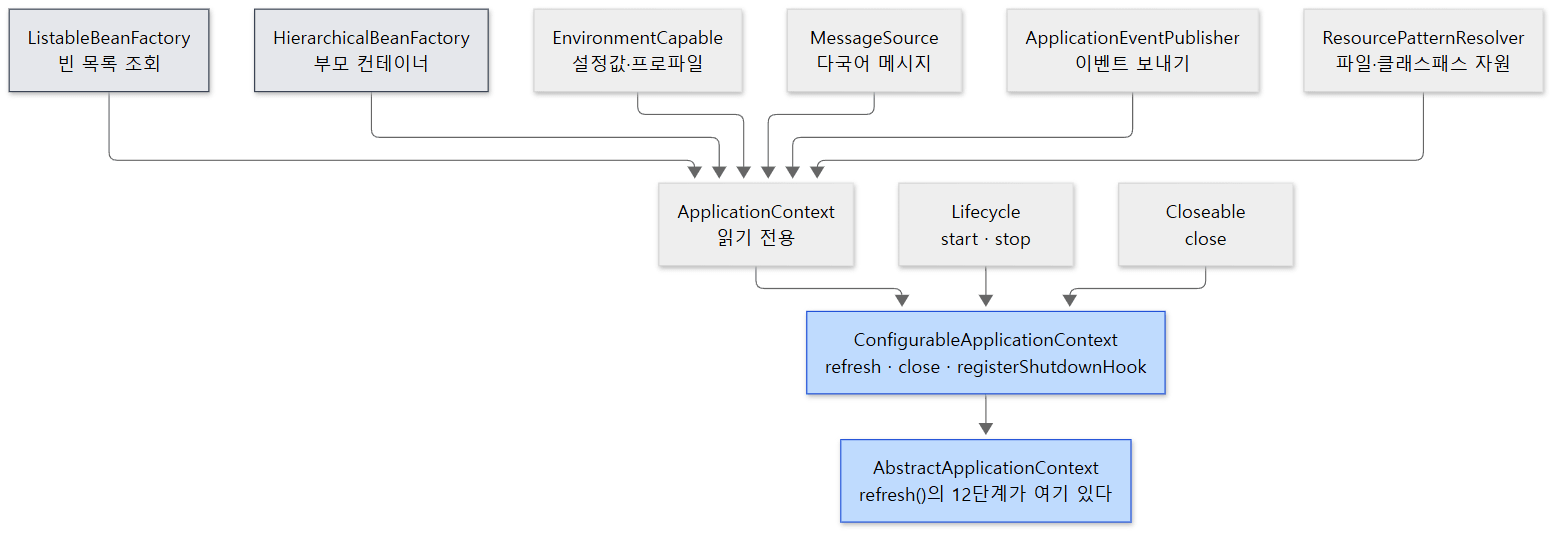 회색 둘은 3편에서 본
BeanFactory 계열입니다. 파란 둘이 이 글의 무대입니다.
그런데 이 목록에는 refresh()도 close()도 없습니다. ApplicationContext는 설명 주석대로 읽기 전용이고(28–30행), 켜고 끄는 메서드는 한 단계 아래의 ConfigurableApplicationContext에 있습니다.
public interface ConfigurableApplicationContext extends ApplicationContext, Lifecycle, Closeable {
spring-context/src/main/java/org/springframework/context/ConfigurableApplicationContext.java 45행
여기에 refresh()(222행), close()(267행), registerShutdownHook()(256행), isActive()(289행), 그리고 안에 든 BeanFactory를 꺼내는 getBeanFactory()(310행)가 선언되어 있습니다. 빈을 쓰는 쪽에는 읽기 전용 ApplicationContext를 주고, 켜고 끄는 일은 Configurable…에만 열어 둔 것입니다.
이 모든 것을 실제로 구현한 클래스가 AbstractApplicationContext입니다(AbstractApplicationContext 145–146행). 이 글에서 읽는 메서드는 거의 전부 이 클래스에 있습니다.
컨텍스트는 BeanFactory를 "가지고" 있습니다
AbstractApplicationContext가 BeanFactory의 메서드를 어떻게 구현하는지 보면 설계가 보입니다.
	@Override
	public Object getBean(String name) throws BeansException {
		assertBeanFactoryActive();
		return getBeanFactory().getBean(name);
	}
직접 만들지 않고 안에 든 BeanFactory에 넘깁니다. 컨텍스트는 BeanFactory를 상속해서 커진 것이 아니라, 4편에서 본 DefaultListableBeanFactory를 안에 하나 품고 그 둘레에 설정값·이벤트·메시지 같은 기능을 두른 것입니다. 앞의 assertBeanFactoryActive()는 "켜져 있는가"를 확인하는 한 줄입니다.
	protected void assertBeanFactoryActive() {
		if (!this.active.get()) {
			if (this.closed.get()) {
				throw new IllegalStateException(getDisplayName() + " has been closed already");
			}
			else {
				throw new IllegalStateException(getDisplayName() + " has not been refreshed yet");
			}
		}
	}
active와 closed는 AtomicBoolean 필드 둘입니다(209–212행). refresh()가 active를 켜고, close()가 closed를 켜고 active를 끕니다. 이 두 깃발이 글 전체를 관통합니다.
2. refresh()의 뼈대 — 세어 보니 열두 개
new AnnotationConfigApplicationContext(AppConfig.class)의 생성자가 register와 refresh 두 줄이라는 것은 1편에서 봤습니다(AnnotationConfigApplicationContext 89–93행). 그 refresh()의 본문입니다. 예외 처리 부분은 8절에서 따로 보므로 여기서는 // ...로 줄였습니다.
	@Override
	public void refresh() throws BeansException, IllegalStateException {
		this.startupShutdownLock.lock();
		try {
			this.startupShutdownThread = Thread.currentThread();

			StartupStep contextRefresh = this.applicationStartup.start("spring.context.refresh");

			// Prepare this context for refreshing.
			prepareRefresh();

			// Tell the subclass to refresh the internal bean factory.
			ConfigurableListableBeanFactory beanFactory = obtainFreshBeanFactory();

			// Prepare the bean factory for use in this context.
			prepareBeanFactory(beanFactory);

			try {
				// Allows post-processing of the bean factory in context subclasses.
				postProcessBeanFactory(beanFactory);

				StartupStep beanPostProcess = this.applicationStartup.start("spring.context.beans.post-process");
				// Invoke factory processors registered as beans in the context.
				invokeBeanFactoryPostProcessors(beanFactory);
				// Register bean processors that intercept bean creation.
				registerBeanPostProcessors(beanFactory);
				beanPostProcess.end();

				// Initialize message source for this context.
				initMessageSource();

				// Initialize event multicaster for this context.
				initApplicationEventMulticaster();

				// Initialize other special beans in specific context subclasses.
				onRefresh();

				// Check for listener beans and register them.
				registerListeners();

				// Instantiate all remaining (non-lazy-init) singletons.
				finishBeanFactoryInitialization(beanFactory);

				// Last step: publish corresponding event.
				finishRefresh();
			}

			catch (RuntimeException | Error ex) {
				// ...
			}

			finally {
				contextRefresh.end();
			}
		}
		finally {
			this.startupShutdownThread = null;
			this.startupShutdownLock.unlock();
		}
	}
주석이 한 줄씩 붙은 메서드 호출을 세어 보면 prepareRefresh부터 finishRefresh까지 정확히 열두 개입니다. 1편과 2편에서 "열두 단계"라고 쓴 것이 이 커밋에서도 맞습니다. 참고로 StartupStep은 각 구간의 소요 시간을 재는 측정 도구라 단계에 넣지 않았습니다.
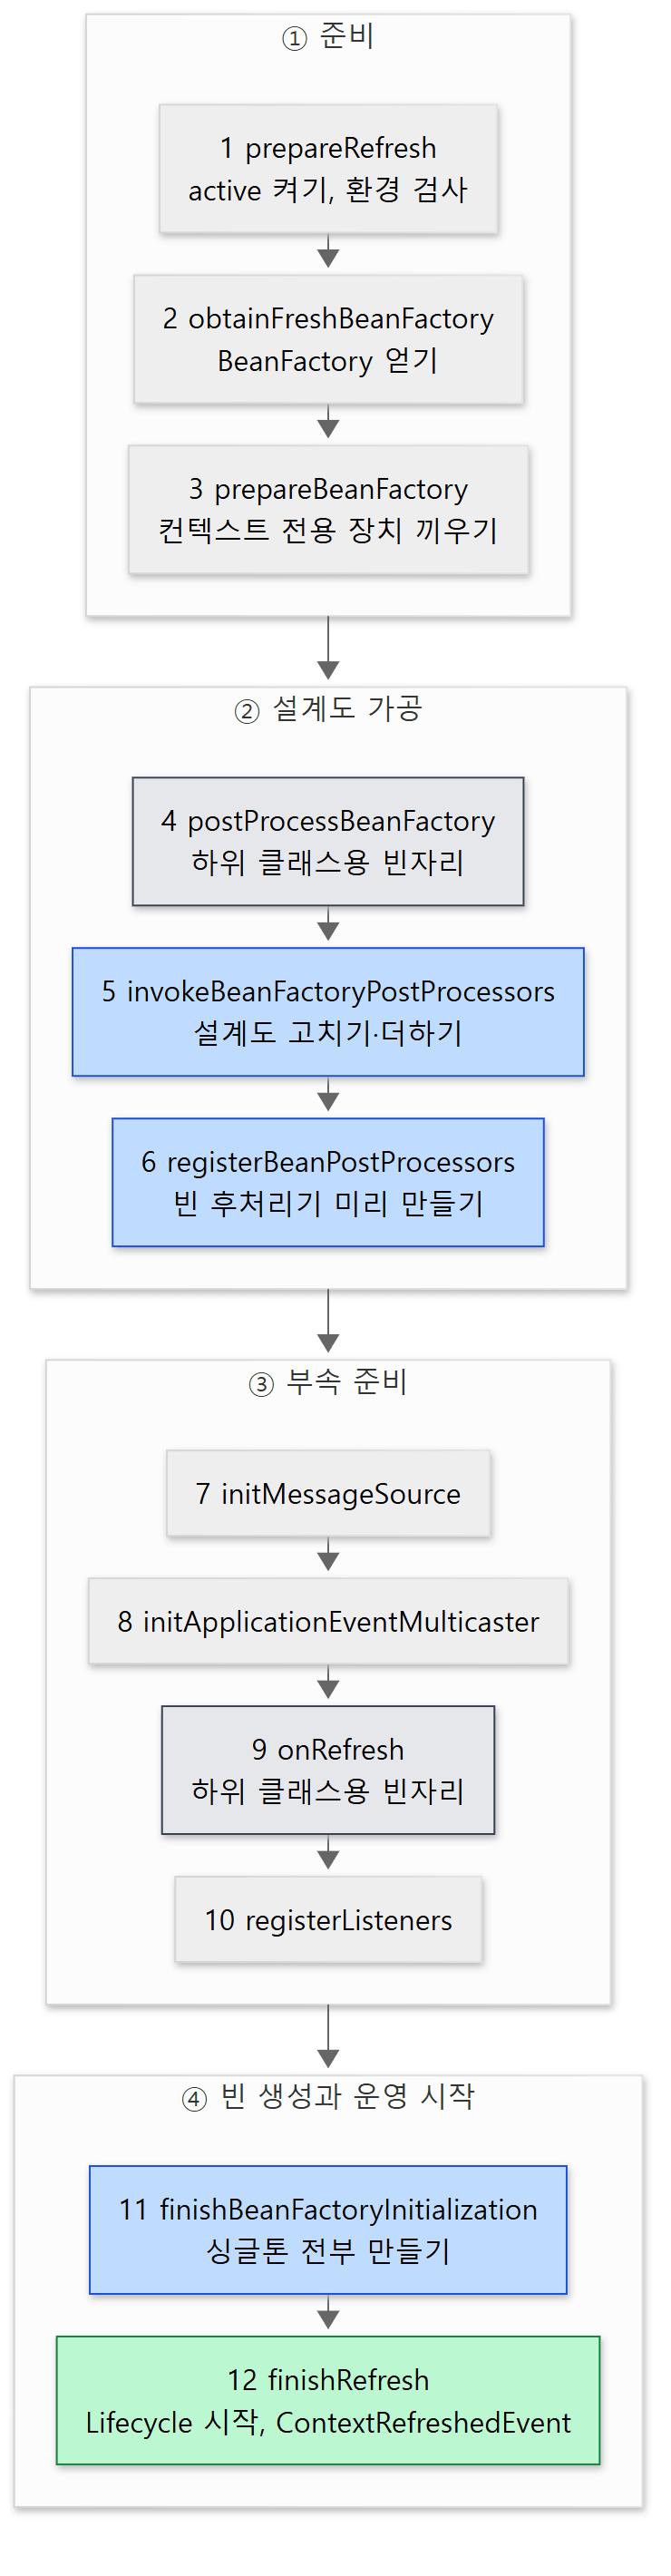 2편의 네 덩어리와 열두 단계를 맞춘 그림입니다. 회색은 기본 구현이 비어 있는 하위 클래스용 자리, 파란색은 후처리기와 빈 생성, 초록색이 마지막입니다.
| 단계 | 메서드 | 한 줄 요약 | 절 |
|---|---|---|---|
| 1 | prepareRefresh |
active 켜기, 환경 검사, 이른 이벤트 그릇 준비 |
3 |
| 2 | obtainFreshBeanFactory |
안에 둘 BeanFactory를 얻는다 (두 갈래가 갈리는 곳) |
3, 7 |
| 3 | prepareBeanFactory |
BeanFactory에 컨텍스트 전용 장치를 끼운다 |
3 |
| 4 | postProcessBeanFactory |
하위 클래스용 빈자리 (기본은 비어 있음) | 4 |
| 5 | invokeBeanFactoryPostProcessors |
설계도를 고치고 더한다 | 4 |
| 6 | registerBeanPostProcessors |
빈 후처리기를 미리 만들어 등록한다 | 4 |
| 7 | initMessageSource |
메시지 소스 준비 | 5 |
| 8 | initApplicationEventMulticaster |
이벤트 전달기 준비 | 5 |
| 9 | onRefresh |
하위 클래스용 빈자리 (기본은 비어 있음) | 5 |
| 10 | registerListeners |
리스너 등록, 밀린 이벤트 보내기 | 5 |
| 11 | finishBeanFactoryInitialization |
싱글톤 빈 전부 만들기 | 6 |
| 12 | finishRefresh |
Lifecycle 시작, ContextRefreshedEvent |
6 |
메서드 맨 앞의 startupShutdownLock은 켜기와 끄기가 동시에 일어나지 않게 하는 락입니다(215행). 8절의 close()도 같은 락을 잡습니다. startupShutdownThread는 지금 그 락을 잡고 일하는 스레드를 기록해 두는 필드입니다(218행).
3. 1~3단계: 준비
1단계 prepareRefresh()(668–703행)는 네 가지를 합니다. 시작 시각을 적고 closed를 끄고 active를 켭니다(670–672행). Environment에 "반드시 있어야 한다"고 표시된 설정값이 다 있는지 검사합니다(688행). refresh() 전에 코드로 직접 등록해 둔 리스너를 따로 보관해 둡니다(691–698행). 그리고 earlyApplicationEvents라는 빈 집합을 만듭니다(702행). 이 집합의 쓸모는 5절에서 드러납니다. (기본 구현이 비어 있는 initPropertySources() 호출(710–712행)은 세지 않았습니다.)
**2단계 obtainFreshBeanFactory()**는 두 줄입니다.
	protected ConfigurableListableBeanFactory obtainFreshBeanFactory() {
		refreshBeanFactory();
		return getBeanFactory();
	}
refreshBeanFactory()와 getBeanFactory()는 둘 다 추상 메서드입니다(1633행, 1656행). 안에 둘 BeanFactory를 어떻게 마련할지는 부모가 정하지 않고 자식에게 맡긴 것입니다. 이것이 7절의 두 갈래입니다.
**3단계 prepareBeanFactory()**가 이 글에서 가장 눈여겨볼 준비 단계입니다. 방금 얻은 평범한 BeanFactory에 "컨텍스트 안에서 쓰이는 BeanFactory"로서 필요한 장치를 끼웁니다. 요지만 남기면 이렇습니다.
	protected void prepareBeanFactory(ConfigurableListableBeanFactory beanFactory) {
		// Tell the internal bean factory to use the context's class loader etc.
		beanFactory.setBeanClassLoader(getClassLoader());
		// ...

		// Configure the bean factory with context callbacks.
		beanFactory.addBeanPostProcessor(new ApplicationContextAwareProcessor(this));
		beanFactory.ignoreDependencyInterface(EnvironmentAware.class);
		// ...
		beanFactory.ignoreDependencyInterface(ApplicationContextAware.class);
		// ...

		// BeanFactory interface not registered as resolvable type in a plain factory.
		// MessageSource registered (and found for autowiring) as a bean.
		beanFactory.registerResolvableDependency(BeanFactory.class, beanFactory);
		beanFactory.registerResolvableDependency(ResourceLoader.class, this);
		beanFactory.registerResolvableDependency(ApplicationEventPublisher.class, this);
		beanFactory.registerResolvableDependency(ApplicationContext.class, this);

		// Register early post-processor for detecting inner beans as ApplicationListeners.
		beanFactory.addBeanPostProcessor(new ApplicationListenerDetector(this));
		// ...

		// Register default environment beans.
		if (!beanFactory.containsLocalBean(ENVIRONMENT_BEAN_NAME)) {
			beanFactory.registerSingleton(ENVIRONMENT_BEAN_NAME, getEnvironment());
		}
		// ...
	}
세 가지를 끼웁니다.
ApplicationContextAwareProcessor(737행). 빈이ApplicationContextAware,EnvironmentAware같은 인터페이스를 구현하고 있으면 컨텍스트나Environment를 넣어 주는 **BeanPostProcessor**입니다. 열어 보면postProcessBeforeInitialization에서instanceof로 일곱 종류를 차례로 확인합니다(ApplicationContextAwareProcessor83–112행). 즉 "컨텍스트가Aware인터페이스를 알아본다"는 기능도 4편에서 본 후처리기 하나로 구현되어 있습니다. 그 아래ignoreDependencyInterface(738–744행)는 같은 일곱 인터페이스의 setter를 자동 주입 대상에서 빼라는 뜻입니다. 후처리기가 넣어 줄 것이니 주입 쪽이 끼어들지 말라는 것입니다.registerResolvableDependency(748–751행).BeanFactory,ApplicationContext같은 타입은 빈으로 등록된 적이 없는데도@Autowired ApplicationContext ctx;가 되는 이유가 이 네 줄입니다. "이 타입을 달라고 하면 이 객체를 줘라"고BeanFactory에 미리 적어 둡니다. 소스의 주석대로MessageSource는 여기 없고 7단계에서 빈으로 등록됩니다.ApplicationListenerDetector(754행). 만들어진 빈이ApplicationListener면 리스너 명단에 올려 주는 후처리기입니다(ApplicationListenerDetector75–95행). 10단계의registerListeners가 이름으로 찾아 등록하지 못하는 내부 빈(inner bean)을 위한 보완 장치입니다.
마지막으로 environment, systemProperties, systemEnvironment, applicationStartup 네 객체를 싱글톤 빈으로 넣어 둡니다(764–775행). @Autowired Environment env;가 되는 이유입니다.
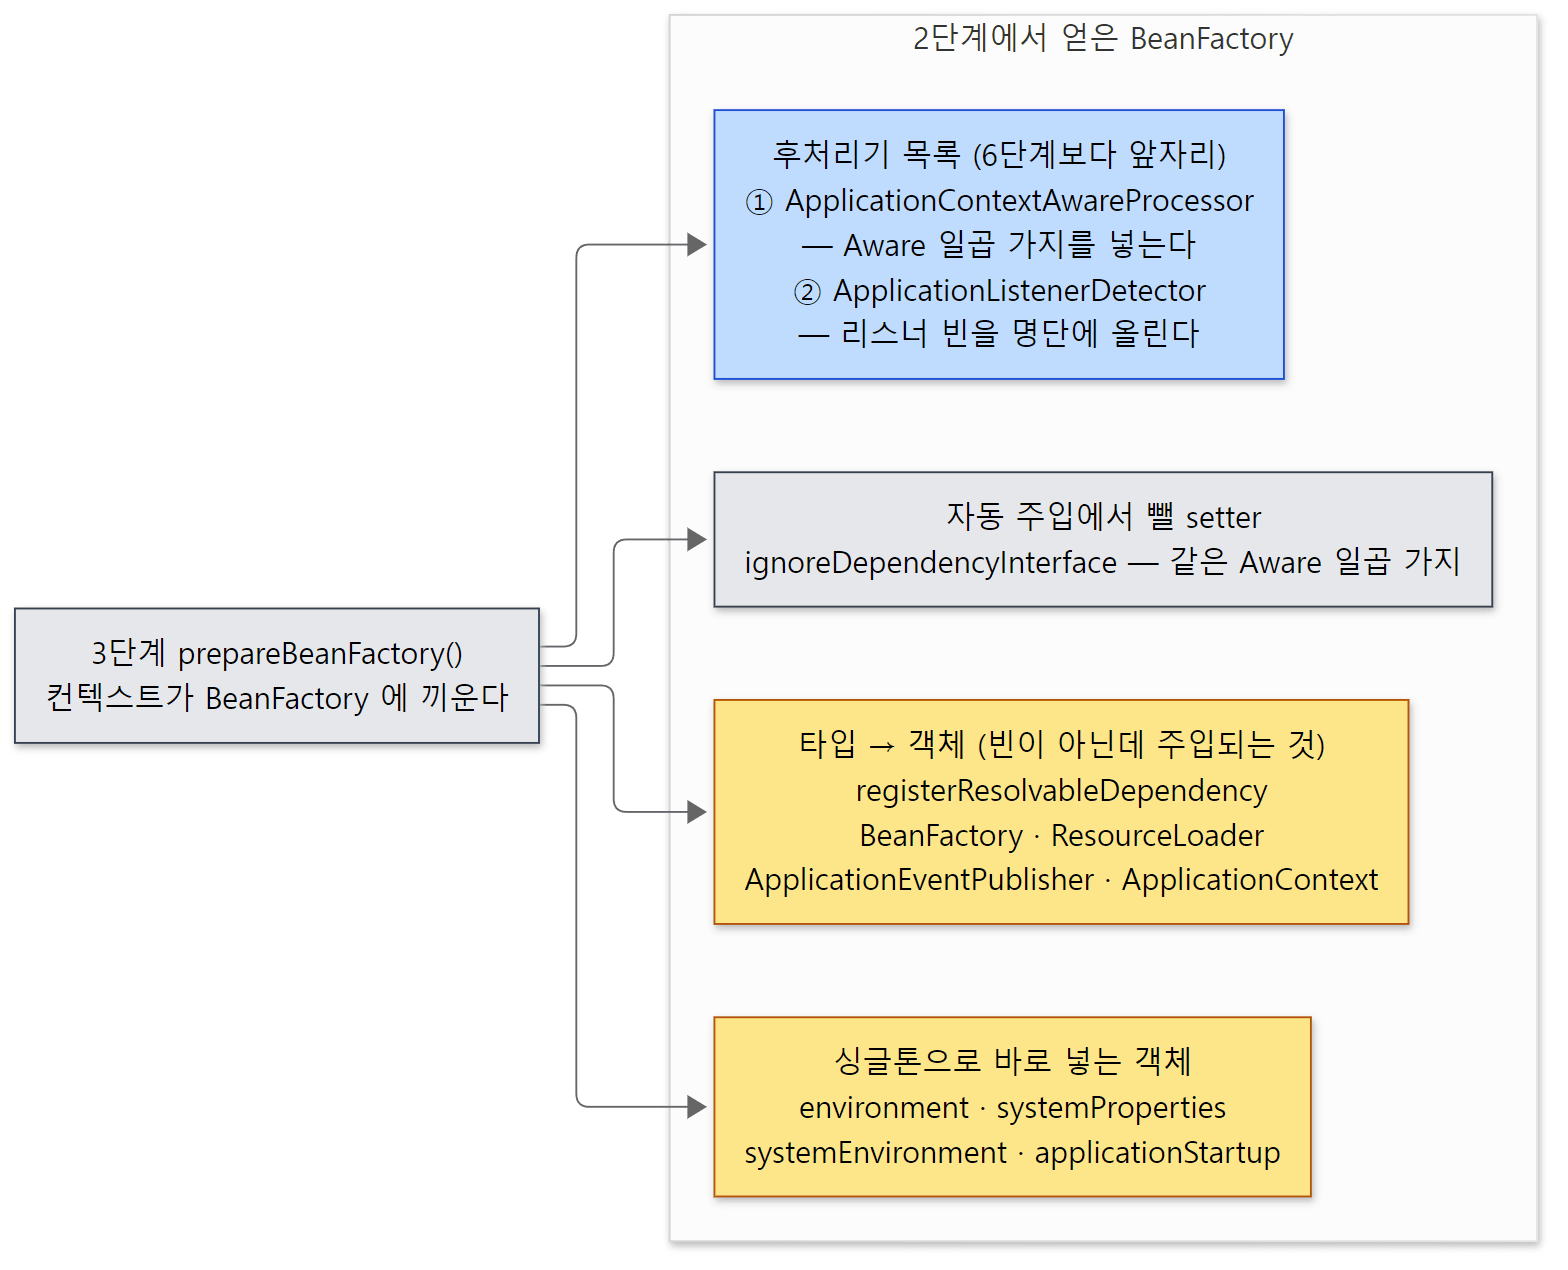 위 코드에서 끼우는 것을 종류별로 묶은 그림입니다. 파란 칸은 빈이 만들어질 때 일하는 후처리기, 노란 칸은 주입할 때 꺼내 쓰는 객체입니다(위 코드에서 줄인 LoadTimeWeaver 관련 줄은 넣지 않았습니다).
헷갈리기 쉬운 곳
Aware콜백은 "컨텍스트의 기능"이지BeanFactory의 기능이 아닙니다.DefaultListableBeanFactory를 컨텍스트 없이 단독으로 쓰면ApplicationContextAware는 불리지 않습니다. 그것을 불러 주는 후처리기가 3단계에서 끼워지기 때문입니다. 4편의invokeAwareMethods가 직접 처리하는 것은BeanNameAware,BeanClassLoaderAware,BeanFactoryAware셋뿐입니다.- 후처리기 둘은 6단계보다 먼저 들어갑니다. 3단계에서
addBeanPostProcessor로 직접 끼운 것이라, 빈으로 등록된 후처리기를 모아 등록하는 6단계보다 앞 순서입니다. 그래서 6절 예제에서ApplicationContextAware가 우리가 만든BeanPostProcessor보다 먼저 찍힙니다.
4. 4~6단계: 설계도 가공
**4단계 postProcessBeanFactory()**는 기본 구현이 비어 있습니다(787–788행). 템플릿 메서드 패턴의 "자식이 채우는 자리"입니다. 설명 주석에 적힌 시점이 중요합니다. 설계도는 읽혔지만 후처리기는 아직 돌지 않았고 빈은 하나도 만들어지지 않은 때입니다(779–782행). 웹 환경의 컨텍스트가 서블릿 관련 후처리기를 여기서 끼웁니다(GenericWebApplicationContext 153행, 20편에서 봅니다).
**5단계 invokeBeanFactoryPostProcessors()**는 한 줄짜리 위임입니다.
	protected void invokeBeanFactoryPostProcessors(ConfigurableListableBeanFactory beanFactory) {
		PostProcessorRegistrationDelegate.invokeBeanFactoryPostProcessors(beanFactory, getBeanFactoryPostProcessors());
		// ...
	}
getBeanFactoryPostProcessors()는 코드로 직접 addBeanFactoryPostProcessor해 둔 것들의 목록이고(203행), 빈으로 등록된 BeanFactoryPostProcessor는 PostProcessorRegistrationDelegate가 BeanFactory에서 찾아 만들고 순서대로 부릅니다(PostProcessorRegistrationDelegate 68행부터). 그 순서 규칙은 6편의 주제였으므로 여기서는 되풀이하지 않습니다.
이 단계가 중요한 이유는 어노테이션 설정의 해석이 여기서 일어나기 때문입니다. @Configuration 클래스를 읽어 @Bean 메서드와 @ComponentScan 결과를 설계도로 추가하는 ConfigurationClassPostProcessor가 BeanFactoryPostProcessor의 한 종류라서 이 단계에서 돕니다(AnnotationConfigUtils 158–161행에서 등록). 2편에서 "정의 수집의 많은 부분이 정의 가공의 장치로 구현되어 있다"고 한 것이 이 뜻입니다. 자세한 내용은 8편에서 봅니다.
**6단계 registerBeanPostProcessors()**도 같은 위임입니다(812–814행, 구현은 PostProcessorRegistrationDelegate 211행부터). 빈으로 등록된 BeanPostProcessor를 지금 전부 만들어 BeanFactory에 끼워 둡니다. 후처리기는 다른 빈이 만들어질 때 끼어들어야 하므로, 평범한 빈보다 먼저 존재해야 합니다. 그래서 11단계가 아니라 6단계입니다.
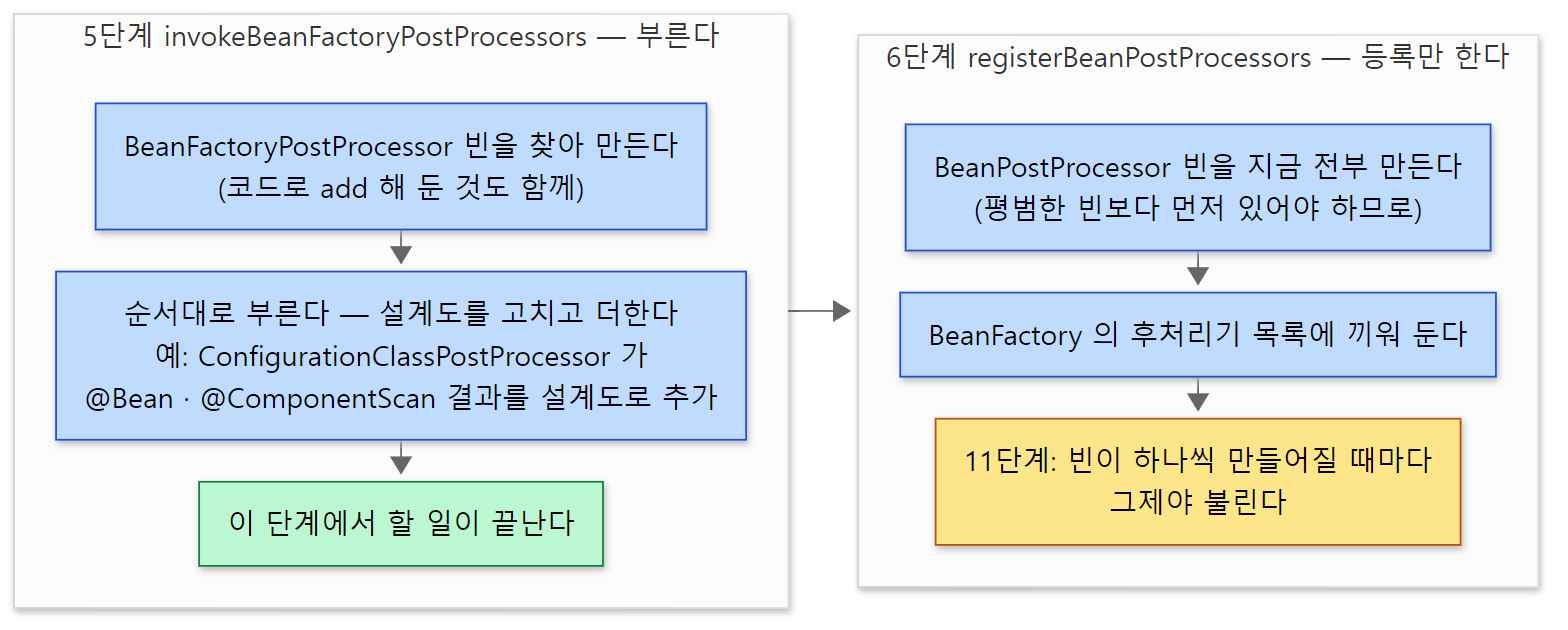 이름이 비슷한 두 단계지만, 5단계의 후처리기는 그 자리에서 일하고 6단계의 후처리기는 11단계까지 기다립니다.
헷갈리기 쉬운 곳
- 5단계는 "부른다", 6단계는 "등록만 한다".
BeanFactoryPostProcessor는 이 단계에서 실제로 실행되고 끝납니다.BeanPostProcessor는 여기서 만들어 등록만 되고, 실제로 일하는 것은 11단계에서 빈이 하나씩 만들어질 때입니다. - 후처리기 빈은 일반 빈보다 일찍 만들어지므로 후처리기가
@Autowired로 일반 빈을 받으면 그 빈도 덩달아 일찍 만들어집니다. 그러면 그 빈은 아직 등록되지 않은 다른 후처리기의 처리를 받지 못합니다. 이것은 6편에서 다룬 함정입니다.
5. 7~10단계: 부속 준비
7, 8단계는 같은 모양입니다. "그 이름의 빈이 있으면 그것을 쓰고, 없으면 기본 구현을 만들어 빈으로 등록한다."
- 7단계
initMessageSource()(821–846행):messageSource라는 이름의 빈이 있으면 쓰고, 없으면DelegatingMessageSource를 만들어 등록합니다(838–841행). 1절에서 본MessageSource인터페이스의 메서드는 이 객체에 위임됩니다(1537–1550행). - 8단계
initApplicationEventMulticaster()(854–871행):applicationEventMulticaster라는 빈이 있으면 쓰고, 없으면SimpleApplicationEventMulticaster를 만듭니다(864–865행). 이벤트를 리스너들에게 실제로 나눠 주는 객체입니다.
**9단계 onRefresh()**는 4단계와 같은 빈자리입니다(907–909행). 설명 주석대로 "특수한 빈을 초기화하되, 싱글톤 인스턴스화 전에" 할 일을 자식이 넣는 곳입니다. 이 저장소의 어느 모듈에도(테스트 코드 하나를 빼면) 이것을 재정의하는 클래스가 없습니다. 바깥 프레임워크를 위한 자리인 셈입니다(Spring Boot가 내장 웹 서버를 여기서 띄우는 것으로 알려져 있는데, Spring Boot는 이 저장소와 별개의 프로젝트라서 소스로 확인한 내용은 아닙니다).
**10단계 registerListeners()**는 세 토막입니다.
	protected void registerListeners() {
		// Register statically specified listeners first.
		for (ApplicationListener<?> listener : getApplicationListeners()) {
			getApplicationEventMulticaster().addApplicationListener(listener);
		}

		// Do not initialize FactoryBeans here: We need to leave all regular beans
		// uninitialized to let post-processors apply to them!
		String[] listenerBeanNames = getBeanNamesForType(ApplicationListener.class, true, false);
		for (String listenerBeanName : listenerBeanNames) {
			getApplicationEventMulticaster().addApplicationListenerBean(listenerBeanName);
		}

		// Publish early application events now that we finally have a multicaster...
		Set<ApplicationEvent> earlyEventsToProcess = this.earlyApplicationEvents;
		this.earlyApplicationEvents = null;
		if (!CollectionUtils.isEmpty(earlyEventsToProcess)) {
			for (ApplicationEvent earlyEvent : earlyEventsToProcess) {
				getApplicationEventMulticaster().multicastEvent(earlyEvent);
			}
		}
	}
첫 토막은 코드로 직접 등록한 리스너, 둘째 토막은 빈으로 등록된 리스너입니다. 둘째에서 눈여겨볼 것은 이름만 넘긴다는 점(addApplicationListenerBean)입니다. 주석대로 아직 빈을 만들면 안 되는 때라, 이름을 적어 두고 실제 객체는 11단계 뒤에 꺼냅니다.
셋째 토막이 1단계에서 만든 earlyApplicationEvents의 쓸모입니다. publishEvent()를 열어 보면 이 집합이 null이 아닌 동안은 이벤트를 보내지 않고 모아 둡니다.
		// Multicast right now if possible - or lazily once the multicaster is initialized
		if (this.earlyApplicationEvents != null) {
			this.earlyApplicationEvents.add(applicationEvent);
		}
		else if (this.applicationEventMulticaster != null) {
			this.applicationEventMulticaster.multicastEvent(applicationEvent, eventType);
		}
1단계에서 집합을 만들고(null이 아니게 되고) 10단계에서 다시 null로 돌리므로, 그 사이에 누가 publishEvent를 부르면 — 예를 들어 5단계의 BeanFactoryPostProcessor가 — 이벤트는 집합에 쌓였다가 10단계에서 한꺼번에 나갑니다. 전달기(8단계)도 리스너(10단계)도 없는 때 보낸 이벤트가 사라지지 않게 한 장치입니다.
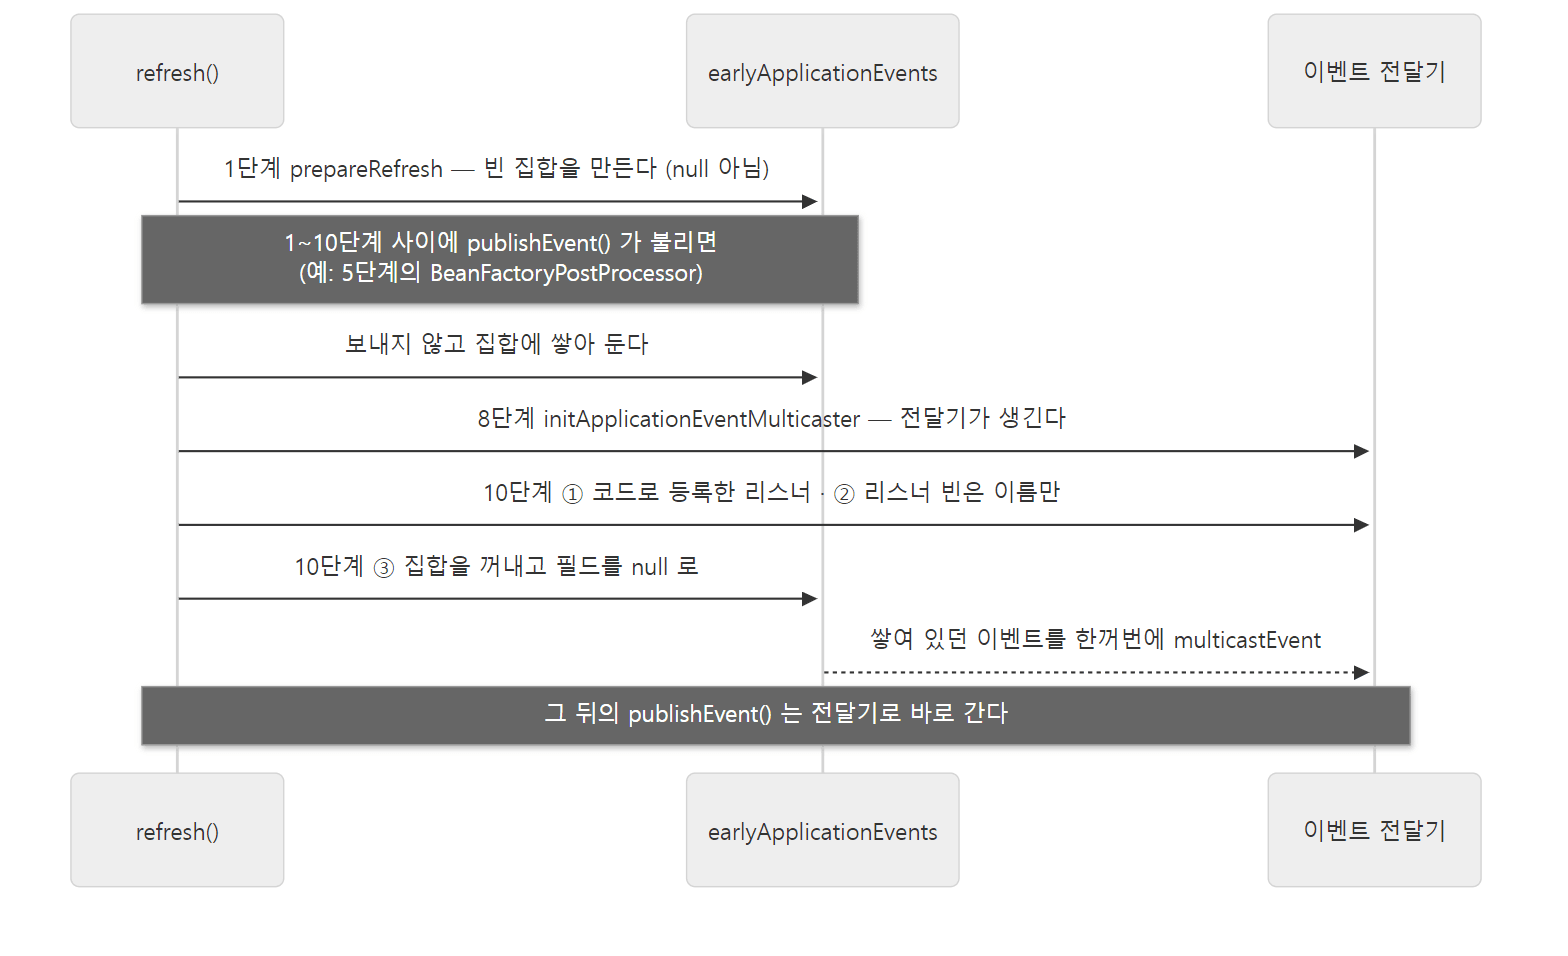
earlyApplicationEvents가 null이 아닌 동안(1~10단계)이 "모아 두는 시간"입니다.
헷갈리기 쉬운 곳
- 8단계 전에는 전달기가 없습니다.
getApplicationEventMulticaster()는null이면 "call 'refresh' before multicasting events"라는IllegalStateException을 던집니다(468–474행). 다만publishEvent는 위에서 봤듯 이른 이벤트 집합으로 받아 주므로refresh()도중에는 예외가 나지 않습니다. - 리스너 빈이 받을 수 있는 가장 이른 이벤트는 10단계 이후의 것입니다. 그 전의 이벤트는 집합에 모였다가 10단계에서 나가는데, 그때 빈 리스너는 이름만 등록된 상태이므로 그 이벤트를 받으려면 빈이 그 자리에서 만들어집니다.
6. 11~12단계: 빈 생성과 운영 시작
**11단계 finishBeanFactoryInitialization()**이 4편에서 본 preInstantiateSingletons()를 부르는 곳입니다. 그 앞에 준비가 몇 줄 있습니다.
	protected void finishBeanFactoryInitialization(ConfigurableListableBeanFactory beanFactory) {
		// ...
		// Initialize conversion service for this context.
		if (beanFactory.containsBean(CONVERSION_SERVICE_BEAN_NAME) &&
				beanFactory.isTypeMatch(CONVERSION_SERVICE_BEAN_NAME, ConversionService.class)) {
			beanFactory.setConversionService(
					beanFactory.getBean(CONVERSION_SERVICE_BEAN_NAME, ConversionService.class));
		}

		// Register a default embedded value resolver if no BeanFactoryPostProcessor
		// (such as a PropertySourcesPlaceholderConfigurer bean) registered any before:
		// at this point, primarily for resolution in annotation attribute values.
		if (!beanFactory.hasEmbeddedValueResolver()) {
			beanFactory.addEmbeddedValueResolver(strVal -> getEnvironment().resolvePlaceholders(strVal));
		}
		// ...

		// Stop using the temporary ClassLoader for type matching.
		beanFactory.setTempClassLoader(null);

		// Allow for caching all bean definition metadata, not expecting further changes.
		beanFactory.freezeConfiguration();

		// Instantiate all remaining (non-lazy-init) singletons.
		beanFactory.preInstantiateSingletons();
	}
conversionService라는 빈이 있으면BeanFactory의 타입 변환기로 끼웁니다(955–959행). 문자열 설정값을 숫자나 날짜로 바꾸는 장치로, 14편의 주제입니다.- 임베디드 값 리졸버가 하나도 없으면
Environment의 자리 표시자(${...}) 해석을 기본으로 넣습니다(964–966행).@Value("${server.port}")가 별도 설정 없이도 되는 이유입니다. freezeConfiguration()은 "설계도는 더 바뀌지 않는다"고 선언해BeanFactory가 메타데이터를 캐시하게 합니다(992행, 구현은DefaultListableBeanFactory998–1002행).- 마지막
preInstantiateSingletons()(995행)가 지연 초기화가 아닌 싱글톤을 전부getBean()으로 만듭니다(DefaultListableBeanFactory1102–1151행). 빈이 전부 만들어진 뒤에는SmartInitializingSingleton을 구현한 빈마다afterSingletonsInstantiated()를 한 번씩 부릅니다(1142–1150행). "내 빈만이 아니라 모든 싱글톤이 준비된 뒤"에 할 일을 두는 자리입니다.
**12단계 finishRefresh()**는 다섯 줄입니다.
	protected void finishRefresh() {
		// Reset common introspection caches in Spring's core infrastructure.
		resetCommonCaches();

		// Clear context-level resource caches (such as ASM metadata from scanning).
		clearResourceCaches();

		// Initialize lifecycle processor for this context.
		initLifecycleProcessor();

		// Propagate refresh to lifecycle processor first.
		getLifecycleProcessor().onRefresh();

		// Publish the final event.
		publishEvent(new ContextRefreshedEvent(this));
	}
resetCommonCaches()는 기동 중에 리플렉션과 어노테이션을 읽느라 쌓인 캐시를 비웁니다(1042–1047행). 빈이 다 만들어졌으니 더는 필요 없는 메모리입니다.clearResourceCaches()는 클래스패스 스캔에 쓴 자원 캐시를 비웁니다(1050–1055행).initLifecycleProcessor()는 7, 8단계와 같은 모양입니다.lifecycleProcessor빈이 없으면DefaultLifecycleProcessor를 만들어 등록합니다(880–898행).getLifecycleProcessor().onRefresh()가Lifecycle인터페이스(start(),stop(),isRunning()—Lifecycle50행)를 구현한 빈 가운데 자동 시작 대상인 것의start()를 부릅니다(DefaultLifecycleProcessor295–315행).SmartLifecycle은isAutoStartup()이 기본true라서(SmartLifecycle100행) 구현만 하면 여기서 시작됩니다. 메시지 큐 소비자나 스케줄러처럼 "빈이 다 만들어진 뒤에 돌기 시작해야 하는 것"이 이 자리를 씁니다.- 마지막으로
ContextRefreshedEvent를 보냅니다. "컨테이너가 다 켜졌다"는 신호입니다. Spring 자신도 이 신호를 씁니다.DispatcherServlet이 이 이벤트를 받아 요청 처리에 쓸 전략 객체를 모으는 과정을 21편에서 봅니다.
예제: 어느 단계에서 무엇이 불리나
5, 6, 11, 12단계에 하나씩 걸쳐 두고 출력 순서를 봅니다.
// 이 글을 위해 쓴 예제입니다 (Spring의 소스가 아닙니다)
package ex.u05;

// ... (import 생략)

public class RefreshOrderExample {

    // 5단계 invokeBeanFactoryPostProcessors — 설계도(BeanDefinition)를 손볼 수 있는 때
    static class LoggingFactoryPostProcessor implements BeanFactoryPostProcessor {
        @Override
        public void postProcessBeanFactory(ConfigurableListableBeanFactory beanFactory) {
            String name = "refreshOrderExample.Greeter";   // 중첩 클래스라 빈 이름이 이렇게 붙는다
            System.out.println("[5] BeanFactoryPostProcessor: Greeter definition="
                    + beanFactory.containsBeanDefinition(name)
                    + ", instance=" + beanFactory.containsSingleton(name));
        }
    }

    // 6단계 registerBeanPostProcessors 에서 등록되고, 11단계에서 빈마다 불린다
    static class LoggingPostProcessor implements BeanPostProcessor {
        @Override
        public Object postProcessBeforeInitialization(Object bean, String beanName) {
            if (bean.getClass().getPackageName().startsWith("ex.u05")) {
                System.out.println("[11]   BeanPostProcessor before: " + bean.getClass().getSimpleName());
            }
            return bean;
        }

        @Override
        public Object postProcessAfterInitialization(Object bean, String beanName) {
            if (bean.getClass().getPackageName().startsWith("ex.u05")) {
                System.out.println("[11]   BeanPostProcessor after:  " + bean.getClass().getSimpleName());
            }
            return bean;
        }
    }

    // 11단계 finishBeanFactoryInitialization — 평범한 싱글톤 빈 하나
    static class Greeter implements ApplicationContextAware, SmartInitializingSingleton {
        @Override
        public void setApplicationContext(ApplicationContext applicationContext) {
            System.out.println("[11]   ApplicationContextAware: Greeter");
        }

        @PostConstruct
        void init() {
            System.out.println("[11]   @PostConstruct: Greeter");
        }

        @Override
        public void afterSingletonsInstantiated() {
            System.out.println("[11] SmartInitializingSingleton: after every singleton is created");
        }
    }

    // 12단계 finishRefresh — LifecycleProcessor.onRefresh() 가 start() 를 부른다
    static class Starter implements SmartLifecycle {
        private boolean running;

        @Override
        public void start() {
            this.running = true;
            System.out.println("[12] SmartLifecycle.start()");
        }

        @Override
        public void stop() {
            this.running = false;
        }

        @Override
        public boolean isRunning() {
            return this.running;
        }
    }

    // 12단계 finishRefresh — 마지막에 ContextRefreshedEvent
    static class RefreshedListener implements ApplicationListener<ContextRefreshedEvent> {
        @Override
        public void onApplicationEvent(ContextRefreshedEvent event) {
            System.out.println("[12] ContextRefreshedEvent");
        }
    }

    public static void main(String[] args) {
        System.out.println("-- refresh() begins");
        AnnotationConfigApplicationContext context = new AnnotationConfigApplicationContext(
                LoggingFactoryPostProcessor.class, LoggingPostProcessor.class,
                Greeter.class, Starter.class, RefreshedListener.class);
        System.out.println("-- refresh() done: " + context.getBean(Greeter.class).getClass().getSimpleName());
        context.close();
    }
}
출력입니다.
-- refresh() begins
[5] BeanFactoryPostProcessor: Greeter definition=true, instance=false
[11]   ApplicationContextAware: Greeter
[11]   BeanPostProcessor before: Greeter
[11]   @PostConstruct: Greeter
[11]   BeanPostProcessor after:  Greeter
[11]   BeanPostProcessor before: Starter
[11]   BeanPostProcessor after:  Starter
[11]   BeanPostProcessor before: RefreshedListener
[11]   BeanPostProcessor after:  RefreshedListener
[11] SmartInitializingSingleton: after every singleton is created
[12] SmartLifecycle.start()
[12] ContextRefreshedEvent
-- refresh() done: Greeter
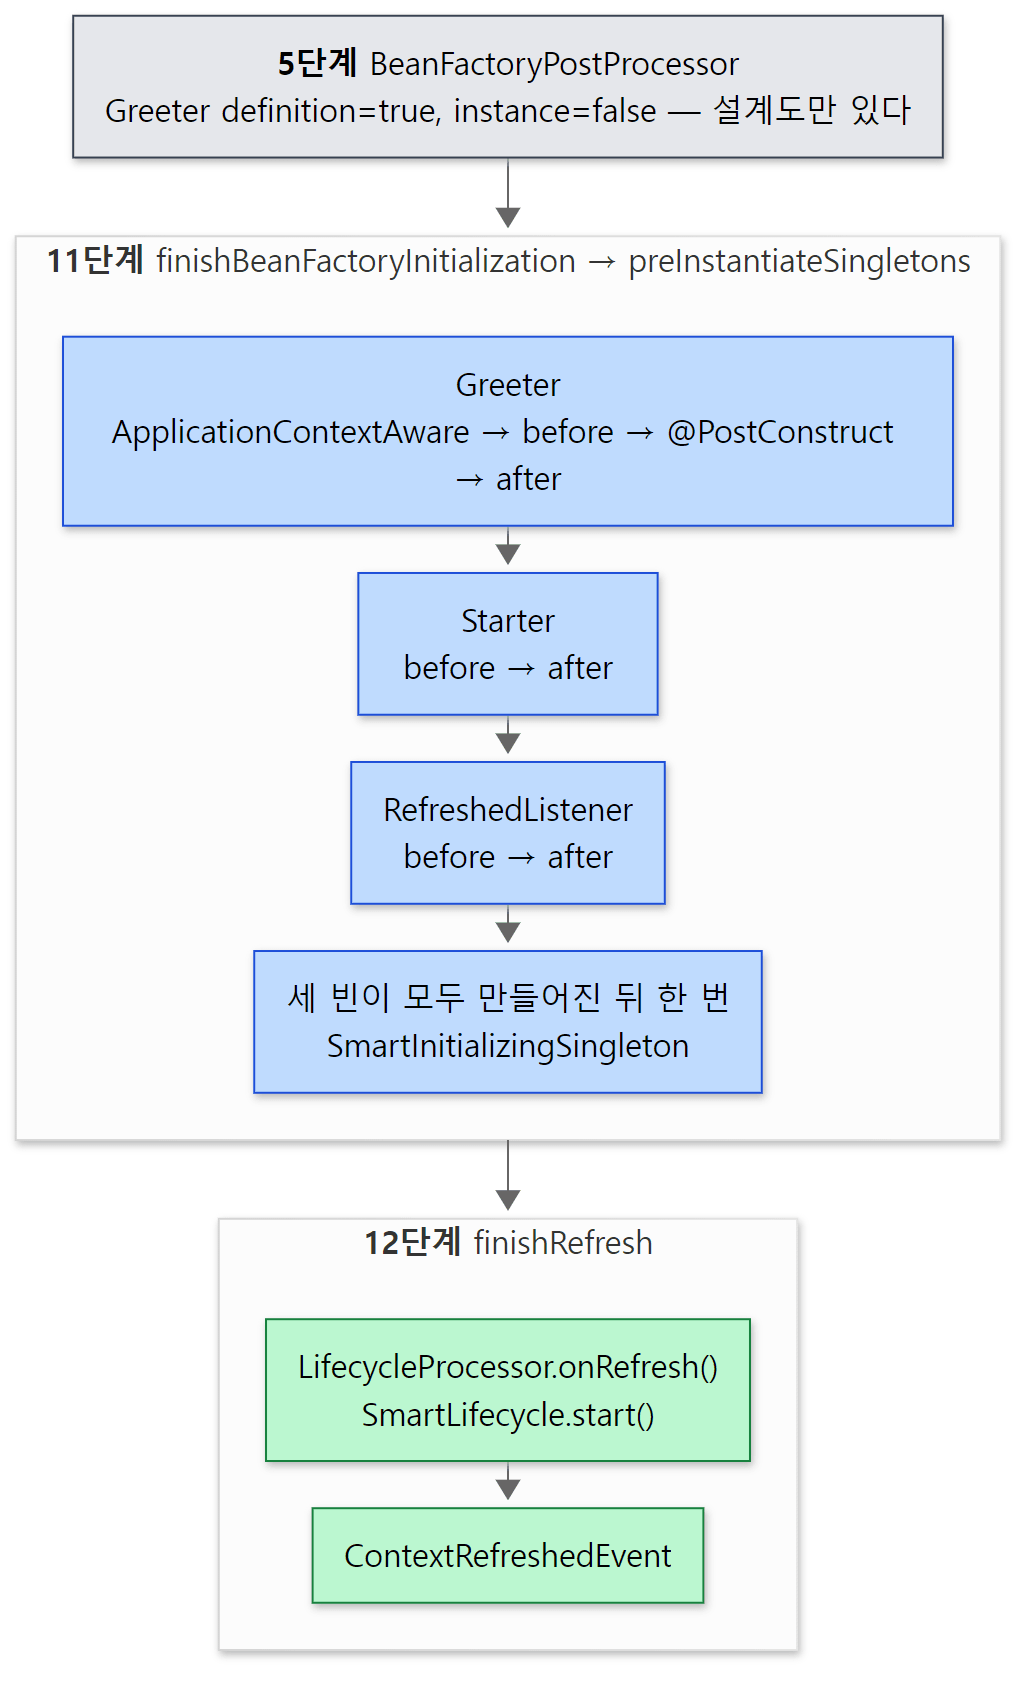 위 출력의
[5], [11], [12] 줄을 단계 상자에 나눠 담은 것입니다. 순서는 실제 출력 그대로입니다.
읽을 점은 네 가지입니다.
- 5단계에서
Greeter의 설계도는 있고 객체는 없습니다.BeanFactoryPostProcessor가 보는 세계가 이것입니다. ApplicationContextAware가 우리BeanPostProcessor의before보다 먼저입니다. 3절에서 본 대로ApplicationContextAwareProcessor가 3단계에서 먼저 끼워졌기 때문입니다.SmartInitializingSingleton은 세 빈이 모두 만들어진 뒤 한 번 불립니다.@PostConstruct가 빈마다 불리는 것과 다릅니다.start()가ContextRefreshedEvent보다 먼저입니다.finishRefresh()의 줄 순서 그대로입니다.
이 예제는 릴리스 버전인 Spring Framework 7.0.9로 실행해 위 출력을 확인했습니다(이 시리즈가 읽는 7.1.0-SNAPSHOT을 직접 빌드해 돌린 것은 아닙니다).
7. 두 갈래: GenericApplicationContext와 AbstractRefreshableApplicationContext
2단계의 refreshBeanFactory()가 추상 메서드였습니다. 이것을 채우는 자식이 둘이고, 채우는 방식이 정반대입니다.
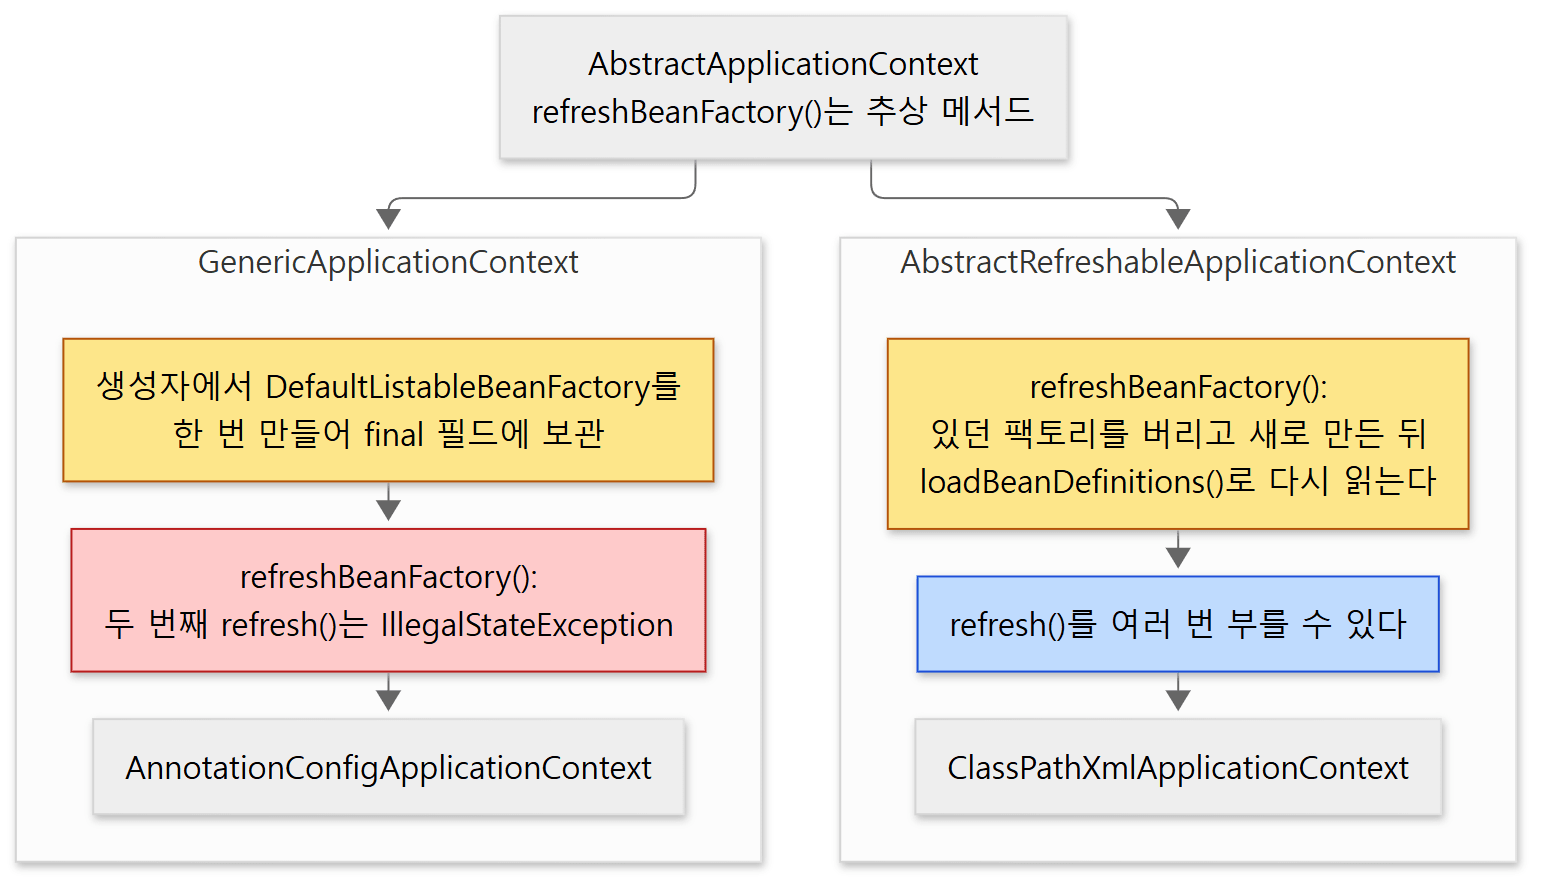 노란 상자가
BeanFactory를 마련하는 방식, 빨간 상자가 두 번째 refresh()의 운명입니다.
**GenericApplicationContext**는 생성자에서 BeanFactory를 한 번 만들어 final 필드에 둡니다.
	private final DefaultListableBeanFactory beanFactory;
	// ...
	private final AtomicBoolean refreshed = new AtomicBoolean();


	/**
	 * Create a new GenericApplicationContext.
	 * @see #registerBeanDefinition
	 * @see #refresh
	 */
	public GenericApplicationContext() {
		this.beanFactory = new DefaultListableBeanFactory();
	}
그래서 refreshBeanFactory()가 할 일은 "두 번째가 아닌지 확인하기"뿐입니다.
	@Override
	protected final void refreshBeanFactory() throws IllegalStateException {
		if (!this.refreshed.compareAndSet(false, true)) {
			throw new IllegalStateException(
					"GenericApplicationContext does not support multiple refresh attempts: just call 'refresh' once");
		}
		this.beanFactory.setSerializationId(getId());
	}
BeanFactory가 처음부터 있다는 것은 refresh() 전에 설계도를 등록할 수 있다는 뜻입니다. registerBean(Class)(499–500행)이나 BeanDefinitionRegistry의 registerBeanDefinition이 그것입니다. 1편의 AnnotationConfigApplicationContext가 이 갈래입니다(AnnotationConfigApplicationContext 57행). 생성자의 register(componentClasses)가 바로 "refresh() 전에 설계도 등록"입니다.
**AbstractRefreshableApplicationContext**는 반대로 refresh()마다 BeanFactory를 새로 만듭니다.
	@Override
	protected final void refreshBeanFactory() throws BeansException {
		if (hasBeanFactory()) {
			destroyBeans();
			closeBeanFactory();
		}
		try {
			DefaultListableBeanFactory beanFactory = createBeanFactory();
			beanFactory.setSerializationId(getId());
			beanFactory.setApplicationStartup(getApplicationStartup());
			customizeBeanFactory(beanFactory);
			loadBeanDefinitions(beanFactory);
			this.beanFactory = beanFactory;
		}
		catch (IOException ex) {
			throw new ApplicationContextException("I/O error parsing bean definition source for " + getDisplayName(), ex);
		}
	}
이미 BeanFactory가 있으면 빈을 소멸시키고 버린 뒤, 새 DefaultListableBeanFactory를 만들고(195–197행) 추상 메서드 loadBeanDefinitions()로 설계도를 다시 읽습니다. XML 파일을 읽는 ClassPathXmlApplicationContext가 이 갈래입니다(ClassPathXmlApplicationContext 53행, loadBeanDefinitions는 AbstractXmlApplicationContext 83행). "설정 파일을 고치고 refresh()를 다시 불러 새로 읽는다"는 쓰임이 설계의 출발점이었고, 메서드 이름이 **"새로 고침"**인 것도 이 갈래 때문입니다. 클래스 설명 주석도 "refresh()를 여러 번 부를 수 있게, 매번 새 BeanFactory를 만드는" 기반 클래스라고 적고 있습니다(29–32행).
GenericApplicationContext |
AbstractRefreshableApplicationContext |
|
|---|---|---|
BeanFactory를 만드는 때 |
생성자에서 한 번 | refresh()마다 |
| 설계도를 넣는 쪽 | 바깥에서 (registerBean, BeanDefinitionReader) |
안에서 (loadBeanDefinitions) |
refresh() 두 번 |
IllegalStateException |
가능 — 빈을 전부 버리고 다시 읽는다 |
| 대표 자식 | AnnotationConfigApplicationContext |
ClassPathXmlApplicationContext |
getBeanFactory() |
늘 같은 객체를 돌려준다(324–326행) | 없으면 IllegalStateException(164–171행) |
예제: refresh() 전, 후, 두 번째, close() 뒤
// 이 글을 위해 쓴 예제입니다 (Spring의 소스가 아닙니다)
package ex.u05;

// ... (import 생략)

public class RefreshTwiceExample {

    static class Greeter {
        String hello() {
            return "hello";
        }
    }

    public static void main(String[] args) {
        GenericApplicationContext context = new GenericApplicationContext();
        context.registerBean(Greeter.class);           // 설계도만 등록 — 객체는 아직 없다

        try {
            context.getBean(Greeter.class);            // refresh() 전에 꺼내 보면?
        }
        catch (IllegalStateException ex) {
            System.out.println("before refresh, getBean: " + ex.getMessage());
        }

        context.refresh();                             // 컨테이너를 켠다
        System.out.println("after refresh, getBean: " + context.getBean(Greeter.class).hello());

        try {
            context.refresh();                         // 한 번 더 켜 보면?
        }
        catch (IllegalStateException ex) {
            System.out.println("second refresh: " + ex.getMessage());
        }

        context.close();
        try {
            context.getBean(Greeter.class);            // close() 뒤에 꺼내 보면?
        }
        catch (IllegalStateException ex) {
            System.out.println("after close, getBean: " + ex.getMessage());
        }
    }
}
before refresh, getBean: org.springframework.context.support.GenericApplicationContext@6fdb1f78 has not been refreshed yet
after refresh, getBean: hello
second refresh: GenericApplicationContext does not support multiple refresh attempts: just call 'refresh' once
after close, getBean: org.springframework.context.support.GenericApplicationContext@6fdb1f78 has been closed already
첫째와 넷째 줄이 1절의 assertBeanFactoryActive(), 셋째 줄이 위의 refreshBeanFactory()입니다. 같은 IllegalStateException이지만 메시지가 어느 깃발 때문인지를 알려 줍니다. (@6fdb1f78 부분은 객체 해시라 실행마다 다릅니다.) 이 예제도 Spring Framework 7.0.9로 실행했습니다.
헷갈리기 쉬운 곳
- "
refresh()전에 등록"은Generic…갈래에서만 됩니다.AbstractRefreshable…갈래는refresh()전에BeanFactory가 아예 없어서(getBeanFactory()가 예외) 설계도를 넣을 곳이 없습니다. 설정 위치만 알려 주고refresh()가 읽게 합니다. GenericApplicationContext의 두 번째refresh()는 "다시 켜기"가 아니라 예외입니다. 설계도를 바꿔 다시 켜고 싶으면 새 컨텍스트를 만듭니다. 7.x에는ConfigurableApplicationContext에restart()와pause()도 있는데(234행, 244행), 이것은Lifecycle빈을 멈췄다 다시 시작하는 것이지 빈을 다시 만드는 것이 아닙니다. 이 글에서는 다루지 않습니다.
8. 실패하면, 그리고 닫을 때
refresh() 도중에 예외가 나면
2절에서 줄였던 catch 블록입니다.
			catch (RuntimeException | Error ex) {
				if (logger.isWarnEnabled()) {
					logger.warn("Exception encountered during context initialization - " +
							"cancelling refresh attempt: " + ex);
				}

				// Stop already started Lifecycle beans to avoid dangling resources.
				if (this.lifecycleProcessor != null && this.lifecycleProcessor.isRunning()) {
					try {
						this.lifecycleProcessor.stop();
					}
					catch (Throwable ex2) {
						logger.warn("Exception thrown from LifecycleProcessor on cancelled refresh", ex2);
					}
				}

				// Destroy already created singletons to avoid dangling resources.
				destroyBeans();

				// Reset 'active' flag.
				cancelRefresh(ex);

				// Propagate exception to caller.
				throw ex;
			}
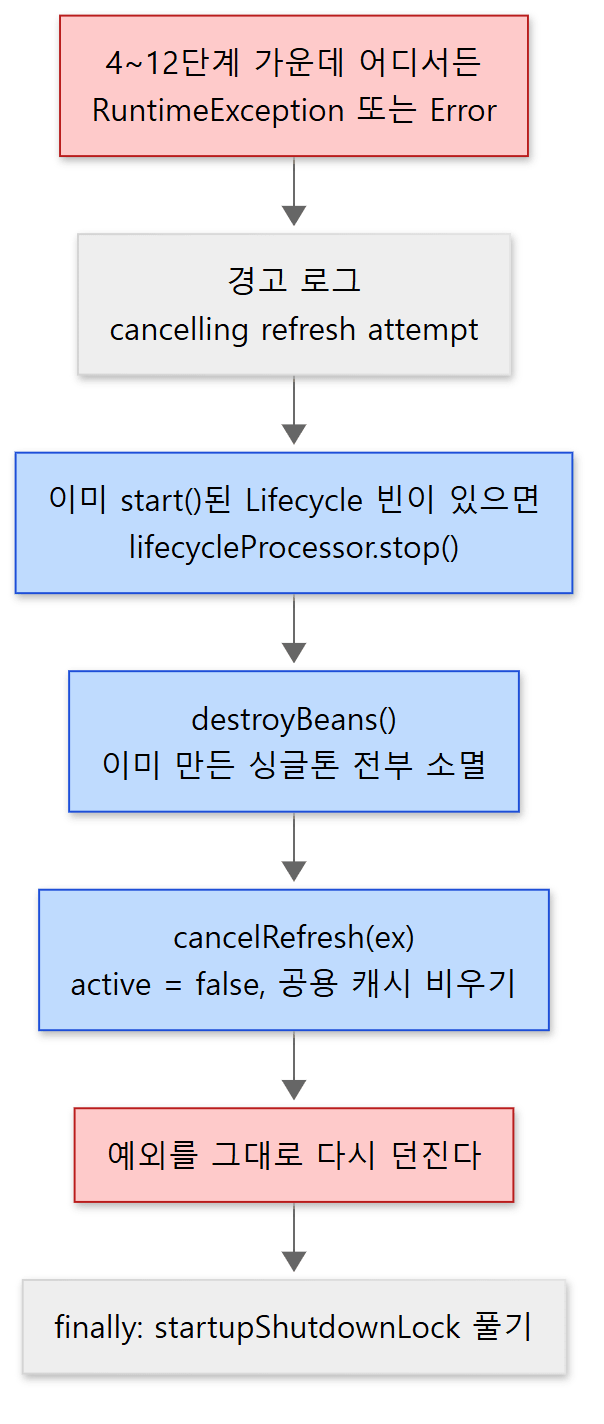 빨간 상자가 들어오는 예외와 나가는 예외입니다. 그 사이에서 만들어 둔 것을 전부 치웁니다.
ConfigurableApplicationContext.refresh()의 설명 주석에 원칙이 적혀 있습니다. "이 메서드가 끝난 뒤에는 모든 싱글톤이 만들어졌거나, 하나도 만들어지지 않았거나 둘 중 하나여야 한다"(212–221행). 그래서 11단계에서 열 번째 빈을 만들다 실패하면 앞의 아홉 개도 destroyBeans()로 소멸시키고(645행, 구현은 1246–1248행), cancelRefresh()가 active를 끄고 캐시를 비웁니다(1025–1030행). 예외는 삼키지 않고 그대로 다시 던지므로 new AnnotationConfigApplicationContext(...)를 부른 쪽이 받습니다. 4단계부터 12단계까지만 try 안에 있다는 점도 눈여겨볼 만합니다. 1~3단계는 빈을 만들지 않으므로 치울 것이 없습니다.
close()와 doClose()
close()는 락을 잡고 doClose()를 부른 뒤, 등록해 둔 JVM 종료 훅이 있으면 떼어 냅니다(1146–1171행). 실제 일은 doClose()에 있습니다.
	protected void doClose() {
		// Check whether an actual close attempt is necessary...
		if (this.active.get() && this.closed.compareAndSet(false, true)) {
			// ...
			try {
				// Publish shutdown event.
				publishEvent(new ContextClosedEvent(this));
			}
			catch (Throwable ex) {
				logger.warn("Exception thrown from ApplicationListener handling ContextClosedEvent", ex);
			}

			// Stop all Lifecycle beans, to avoid delays during individual destruction.
			if (this.lifecycleProcessor != null) {
				try {
					this.lifecycleProcessor.onClose();
				}
				// ...
			}

			// Destroy all cached singletons in the context's BeanFactory.
			destroyBeans();

			// Close the state of this context itself.
			closeBeanFactory();

			// Let subclasses do some final clean-up if they wish...
			onClose();

			// Reset common introspection caches to avoid class reference leaks.
			resetCommonCaches();
			// ...

			// Reset internal delegates.
			this.applicationEventMulticaster = null;
			this.messageSource = null;
			this.lifecycleProcessor = null;

			// Switch to inactive.
			this.active.set(false);
		}
	}
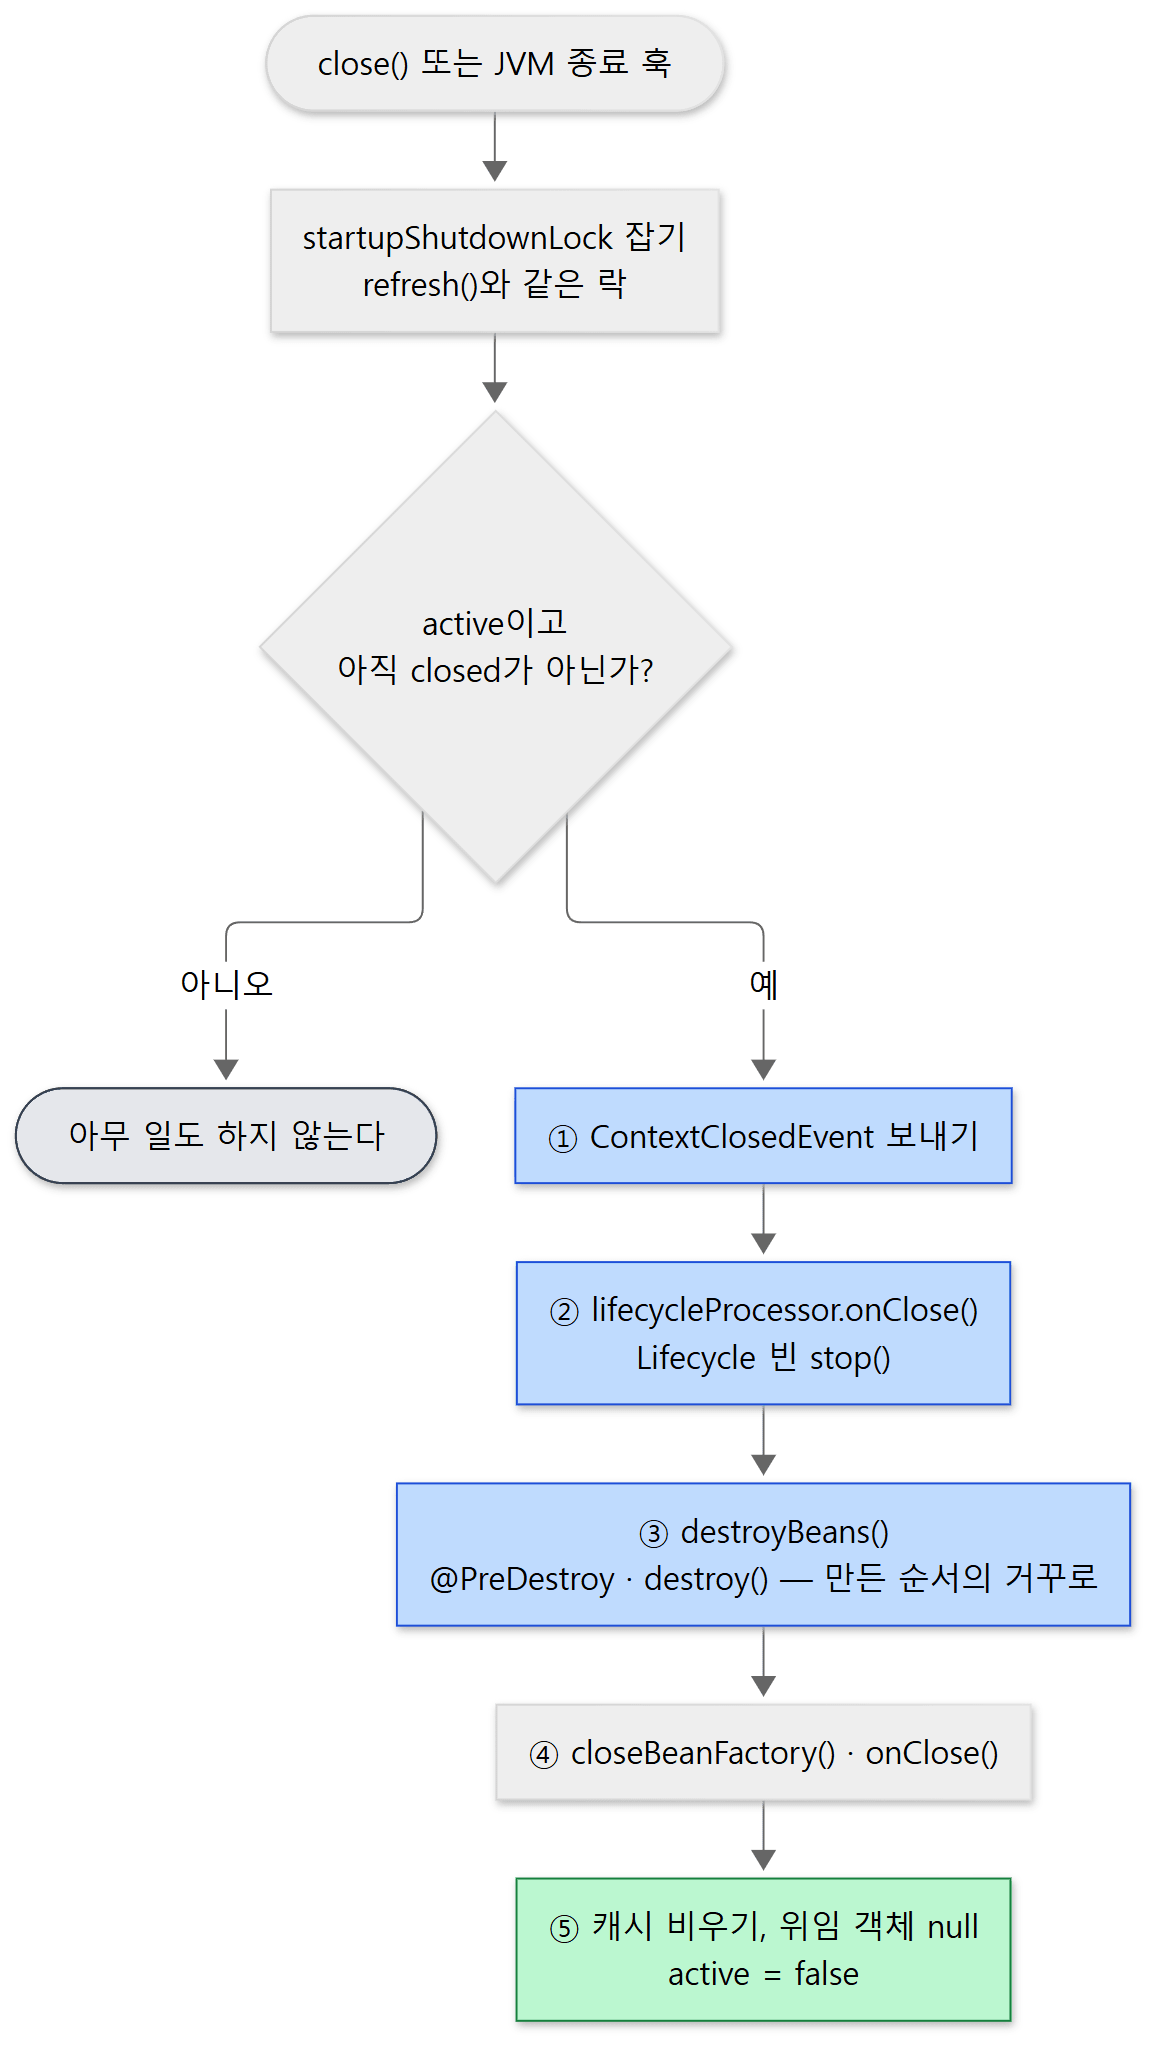 켜질 때와 거꾸로입니다. 이벤트를 먼저 보내고, 돌던 것을 멈추고, 그 다음 빈을 없앱니다.
순서가 켜질 때와 거꾸로입니다. 12단계에서 start() → ContextRefreshedEvent였다면, 닫을 때는 ContextClosedEvent → stop()(onClose()는 stopBeans를 부릅니다 — DefaultLifecycleProcessor 336–339행) → 빈 소멸입니다. 빈이 살아 있는 동안 "닫힌다"는 소식을 먼저 알리고, 돌고 있던 것을 멈춘 뒤에야 없앱니다. 맨 앞의 if는 closed를 compareAndSet으로 켜므로 close()를 두 번 불러도 두 번째는 조용히 지나갑니다.
destroyBeans()가 부르는 destroySingletons()는 소멸 콜백이 있는 빈의 이름 목록을 뒤에서부터 돕니다(DefaultSingletonBeanRegistry 703–705행). 그 목록에는 빈이 만들어진 순서대로 들어가므로(AbstractAutowireCapableBeanFactory 640행), 나중에 만들어진 빈이 먼저 소멸합니다.
예제: close() 때의 순서
// 이 글을 위해 쓴 예제입니다 (Spring의 소스가 아닙니다)
package ex.u05;

// ... (import 생략)

public class CloseOrderExample {

    // 먼저 등록된 빈 — 소멸은 나중에
    static class Repository implements DisposableBean {
        @Override
        public void destroy() {
            System.out.println("[3] DisposableBean.destroy(): Repository");
        }
    }

    // 나중에 등록된 빈 — 소멸은 먼저
    static class Service {
        @PreDestroy
        void shutdown() {
            System.out.println("[3] @PreDestroy: Service");
        }
    }

    static class Starter implements SmartLifecycle {
        private boolean running;

        @Override
        public void start() {
            this.running = true;
        }

        @Override
        public void stop() {
            this.running = false;
            System.out.println("[2] SmartLifecycle.stop()");
        }

        @Override
        public boolean isRunning() {
            return this.running;
        }
    }

    static class ClosedListener implements ApplicationListener<ContextClosedEvent> {
        @Override
        public void onApplicationEvent(ContextClosedEvent event) {
            System.out.println("[1] ContextClosedEvent");
        }
    }

    public static void main(String[] args) {
        AnnotationConfigApplicationContext context = new AnnotationConfigApplicationContext(
                Repository.class, Service.class, Starter.class, ClosedListener.class);
        System.out.println("-- close() begins");
        context.close();
        System.out.println("-- close() done: isActive=" + context.isActive() + ", isClosed=" + context.isClosed());
    }
}
-- close() begins
[1] ContextClosedEvent
[2] SmartLifecycle.stop()
[3] @PreDestroy: Service
[3] DisposableBean.destroy(): Repository
-- close() done: isActive=false, isClosed=true
이벤트 → stop() → 소멸의 순서와, Repository보다 나중에 등록된 Service가 먼저 소멸하는 것이 보입니다. 이 예제도 Spring Framework 7.0.9로 실행했습니다.
헷갈리기 쉬운 곳
close()를 부르지 않으면@PreDestroy는 불리지 않습니다.doClose()를 부르는 길은close()와 JVM 종료 훅 둘뿐인데, 종료 훅은registerShutdownHook()을 직접 불러야 등록됩니다(1069–1088행).main이 그냥 끝나는 프로그램에서는 둘 중 하나를 해 두어야 합니다.ConfigurableApplicationContext가Closeable이므로try (var context = new AnnotationConfigApplicationContext(...))로 쓰는 것이 가장 짧은 방법입니다. (Spring Boot는 이 훅을 알아서 등록하는 것으로 알려져 있는데, Spring Boot는 이 저장소와 별개의 프로젝트라서 소스로 확인한 내용은 아닙니다.)ContextClosedEvent리스너 안에서 던진 예외는 닫기를 막지 않습니다.publishEvent가try/catch로 감싸져 경고 로그만 남기고 계속 갑니다(1189–1195행).- 닫힌 뒤의
getBean()은 예외입니다. 7절 예제의 마지막 줄 "has been closed already"가 그것입니다. 컨텍스트 참조를 어딘가에 들고 있다가 닫은 뒤 쓰면 이 메시지를 만납니다.
더 깊이 들어가면
이 글이 이름만 적고 지나간 것들입니다. 7.x의 restart()·pause()와 ContextRestartedEvent·ContextPausedEvent(ConfigurableApplicationContext 234–244행). 부모 컨텍스트로 이벤트를 함께 전파하는 publishEvent의 뒷부분(453–460행). 종료 훅이 락을 못 잡을 때 기동 스레드가 System.exit로 멈춰 있는지 알아내는 isStartupShutdownThreadStuck()(1118–1136행). 11단계 앞부분의 bootstrapExecutor(빈을 백그라운드 스레드에서 만드는 실행기, 948–952행)와 BeanFactoryInitializer(969–972행). 3단계와 5단계에 나오는 LoadTimeWeaver(클래스 로딩 시점에 바이트코드를 바꾸는 장치, 757–761행). refresh() 대신 쓰는 AOT 처리용 refreshForAotProcessing(GenericApplicationContext, 16편). StartupStep으로 기동 시간을 재는 ApplicationStartup(587행). 그리고 Environment·MessageSource·이벤트 전달기의 내부는 12편에서 봅니다.
정리
| 개념 | 한 줄 요약 |
|---|---|
ApplicationContext |
BeanFactory 둘 + Environment, MessageSource, 이벤트 발행, 자원 읽기. 읽기 전용 |
ConfigurableApplicationContext |
거기에 refresh(), close(), Lifecycle을 더한 "켜고 끄는" 쪽 |
AbstractApplicationContext |
위를 구현. BeanFactory를 상속하지 않고 안에 품어서 위임한다 |
refresh() |
열두 단계. 준비(1~3) → 설계도 가공(4~6) → 부속 준비(7~10) → 빈 생성과 운영 시작(11~12) |
3단계 prepareBeanFactory |
Aware 후처리기, 리스너 감지기, @Autowired ApplicationContext가 되게 하는 등록 |
| 5단계와 6단계 | BeanFactoryPostProcessor는 여기서 실행, BeanPostProcessor는 여기서 등록만 |
| 이른 이벤트 | 1단계~10단계 사이에 보낸 이벤트는 모아 뒀다가 10단계에서 보낸다 |
| 11단계 | freezeConfiguration 뒤 preInstantiateSingletons. 끝에 SmartInitializingSingleton |
| 12단계 | Lifecycle.start() 다음 ContextRefreshedEvent |
GenericApplicationContext |
BeanFactory를 생성자에서 한 번. refresh() 전에 등록 가능, 두 번째 refresh()는 예외 |
AbstractRefreshableApplicationContext |
refresh()마다 새 BeanFactory에 설계도를 다시 읽는다 |
| 실패 | 만든 싱글톤을 전부 소멸시키고 active를 끈 뒤 예외를 다시 던진다 |
close() |
ContextClosedEvent → stop() → 빈 소멸(만든 순서의 거꾸로) → active 끄기 |
다음에 볼 것
5단계에서 "ConfigurationClassPostProcessor가 @Configuration 클래스를 읽어 설계도를 추가한다"고 한 줄로 지나갔습니다. @Bean 메서드 하나가 어떻게 BeanDefinition이 되는지, @ComponentScan은 클래스패스를 어떻게 뒤지는지, @Configuration 클래스는 왜 CGLIB으로 감싸지는지가 거기에 들어 있습니다. 8편: @Configuration과 @ComponentScan은 어떻게 설계도가 되나에서 봅니다.