이 글에서 다루는 것
"Spring 소스 파헤치기" 시리즈의 아홉 번째 글입니다. 8편에서는 @Configuration 클래스와 @ComponentScan이 ConfigurationClassParser를 거쳐 빈의 설계도(BeanDefinition)가 되는 과정을 봤습니다. 그 과정에는 "이 설정은 조건에 따라 쓰거나 말거나 한다"와 "이 설정은 다른 설정을 가져온다"는 두 가지 일이 끼어 있습니다. 이번 글은 그 둘을 엽니다.
답하려는 질문은 네 가지입니다.
@Conditional과@Profile이 붙은 빈은 언제 등록할지 말지가 정해지는가. 빈을 만들 때인가, 그 전인가@Import에 적을 수 있는 것은 왜 세 종류(@Configuration클래스,ImportSelector,ImportBeanDefinitionRegistrar)이고 각각 어떻게 다르게 처리되는가DeferredImportSelector는 무엇을 "미루고", 왜 미뤄야 하는가. 서로@Import하는 두 설정은 어떻게 되는가@EnableAsync,@EnableTransactionManagement같은@EnableXxx어노테이션은 왜 전부@Import의 응용인가
| 항목 | 내용 |
|---|---|
| 기준 소스 | Spring Framework 7.1.0-SNAPSHOT |
| 커밋 | f447f3c310 (2026-10-01, main 브랜치) |
| 주로 읽는 모듈 | spring-context (context.annotation 패키지), 조금의 spring-core와 spring-tx |
| 주로 읽는 클래스 | ConditionEvaluator, ConfigurationClassParser, ConfigurationClassBeanDefinitionReader, ProfileCondition |
글에 나오는 줄 번호와 세부 동작은 모두 이 커밋 기준입니다. 다른 버전에서는 줄 번호가 다르고 세부 내용도 달라질 수 있습니다. 같은 커밋의 소스를 받는 방법은 1편에 있습니다.
원래 공부 노트는 줄 단위로 훨씬 깊이 들어가지만, 이 글은 Spring을 처음 보는 분이 따라올 수 있는 큰 줄기만 골랐습니다. 빼놓은 것은 글 끝의 "이 글에서 뺀 것"에 이름만 적어 두었습니다.
먼저 알아 둘 말
설정 클래스는 @Configuration이 붙은 클래스처럼 "무엇을 빈으로 만들지"를 적어 둔 클래스입니다. 컨테이너는 설정 클래스를 파싱(읽어서 해석)해 빈의 설계도(BeanDefinition)를 만들고, 나중에 그 설계도로 객체를 만듭니다. 설계도는 3편, 파싱은 8편에 있습니다.
메타데이터(AnnotationMetadata, MethodMetadata)는 클래스나 메서드에 "어떤 어노테이션이 어떤 값으로 붙어 있는가"를 담은 객체입니다. 컨테이너는 클래스를 로딩하지 않고도 이 메타데이터로 어노테이션을 읽습니다. 이 글의 조건 평가는 전부 메타데이터를 보고 이뤄집니다.
조건(Condition)은 "이 빈을 등록해도 되는가"에 true/false로 답하는 작은 객체입니다. @Conditional(어떤조건.class)로 클래스나 @Bean 메서드에 붙입니다.
프로파일(profile)은 "dev", "prod"처럼 이름을 붙인 실행 환경 묶음입니다. 어떤 프로파일이 켜져 있느냐에 따라 다른 빈을 쓰고 싶을 때 @Profile("dev")를 붙입니다.
**Environment**는 컨테이너가 들고 있는 "지금 환경" 객체입니다. 켜진 프로파일 목록과 설정값(시스템 프로퍼티, 환경 변수 등)을 여기서 읽습니다. 자세한 것은 12편에서 다룰 예정이고, 이 글에서는 프로파일을 묻는 메서드만 봅니다.
메타 어노테이션은 어노테이션 위에 붙은 어노테이션입니다. @Profile의 선언에는 @Conditional(...)이 붙어 있고, @EnableAsync의 선언에는 @Import(...)가 붙어 있습니다. Spring은 "어노테이션에 붙은 어노테이션"까지 따라가서 읽기 때문에, 이 글의 주인공 둘(@Profile, @EnableXxx)은 사실 @Conditional과 @Import의 응용입니다.
1. 조건은 빈을 만들 때가 아니라 설계도를 만들 때 평가됩니다
@Conditional의 선언은 짧습니다. 값으로 Condition 클래스 배열을 받고, 클래스와 메서드에 붙일 수 있습니다(Conditional 59–68행). Condition은 boolean matches(ConditionContext context, AnnotatedTypeMetadata metadata) 하나뿐인 인터페이스입니다(Condition 48–61행). 두 인자가 조건이 볼 수 있는 전부입니다. metadata는 지금 검사하는 클래스나 메서드의 어노테이션 정보이고, context는 Environment, BeanDefinitionRegistry(지금까지 등록된 설계도), ResourceLoader, ClassLoader를 꺼내 주는 창구입니다(ConditionContext 41–65행). 주의할 점은 Condition의 설명 주석에 적혀 있습니다. 조건은 설계도가 등록되기 직전에 검사되며, BeanFactoryPostProcessor와 같은 제약을 지켜 빈 인스턴스를 건드리면 안 됩니다(26–33행). 조건이 평가되는 시점에는 아직 빈이 하나도 만들어지지 않았기 때문입니다.
실제로 조건을 평가하는 클래스는 ConditionEvaluator입니다. 패키지 밖에서는 보이지 않는 내부 클래스이고, 핵심은 shouldSkip 하나입니다.
	public boolean shouldSkip(@Nullable AnnotatedTypeMetadata metadata, @Nullable ConfigurationPhase phase) {
		if (metadata == null || !metadata.isAnnotated(Conditional.class.getName())) {
			return false;
		}

		if (phase == null) {
			if (metadata instanceof AnnotationMetadata annotationMetadata &&
					ConfigurationClassUtils.isConfigurationCandidate(annotationMetadata)) {
				return shouldSkip(metadata, ConfigurationPhase.PARSE_CONFIGURATION);
			}
			return shouldSkip(metadata, ConfigurationPhase.REGISTER_BEAN);
		}

		List<Condition> conditions = collectConditions(metadata);
		for (Condition condition : conditions) {
			ConfigurationPhase requiredPhase = null;
			if (condition instanceof ConfigurationCondition configurationCondition) {
				requiredPhase = configurationCondition.getConfigurationPhase();
			}
			if ((requiredPhase == null || requiredPhase == phase) && !condition.matches(this.context, metadata)) {
				return true;
			}
		}

		return false;
	}
spring-context/src/main/java/org/springframework/context/annotation/ConditionEvaluator.java 81–106행
위에서부터 읽으면 이렇습니다.
@Conditional이 (메타 어노테이션으로라도) 붙어 있지 않으면 건너뛸 이유가 없으니false입니다. 조건이 없는 평범한 빈은 여기서 끝납니다.phase(단계)가 지정되지 않았으면 메타데이터를 보고 추론합니다. 설정 클래스 후보(@Component·@ComponentScan·@Import·@ImportResource가 붙었거나@Bean메서드가 있는 클래스,ConfigurationClassUtils174–189행)면PARSE_CONFIGURATION, 아니면REGISTER_BEAN입니다. 이 두 단계는 2절에서 설명합니다.@Conditional에 적힌 조건 클래스를 전부 모아 객체로 만들고@Order순으로 정렬합니다(collectConditions, 114–128행). 객체는BeanUtils.instantiateClass로 그냥new합니다(137–140행). 조건 객체는 빈이 아닙니다. 의존성 주입도 받지 못합니다.- 조건을 차례로 묻다가 하나라도
matches가false를 돌려주면 "건너뛴다"(true)입니다. 모든 조건이 맞아야 등록됩니다.
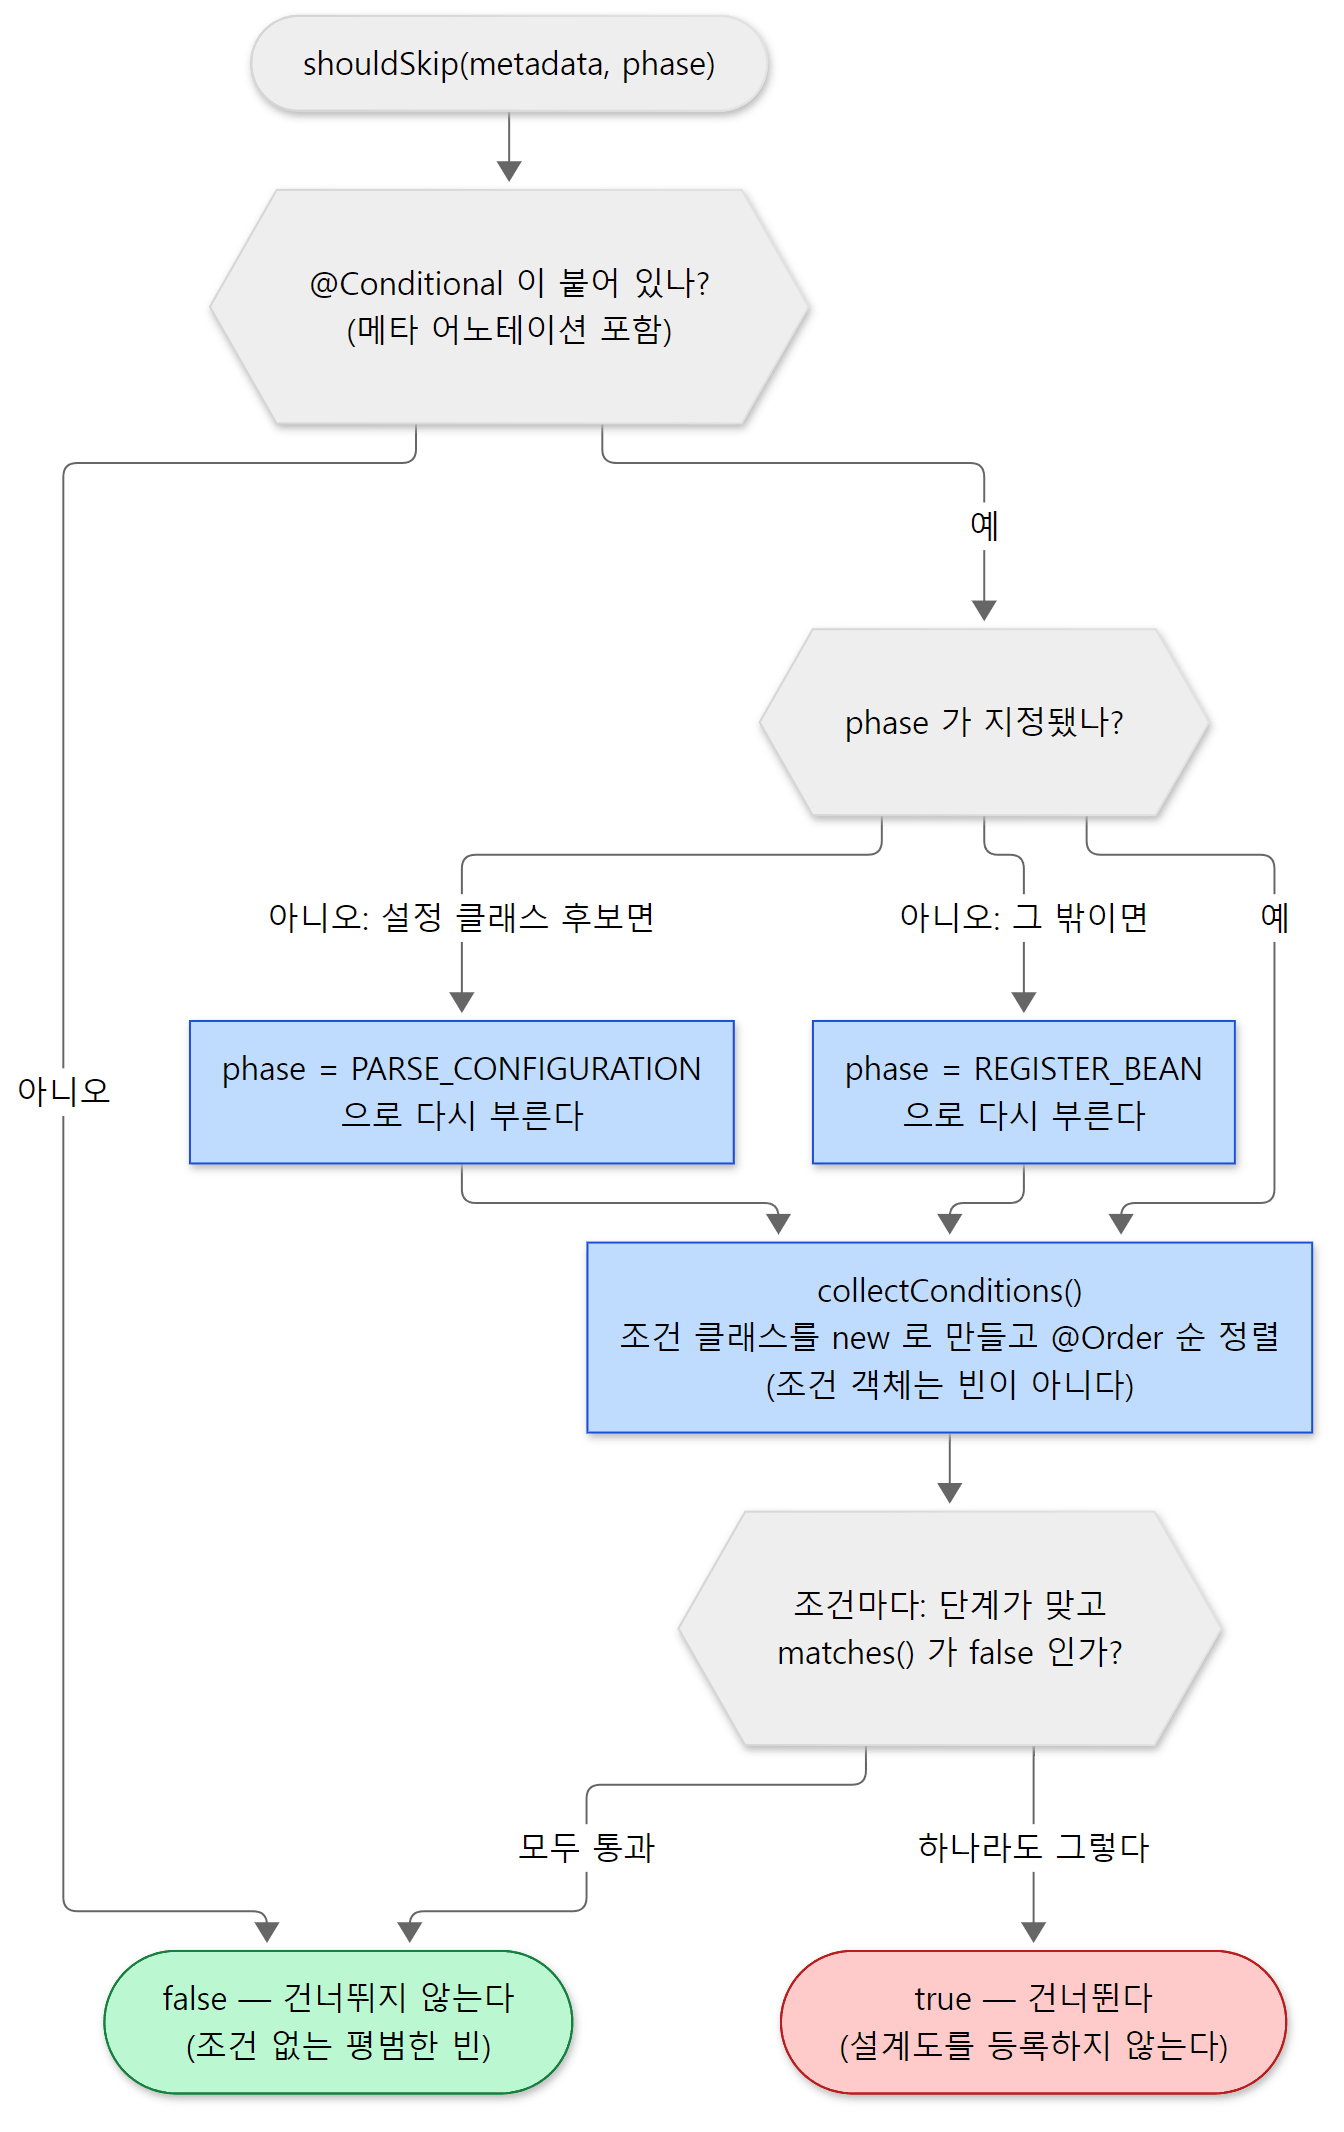 위 코드와 1~4번 설명을 한 장으로 옮긴 것입니다. 초록이 "등록한다", 빨강이 "건너뛴다"입니다.
메서드 이름이 matches가 아니라 shouldSkip인 것도 눈여겨볼 만합니다. 부르는 쪽은 "등록할까?"가 아니라 "건너뛸까?"를 묻고, true면 그 자리에서 return 합니다.
2. 같은 조건을 세 번 묻습니다 — 등록할 때, 파싱할 때, 설계도로 옮길 때
shouldSkip은 한 군데서 불리지 않습니다. 설정이 설계도가 되는 길 위에 세 번 서 있습니다.
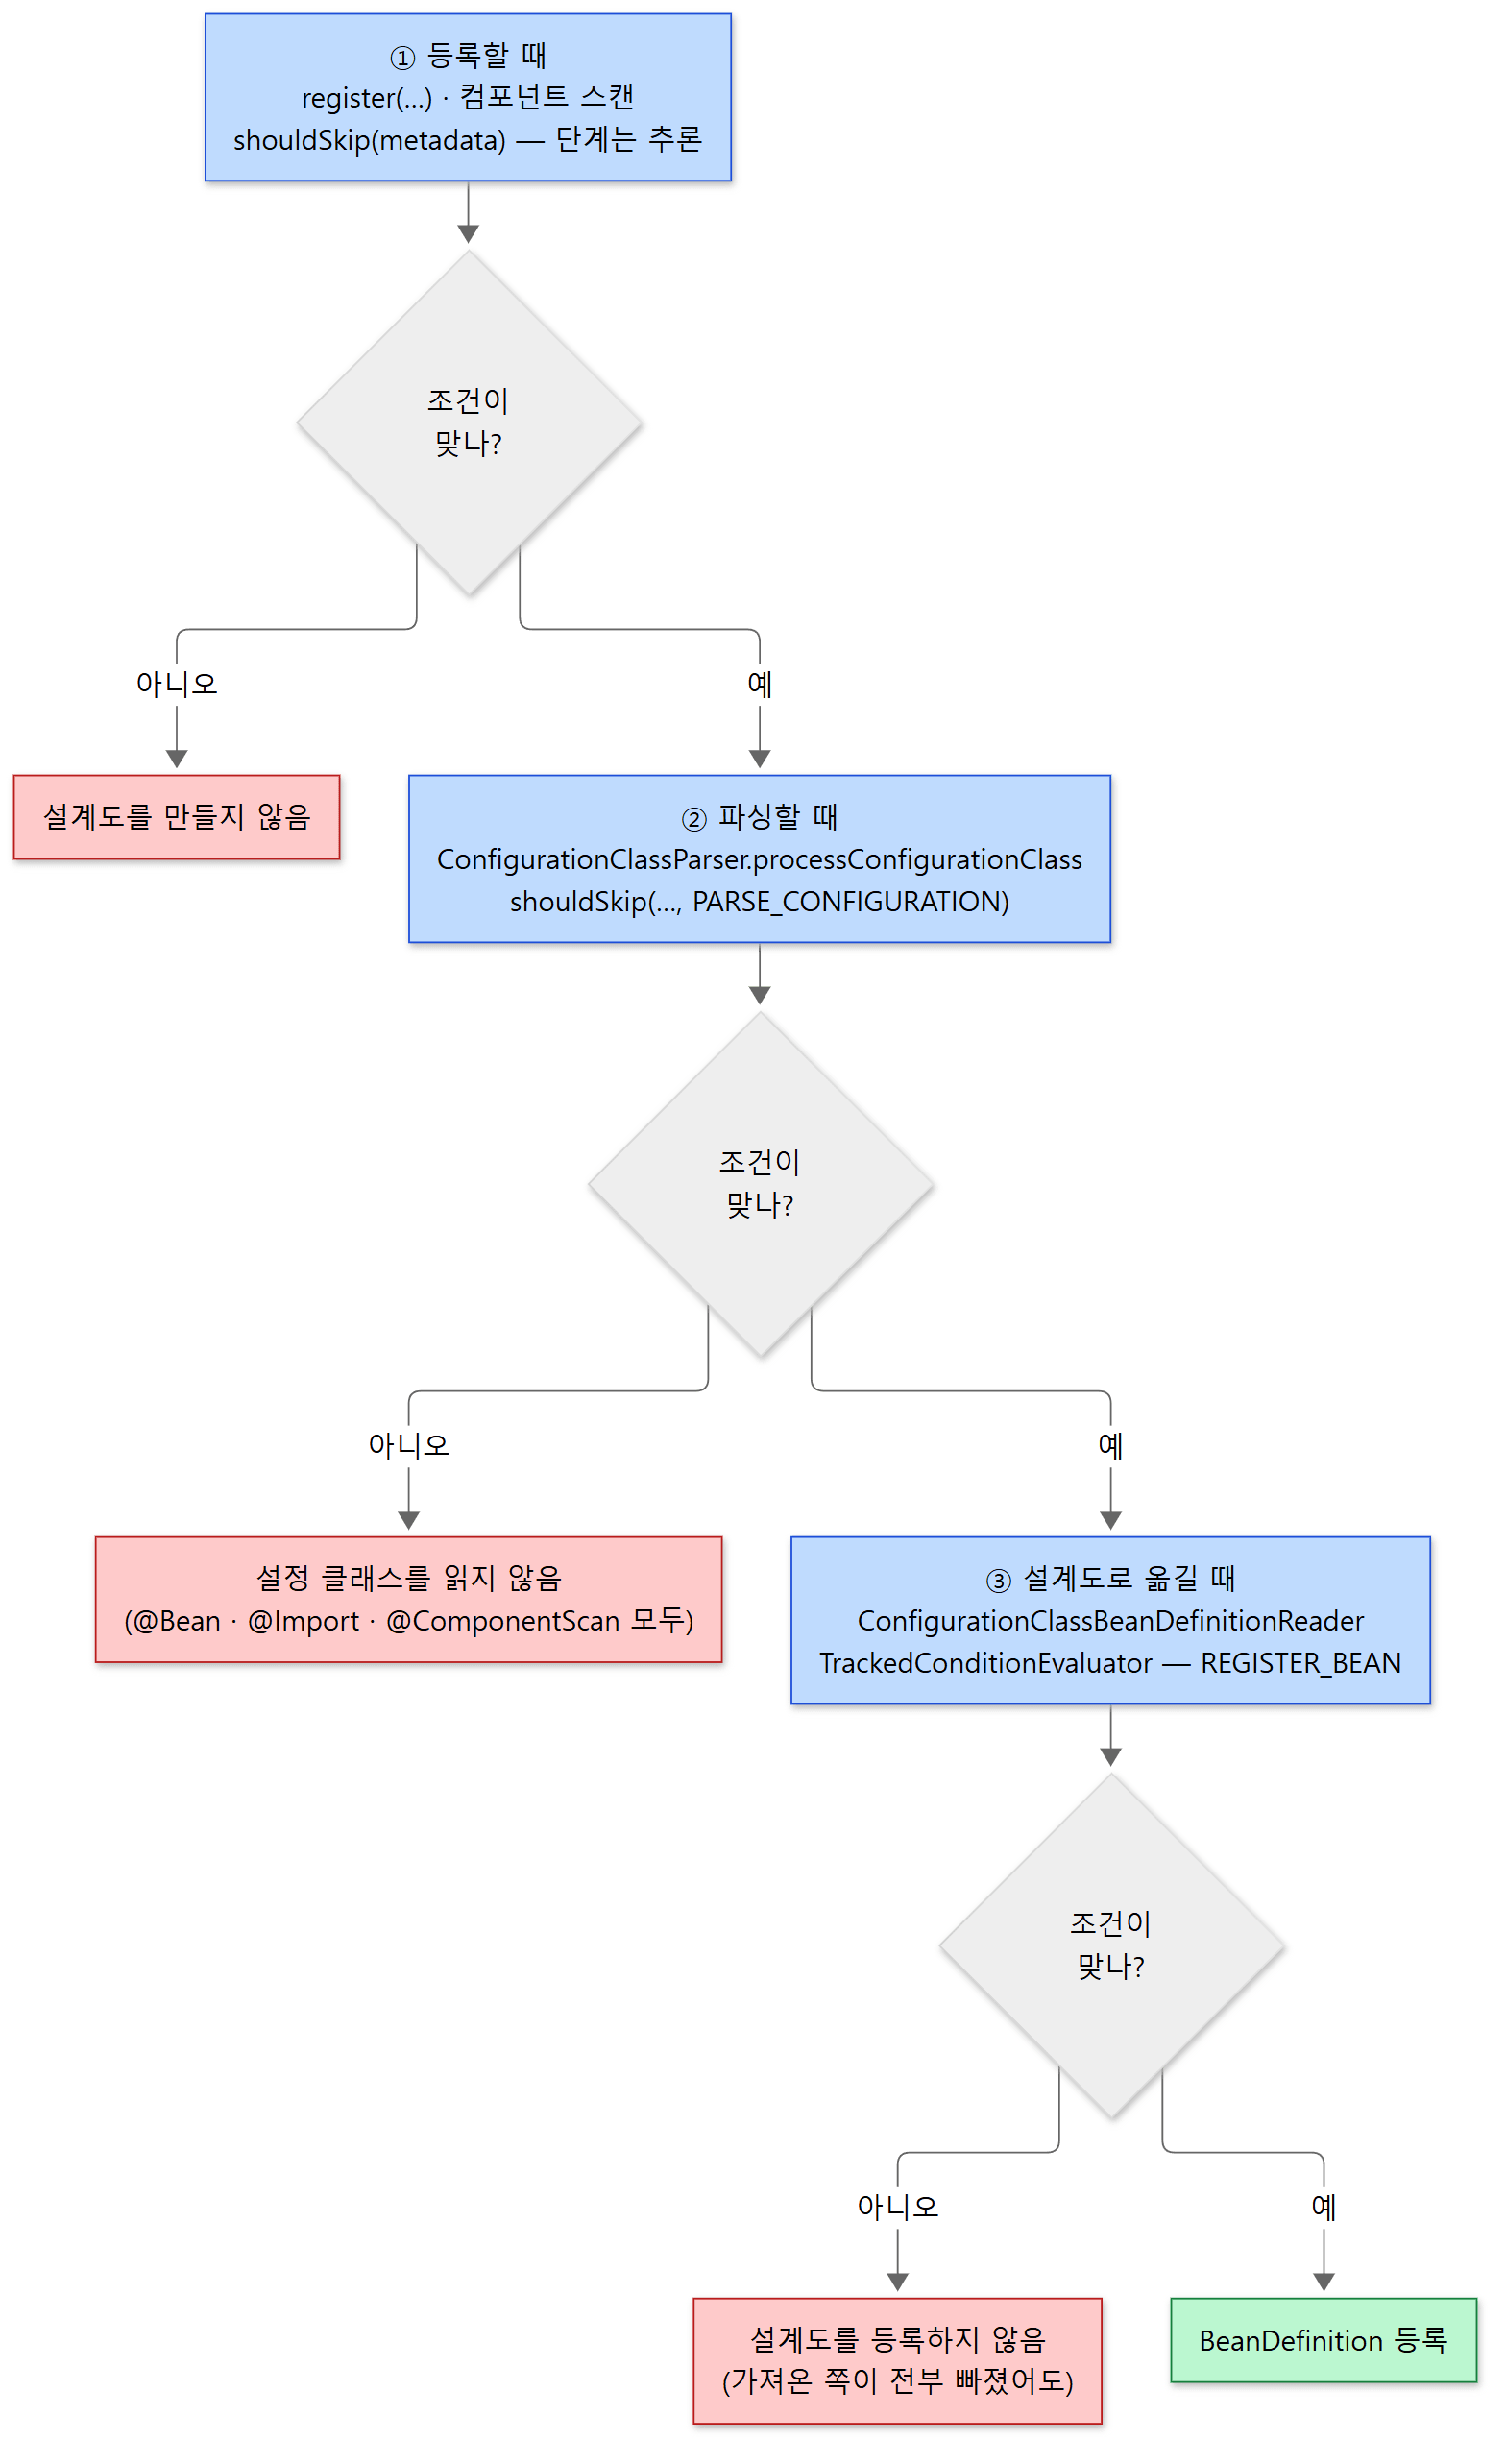 파란 상자가
shouldSkip이 불리는 세 자리, 빨간 상자가 건너뛰었을 때의 결과입니다.
| 어디서 | 어느 단계로 | 건너뛰면 | |
|---|---|---|---|
| ① 등록할 때 | AnnotatedBeanDefinitionReader.doRegisterBean (257행), 컴포넌트 스캔의 isConditionMatch (554–560행) |
추론 (설정 클래스면 PARSE_CONFIGURATION) |
설계도 자체를 만들지 않는다 |
| ② 파싱할 때 | ConfigurationClassParser.processConfigurationClass (249–251행) |
PARSE_CONFIGURATION |
그 클래스의 @Bean·@Import·@ComponentScan을 전혀 읽지 않는다 |
| ③ 설계도로 옮길 때 | ConfigurationClassBeanDefinitionReader — 클래스는 TrackedConditionEvaluator (135행), @Bean 메서드는 196행 |
REGISTER_BEAN |
설계도를 등록하지 않는다 (이미 있던 것은 지운다) |
①은 new AnnotationConfigApplicationContext(AppConfig.class)의 register가 하는 일이고, ②와 ③은 refresh()의 invokeBeanFactoryPostProcessors 단계(AbstractApplicationContext 604행, 7편)에서 ConfigurationClassPostProcessor가 파서와 리더를 차례로 돌릴 때 일어납니다(ConfigurationClassPostProcessor 452행, 464행).
두 단계: PARSE_CONFIGURATION과 REGISTER_BEAN
왜 "단계"가 있을까요. Condition의 확장인 ConfigurationCondition이 그 답입니다. 이 인터페이스는 getConfigurationPhase() 하나를 더 가지고, 그 반환형인 열거형 ConfigurationPhase에 값이 둘 있습니다(ConfigurationCondition 30–61행). 설명 주석이 두 단계를 이렇게 정의합니다(43–58행).
PARSE_CONFIGURATION— 설정 클래스를 파싱하는 동안 평가한다. 안 맞으면 그 설정 클래스는 아예 추가되지 않는다.REGISTER_BEAN— 평범한 빈을 추가할 때 평가한다. 설정 클래스가 추가되는 것은 막지 않는다. 이 시점에는 모든 설정 클래스의 파싱이 끝나 있다.
1절의 shouldSkip을 다시 보면, ConfigurationCondition이 아닌 평범한 Condition은 requiredPhase가 null이라 어느 단계에서 물어도 대답합니다. 반대로 ConfigurationCondition은 자기가 정한 단계에서만 대답하고 다른 단계에서는 무시됩니다. "어떤 빈이 이미 등록되어 있는가"를 보는 조건이라면 파싱 중에는 아직 다른 설정의 빈이 등록되지 않았을 수 있으니 REGISTER_BEAN을 골라야 합니다. 그래서 단계가 필요합니다.
③에서 클래스에 쓰이는 TrackedConditionEvaluator는 한 가지를 더 봅니다.
		public boolean shouldSkip(ConfigurationClass configClass) {
			Boolean skip = this.skipped.get(configClass);
			if (skip == null) {
				if (configClass.isImported()) {
					boolean allSkipped = true;
					for (ConfigurationClass importedBy : configClass.getImportedBy()) {
						if (!shouldSkip(importedBy)) {
							allSkipped = false;
							break;
						}
					}
					if (allSkipped) {
						// ...
						skip = true;
					}
				}
				if (skip == null) {
					skip = conditionEvaluator.shouldSkip(configClass.getMetadata(), ConfigurationPhase.REGISTER_BEAN);
				}
				this.skipped.put(configClass, skip);
			}
			return skip;
		}
이 설정 클래스가 다른 설정에서 @Import로 가져와진 것이면, 가져온 쪽이 전부 건너뛰어졌을 때 이 클래스도 건너뜁니다. @Conditional이 붙은 설정 A가 설정 B를 가져왔는데 A가 조건에 걸려 빠졌다면, B도 따라서 빠지는 것이 자연스럽기 때문입니다. 결과는 skipped 맵에 기억해 두어 같은 클래스에 두 번 묻지 않습니다.
예제: 조건이 몇 번 불리나
시스템 프로퍼티 ex.feature가 있을 때만 맞는 조건을 만들고, @Bean 메서드 하나와 설정 클래스 하나에 각각 걸어 봤습니다. matches가 불릴 때마다 무엇을 검사하는지 출력합니다.
// 이 글을 위해 쓴 예제입니다 (Spring의 소스가 아닙니다)
static class OnFeatureProperty implements Condition {
    @Override
    public boolean matches(ConditionContext context, AnnotatedTypeMetadata metadata) {
        boolean present = context.getEnvironment().containsProperty("ex.feature");
        System.out.println("  OnFeatureProperty.matches -> " + present + " (checked on " + describe(metadata) + ")");
        return present;          // describe()는 메서드면 "method 이름", 클래스면 "class 이름"을 돌려준다
    }
}

@Configuration
static class FeatureConfig {
    @Bean @Conditional(OnFeatureProperty.class) Feature feature() { return new Feature(); }  // 메서드에 건 조건
    @Bean String always() { return "always"; }
}

@Configuration
@Conditional(OnFeatureProperty.class)       // 설정 클래스 전체에 건 조건
static class GatedConfig {
    @Bean String gated() { return "gated"; }
}

// main: new AnnotationConfigApplicationContext(FeatureConfig.class, GatedConfig.class) 를
//       프로퍼티 없이 한 번, System.setProperty("ex.feature", "on") 뒤에 한 번 만든다
출력은 이렇습니다.
1) without ex.feature
  OnFeatureProperty.matches -> false (checked on class ex.u07.ConditionalExample$GatedConfig)
  OnFeatureProperty.matches -> false (checked on method feature)
  Feature beans=[]
  String beans=[always]
2) with ex.feature=on
  OnFeatureProperty.matches -> true (checked on class ex.u07.ConditionalExample$GatedConfig)
  OnFeatureProperty.matches -> true (checked on class ex.u07.ConditionalExample$GatedConfig)
  OnFeatureProperty.matches -> true (checked on method feature)
  OnFeatureProperty.matches -> true (checked on class ex.u07.ConditionalExample$GatedConfig)
  Feature beans=[feature]
  String beans=[always, gated]
위의 표와 정확히 맞습니다. 프로퍼티가 없을 때 GatedConfig는 ①에서 한 번 묻고 바로 빠져서 ②③까지 오지 않습니다. 프로퍼티가 있을 때는 ①(등록), ②(파싱), ③(설계도로 옮길 때) 세 번 불립니다. @Bean 메서드의 조건은 ③에서만, 한 번 불립니다. 세 번째와 네 번째 줄 사이에 feature 메서드가 끼어 있는 것은 리더가 FeatureConfig를 먼저 처리하기 때문입니다.
이 예제는 릴리스 버전인 Spring Framework 7.0.9로 실행해 위 출력을 확인했습니다(이 시리즈가 읽는 7.1.0-SNAPSHOT을 직접 빌드해 돌린 것은 아닙니다).
헷갈리기 쉬운 곳
- 클래스에 건 조건은 여러 번 불립니다. 위에서 봤듯이 최대 세 번입니다. 조건 안에서 비싼 일을 하거나 부작용을 내면 그만큼 되풀이됩니다. 결과를 기억해 두는 것은
TrackedConditionEvaluator가 ③ 안에서만 합니다. - 설정 클래스에 건 조건은 그 안의 전부를 막습니다.
@Conditional의 설명 주석에@Bean메서드,@Import,@ComponentScan이 모두 조건의 영향을 받는다고 적혀 있습니다(41–44행). ②에서return되면 파서가 그 클래스를 열어 보지도 않기 때문입니다. - 조건은 상속되지 않습니다.
@Conditional은 일부러@Inherited를 달지 않았고, 부모 클래스나 오버라이드된 메서드의 조건은 고려되지 않습니다(46–52행).
3. @Profile은 @Conditional의 응용입니다
@Profile의 선언을 보면 끝에 @Conditional이 붙어 있습니다.
@Target({ElementType.TYPE, ElementType.METHOD})
@Retention(RetentionPolicy.RUNTIME)
@Documented
@Conditional(ProfileCondition.class)
public @interface Profile {

	// ...
	String[] value();

}
spring-context/src/main/java/org/springframework/context/annotation/Profile.java 107–118행
그러니 @Profile("dev")를 붙인 것은 곧 @Conditional(ProfileCondition.class)를 붙인 것이고, 2절의 세 시점에 똑같이 평가됩니다. 새 장치는 없고 ProfileCondition이라는 조건 하나가 더 있을 뿐입니다.
	public boolean matches(ConditionContext context, AnnotatedTypeMetadata metadata) {
		MultiValueMap<String, @Nullable Object> attrs = metadata.getAllAnnotationAttributes(Profile.class.getName());
		if (attrs != null) {
			for (Object value : attrs.get("value")) {
				if (context.getEnvironment().matchesProfiles((String[]) value)) {
					return true;
				}
			}
			return false;
		}
		return true;
	}
spring-context/src/main/java/org/springframework/context/annotation/ProfileCondition.java 37–48행
메타데이터에서 @Profile의 value를 꺼내 Environment.matchesProfiles에게 넘기는 것이 전부입니다. 그 뒤는 spring-core의 일입니다.
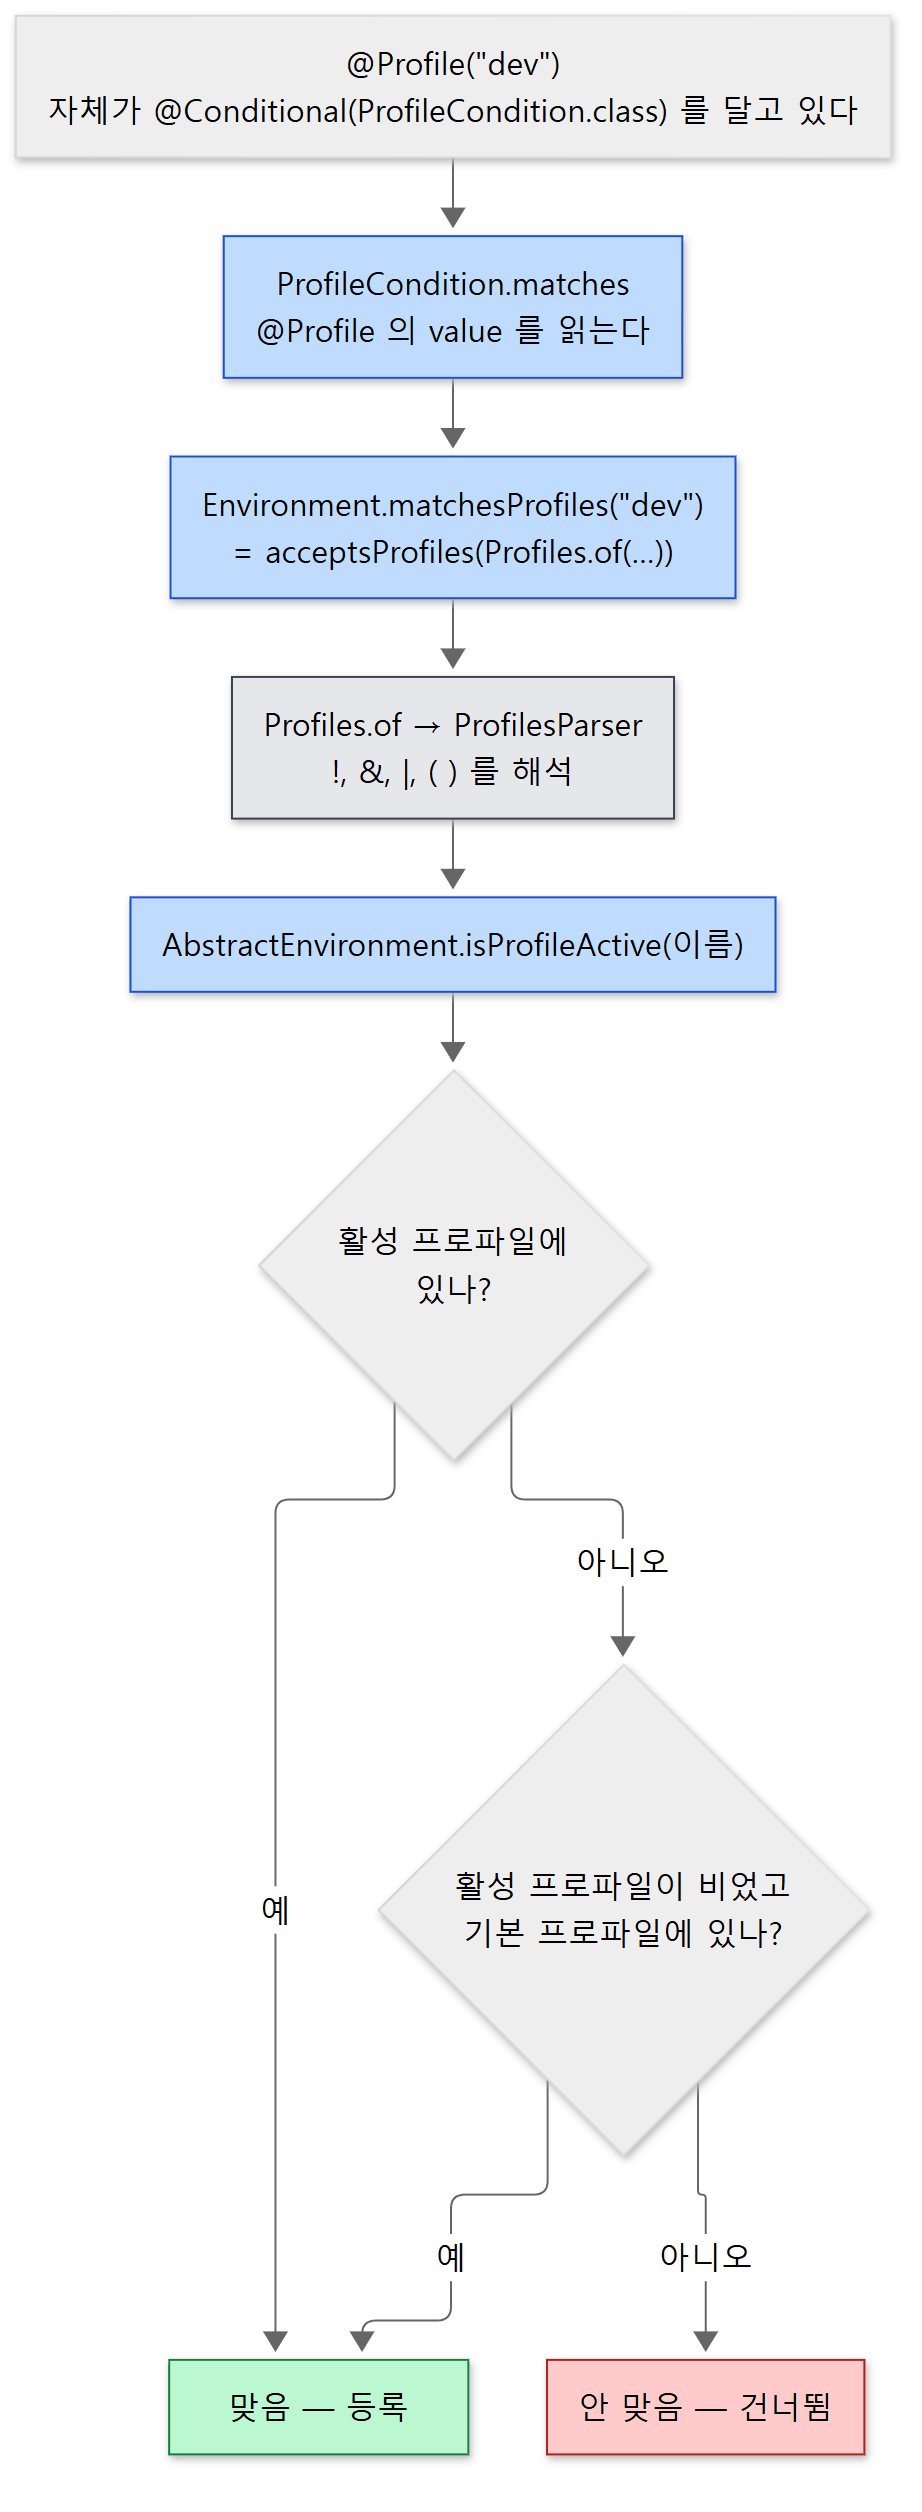
@Profile 한 줄이 Environment까지 내려가는 길. 회색 상자는 표현식 해석기로, 이 글에서는 이름만 적습니다.
matchesProfiles(String...)는acceptsProfiles(Profiles.of(표현식들))의 줄임입니다(Environment113–115행).Profiles.of는"dev"같은 이름뿐 아니라"!prod","a & b","(a & b) | c"같은 표현식을 해석합니다(Profiles71–73행). 실제 해석은ProfilesParser가(,),&,|,!를 토큰으로 잘라서 합니다(55–59행).&와|를 괄호 없이 섞으면 안 된다는 규칙도 설명 주석에 있습니다(61–64행).- 표현식의 잎(이름 하나)이 켜져 있는지는
AbstractEnvironment.isProfileActive가 답합니다.
	protected boolean isProfileActive(String profile) {
		validateProfile(profile);
		Set<String> currentActiveProfiles = doGetActiveProfiles();
		return (currentActiveProfiles.contains(profile) ||
				(currentActiveProfiles.isEmpty() && doGetDefaultProfiles().contains(profile)));
	}
spring-core/src/main/java/org/springframework/core/env/AbstractEnvironment.java 407–412행
규칙은 두 줄입니다. 활성 프로파일에 있으면 켜진 것이고, 활성 프로파일이 하나도 없을 때만 기본 프로파일을 대신 봅니다. 기본 프로파일은 따로 바꾸지 않으면 "default" 하나입니다(100행, 250–252행). 활성 프로파일은 setActiveProfiles로 직접 넣거나, 비어 있으면 spring.profiles.active 프로퍼티에서 읽어 옵니다(272–283행).
예제: dev와 prod
// 이 글을 위해 쓴 예제입니다 (Spring의 소스가 아닙니다)
@Configuration
static class StorageConfig {
    @Bean @Profile("dev")  Storage devStorage()  { return new DevStorage(); }   // dev 일 때만
    @Bean @Profile("prod") Storage prodStorage() { return new ProdStorage(); }  // prod 일 때만
    @Bean @Profile("!prod") String notProdMarker() { return "not-prod"; }       // prod 가 아닐 때
}

static void run(String... activeProfiles) {          // main: run("dev"); run("prod"); run();
    var context = new AnnotationConfigApplicationContext();
    context.getEnvironment().setActiveProfiles(activeProfiles);   // refresh() 전에 정해야 한다
    context.register(StorageConfig.class);
    context.refresh();
    // 켜진 프로파일과, Storage 타입·String 타입 빈의 이름을 출력한다
    context.close();
}
active=[dev] -> Storage beans=[devStorage], String beans=[notProdMarker]
active=[prod] -> Storage beans=[prodStorage], String beans=[]
active=[] -> Storage beans=[], String beans=[notProdMarker]
셋째 줄이 isProfileActive의 두 번째 조건입니다. 아무것도 켜지 않으면 활성 프로파일이 비어 기본 프로파일 "default"를 보는데, "dev"도 "prod"도 아니므로 둘 다 빠지고 "!prod"만 맞습니다. 이 예제도 Spring Framework 7.0.9로 실행했습니다.
헷갈리기 쉬운 곳
setActiveProfiles는refresh()전에 불러야 합니다. 조건은 2절에서 본 대로 설계도를 만들 때 평가되고, 그 일은refresh()안에서 끝납니다. 예제에서 생성자에 클래스를 넘기지 않고register와refresh를 따로 부른 이유가 이것입니다. 1편에서 본AnnotationConfigApplicationContext(Class...)생성자는 안에서 바로refresh()를 부릅니다(89–93행).@Profile({"a", "b"})는 "a 또는 b"입니다.ProfileCondition의 반복문이 하나라도 맞으면true를 돌려주고,Profiles.of의 설명 주석도 표현식 중 하나만 맞으면 된다고 적고 있습니다(49–50행). "a 그리고 b"는@Profile("a & b")입니다.@Profile이 없는 빈은 프로파일과 무관하게 등록됩니다.ProfileCondition의 마지막return true가 그것입니다. 다만@Profile이 붙어 있지 않으면shouldSkip의 첫 줄에서 이미 끝나므로 이 줄까지 오는 일은 드뭅니다.
4. @Import의 세 갈래
@Import는 "이 클래스들도 설정으로 쳐 달라"는 표시입니다. 값은 Class<?>[]이고 설명 주석은 @Configuration 클래스, ImportSelector, ImportBeanDefinitionRegistrar, BeanRegistrar 네 종류와 평범한 컴포넌트 클래스를 받는다고 적고 있습니다(Import 33–36행, 72–77행). 이 글은 오래전부터 있던 세 갈래를 다루고, 7.0에 들어온 BeanRegistrar는 "뺀 것"에 적어 둡니다.
파서는 설정 클래스 하나를 읽는 doProcessConfigurationClass 안에서, @ComponentScan 처리가 끝난 다음 @Import를 처리합니다(ConfigurationClassParser 363–364행, 전체 순서는 8편). getImports가 클래스에 직접 붙은 @Import와 메타 어노테이션으로 붙은 @Import, 7.0부터는 구현한 인터페이스의 @Import까지 모아 오고(541–579행), processImports가 하나씩 갈래를 나눕니다. (순환 import를 잡는 부분과 예외 처리, 그리고 7.0에 들어온 BeanRegistrar 갈래는 // ...로 줄였습니다.)
	private void processImports(ConfigurationClass configClass, SourceClass currentSourceClass,
			Collection<SourceClass> importCandidates, Predicate<String> filter, boolean checkForCircularImports) {

		// ...
			this.importStack.push(configClass);
			try {
				for (SourceClass candidate : importCandidates) {
					if (candidate.isAssignable(ImportSelector.class)) {
						// ...
						if (selector instanceof DeferredImportSelector deferredImportSelector) {
							this.deferredImportSelectorHandler.handle(configClass, deferredImportSelector);
						}
						else {
							String[] importClassNames = selector.selectImports(currentSourceClass.getMetadata());
							Collection<SourceClass> importSourceClasses = asSourceClasses(importClassNames, filter);
							processImports(configClass, currentSourceClass, importSourceClasses, filter, false);
						}
					}
					// ...
					else if (candidate.isAssignable(ImportBeanDefinitionRegistrar.class)) {
						// ...
						configClass.addImportBeanDefinitionRegistrar(registrar, currentSourceClass.getMetadata());
					}
					else {
						// ...
						this.importStack.registerImport(
								currentSourceClass.getMetadata(), candidate.getMetadata().getClassName());
						processConfigurationClass(candidate.asConfigClass(configClass), filter);
					}
				}
			}
			// ...
			finally {
				this.importStack.pop();
			}
		// ...
	}
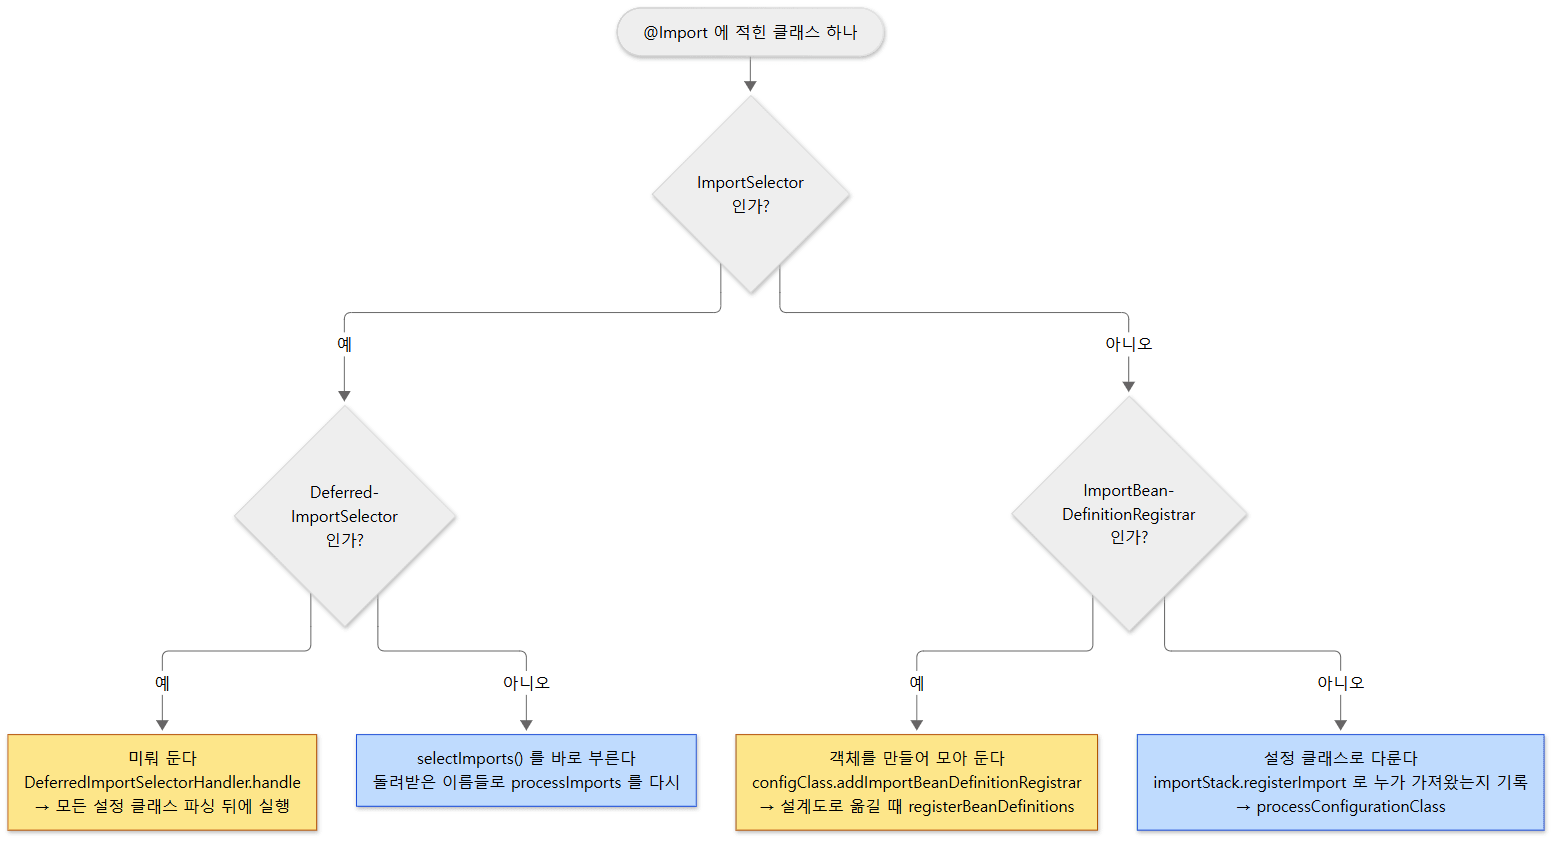 왼쪽부터 ImportSelector, ImportBeanDefinitionRegistrar, 설정 클래스의 갈래. 노란 상자는 "지금 하지 않고 모아 두는" 자리입니다.
| 갈래 | 무엇을 하나 | 언제 실행되나 | 결과 |
|---|---|---|---|
ImportSelector |
selectImports(가져온 쪽의 메타데이터)가 클래스 이름 배열을 돌려준다 |
파싱 중 그 자리에서 (DeferredImportSelector면 미룸, 5절) |
돌려받은 이름들로 processImports를 다시 돈다. 그래서 선택기가 선택기나 레지스트라를 돌려줘도 된다 |
ImportBeanDefinitionRegistrar |
registerBeanDefinitions(메타데이터, registry)에서 설계도를 직접 등록한다 |
파싱 중에는 객체만 만들어 모아 두고(ConfigurationClass 236행), 설계도로 옮기는 단계에서 부른다(ConfigurationClassBeanDefinitionReader 152행, 423–428행) |
@Bean으로는 못 하는 일(이름·스코프·속성을 손으로 정한 설계도, 프록시 생성기 등록 등) |
| 그 밖의 클래스 | processConfigurationClass로 설정 클래스처럼 파싱한다 |
파싱 중 그 자리에서 (재귀) | 가져온 클래스 자체도 빈으로 등록되고, 그 안의 @Bean도 설계도가 된다 |
세 번째 갈래에서 가져온 클래스에는 "누가 가져왔는지"가 붙습니다. candidate.asConfigClass(configClass)가 만드는 ConfigurationClass는 importedBy에 가져온 쪽을 담고(ConfigurationClass 99–103행), 리더는 isImported()인 클래스를 빈으로 따로 등록합니다(144–146행, 159–184행). 빈 이름은 importBeanNameGenerator가 짓는데, 기본은 클래스의 전체 이름입니다(ConfigurationClassPostProcessor 165–166행, 뒤의 예제 출력에서 확인할 수 있습니다). 2절의 TrackedConditionEvaluator가 보던 getImportedBy()도 이 값입니다.
ImportSelector와 ImportBeanDefinitionRegistrar 객체는 빈이 아니지만, 줄인 자리의 ParserStrategyUtils.instantiateClass(598–599행, 626–628행)로 만들어지면서 Environment, BeanFactory, ClassLoader, ResourceLoader를 생성자 인자나 Aware 인터페이스로 받을 수 있습니다(ParserStrategyUtils 56–69행, ImportSelector 30–47행). 1절의 Condition이 그냥 new 되는 것과 다른 점입니다.
5. 미루는 선택기와 "누가 나를 가져왔나"
DeferredImportSelector: 모든 설정이 파싱된 뒤에
DeferredImportSelector는 ImportSelector를 상속한 인터페이스로, 메서드를 하나도 더 강제하지 않습니다(39–49행). 다른 것은 파서가 그것을 다루는 시점뿐입니다. 4절 코드에서 DeferredImportSelector면 selectImports를 부르지 않고 deferredImportSelectorHandler.handle에 넘겼습니다.
		void handle(ConfigurationClass configClass, DeferredImportSelector importSelector) {
			DeferredImportSelectorHolder holder = new DeferredImportSelectorHolder(configClass, importSelector);
			if (this.deferredImportSelectors == null) {
				DeferredImportSelectorGroupingHandler handler = new DeferredImportSelectorGroupingHandler();
				handler.register(holder);
				handler.processGroupImports();
			}
			else {
				this.deferredImportSelectors.add(holder);
			}
		}
handle은 평소에는(목록이 null이 아닐 때) 선택기를 목록에 넣기만 합니다. 목록을 비우는 process()(825–839행)는 parse(후보들)가 후보 설정 클래스를 전부 돈 다음 마지막 줄에서 불립니다(200행). 그때 목록을 null로 바꾸고, 모아 둔 선택기를 @Order대로 정렬해 그룹으로 묶은 다음, 각 선택기의 selectImports를 부르고 돌려받은 이름으로 processImports를 돕니다(859–880행). 그 도중에 또 만난 DeferredImportSelector는 목록이 null이므로 handle의 첫 갈래대로 바로 처리됩니다.
왜 미룰까요. DeferredImportSelector의 설명 주석은 "가져올 설정이 @Conditional일 때 특히 유용하다"고 적고 있습니다(24–26행). "사용자가 DataSource 빈을 직접 정의하지 않았을 때만 기본 DataSource 설정을 가져온다" 같은 조건은 사용자의 설정이 전부 파싱된 뒤에 봐야 맞는 답이 나옵니다. 파싱 도중에 보면 아직 읽지 않은 설정 클래스의 빈이 안 보여서 잘못 판단합니다. 그래서 사용자 설정을 다 읽은 다음으로 미룹니다. (Spring Boot의 자동 설정이 이 장치 위에 있다고 알려져 있지만, Spring Boot는 별개의 프로젝트라 이 글에서 소스로 확인한 것은 아닙니다.)
예제: 세 갈래가 불리는 순서
설정 클래스 둘을 등록합니다. AppConfig는 DeferredImportSelector(LateSelector), 평범한 ImportSelector(MailSelector), ImportBeanDefinitionRegistrar(SchedulerRegistrar)를 가져오고, OtherConfig는 파싱 시점을 보여 주기 위한 OtherSelector를 가져옵니다. MailSelector가 돌려주는 MailConfig는 ImportAware를 구현해 자기를 가져온 쪽의 이름을 출력합니다.
// 이 글을 위해 쓴 예제입니다 (Spring의 소스가 아닙니다). 각 메서드는 불리면 자기 이름과 가져온 쪽을 출력합니다
@Configuration
static class MailConfig implements ImportAware {               // 갈래 ① 설정 클래스
    @Override public void setImportMetadata(AnnotationMetadata importMetadata) { /* 출력 */ }
    @Bean Mailer mailer() { return new Mailer(); }
}

static class MailSelector implements ImportSelector {           // 갈래 ② 이름을 돌려준다
    @Override public String[] selectImports(AnnotationMetadata importingClassMetadata) {
        return new String[] {MailConfig.class.getName()};
    }
}

static class LateSelector implements DeferredImportSelector {   // 갈래 ② 의 미루는 변형
    @Override public String[] selectImports(AnnotationMetadata importingClassMetadata) { return new String[0]; }
}

static class SchedulerRegistrar implements ImportBeanDefinitionRegistrar {   // 갈래 ③ 설계도를 직접
    @Override public void registerBeanDefinitions(AnnotationMetadata importingClassMetadata, BeanDefinitionRegistry registry) {
        registry.registerBeanDefinition("scheduler", new RootBeanDefinition(Scheduler.class));
    }
}

@Configuration
@Import({LateSelector.class, MailSelector.class, SchedulerRegistrar.class})
static class AppConfig { }

@Configuration
@Import(OtherSelector.class)      // OtherSelector 는 LateSelector 와 같되 평범한 ImportSelector
static class OtherConfig { }

// main: new AnnotationConfigApplicationContext(AppConfig.class, OtherConfig.class)
creating context with AppConfig, OtherConfig
  MailSelector.selectImports (importing ex.u07.ImportExample$AppConfig)
  OtherSelector.selectImports (importing ex.u07.ImportExample$OtherConfig)
  LateSelector.selectImports (importing ex.u07.ImportExample$AppConfig)
  SchedulerRegistrar.registerBeanDefinitions (importing ex.u07.ImportExample$AppConfig)
  MailConfig.setImportMetadata <- imported by ex.u07.ImportExample$AppConfig
Mailer beans=[mailer]
Scheduler beans=[scheduler]
MailConfig beans=[ex.u07.ImportExample$MailConfig]
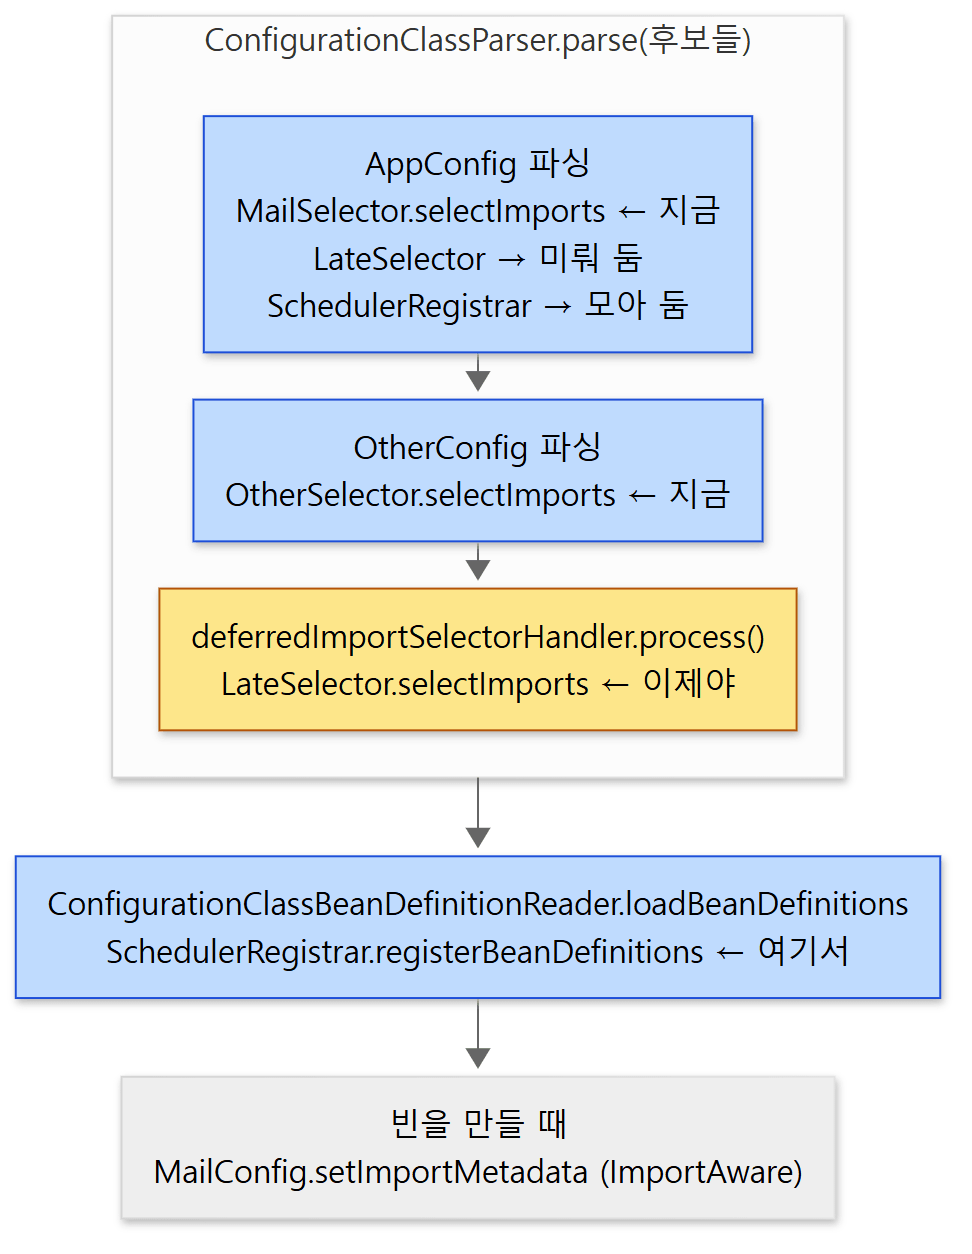 출력의 다섯 줄을 소스의 자리에 놓은 것. 노란 상자가 "미뤄 둔 것이 실행되는" 자리입니다.
@Import에는 LateSelector를 맨 앞에 적었지만, 실제로는 OtherConfig의 선택기보다도 뒤에 불렸습니다. 모든 후보의 파싱이 끝난 다음이기 때문입니다. 그리고 레지스트라는 그보다 더 뒤, 리더가 설계도를 옮기는 단계에서 불립니다. 이 예제도 Spring Framework 7.0.9로 실행했습니다.
ImportAware: 가져온 쪽의 메타데이터 받기
출력의 마지막 줄 MailConfig.setImportMetadata가 가장 늦게 나온 이유는 그것이 빈을 만들 때의 일이기 때문입니다. 길은 세 토막입니다.
- 4절 코드의 세 번째 갈래에서
importStack.registerImport(가져온 쪽 메타데이터, 가져온 클래스 이름)로 누가 누구를 가져왔는지 기록합니다.ImportStack은 스택이면서 동시에 이 기록을 담는ImportRegistry입니다(755–766행). - 파싱이 다 끝나면
ConfigurationClassPostProcessor가 이ImportRegistry를 싱글톤 빈으로 등록해 둡니다(493–496행). - 빈을 만들 때
ImportAwareBeanPostProcessor가 "초기화 전" 훅(6편)에서 그 기록을 찾아 넣어 줍니다.
		@Override
		public Object postProcessBeforeInitialization(Object bean, String beanName) {
			if (bean instanceof ImportAware importAware) {
				ImportRegistry ir = this.beanFactory.getBean(IMPORT_REGISTRY_BEAN_NAME, ImportRegistry.class);
				AnnotationMetadata importingClass = ir.getImportingClassFor(ClassUtils.getUserClass(bean).getName());
				if (importingClass != null) {
					importAware.setImportMetadata(importingClass);
				}
			}
			return bean;
		}
이 후처리기는 ConfigurationClassPostProcessor가 postProcessBeanFactory 끝에서 등록합니다(338행). ImportAware가 쓸모 있는 때는 7절의 @EnableXxx처럼 어노테이션의 속성값을 가져온 설정이 읽어야 할 때입니다.
헷갈리기 쉬운 곳
ImportBeanDefinitionRegistrar는DeferredImportSelector보다도 늦게 실행됩니다. 파싱 단계가 아니라 설계도로 옮기는 단계이기 때문입니다. 리더는 설정 클래스 하나마다@Bean→@ImportResource→ 레지스트라 순으로 옮기므로(147–153행), 레지스트라 안에서registry.containsBeanDefinition(...)을 보면 같은 클래스와 앞선 클래스의@Bean은 보이고 뒤에 오는 설정 클래스의@Bean은 안 보입니다.@Import로 가져온 클래스에@Configuration이 없어도 빈이 됩니다. 세 번째 갈래는 "선택기도 레지스트라도 아니면" 전부 설정 클래스로 다루고,isImported()인 클래스는 리더가 빈으로 등록합니다. 설명 주석의 "regular component classes"가 이 경우입니다.- 같은 클래스를 두 설정이 가져오면 한 번만 파싱됩니다.
processConfigurationClass는 이미 처리한 클래스를 다시 만나면importedBy만 합치고 돌아갑니다(253–261행). 다만 직접 등록한(가져온 것이 아닌) 클래스가 나중에 나타나면 가져온 쪽을 지우고 새것을 따릅니다(272–277행).
6. 서로를 가져오면 — ImportStack
4절 코드에서 processImports는 들어갈 때 importStack.push, 나올 때 pop을 합니다. 그 사이에 가져온 설정 클래스를 재귀로 파싱하므로, 스택에는 "지금 가져오는 중인 설정 클래스들"이 쌓입니다. 줄였던 앞부분이 이 스택으로 순환을 잡습니다.
		if (checkForCircularImports && isChainedImportOnStack(configClass)) {
			this.problemReporter.error(new CircularImportProblem(configClass, this.importStack));
		}
	private boolean isChainedImportOnStack(ConfigurationClass configClass) {
		if (this.importStack.contains(configClass)) {
			String configClassName = configClass.getMetadata().getClassName();
			AnnotationMetadata importingClass = this.importStack.getImportingClassFor(configClassName);
			while (importingClass != null) {
				if (configClassName.equals(importingClass.getClassName())) {
					return true;
				}
				importingClass = this.importStack.getImportingClassFor(importingClass.getClassName());
			}
		}
		return false;
	}
스택에 이미 있는 클래스라면, 5절에서 본 "누가 누구를 가져왔나" 기록을 거슬러 올라가 자기 자신이 나오는지 봅니다. 나오면 problemReporter.error를 부르고, 기본 리포터인 FailFastProblemReporter는 그 자리에서 BeanDefinitionParsingException을 던집니다(70–72행). 이 예외는 BeanDefinitionStoreException의 자식입니다(30행). checkForCircularImports가 false인 호출은 선택기가 돌려준 이름을 처리하는 재귀 호출(610행)과 미뤄 둔 선택기 처리(866–868행)입니다. 그때는 같은 설정 클래스가 이미 스택에 있는 것이 정상이기 때문입니다.
예제: A는 B를, B는 A를
// 이 글을 위해 쓴 예제입니다 (Spring의 소스가 아닙니다)
@Configuration
@Import(ConfigB.class)        // A 는 B 를 가져오고
static class ConfigA { }

@Configuration
@Import(ConfigA.class)        // B 는 다시 A 를 가져온다
static class ConfigB { }

// main: new AnnotationConfigApplicationContext(ConfigA.class) 를 try 로 감싸고 예외의 클래스와 메시지를 출력
org.springframework.beans.factory.parsing.BeanDefinitionParsingException
Configuration problem: A circular @Import has been detected: Illegal attempt by @Configuration class 'CircularImportExample.ConfigB' to import class 'CircularImportExample.ConfigA' as 'CircularImportExample.ConfigA' is already present in the current import stack [CircularImportExample.ConfigB->CircularImportExample.ConfigA]
Offending resource: ex.u07.CircularImportExample$ConfigB
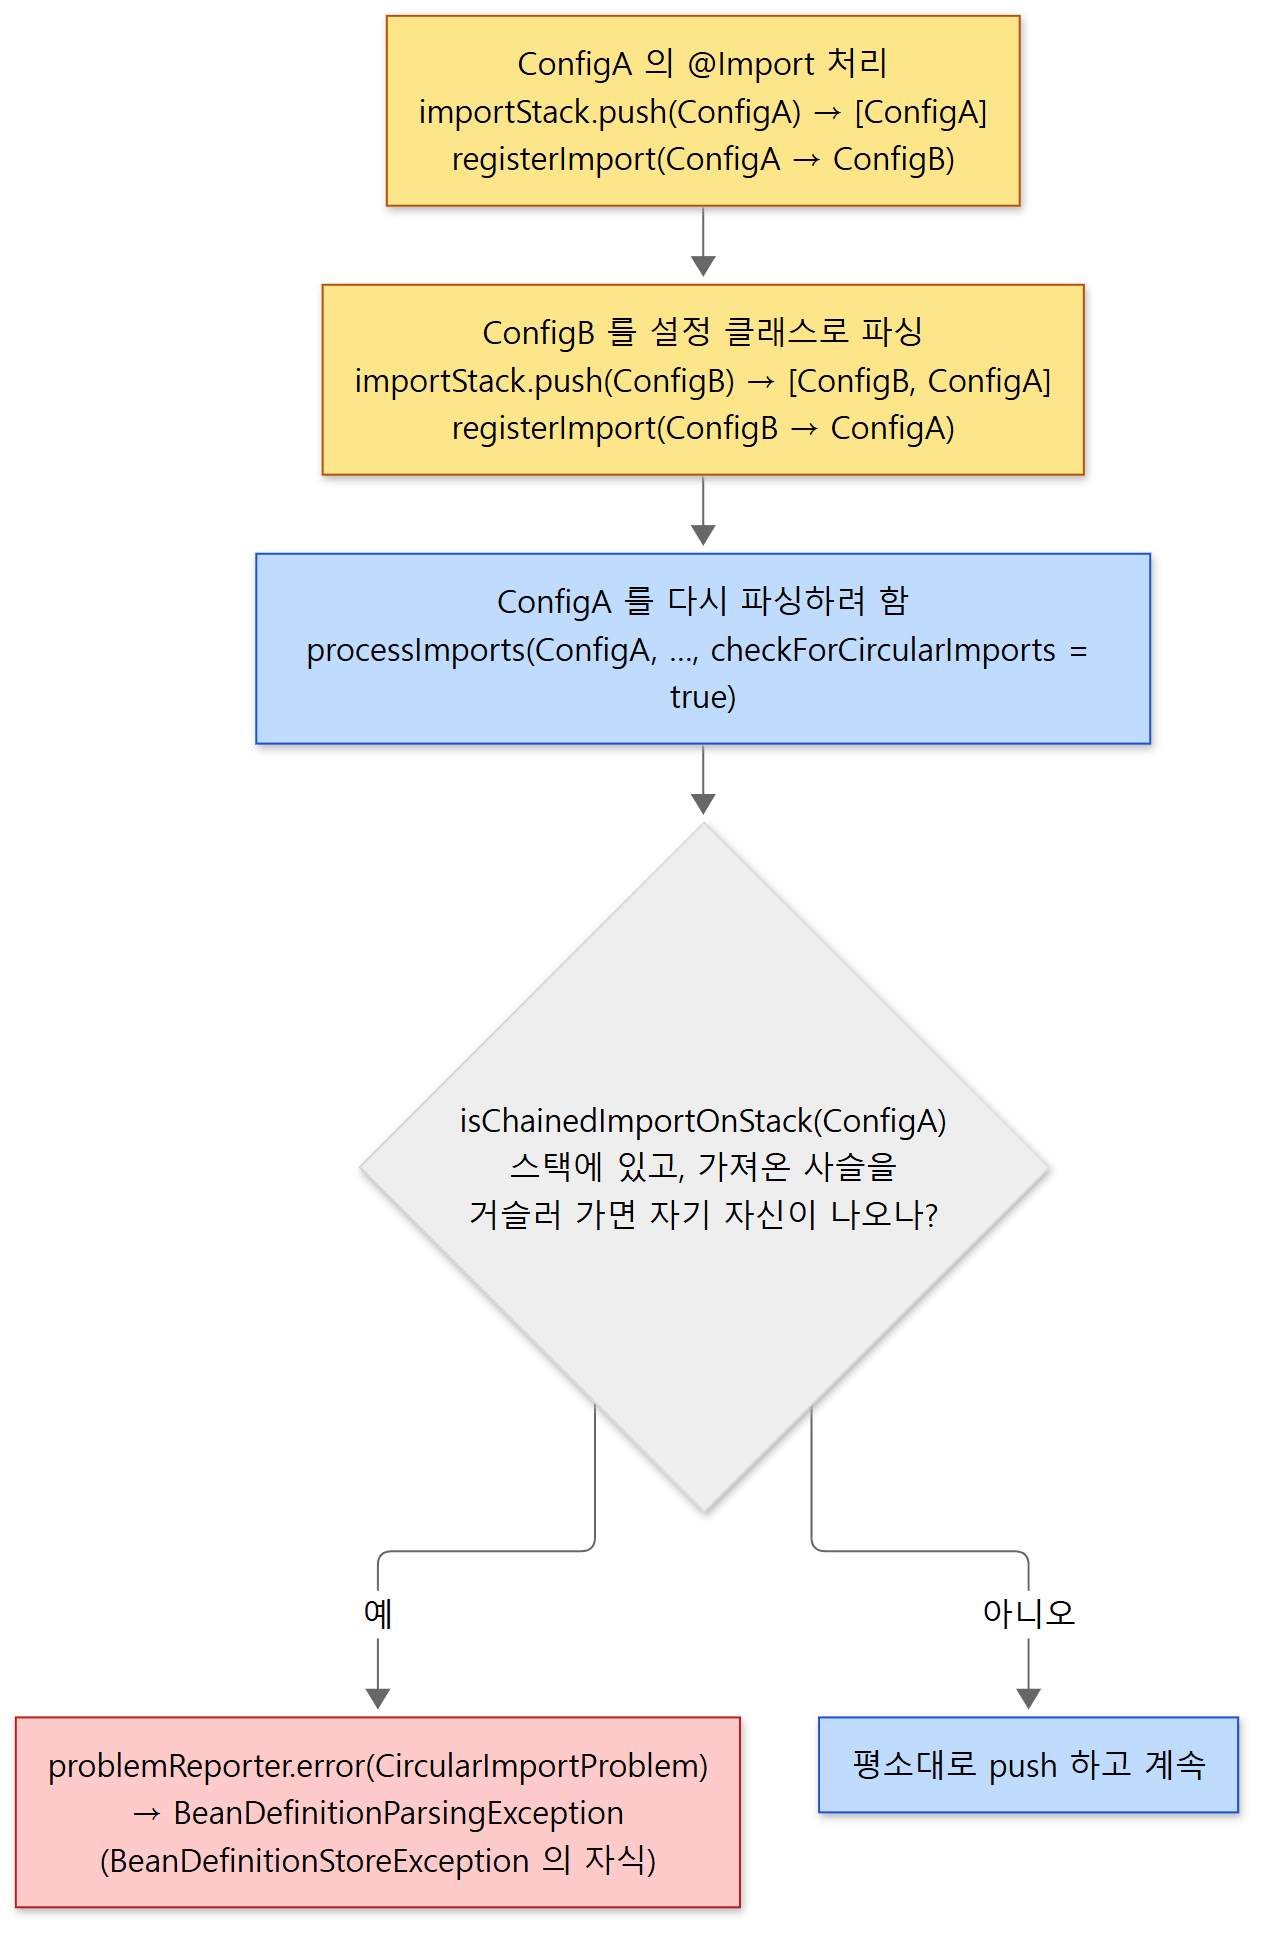 메시지의
[ConfigB->ConfigA]가 그때의 스택입니다. 스택은 가장 최근 것이 앞에 오므로 ConfigB가 먼저 적힙니다.
메시지를 소스와 맞춰 보면 이렇습니다(CircularImportProblem 1165–1174행). ConfigA를 파싱하다 ConfigB를 가져오고(스택 [A]), ConfigB를 파싱하다 ConfigA를 가져오려고 processConfigurationClass(A)에 들어갑니다(스택 [B, A]). 아직 A의 파싱이 끝나지 않아 "이미 처리한 클래스" 목록에는 없으므로 다시 doProcessConfigurationClass(A)가 돌고, 그 안의 processImports(A, …, true)에서 isChainedImportOnStack(A)가 참이 됩니다. "B가 A를 가져오려는 시도"로 보고된 것은 메시지가 스택 맨 위(importStack.element(), 곧 B)를 주어로 쓰기 때문입니다. 이 예제도 Spring Framework 7.0.9로 실행했습니다.
헷갈리기 쉬운 곳
- 순환이 아닌 "두 번 가져오기"는 괜찮습니다. A가 B와 C를 가져오고 B도 C를 가져오는 마름모꼴은 스택에 C가 두 번 겹치지 않으므로 통과하고, 5절에서 본 대로
importedBy만 합쳐집니다. - 4편의 순환 참조와는 다른 이야기입니다. 4편의 순환은 빈 객체끼리 서로 필요로 하는 것이고 3단계 캐시로 풀립니다. 이 절의 순환은 설정 클래스끼리 서로 가져오는 것이고, 파싱 단계에서 예외로 끝납니다. 설계도의 순환은 풀 방법이 없기 때문입니다.
7. @EnableXxx는 전부 @Import입니다
Spring에는 @EnableAsync, @EnableTransactionManagement, @EnableAspectJAutoProxy처럼 "기능을 켠다"는 어노테이션이 여럿 있습니다. 선언을 열어 보면 셋 다 같은 모양입니다. @Import 하나가 메타 어노테이션으로 붙어 있고, 그것이 전부입니다.
| 어노테이션 | @Import에 적힌 것 |
갈래 | 그것이 하는 일 |
|---|---|---|---|
@EnableAspectJAutoProxy (122행) |
AspectJAutoProxyRegistrar |
ImportBeanDefinitionRegistrar (34행) |
자동 프록시 생성기의 설계도를 등록하고, proxyTargetClass·exposeProxy 속성대로 설정한다 (42–57행) |
@EnableAsync (167행) |
AsyncConfigurationSelector |
ImportSelector (AdviceModeImportSelector를 상속, 33행) |
mode가 PROXY면 ProxyAsyncConfiguration을, ASPECTJ면 AspectJ용 설정의 이름을 돌려준다 (45–50행) |
@EnableTransactionManagement (spring-tx 162행) |
TransactionManagementConfigurationSelector |
ImportSelector (AdviceModeImportSelector를 상속, 38행) |
PROXY면 AutoProxyRegistrar와 ProxyTransactionManagementConfiguration 두 이름을 돌려준다 (47–53행) |
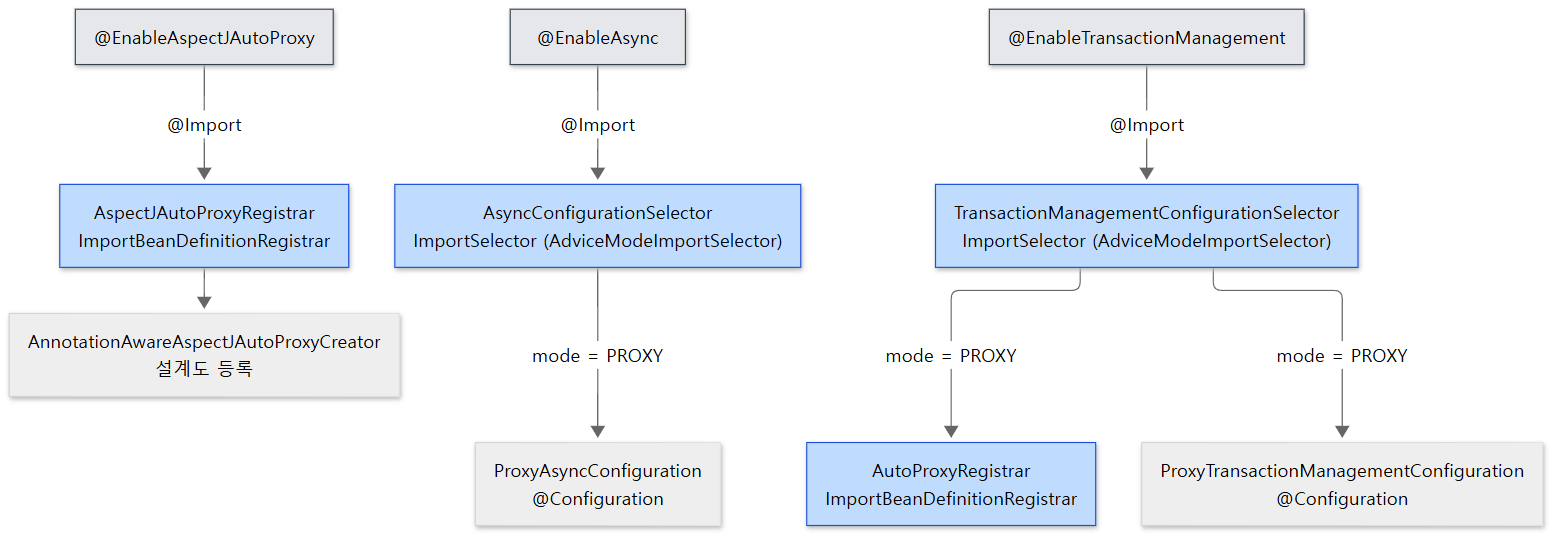 회색이 어노테이션, 파란색이 4절의 두 갈래(선택기와 레지스트라)입니다. 선택기가 돌려준 이름이 다시 레지스트라일 수 있다는 것이 트랜잭션 쪽에 보입니다.
셋 가운데 하나는 레지스트라 갈래, 둘은 선택기 갈래이고, 선택기가 돌려준 ProxyAsyncConfiguration 같은 이름은 다시 설정 클래스 갈래로 처리되므로 4절의 갈래 셋이 모두 쓰입니다. 사용자는 @Configuration 클래스에 @EnableAsync 한 줄을 붙일 뿐이지만, 파서의 collectImports가 메타 어노테이션까지 따라가서 @Import(AsyncConfigurationSelector.class)를 찾아내고(571–577행), 그 뒤는 사용자가 직접 @Import를 쓴 것과 같습니다.
두 선택기가 상속하는 AdviceModeImportSelector의 selectImports(AnnotationMetadata)를 보면 "가져온 쪽의 메타데이터"라는 인자의 쓸모가 보입니다(66–84행). 제네릭 인자(AdviceModeImportSelector<EnableAsync>)로 어떤 어노테이션을 볼지 알아내고(68행), 가져온 쪽 클래스에 붙은 그 어노테이션의 mode 속성을 읽어(71행, 78행) 자식 클래스의 selectImports(AdviceMode)에 넘깁니다(79행). 사용자가 @EnableAsync(mode = ASPECTJ)라고 적으면 다른 설정 클래스가 선택되는 것입니다. 같은 이유로 선택된 ProxyAsyncConfiguration의 부모 AbstractAsyncConfiguration은 ImportAware를 구현해, 5절의 길을 통해 @EnableAsync의 나머지 속성을 받습니다(47행, 57행). 트랜잭션 쪽의 AbstractTransactionManagementConfiguration도 같습니다(49행).
정리하면 @EnableXxx는 새로운 장치가 아닙니다. 메타 어노테이션으로 숨긴 @Import, 그리고 속성값을 읽어 어느 설정을 가져올지 고르는 선택기, 또는 설계도를 직접 등록하는 레지스트라의 조합입니다. 이 글의 세 갈래를 알면 어떤 @EnableXxx든 선언을 열어 @Import를 따라가면 됩니다. 캐시·비동기·재시도의 스위치를 실제로 그렇게 따라가 보는 글이 27편입니다.
이 글에서 뺀 것
큰 줄기를 위해 다음은 이름과 위치만 적어 둡니다. 7.0에 들어온 @Import의 네 번째 갈래 BeanRegistrar(ConfigurationClassParser 613–621행). XML 설정을 가져오는 @ImportResource(367–375행). 설정 클래스 안의 중첩 클래스를 처리할 때도 같은 ImportStack을 쓰는 processMemberClasses(410–438행). 미뤄 둔 선택기들을 묶어 한꺼번에 정렬·필터링하는 DeferredImportSelector.Group과 getImportGroup(DeferredImportSelector 47–123행), 그리고 선택기가 가져올 후보를 걸러 내는 getExclusionFilter(ImportSelector 81–83행). REGISTER_BEAN 단계의 조건이 붙은 설정 클래스에는 @ComponentScan을 쓸 수 없다는 검사(340–345행). 조건에 걸려 빠진 @Bean 메서드 이름을 기억해 두어 같은 이름의 오버로드를 함께 빼는 skippedBeanMethods(ConfigurationClassBeanDefinitionReader 196–202행). 그리고 AOT 빌드에서 ImportAware를 지원하는 ImportAwareAotContribution(ConfigurationClassPostProcessor 621행부터)이 있습니다.
정리
| 개념 | 한 줄 요약 |
|---|---|
@Conditional / Condition |
"이 설계도를 등록해도 되나"에 true/false로 답하는 객체. 빈이 아니라 new로 만들어진다 |
ConditionEvaluator.shouldSkip |
조건을 모아 하나라도 안 맞으면 "건너뛴다". @Conditional이 없으면 바로 false |
| 세 시점 | 등록할 때(추론) → 파싱할 때(PARSE_CONFIGURATION) → 설계도로 옮길 때(REGISTER_BEAN). 클래스 조건은 최대 세 번 불린다 |
ConfigurationCondition |
두 단계 중 어느 쪽에서 평가될지 고르는 조건. "다른 빈이 있나"를 보려면 REGISTER_BEAN |
TrackedConditionEvaluator |
가져온 쪽이 전부 빠졌으면 가져와진 설정도 뺀다. 결과를 기억한다 |
@Profile |
@Conditional(ProfileCondition.class)의 응용. Environment.matchesProfiles로 표현식을 묻는다 |
| 프로파일 규칙 | 활성 프로파일에 있으면 켜짐. 활성이 비어 있을 때만 기본 프로파일("default")을 본다 |
@Import 세 갈래 |
설정 클래스(바로 파싱), ImportSelector(이름을 돌려줌 → 다시 처리), ImportBeanDefinitionRegistrar(모아 뒀다가 설계도를 직접 등록) |
DeferredImportSelector |
모든 후보 설정이 파싱된 뒤 parse() 끝에서 실행. 조건이 걸린 설정을 가져올 때 쓴다 |
ImportAware / ImportRegistry |
파서가 "누가 누구를 가져왔나"를 기록하고, 빈을 만들 때 후처리기가 그것을 넣어 준다 |
ImportStack |
가져오는 중인 설정 클래스의 스택. 사슬을 거슬러 자기 자신이 나오면 BeanDefinitionParsingException |
@EnableXxx |
메타 어노테이션으로 숨긴 @Import. 속성값에 따라 설정을 고르는 선택기나 설계도를 등록하는 레지스트라 |
다음에 볼 것
여기까지가 분석 지도의 Phase 1(IoC 컨테이너)에서 주 경로에 든 단위의 마지막입니다. 설계도가 어떻게 생겼고(3편), 그것으로 객체가 어떻게 만들어지고(4편), 어노테이션이 어떻게 설계도가 되는지(8편)에 이어, 설계도를 고르고 가져오는 장치를 봤습니다.
주 경로는 여기서 AOP로 넘어갑니다. 7절의 @EnableAspectJAutoProxy와 @EnableTransactionManagement가 둘 다 등록하는 것이 자동 프록시 생성기였고, 4편에서 "초기화 후 훅에서 원본 대신 프록시를 돌려준다"고만 했던 그 후처리기입니다. 다음 글에서는 그 프록시가 실제로 어떻게 만들어지는지, 인터페이스를 쓰는 JDK 방식과 클래스를 상속하는 CGLIB 방식이 무엇이 다른지를 spring-aop에서 읽습니다.