이 글에서 다루는 것
"Spring 소스 파헤치기" 시리즈의 열 번째 글입니다. 9편까지는 컨테이너가 설계도를 읽고 빈을 만드는 쪽(Phase 1)을 봤습니다. 이번 글부터 두 편은 Phase 2, AOP입니다. 4편에서 "BeanPostProcessor의 초기화 후 훅에서 빈이 프록시로 바뀔 수 있다"고만 하고 넘어갔는데, 그 프록시가 실제로 어떻게 만들어지는지를 이 글에서 봅니다.
이 글은 컨테이너와 떼어 놓고 spring-aop 모듈의 aop.framework 패키지만 봅니다. 컨테이너가 빈을 알아서 감싸는 자동 프록시와 @Aspect는 11편에서 다룹니다.
답하려는 질문은 네 가지입니다.
ProxyFactory는 JDK 동적 프록시와 CGLIB 프록시 가운데 하나를 어떤 기준으로 고르는가- 두 방식은 각각 어떻게 프록시 객체를 만드는가
- 프록시의 메서드를 부르면 그 호출은 어디로 가는가
- 왜 자기 자신의 메서드를 안에서 부르면(self-invocation) 프록시가 적용되지 않는가
| 항목 | 내용 |
|---|---|
| 기준 소스 | Spring Framework 7.1.0-SNAPSHOT |
| 커밋 | f447f3c310 (2026-10-01, main 브랜치) |
| 주로 읽는 모듈 | spring-aop (그리고 spring-core의 org.springframework.cglib) |
| 주로 읽는 클래스 | ProxyFactory, AdvisedSupport, DefaultAopProxyFactory, JdkDynamicAopProxy, CglibAopProxy, ReflectiveMethodInvocation |
글에 나오는 줄 번호와 세부 동작은 모두 이 커밋 기준입니다. 다른 버전에서는 줄 번호가 다르고 세부 내용도 달라질 수 있습니다. 같은 커밋의 소스를 받는 방법은 1편에 있습니다.
원래 공부 노트는 줄 단위로 훨씬 깊이 들어가지만, 이 글은 Spring을 처음 보는 분이 따라올 수 있는 큰 줄기만 골랐습니다. 빼놓은 것은 글 끝의 "이 글에서 뺀 것"에 이름만 적어 두었습니다.
먼저 알아 둘 말
프록시(proxy)는 원래 객체를 감싸서 대신 나서는 객체입니다. 겉으로는 원래 객체와 같은 타입으로 보이지만, 메서드가 불리면 앞뒤로 다른 일을 하고 나서 원래 객체에게 넘깁니다. 감싸이는 원래 객체를 이 글에서는 대상(target)이라고 부릅니다. 4편의 "먼저 알아 둘 말"에도 있습니다.
AOP(관점 지향 프로그래밍)는 로그 남기기나 트랜잭션처럼 여러 클래스에 똑같이 끼어드는 코드를 한 곳에 모아 두고, 각 클래스를 고치지 않고 끼워 넣는 기법입니다. Spring의 AOP는 그 끼워 넣기를 프록시를 만들어 대상 대신 돌려주는 방식으로 합니다. 그래서 Spring AOP를 이해하려면 프록시를 먼저 알아야 합니다.
어드바이스(advice)는 "끼워 넣을 동작"입니다. 이 글에서 쓰는 어드바이스는 가장 기본 형태인 MethodInterceptor(인터셉터) 하나뿐입니다. 메서드가 invoke(MethodInvocation) 하나이고, 안에서 invocation.proceed()를 부르면 다음 순서(다른 인터셉터 또는 대상 메서드)로 넘어갑니다(MethodInterceptor 44–59행, Joinpoint 51행). 패키지가 org.aopalliance인 것은 여러 AOP 구현이 함께 쓰려고 만든 공통 인터페이스를 Spring이 그대로 담고 있기 때문입니다.
포인트컷(pointcut)은 "어느 클래스의 어느 메서드에 끼워 넣을지"를 정하는 조건이고, 어드바이저(advisor)는 어드바이스와 포인트컷을 한 쌍으로 묶은 것입니다. Pointcut은 클래스를 거르는 ClassFilter와 메서드를 거르는 MethodMatcher로 되어 있고, Pointcut.TRUE는 "모든 메서드"입니다(Pointcut 33–53행). PointcutAdvisor는 getAdvice()에 getPointcut()을 더한 인터페이스입니다(Advisor 55행, PointcutAdvisor 26–33행).
**TargetSource**는 "대상을 꺼내 오는 곳"입니다. 프록시는 대상 객체를 직접 들고 있지 않고 TargetSource에게 getTarget()으로 달라고 합니다(TargetSource 36–78행). 보통은 객체 하나를 그대로 돌려주는 SingletonTargetSource가 쓰이고, isStatic()이 true라서 "언제 불러도 같은 객체"임을 알려 줍니다(SingletonTargetSource 66–74행). 매번 새 객체를 주거나 풀에서 빌려 주는 구현도 있지만 이 글에서는 다루지 않습니다.
JDK 동적 프록시는 Java 표준 라이브러리의 java.lang.reflect.Proxy가 실행 중에 만들어 주는 클래스입니다. 주어진 인터페이스들을 구현하는 클래스를 만들고, 그 메서드가 불리면 전부 InvocationHandler.invoke() 하나로 보내 줍니다. 인터페이스가 있어야만 쓸 수 있습니다.
CGLIB는 실행 중에 바이트코드를 만들어 클래스의 서브클래스를 찍어 내는 라이브러리입니다. 인터페이스가 없는 클래스도 감쌀 수 있습니다. Spring은 CGLIB를 따로 의존하지 않고 spring-core 안에 org.springframework.cglib 패키지로 다시 담아 두었습니다. 그 패키지의 설명에는 CGLIB 3.3을 Spring용 패치를 더해 다시 패키징한 것이고 내부용이라고 적혀 있습니다(spring-core/.../cglib/package-info.java 1–11행). 이 글에서 CGLIB의 Enhancer라고 하면 spring-core/src/main/java/org/springframework/cglib/proxy/Enhancer.java를 가리킵니다.
1. ProxyFactory — 설정을 모아 두는 객체
프록시를 직접 만들 때 쓰는 입구가 ProxyFactory입니다. 컨테이너가 알아서 감쌀 때도 안에서는 결국 ProxyFactory를 만들어 씁니다(AbstractAutoProxyCreator 447행, 이쪽은 11편). 그래서 이 클래스 하나를 알면 두 길이 모두 읽힙니다.
ProxyFactory는 상속 사슬 네 단으로 되어 있고, 단마다 역할이 다릅니다.
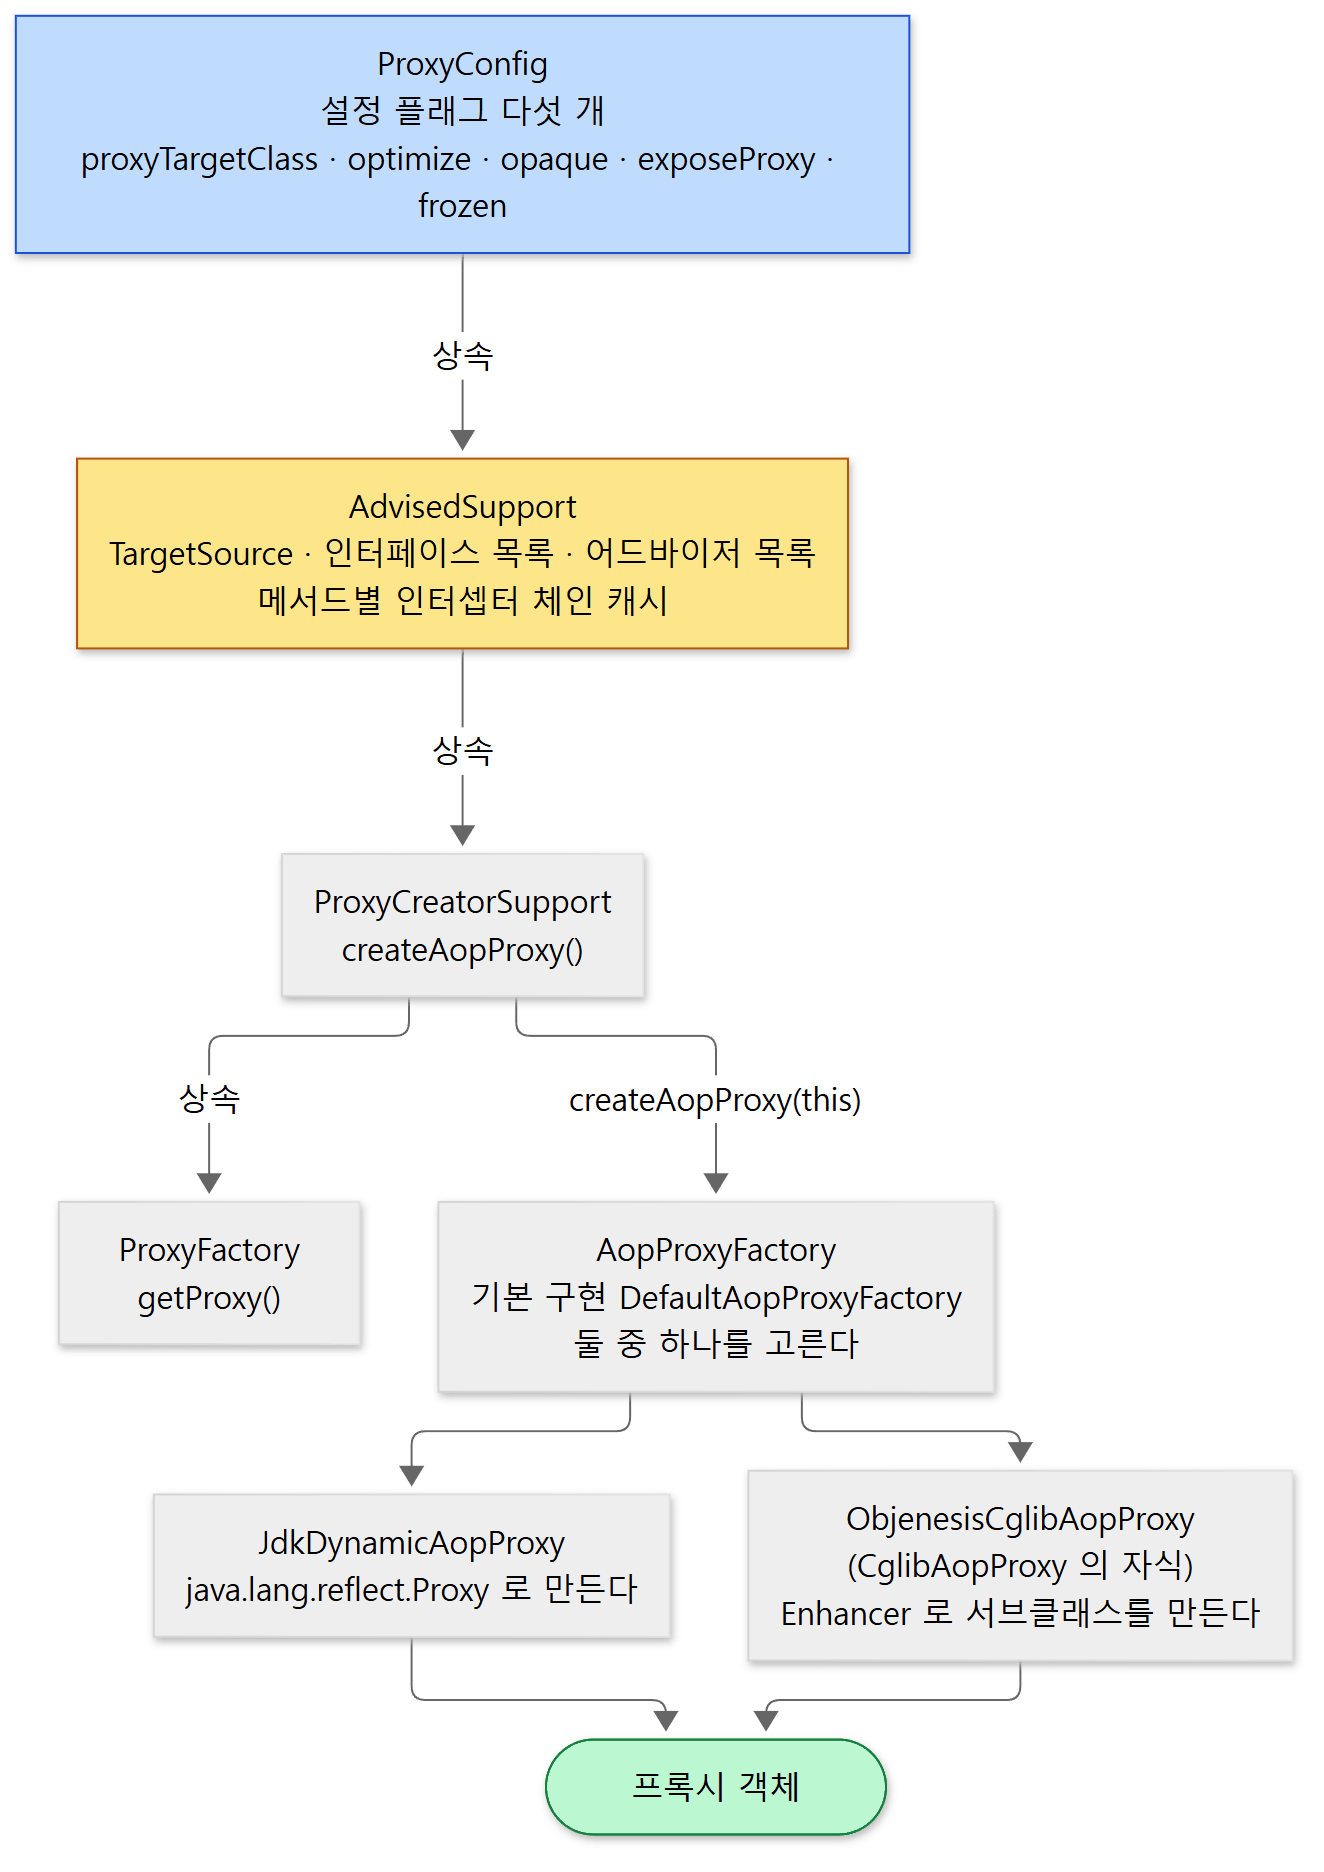 위 세 단은 "설정", 맨 아래 한 단은 "만들기"입니다. 파란 상자가 설정 플래그, 노란 상자가 이 글 4절의 캐시입니다.
| 클래스 | 맡은 것 | 위치 |
|---|---|---|
ProxyConfig |
플래그 다섯 개: proxyTargetClass, optimize, opaque, exposeProxy, frozen |
33–47행 |
AdvisedSupport |
TargetSource, 프록시할 인터페이스 목록, 어드바이저 목록, 메서드별 인터셉터 체인 캐시 |
68–129행 |
ProxyCreatorSupport |
createAopProxy() — 설정을 AopProxyFactory에게 넘겨 AopProxy를 받는다 |
33–106행 |
ProxyFactory |
getProxy() — 그 AopProxy에게 프록시 객체를 만들게 한다 |
36–98행 |
플래그 다섯 개는 전부 Boolean이고 따로 정하지 않으면 false로 읽힙니다(ProxyConfig 69–71행). 이 글에서 중요한 것은 셋입니다.
| 플래그 | 뜻 | 설명 주석 |
|---|---|---|
proxyTargetClass |
인터페이스가 아니라 대상 클래스 자체를 프록시한다(= CGLIB를 강제한다) | 50–61행 |
optimize |
"공격적인 최적화". 지금의 구현에서는 CGLIB를 강제하되 final 메서드 검사 등을 건너뛴다 | 73–81행 |
exposeProxy |
호출 중인 프록시를 ThreadLocal에 적어 두어 AopContext로 꺼낼 수 있게 한다. 6절의 주인공 |
111–119행 |
AdvisedSupport에 무언가를 넣는 메서드는 받은 것을 그대로 두지 않고 한 겹 감쌉니다.
setTarget(obj)는SingletonTargetSource로 감싸서targetSource에 넣습니다(153–155행).addAdvice(advice)는 어드바이스를DefaultPointcutAdvisor로 감싸서 어드바이저 목록에 넣습니다(426–449행). 이 어드바이저의 포인트컷은Pointcut.TRUE, 곧 모든 메서드입니다(DefaultPointcutAdvisor41행, 57–59행). 목록에는 언제나 어드바이저만 들어 있습니다.ProxyFactory(Object target)생성자는setTarget다음에 대상이 구현한 인터페이스를 전부 프록시할 인터페이스로 등록합니다(49–52행). 2절의 선택 규칙에서 이 점이 중요합니다.
그리고 getProxy()는 두 줄입니다.
	public Object getProxy() {
		return createAopProxy().getProxy();
	}
spring-aop/src/main/java/org/springframework/aop/framework/ProxyFactory.java 96–98행
	protected final synchronized AopProxy createAopProxy() {
		if (!this.active) {
			activate();
		}
		return getAopProxyFactory().createAopProxy(this);
	}
spring-aop/src/main/java/org/springframework/aop/framework/ProxyCreatorSupport.java 101–106행
createAopProxy(this)의 this가 바로 설정을 다 담은 AdvisedSupport입니다. 그것을 받아서 AopProxy를 돌려주는 AopProxyFactory는 메서드가 하나뿐인 인터페이스이고(44–55행), 기본 구현은 DefaultAopProxyFactory.INSTANCE입니다(ProxyCreatorSupport 46–48행). 돌아오는 AopProxy도 getProxy()와 getProxyClass()만 가진 작은 인터페이스입니다(32–64행). 구현은 둘, JdkDynamicAopProxy와 CglibAopProxy입니다.
헷갈리기 쉬운 곳
ProxyFactory는 프록시가 아니라 설정입니다.AdvisedSupport의 설명 주석도 "이것들은 그 자체로 AOP 프록시가 아니"라고 적고 있습니다(52–53행). 프록시는getProxy()를 부를 때마다 새로 만들어지고, 그 사이에 인터페이스나 어드바이스를 바꾸면 다음 프록시에 반영됩니다(ProxyFactory88–95행). 6절의 예제가 이 점을 씁니다.- 만들어진 프록시도
Advised입니다.AdvisedSupport가 구현하는Advised인터페이스(38행)를 프록시 객체도 구현하게 만들어 둡니다(3절). 그래서 프록시를Advised로 캐스팅하면 어드바이저 목록이나TargetSource를 들여다볼 수 있습니다. 막고 싶으면opaque플래그를 켭니다.
2. 둘 중 하나를 고르는 규칙 — DefaultAopProxyFactory
선택은 메서드 하나에 다 들어 있습니다. 소스 그대로입니다.
	@Override
	public AopProxy createAopProxy(AdvisedSupport config) throws AopConfigException {
		if (config.isOptimize() || config.isProxyTargetClass() || !config.hasUserSuppliedInterfaces()) {
			Class<?> targetClass = config.getTargetClass();
			if (targetClass == null && config.getProxiedInterfaces().length == 0) {
				throw new AopConfigException("TargetSource cannot determine target class: " +
						"Either an interface or a target is required for proxy creation.");
			}
			if (targetClass == null || targetClass.isInterface() ||
					Proxy.isProxyClass(targetClass) || ClassUtils.isLambdaClass(targetClass)) {
				return new JdkDynamicAopProxy(config);
			}
			return new ObjenesisCglibAopProxy(config);
		}
		else {
			return new JdkDynamicAopProxy(config);
		}
	}
spring-aop/src/main/java/org/springframework/aop/framework/DefaultAopProxyFactory.java 59–76행
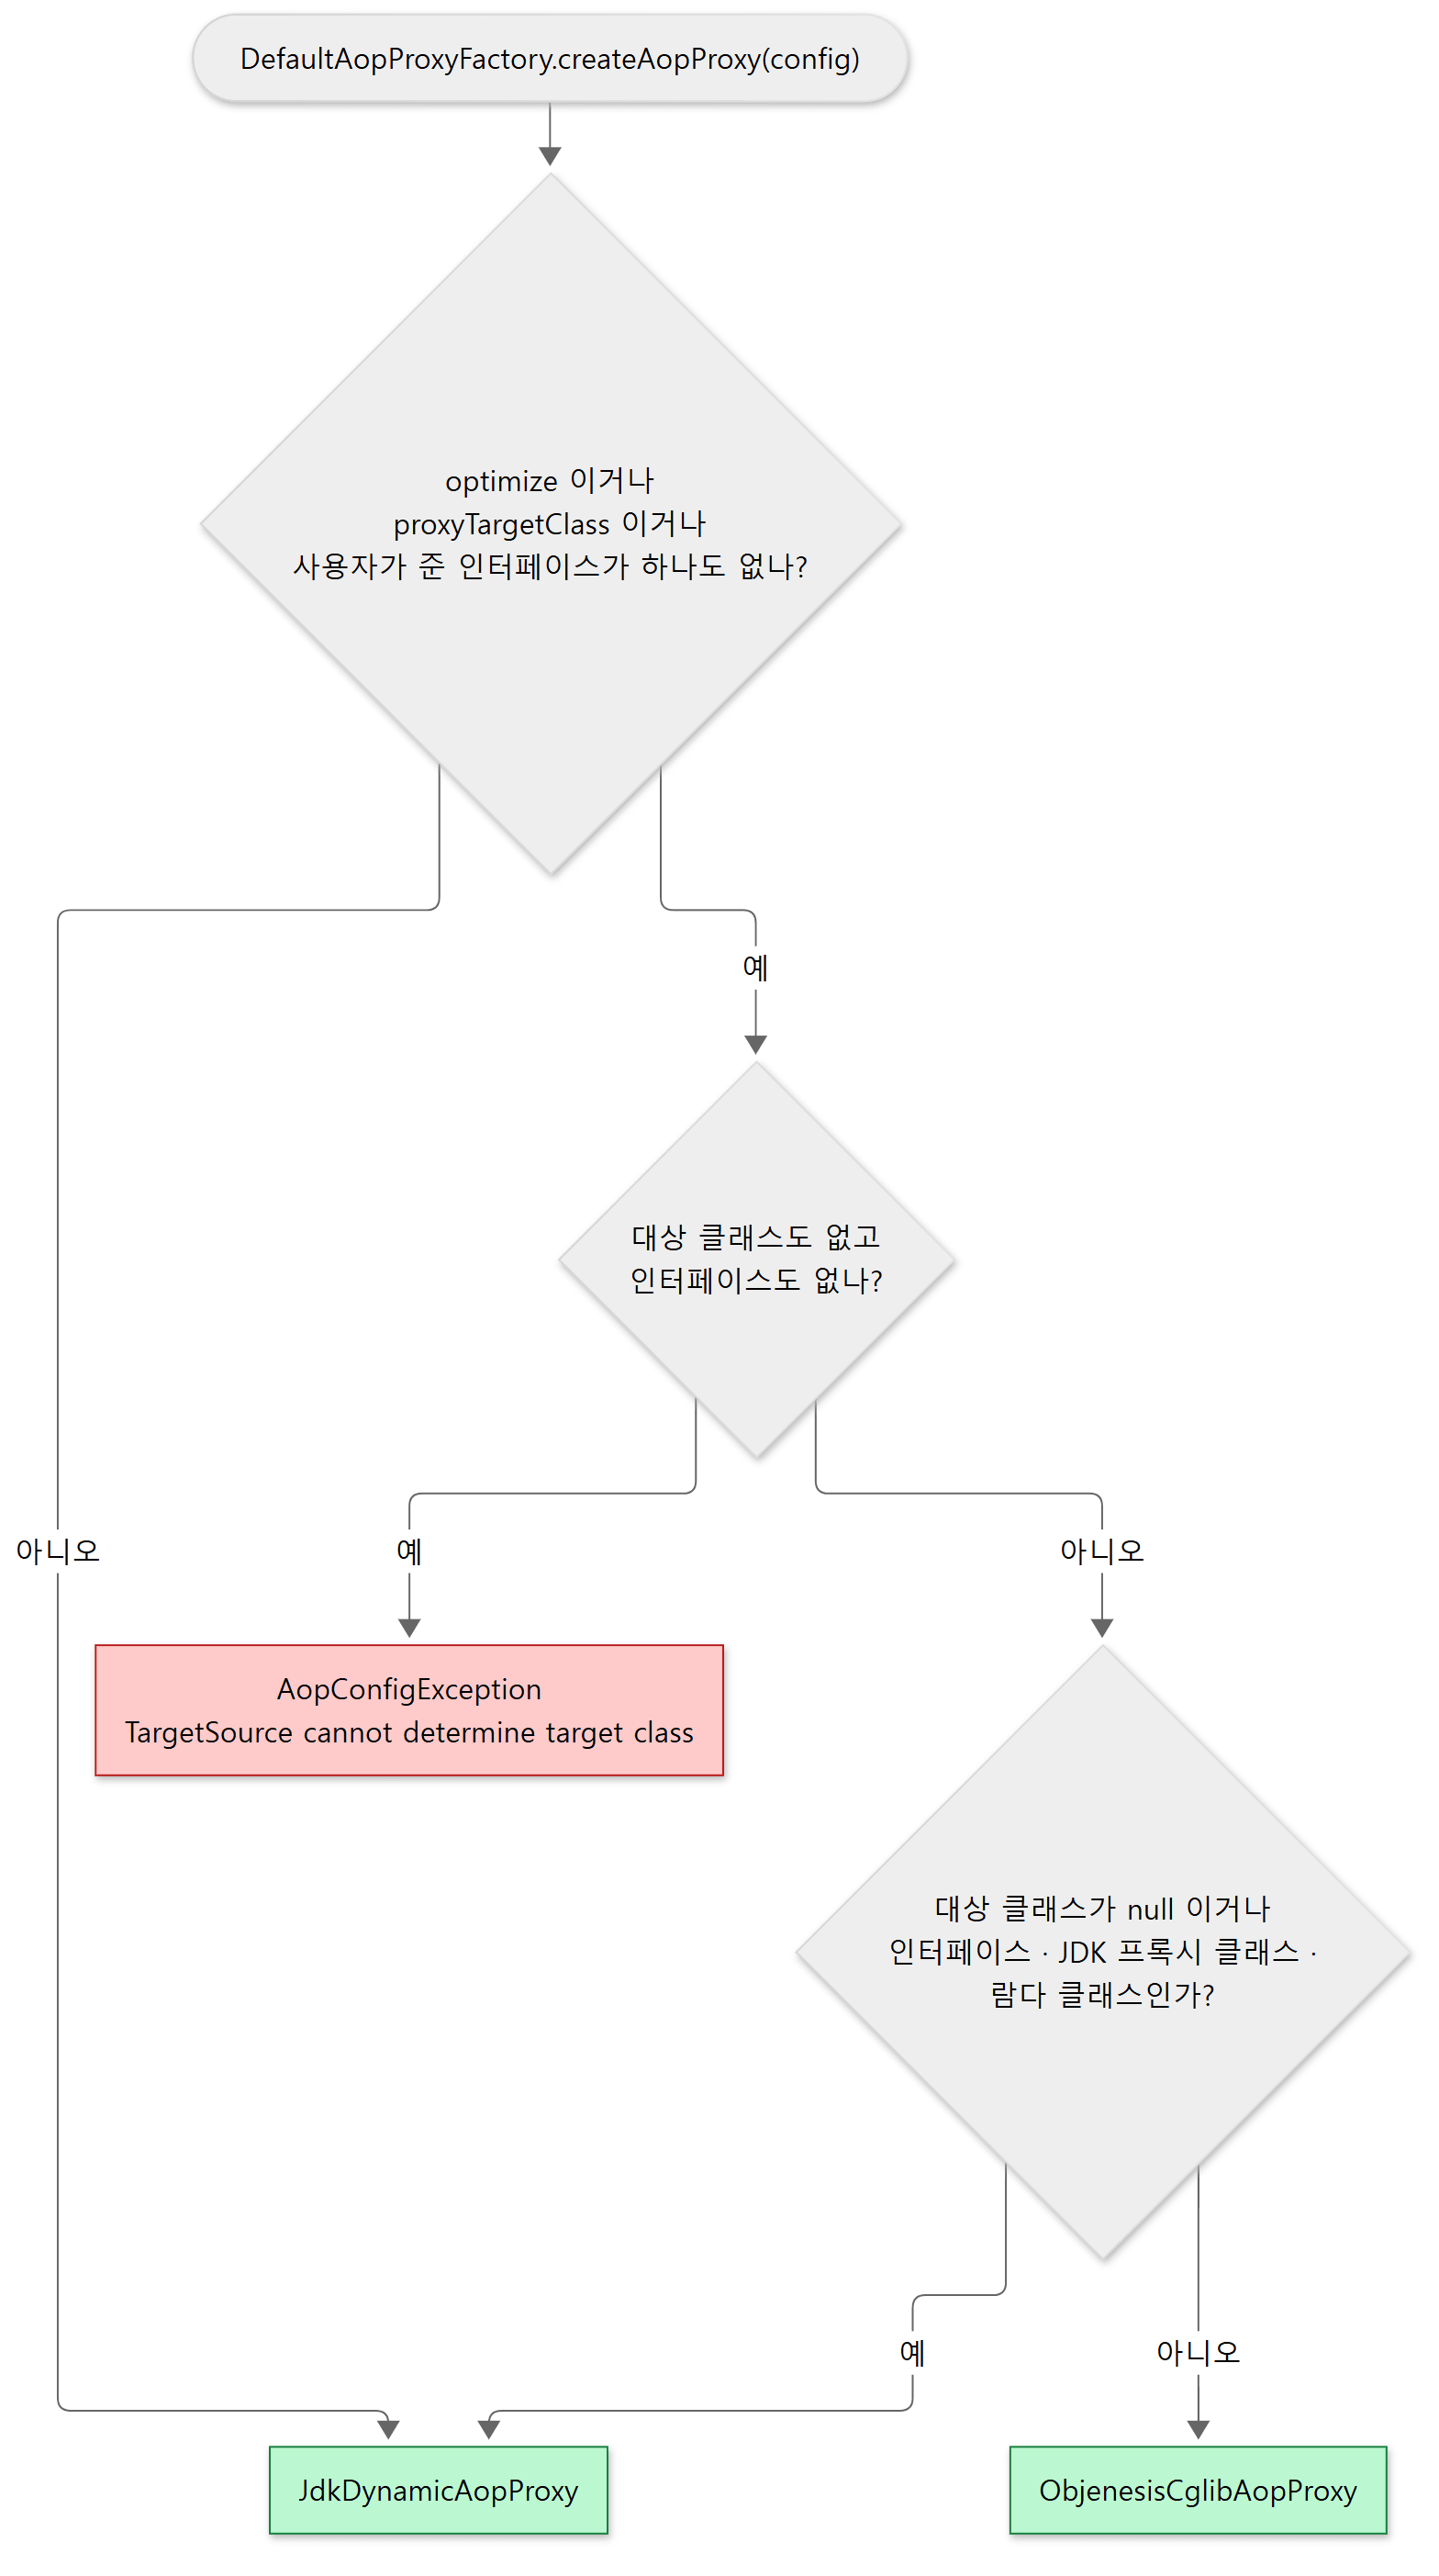 초록 상자가 결과입니다. CGLIB로 가는 길에도 JDK로 빠지는 예외가 셋 있습니다.
읽으면 이렇습니다.
- 기본은 JDK 동적 프록시입니다. 첫
if의 세 조건이 모두 거짓이면 바로JdkDynamicAopProxy입니다. 세 조건은optimize가 켜졌거나,proxyTargetClass가 켜졌거나, 사용자가 준 인터페이스가 하나도 없거나입니다. - 세 조건 가운데 하나라도 참이면 CGLIB 쪽으로 갑니다. 다만 대상 클래스가
null이거나, 그 자체가 인터페이스이거나, 이미 JDK 프록시 클래스이거나, 람다 클래스이면 CGLIB로 서브클래스를 만들 수 없으니 다시JdkDynamicAopProxy입니다. 람다 클래스 판정은ClassUtils.isLambdaClass가 합니다(946–949행). - 남은 경우, 곧 평범한 클래스이면
ObjenesisCglibAopProxy입니다. 이름의 Objenesis는 5절에서 설명합니다.
"사용자가 준 인터페이스"의 판정은 hasUserSuppliedInterfaces()입니다. 인터페이스 목록을 돌면서 SpringProxy 계열과 어드바이저가 끼워 넣은(introduction) 인터페이스는 빼고 하나라도 남으면 참입니다(AdvisedSupport 268–275행).
예제 ①②③: 같은 대상, 세 가지 결과
이 예제는 릴리스 버전인 Spring Framework 7.0.9로 실행해 아래 출력을 확인했습니다(이 시리즈가 읽는 7.1.0-SNAPSHOT을 직접 빌드해 돌린 것은 아닙니다). 인터셉터는 호출 앞뒤에 한 줄씩 찍는 것 하나입니다.
// 이 글을 위해 쓴 예제입니다 (Spring의 소스가 아닙니다)
    interface Greeter {
        String greet(String name);
    }

    static class GreeterImpl implements Greeter {
        public String greet(String name) { return "Hello, " + name; }
    }

    /** 호출 앞뒤에 한 줄씩 찍는 인터셉터. */
    static class LogInterceptor implements MethodInterceptor {
        public Object invoke(MethodInvocation invocation) throws Throwable {
            System.out.println("-> before " + invocation.getMethod().getName());
            Object result = invocation.proceed();          // 다음 인터셉터 또는 대상 메서드로
            System.out.println("<- after  " + invocation.getMethod().getName());
            return result;
        }
    }

    public static void main(String[] args) {
        ProxyFactory factory = new ProxyFactory(new GreeterImpl());   // 대상이 구현한 인터페이스를 모두 프록시한다
        factory.addAdvice(new LogInterceptor());
        Object proxy = factory.getProxy();

        System.out.println("class             = " + proxy.getClass().getName());
        System.out.println("isProxyClass      = " + Proxy.isProxyClass(proxy.getClass()));
        System.out.println("isJdkDynamicProxy = " + AopUtils.isJdkDynamicProxy(proxy));
        System.out.println("interfaces        = " + Arrays.toString(proxy.getClass().getInterfaces()));
        // ... instanceof 와 ((Advised) proxy).getAdvisors().length 도 찍는다

        Greeter greeter = (Greeter) proxy;                              // 인터페이스 타입으로는 받을 수 있다
        System.out.println(greeter.greet("Spring"));

        try {
            GreeterImpl impl = (GreeterImpl) proxy;                     // 구현 클래스로는 받을 수 없다
            System.out.println(impl.greet("never"));
        }
        catch (ClassCastException ex) {
            System.out.println("ClassCastException: " + ex.getMessage());
        }
    }
① 인터페이스를 구현한 대상을 그냥 넘기면 JDK 동적 프록시입니다.
class             = ex.u09.$Proxy0
isProxyClass      = true
isJdkDynamicProxy = true
interfaces        = [interface ex.u09.JdkProxyExample$Greeter, interface org.springframework.aop.SpringProxy, interface org.springframework.aop.framework.Advised, interface org.springframework.core.DecoratingProxy]
instanceof Greeter     = true
instanceof GreeterImpl = false
advisors          = 1
-> before greet
<- after  greet
Hello, Spring
ClassCastException: class ex.u09.$Proxy0 cannot be cast to class ex.u09.JdkProxyExample$GreeterImpl (ex.u09.$Proxy0 and ex.u09.JdkProxyExample$GreeterImpl are in unnamed module of loader 'app')
클래스 이름 $Proxy0은 JDK가 실행 중에 만든 클래스라는 뜻입니다. 프록시는 Greeter를 구현할 뿐 GreeterImpl을 상속하지 않으므로 구현 클래스로 캐스팅하면 ClassCastException입니다. 인터페이스 목록에 내가 준 적 없는 SpringProxy, Advised, DecoratingProxy가 보이는데, 이것은 3절에서 설명합니다.
② 같은 대상에 setProxyTargetClass(true)를 하면 CGLIB입니다. ③ 인터페이스가 하나도 없는 클래스(Counter)는 아무 설정 없이도 CGLIB입니다. 두 경우의 출력입니다.
[2] class        = ex.u09.CglibProxyExample$GreeterImpl$$SpringCGLIB$$0
[2] superclass   = ex.u09.CglibProxyExample$GreeterImpl
[2] isCglibProxy = true
[2] interfaces   = [interface ex.u09.CglibProxyExample$Greeter, interface org.springframework.aop.SpringProxy, interface org.springframework.aop.framework.Advised, interface org.springframework.cglib.proxy.Factory]
[2] instanceof GreeterImpl = true
-> greet
Hello, CGLIB
[3] proxyTargetClass = false
[3] class        = ex.u09.CglibProxyExample$Counter$$SpringCGLIB$$0
[3] isCglibProxy = true
-> next
-> next
[3] next() = 1, 2
이번에는 프록시 클래스가 GreeterImpl의 서브클래스라서 구현 클래스로 캐스팅할 수 있습니다. 클래스 이름의 $$SpringCGLIB$$는 Spring이 CGLIB에 끼워 넣은 이름 규칙 SpringNamingPolicy가 붙인 꼬리표입니다(SpringNamingPolicy 35행, 44–74행). ③에서 proxyTargetClass는 false인데도 CGLIB가 된 것이 위 규칙의 세 번째 조건, "사용자가 준 인터페이스가 없다"입니다.
프록시 종류를 판정하는 AopUtils의 세 메서드는 전부 "SpringProxy의 인스턴스이고"를 먼저 보고, JDK 쪽은 Proxy.isProxyClass, CGLIB 쪽은 클래스 이름에 $$가 들어 있는지를 봅니다(AopUtils 82–112행, ClassUtils.CGLIB_CLASS_SEPARATOR 92행).
헷갈리기 쉬운 곳: "인터페이스가 있으면 JDK"는 절반만 맞습니다
- 규칙이 보는 것은 대상 클래스가 인터페이스를 구현했는지가 아니라
AdvisedSupport의 인터페이스 목록에 무엇이 들어 있는지입니다.new ProxyFactory(target)생성자가 대상의 인터페이스를 자동으로 넣어 주기 때문에 둘이 같아 보일 뿐입니다. 빈 생성자로 만들고setTarget()만 하면 목록이 비어 있어 인터페이스가 있는 클래스도 CGLIB가 됩니다. proxyTargetClass가 켜져 있어도 대상 클래스가 인터페이스 자체이거나 람다이면 JDK 프록시입니다. 위 코드의 두 번째if가 그 예외입니다.- 어느 쪽이든 만들어지는 프록시는 대상이 구현한 인터페이스를 모두 구현합니다. ②의 출력에서 CGLIB 프록시도
Greeter를 구현하고 있습니다.
3. JDK 방식 — 인터페이스를 구현하는 가짜 객체
JdkDynamicAopProxy는 AopProxy이면서 동시에 InvocationHandler입니다(69행). 프록시를 만드는 쪽과 프록시가 받은 호출을 처리하는 쪽을 한 객체가 맡습니다.
만드는 쪽은 한 줄입니다.
	@Override
	public Object getProxy(@Nullable ClassLoader classLoader) {
		if (logger.isTraceEnabled()) {
			logger.trace("Creating JDK dynamic proxy: " + this.advised.getTargetSource());
		}
		return Proxy.newProxyInstance(determineClassLoader(classLoader), this.cache.proxiedInterfaces, this);
	}
spring-aop/src/main/java/org/springframework/aop/framework/JdkDynamicAopProxy.java 116–122행
Proxy.newProxyInstance(클래스로더, 인터페이스들, 핸들러)는 Java 표준입니다. 세 번째 인자가 this이므로, 프록시의 어떤 메서드가 불려도 이 객체의 invoke()로 옵니다.
두 번째 인자 proxiedInterfaces는 생성자에서 AopProxyUtils.completeProxiedInterfaces(config, true)로 미리 계산해 둡니다(94–108행, 324행). 이 메서드가 사용자가 준 인터페이스 뒤에 인터페이스 셋을 덧붙입니다(AopProxyUtils 190–222행). ①의 출력에 낯선 인터페이스 셋이 나온 이유입니다.
| 자동으로 더해지는 인터페이스 | 역할 |
|---|---|
SpringProxy |
메서드가 없는 표시용 인터페이스(27–29행). "이것은 Spring이 만든 프록시다"라는 도장. AopUtils.isAopProxy가 이것을 본다 |
Advised |
프록시의 설정(어드바이저, TargetSource 등)을 밖에서 들여다보고 바꿀 수 있게 한다. opaque이면 빠진다 |
DecoratingProxy |
프록시 뒤의 진짜 클래스를 묻는 getDecoratedClass() 하나(spring-core 37–47행). JDK 프록시에만 더한다 |
Advised는 opaque이면 빠집니다. DecoratingProxy가 JDK 쪽에만 더해지는 이유는 그 인터페이스의 설명 주석에 있습니다. CGLIB 프록시는 대상 클래스의 서브클래스라서 프록시 클래스만 봐도 대상 클래스를 알 수 있으니 필요 없다는 것입니다(23–27행). CglibAopProxy는 인자가 하나인 쪽, 곧 decoratingProxy = false로 부릅니다(AopProxyUtils 173–175행, CglibAopProxy 202행). ②의 출력에 DecoratingProxy가 없고 대신 CGLIB 자체가 붙이는 Factory가 있는 것이 그 때문입니다.
호출을 받는 쪽: invoke()
프록시의 메서드가 불리면 invoke(proxy, method, args)가 실행됩니다. 길지만 큰 줄기는 그림 한 장입니다.
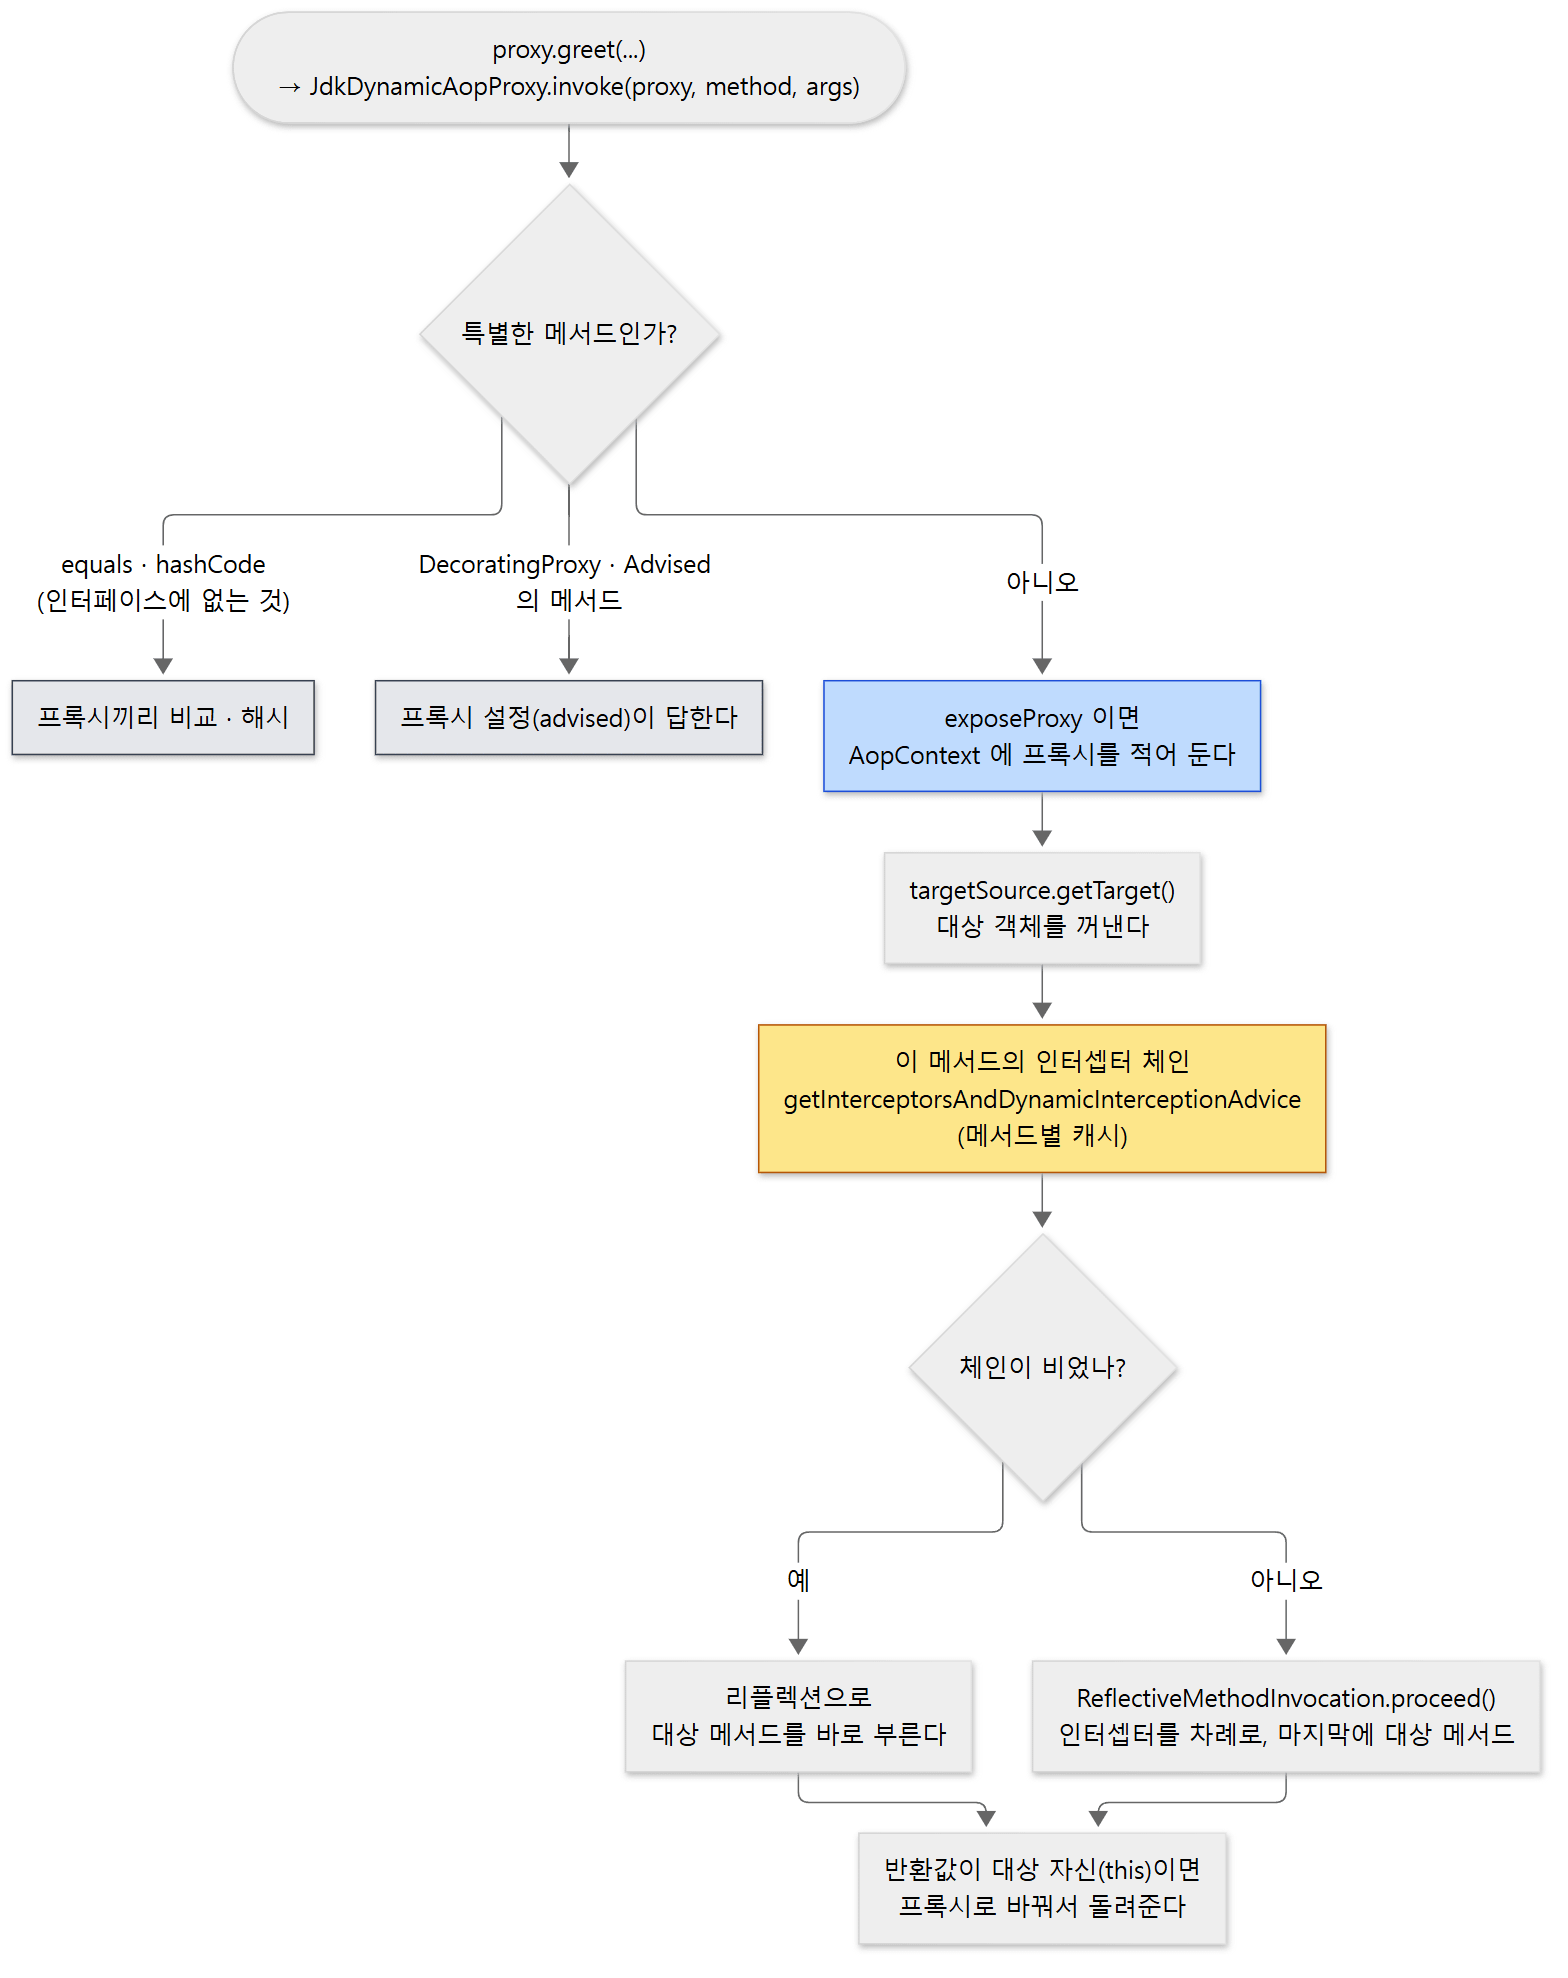 파란 상자는 exposeProxy 설정(6절), 노란 상자는 메서드별 체인 캐시(4절)입니다.
	@Override
	public @Nullable Object invoke(Object proxy, Method method, Object[] args) throws Throwable {
		// ...
		try {
			if (!this.cache.equalsDefined && AopUtils.isEqualsMethod(method)) {
				// The target does not implement the equals(Object) method itself.
				return equals(args[0]);
			}
			// ... hashCode, DecoratingProxy, Advised 의 메서드도 같은 식으로 먼저 처리
			else if (!this.advised.isOpaque() && method.getDeclaringClass().isInterface() &&
					method.getDeclaringClass().isAssignableFrom(Advised.class)) {
				// Service invocations on ProxyConfig with the proxy config...
				return AopUtils.invokeJoinpointUsingReflection(this.advised, method, args);
			}

			Object retVal;

			if (this.advised.isExposeProxy()) {
				// Make invocation available if necessary.
				oldProxy = AopContext.setCurrentProxy(proxy);
				setProxyContext = true;
			}

			// Get as late as possible to minimize the time we "own" the target,
			// in case it comes from a pool.
			target = targetSource.getTarget();
			Class<?> targetClass = (target != null ? target.getClass() : null);

			// Get the interception chain for this method.
			List<Object> chain = this.advised.getInterceptorsAndDynamicInterceptionAdvice(method, targetClass);

			// Check whether we have any advice. If we don't, we can fall back on direct
			// reflective invocation of the target, and avoid creating a MethodInvocation.
			if (chain.isEmpty()) {
				// ...
				retVal = AopUtils.invokeJoinpointUsingReflection(target, method, argsToUse);
			}
			else {
				// We need to create a method invocation...
				MethodInvocation invocation =
						new ReflectiveMethodInvocation(proxy, target, method, args, targetClass, chain);
				// Proceed to the joinpoint through the interceptor chain.
				retVal = invocation.proceed();
			}

			// Massage return value if necessary.
			Class<?> returnType = method.getReturnType();
			if (retVal != null && retVal == target &&
					returnType != Object.class && returnType.isInstance(proxy) &&
					!RawTargetAccess.class.isAssignableFrom(method.getDeclaringClass())) {
				// ...
				retVal = proxy;
			}
			// ...
			return retVal;
		}
		finally {
			if (target != null && !targetSource.isStatic()) {
				// Must have come from TargetSource.
				targetSource.releaseTarget(target);
			}
			if (setProxyContext) {
				// Restore old proxy.
				AopContext.setCurrentProxy(oldProxy);
			}
		}
	}
spring-aop/src/main/java/org/springframework/aop/framework/JdkDynamicAopProxy.java 162–251행
위에서부터 다섯 토막입니다.
- 특별한 메서드를 먼저 걸러 냅니다. 인터페이스에
equals/hashCode가 선언되어 있지 않으면 대상에게 보내지 않고 프록시끼리 비교합니다.DecoratingProxy와Advised의 메서드는 대상이 아니라 프록시 설정 객체(this.advised)가 답합니다. 그래서 ①에서((Advised) proxy).getAdvisors()가 동작했습니다. exposeProxy이면 프록시를AopContext에 적어 둡니다. 6절에서 돌아옵니다.- 대상을 꺼내고 이 메서드의 인터셉터 체인을 가져옵니다. 4절의 주제입니다.
- 체인이 비어 있으면
MethodInvocation을 만들지 않고 리플렉션으로 대상 메서드를 바로 부릅니다. 어드바이스가 없는 메서드에 비용을 들이지 않기 위해서입니다. 비어 있지 않으면ReflectiveMethodInvocation을 만들어proceed()를 부릅니다. - 반환값이 대상 자신(
this)이면 프록시로 바꿔 돌려줍니다. 대상이return this;를 했는데 그대로 내보내면 호출자가 프록시 대신 맨 대상을 쥐게 되어 그다음 호출부터 어드바이스가 빠지기 때문입니다.
finally에서 TargetSource가 isStatic()이 아닐 때만 releaseTarget을 부르는 것도 눈여겨볼 만합니다. 풀에서 빌려 온 대상은 돌려주고, SingletonTargetSource처럼 늘 같은 객체이면 아무것도 하지 않습니다.
헷갈리기 쉬운 곳
equals의 결과는 "같은 대상을 감쌌는가"가 아닙니다. 프록시끼리의 비교는 인터페이스·어드바이저·TargetSource가 같은지를 봅니다(254–286행). 프록시와 맨 대상을equals로 비교하면false입니다.return this의 보정에는 조건이 있습니다. 반환 타입이Object이면 보정하지 않고, 반환 타입이 프록시가 구현한 타입이어야 합니다(위 코드 224–226행). 대상이 자기 참조를 다른 객체 안에 담아 돌려주면 손쓸 수 없다는 주석도 그대로 있습니다.
4. 호출은 어디로 가나 — 인터셉터 체인
3절의 getInterceptorsAndDynamicInterceptionAdvice(method, targetClass)가 "이 메서드에 적용할 인터셉터 목록"을 돌려줍니다. 어드바이저 목록을 메서드마다 다시 거르면 느리므로 메서드별로 캐시합니다.
	public List<Object> getInterceptorsAndDynamicInterceptionAdvice(Method method, @Nullable Class<?> targetClass) {
		List<Object> cachedInterceptors;
		if (this.methodCache != null) {
			// Method-specific cache for method-specific pointcuts
			MethodCacheKey cacheKey = new MethodCacheKey(method);
			cachedInterceptors = this.methodCache.get(cacheKey);
			if (cachedInterceptors == null) {
				cachedInterceptors = this.advisorChainFactory.getInterceptorsAndDynamicInterceptionAdvice(
						this, method, targetClass);
				this.methodCache.put(cacheKey, cachedInterceptors);
			}
		}
		else {
			// Shared cache since there are no method-specific advisors (see below).
			cachedInterceptors = this.cachedInterceptors;
			// ...
		}
		return cachedInterceptors;
	}
spring-aop/src/main/java/org/springframework/aop/framework/AdvisedSupport.java 516–538행
캐시가 methodCache(메서드별)와 cachedInterceptors(공용) 둘인 이유는 adviceChanged()에 있습니다. 어드바이저 목록에 PointcutAdvisor가 하나라도 있을 때만 메서드별 맵을 만들고, 포인트컷이 없으면 모든 메서드의 체인이 같으니 하나를 공유합니다(543–556행). adviceChanged()는 어드바이저나 인터페이스가 바뀔 때마다 불려 캐시를 비웁니다(238행, 413행).
실제로 거르는 일은 DefaultAdvisorChainFactory가 합니다(57–112행). 어드바이저를 등록 순서대로 돌면서 PointcutAdvisor이면 포인트컷의 ClassFilter로 클래스를, MethodMatcher로 메서드를 맞춰 보고, 맞으면 그 어드바이스를 MethodInterceptor로 바꿔 목록에 넣습니다. 우리가 넣은 LogInterceptor는 이미 MethodInterceptor라서 그대로 들어갑니다(DefaultAdvisorAdapterRegistry 81–96행). "클래스 단위로 이 어드바이저가 적용될 여지가 있는가"를 미리 묻는 AopUtils.canApply(239–274행, 298–309행)는 감쌀지 말지를 정하는 자동 프록시 쪽에서 쓰이므로 11편에서 봅니다.
체인을 실제로 타고 가는 것은 ReflectiveMethodInvocation.proceed()입니다.
	@Override
	public @Nullable Object proceed() throws Throwable {
		// We start with an index of -1 and increment early.
		if (this.currentInterceptorIndex == this.interceptorsAndDynamicMethodMatchers.size() - 1) {
			return invokeJoinpoint();
		}

		Object interceptorOrInterceptionAdvice =
				this.interceptorsAndDynamicMethodMatchers.get(++this.currentInterceptorIndex);
		if (interceptorOrInterceptionAdvice instanceof InterceptorAndDynamicMethodMatcher dm) {
			// ...
		}
		else {
			// It's an interceptor, so we just invoke it: The pointcut will have
			// been evaluated statically before this object was constructed.
			return ((MethodInterceptor) interceptorOrInterceptionAdvice).invoke(this);
		}
	}
spring-aop/src/main/java/org/springframework/aop/framework/ReflectiveMethodInvocation.java 154–181행
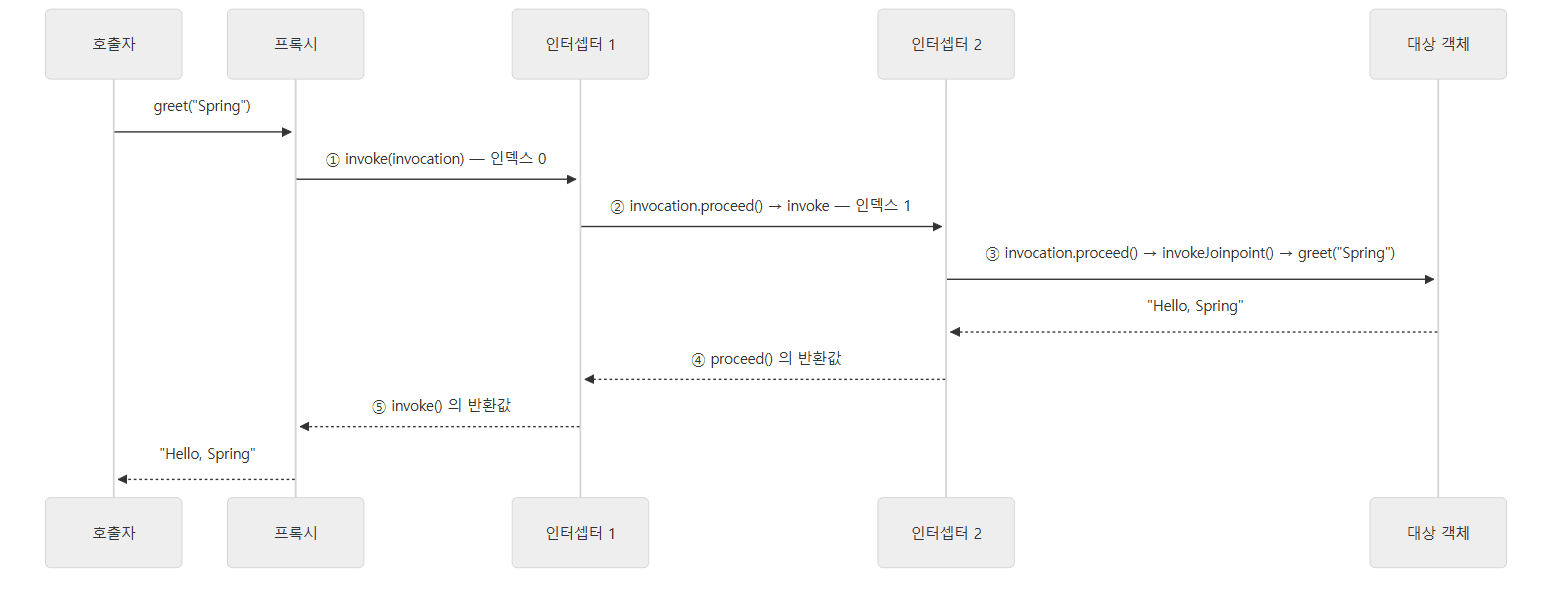 인터셉터는 자기 다음 순서를 모릅니다.
proceed()가 인덱스를 하나 올려 다음을 부를 뿐입니다.
인덱스가 -1에서 시작해 proceed()가 불릴 때마다 하나씩 오르고, 목록의 끝에 닿으면 invokeJoinpoint(), 곧 리플렉션으로 대상 메서드를 부릅니다(189–191행, AopUtils.invokeJoinpointUsingReflection 351–373행). 인터셉터가 invoke(invocation) 안에서 invocation.proceed()를 부르면 같은 invocation 객체의 인덱스가 오르면서 다음 인터셉터로 넘어갑니다. 인터셉터가 proceed()를 안 부르면 거기서 끝이고 대상 메서드는 실행되지 않습니다. ①의 출력에서 -> before greet가 찍힌 뒤 Hello, Spring이 계산되고 <- after greet가 찍히는 것이 이 순서입니다.
헷갈리기 쉬운 곳
- 인터셉터 목록의 순서가 곧 실행 순서입니다. 어드바이저를 등록한 순서대로 체인이 만들어지고, 그 순서대로
invoke()가 불립니다. 여러 어드바이저의 순서를 정하는 규칙(@Order등)은 11편에서 봅니다. proceed()는 한 번만 부르는 것이 원칙입니다. 같은invocation으로 두 번 부르면 인덱스가 이미 끝에 있어 대상 메서드를 또 부르게 됩니다. 다시 부르고 싶으면invocableClone()으로 복제해서 씁니다(203–210행).
5. CGLIB 방식 — 대상 클래스의 서브클래스
CglibAopProxy는 인터페이스 대신 클래스를 상속하는 프록시를 만듭니다. 만드는 코드의 가운데 부분입니다.
			// Configure CGLIB Enhancer...
			Enhancer enhancer = createEnhancer();
			// ...
			enhancer.setSuperclass(proxySuperClass);
			enhancer.setInterfaces(AopProxyUtils.completeProxiedInterfaces(this.advised));
			enhancer.setNamingPolicy(SpringNamingPolicy.INSTANCE);
			// ...

			Callback[] callbacks = getCallbacks(rootClass);
			// ...
			ProxyCallbackFilter filter = new ProxyCallbackFilter(
					this.advised.getConfigurationOnlyCopy(), this.fixedInterceptorMap, this.fixedInterceptorOffset);
			enhancer.setCallbackFilter(filter);
			// ...
spring-aop/src/main/java/org/springframework/aop/framework/CglibAopProxy.java 192–219행
Enhancer는 CGLIB의 클래스 생성기입니다. 부모 클래스(setSuperclass)와 구현할 인터페이스들(setInterfaces)을 주면 오버라이드할 수 있는 메서드를 전부 오버라이드한 서브클래스의 바이트코드를 만들어 냅니다. JDK 방식은 모든 호출이 invoke() 하나로 왔지만, CGLIB는 콜백 배열을 받고 메서드마다 "몇 번 콜백을 쓸지"를 CallbackFilter로 정합니다. 그 결정은 클래스를 만들 때 메서드마다 한 번 내려지고 클래스에 박힙니다.
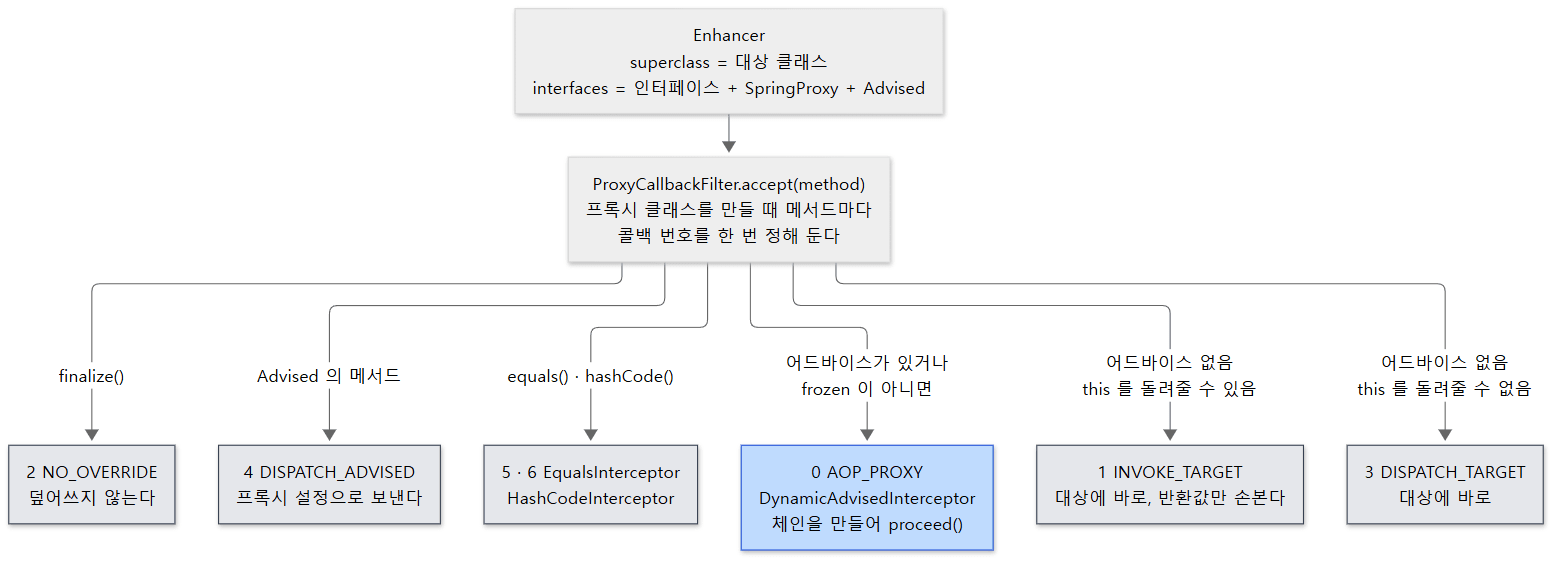 파란 상자가 어드바이스를 실행하는 길입니다. 나머지는 어드바이스 없이 대상이나 설정으로 바로 보내는 지름길입니다.
콜백 배열의 앞 일곱 칸은 고정입니다.
		Callback[] mainCallbacks = new Callback[] {
				aopInterceptor,  // for normal advice
				targetInterceptor,  // invoke target without considering advice, if optimized
				new SerializableNoOp(),  // no override for methods mapped to this
				targetDispatcher, this.advisedDispatcher,
				new EqualsInterceptor(this.advised),
				new HashCodeInterceptor(this.advised)
		};
spring-aop/src/main/java/org/springframework/aop/framework/CglibAopProxy.java 351–358행
칸 번호의 이름은 파일 맨 위에 상수로 있습니다(89–95행). 어느 메서드가 몇 번을 쓰는지는 ProxyCallbackFilter.accept(method)가 정합니다(826–909행). 어드바이스가 걸린 보통의 메서드는 0번 DynamicAdvisedInterceptor로 갑니다. 그 intercept()는 3절의 invoke()와 거의 같은 모양입니다. exposeProxy 처리, getTarget(), 체인 조회, 체인이 비었으면 직접 호출, 아니면 ReflectiveMethodInvocation을 만들어 proceed(), 반환값 보정까지 같습니다(710–751행, 반환값 보정은 444–463행). 다시 말해 프록시를 만드는 방법만 다르고, 호출을 체인으로 보내는 방법은 둘이 같습니다. 4절의 설명이 CGLIB에도 그대로 적용됩니다.
생성자를 부르지 않고 만든다 — Objenesis
2절의 규칙이 돌려준 것은 CglibAopProxy가 아니라 자식인 ObjenesisCglibAopProxy였습니다. 차이는 프록시 인스턴스를 만드는 방법 하나입니다. 부모는 enhancer.create()로 만들지만(248–254행), 자식은 클래스만 만들고 인스턴스는 objenesis.newInstance(proxyClass, ...)로 만든 뒤 콜백 배열을 끼웁니다.
		Class<?> proxyClass = enhancer.createClass();
		Object proxyInstance = null;

		if (objenesis.isWorthTrying()) {
			try {
				proxyInstance = objenesis.newInstance(proxyClass, enhancer.getUseCache());
			}
			// ...
		}

		if (proxyInstance == null) {
			// Regular instantiation via default constructor...
			// ...
		}

		((Factory) proxyInstance).setCallbacks(callbacks);
		return proxyInstance;
spring-aop/src/main/java/org/springframework/aop/framework/ObjenesisCglibAopProxy.java 62–92행
Objenesis는 생성자를 부르지 않고 객체를 만들어 주는 라이브러리이고, 역시 spring-core에 org.springframework.objenesis로 다시 담겨 있습니다(SpringObjenesis 35행). 클래스 설명 주석에 "생성자를 호출하지 않고 프록시 인스턴스를 만들며, 기본으로 쓰인다"고 적혀 있습니다(30–37행). 프록시는 대상 클래스의 서브클래스이므로 보통 방법으로 만들면 대상 클래스의 생성자가 또 한 번 실행됩니다. 대상 객체는 이미 생성자를 거쳐 만들어져 있는데 프록시 때문에 생성자가 두 번 도는 것을 피하는 것입니다. 기본 생성자가 없는 클래스도 감쌀 수 있게 되는 효과도 있습니다. 실패하면 기본 생성자로 되돌아갑니다.
예제 ④: final 메서드는 가로채지 못합니다
서브클래스 방식의 한계가 여기서 나옵니다. Java에서 final 메서드는 오버라이드할 수 없으므로 CGLIB도 그 메서드에는 콜백을 끼울 수 없습니다. CglibAopProxy는 클래스를 만들기 전에 이것을 검사해서 경고를 남깁니다.
					if (Modifier.isFinal(mod)) {
						// ...
						if (logger.isDebugEnabled()) {
							logger.debug("Final method [" + method + "] cannot get proxied via CGLIB: " +
									"Calls to this method will NOT be routed to the target instance and " +
									"might lead to NPEs against uninitialized fields in the proxy instance.");
						}
					}
spring-aop/src/main/java/org/springframework/aop/framework/CglibAopProxy.java 289–310행
"대상 인스턴스로 전달되지 않고, 프록시 인스턴스의 초기화되지 않은 필드 때문에 NPE가 날 수 있다"고 합니다. 직접 확인해 봅니다.
// 이 글을 위해 쓴 예제입니다 (Spring의 소스가 아닙니다)
    static class Account {
        private final String owner;

        Account(String owner) { this.owner = owner; }

        public String owner() { return owner; }              // 보통 메서드: 가로챈다
        public final String ownerFinal() { return owner; }   // final 메서드: 가로채지 못한다
    }

    public static void main(String[] args) {
        ProxyFactory factory = new ProxyFactory(new Account("kim"));   // 인터페이스가 없으니 CGLIB
        factory.addAdvice(new LogInterceptor());
        Account proxy = (Account) factory.getProxy();

        System.out.println("owner()      = " + proxy.owner());
        System.out.println("ownerFinal() = " + proxy.ownerFinal());
    }
-> owner
owner()      = kim
ownerFinal() = null
owner()는 인터셉터를 거쳐 대상에게 가서 kim을 돌려줍니다. ownerFinal()은 인터셉터 로그가 없을 뿐 아니라 값이 **null**입니다. 오버라이드되지 않은 메서드는 프록시 객체 자신에서 실행되는데, 프록시 객체는 Objenesis가 생성자를 부르지 않고 만들었으므로 그 객체의 owner 필드는 비어 있기 때문입니다. 경고 메시지가 말한 그 상황입니다. 이 검사는 optimize가 켜져 있거나 로그 레벨이 INFO보다 높으면 통째로 건너뜁니다(268–277행). 위 예제 프로젝트는 로그 레벨이 WARN이라 검사 자체가 돌지 않았고, 그래서 출력에 경고가 없습니다.
헷갈리기 쉬운 곳
final클래스는 아예 감쌀 수 없습니다. 서브클래스를 만들 수 없으니AopConfigException이 납니다. 예외 메시지에도 "final 클래스나 보이지 않는 클래스가 흔한 원인"이라고 적혀 있습니다(232–236행).private메서드도 가로채지 못합니다. 검사 코드가static과private를 처음부터 건너뛰는 것(288행)은 오버라이드 대상이 아니기 때문입니다.- JDK 프록시에는 이 문제가 없습니다. 인터페이스의 메서드는
final일 수 없습니다. 대신 인터페이스에 없는 메서드는 프록시에 아예 없습니다.
6. 자기 자신을 부르면 왜 안 걸리나 — self-invocation
지금까지 본 것을 합치면 자연스럽게 따라 나오는 결론이 있습니다. 어드바이스는 프록시의 메서드가 불릴 때만 실행됩니다. JDK 방식에서는 invoke()가, CGLIB 방식에서는 콜백이 프록시 객체에 붙어 있고, 대상 객체 자체는 평범한 객체 그대로입니다. 그러니 대상 객체 안에서 this.other()를 부르면 그 호출은 프록시를 거치지 않고 대상의 메서드로 곧장 갑니다.
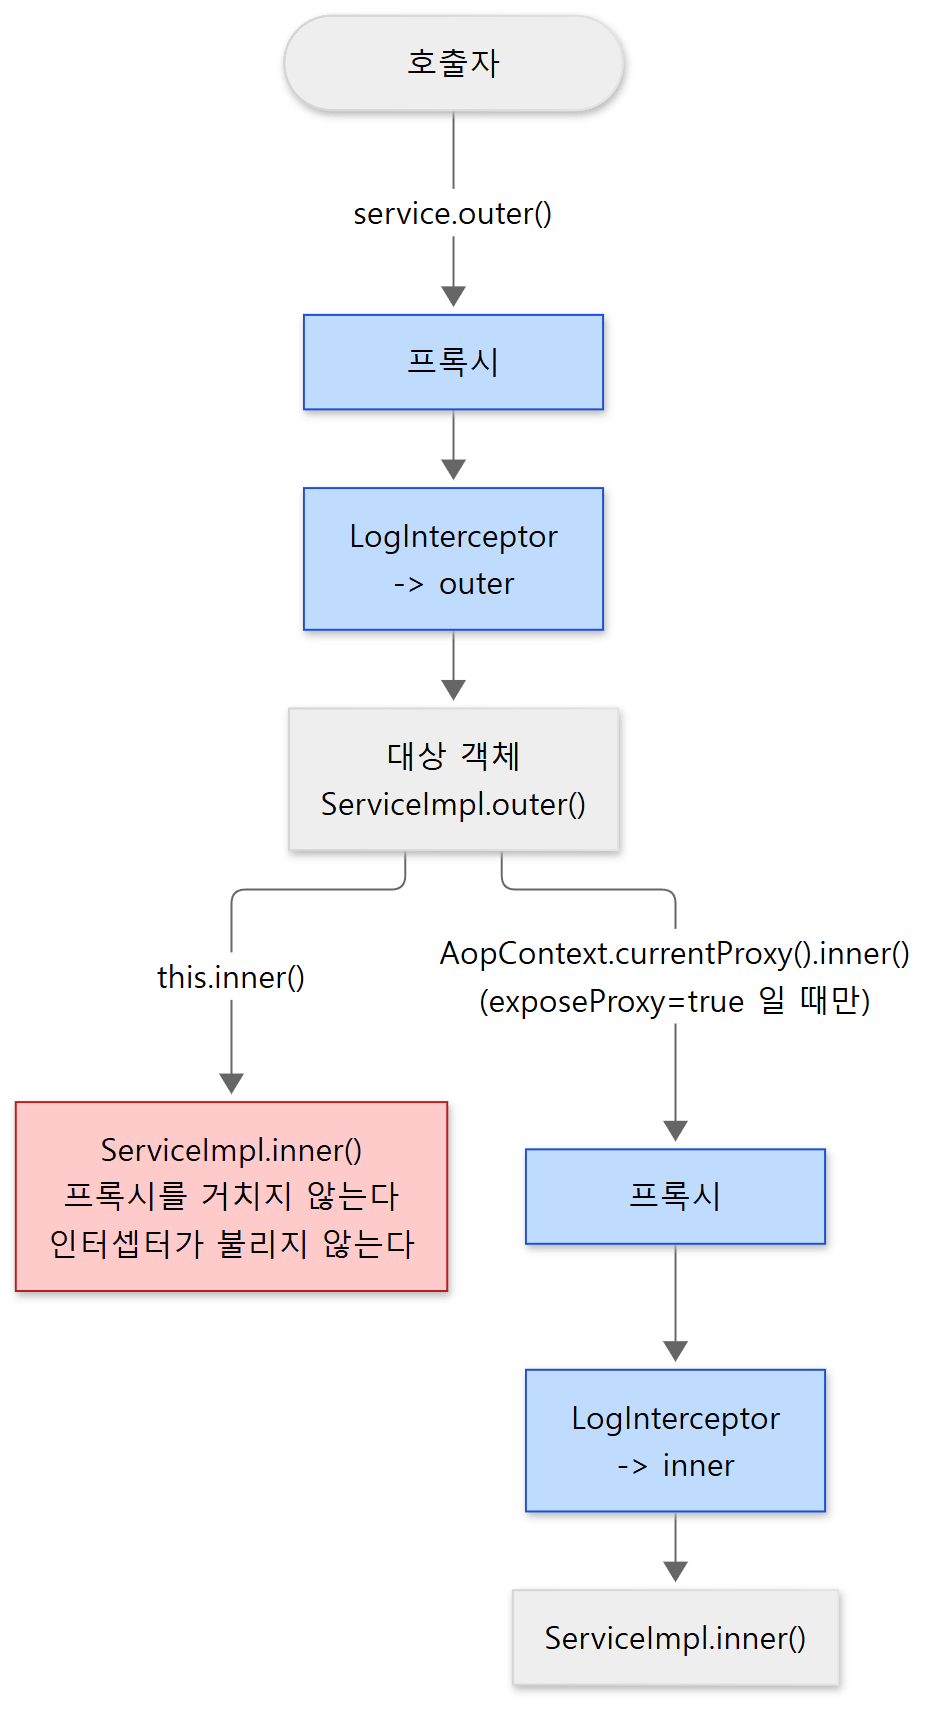 빨간 상자가 어드바이스가 빠지는 길, 파란 상자가 프록시를 거치는 길입니다.
Spring이 준 우회로가 exposeProxy와 AopContext입니다. 3절의 invoke()에서 exposeProxy이면 AopContext.setCurrentProxy(proxy)를 하고 finally에서 되돌리는 것을 봤습니다. AopContext는 ThreadLocal 하나를 가진 클래스이고, currentProxy()는 거기 적힌 프록시를 돌려주되 없으면 예외를 던집니다.
	public static Object currentProxy() throws IllegalStateException {
		Object proxy = currentProxy.get();
		if (proxy == null) {
			throw new IllegalStateException(
					"Cannot find current proxy: Set 'exposeProxy' property on Advised to 'true' to make it available, and " +
							"ensure that AopContext.currentProxy() is invoked in the same thread as the AOP invocation context.");
		}
		return proxy;
	}
spring-aop/src/main/java/org/springframework/aop/framework/AopContext.java 67–75행
Advised의 setExposeProxy 설명 주석도 같은 말을 합니다. "어드바이스된 객체가 자기 자신의 메서드를 어드바이스가 적용된 채로 부르려면 프록시를 노출해야 할 수 있다. 그렇지 않으면 this로 부른 메서드에는 어드바이스가 적용되지 않는다"(76–83행). 기본값이 false인 이유는 성능입니다.
예제 ⑤: this.inner()와 currentProxy().inner()
// 이 글을 위해 쓴 예제입니다 (Spring의 소스가 아닙니다)
    interface Service {
        void outer();
        void outerViaProxy();
        void inner();
    }

    static class ServiceImpl implements Service {
        public void outer() {
            System.out.println("   outer -> this.inner()");
            this.inner();                                       // 프록시를 거치지 않는다
        }
        public void outerViaProxy() {
            System.out.println("   outerViaProxy -> currentProxy().inner()");
            ((Service) AopContext.currentProxy()).inner();      // 프록시를 거친다
        }
        public void inner() {
            System.out.println("   inner");
        }
    }

    public static void main(String[] args) {
        System.out.println("[exposeProxy=false]");
        ProxyFactory factory = new ProxyFactory(new ServiceImpl());
        factory.addAdvice(new LogInterceptor());
        Service service = (Service) factory.getProxy();
        service.outer();
        try {
            service.outerViaProxy();
        }
        catch (IllegalStateException ex) {
            System.out.println("   IllegalStateException: " + ex.getMessage());
        }

        System.out.println("[exposeProxy=true]");
        factory.setExposeProxy(true);
        Service exposed = (Service) factory.getProxy();           // 같은 설정으로 프록시를 다시 만든다
        exposed.outer();
        exposed.outerViaProxy();
    }
[exposeProxy=false]
-> outer
   outer -> this.inner()
   inner
-> outerViaProxy
   outerViaProxy -> currentProxy().inner()
   IllegalStateException: Cannot find current proxy: Set 'exposeProxy' property on Advised to 'true' to make it available, and ensure that AopContext.currentProxy() is invoked in the same thread as the AOP invocation context.
[exposeProxy=true]
-> outer
   outer -> this.inner()
   inner
-> outerViaProxy
   outerViaProxy -> currentProxy().inner()
-> inner
   inner
outer()를 부르면 -> outer는 찍히지만 안에서 부른 inner()에는 -> inner가 없습니다. 설정을 바꾸지 않은 채 currentProxy()를 쓰면 위에서 본 그 예외가 납니다. setExposeProxy(true) 뒤에 프록시를 다시 만들면(1절의 "ProxyFactory는 설정이다") currentProxy().inner()에만 -> inner가 찍힙니다. this.inner()는 여전히 안 걸립니다.
헷갈리기 쉬운 곳
@Transactional이 "안 먹는" 가장 흔한 이유가 이것입니다. 같은 클래스의 메서드끼리 부르는 호출은 프록시를 거치지 않습니다. 컨테이너가 만든 프록시도 이 글의 프록시와 같은 것이므로 같은 규칙이 적용됩니다. 트랜잭션 쪽은 17편에서 다시 봅니다.AopContext는 같은 스레드에서만 됩니다.ThreadLocal이기 때문입니다. 예외 메시지가 그 점까지 적고 있습니다.AopContext.currentProxy()는 권장 방법이 아닙니다. 클래스 설명 주석에 "다른 합리적인 대안이 있다면 쓰지 말라. 애플리케이션 코드가 AOP 아래에서 쓰인다는 사실과 Spring AOP에 의존하게 된다"고 적혀 있습니다(34–37행). 보통은 안에서 부르는 메서드를 다른 빈으로 떼어 내서 프록시를 거치게 합니다.
이 글에서 뺀 것
이 글은 큰 줄기를 위해 많은 것을 뺐습니다. 이름과 위치만 적어 둡니다. 대상이 고정이고 설정이 frozen일 때 메서드마다 체인을 미리 박아 두는 최적화(FixedChainStaticTargetInterceptor, CglibAopProxy 363–391행). 실행 시점에 인자를 보고 다시 맞춰 보는 동적 포인트컷(InterceptorAndDynamicMethodMatcher, ReflectiveMethodInvocation 163–175행). 대상에 없는 인터페이스를 프록시에 덧붙이는 인트로덕션(IntroductionAdvisor, AdvisedSupport 395–401행). MethodInterceptor가 아닌 어드바이스(MethodBeforeAdvice 등)를 인터셉터로 바꿔 주는 어댑터(aop.framework.adapter 패키지). 프록시를 XML 설정의 빈으로 만드는 ProxyFactoryBean. 프록시의 직렬화와 equals의 자세한 규칙. CGLIB 프록시 클래스를 AOT로 미리 만들어 두는 경로(enhancer.setAttemptLoad, CglibAopProxy 204행). 그리고 Kotlin 코루틴의 suspend 함수를 위한 반환값 변환(CoroutinesUtils)이 있습니다.
정리
| 개념 | 한 줄 요약 |
|---|---|
ProxyFactory |
프록시가 아니라 설정. ProxyConfig(플래그) → AdvisedSupport(대상·인터페이스·어드바이저) → ProxyCreatorSupport(만들기) 순으로 상속 |
getProxy() |
createAopProxy()로 AopProxy를 받아 getProxy(). AopProxyFactory가 JDK와 CGLIB 가운데 고른다 |
| 선택 규칙 | 기본은 JDK. optimize·proxyTargetClass·"사용자 인터페이스 없음" 가운데 하나면 CGLIB. 단 대상이 인터페이스·JDK 프록시·람다면 다시 JDK |
| JDK 동적 프록시 | Proxy.newProxyInstance로 인터페이스를 구현하는 클래스를 만든다. 모든 호출이 invoke() 하나로 온다. 구현 클래스로 캐스팅 불가 |
| CGLIB 프록시 | Enhancer로 대상 클래스의 서브클래스를 만든다. 메서드마다 콜백 번호가 정해진다. 이름에 $$SpringCGLIB$$ |
| 자동으로 더해지는 인터페이스 | SpringProxy(도장), Advised(설정 열람), DecoratingProxy(JDK만) |
| 인터셉터 체인 | 메서드마다 어드바이저를 걸러 만든 MethodInterceptor 목록. AdvisedSupport가 메서드별로 캐시 |
ReflectiveMethodInvocation.proceed() |
인덱스를 하나 올려 다음 인터셉터를 부르고, 끝에 닿으면 리플렉션으로 대상 메서드 |
| Objenesis | 생성자를 부르지 않고 CGLIB 프록시 인스턴스를 만든다. 그래서 프록시 객체의 필드는 비어 있다 |
final 메서드 |
오버라이드할 수 없어 가로채지 못하고 프록시 객체 자신에서 실행된다. 필드가 비어 있어 null이나 NPE |
| self-invocation | 어드바이스는 프록시의 메서드에만 붙어 있다. this.other()는 프록시를 거치지 않는다 |
exposeProxy + AopContext |
호출 중인 프록시를 ThreadLocal에 적어 두고 currentProxy()로 꺼내는 우회로. 권장 방법은 아니다 |
다음에 볼 것
이 글에서는 ProxyFactory에 대상과 인터셉터를 직접 넣었습니다. 실제 Spring 애플리케이션에서는 그 일을 컨테이너가 합니다. 어떤 빈을 감쌀지 결정하고, @Aspect가 붙은 클래스에서 어드바이저를 뽑아내고, 여러 어드바이스의 순서를 정해 체인을 만드는 쪽입니다. 그 입구가 4편에서 이름만 나왔던 AbstractAutoProxyCreator이고, 이 글의 ProxyFactory를 그 안에서 만들어 씁니다.
- 다음 글: 11편: @Aspect는 어떻게 발견되고 어드바이스 체인은 어떻게 돌아가나
- 프록시가 빈이 되는 자리(초기화 후 훅)와 조기 참조: 4편: Bean은 어떻게 만들어지나 — 생성 흐름과 3단계 캐시
- AOP와 프록시라는 말이 처음이면: 1편: AI와 함께 소스를 읽는 방법과 분석 지도
- 앞 글: 9편: @Conditional, @Profile, @Import — 조건에 따라 빈을 고르는 법