이 글에서 다루는 것
"Spring 소스 파헤치기" 시리즈의 열두 번째 글입니다. 11편까지로 컨테이너(Phase 1)와 AOP(Phase 2)의 주 경로를 다 걸었습니다. 이번 글은 1편의 지도에서 주 경로 바깥에 남겨 두었던 Phase 1의 마지막 단위 U08입니다. 7편에서 ApplicationContext가 BeanFactory 계열 인터페이스에 몇 가지를 더 물려받는다고 했는데, 그 "몇 가지" 가운데 세 개를 이번에 봅니다.
답하려는 질문은 세 가지입니다.
publishEvent()를 부르면 누가 어떤 순서로 리스너를 찾아 부르고,@EventListener메서드는 언제 리스너가 되는가Environment는 설정값을 어디서 어떤 순서로 찾고, 프로파일은 어떻게 켜지는가"classpath:…"같은 문자열 하나가 어떻게 파일·클래스패스·URL을 가리지 않는Resource객체가 되는가
| 항목 | 내용 |
|---|---|
| 기준 소스 | Spring Framework 7.1.0-SNAPSHOT |
| 커밋 | f447f3c310 (2026-10-01, main 브랜치) |
| 주로 읽는 모듈 | spring-context(context, context.event), spring-core(core.env, core.io, core.io.support) |
| 주로 읽는 클래스 | AbstractApplicationContext, SimpleApplicationEventMulticaster, EventListenerMethodProcessor, AbstractEnvironment, PropertySourcesPropertyResolver, DefaultResourceLoader |
글에 나오는 줄 번호와 세부 동작은 모두 이 커밋 기준입니다. 다른 버전에서는 줄 번호가 다르고 세부 내용도 달라질 수 있습니다. 같은 커밋의 소스를 받는 방법은 1편에 있습니다.
세 주제를 한 글에 담았으므로 이 글은 큰 줄기만 봅니다. 주제마다 처음 보는 분이 "어디에 무엇이 있고 왜 그렇게 되어 있는지"를 잡을 수 있는 정도까지만 가고, 뺀 것은 글 끝의 "이 글에서 뺀 것"에 이름만 적어 두었습니다.
먼저 알아 둘 말
이벤트(event)는 "이런 일이 일어났다"를 담은 객체입니다. 보내는 쪽은 누가 받는지 모르고, 받는 쪽은 누가 보냈는지 모릅니다. 받는 쪽을 리스너(listener)라고 부릅니다. Spring에서는 이벤트를 보내는 메서드가 publishEvent(), 받는 인터페이스가 ApplicationListener, 받는 메서드에 붙이는 어노테이션이 @EventListener입니다.
멀티캐스터(multicaster)는 이벤트 하나를 리스너 여럿에게 나눠 주는 객체입니다. 컨텍스트는 이벤트를 직접 돌리지 않고 이 객체에게 맡깁니다. 소스에서는 ApplicationEventMulticaster 인터페이스와 SimpleApplicationEventMulticaster 클래스입니다.
Environment는 "지금 프로그램이 어떤 환경에서 돌고 있나"를 담은 객체입니다. 두 가지를 들고 있습니다. 하나는 프로퍼티(property), 곧 app.name=… 같은 이름-값 쌍이고, 다른 하나는 프로파일(profile), 곧 dev·prod처럼 환경에 이름을 붙여 둔 것입니다. 9편에서 @Profile이 Environment.matchesProfiles()에 묻는다고 했던 그 객체입니다.
PropertySource는 프로퍼티를 담은 "출처" 하나입니다. 시스템 프로퍼티도 하나, 환경 변수도 하나, 설정 파일 하나도 하나입니다. Environment는 이 출처들을 순서가 있는 목록으로 들고 있고, 그 순서가 곧 우선순위입니다.
Resource는 "읽을 수 있는 무언가"를 가리키는 손잡이입니다. 파일일 수도, JAR 안의 클래스패스 항목일 수도, URL일 수도 있지만 쓰는 쪽에서는 getInputStream() 하나로 읽습니다. 문자열("classpath:a.properties")을 받아 Resource로 바꿔 주는 것이 ResourceLoader입니다.
refresh() 12단계는 컨테이너가 켜질 때 밟는 순서입니다. 이 글은 그 가운데 ①prepareRefresh, ③prepareBeanFactory, ⑧initApplicationEventMulticaster, ⑩registerListeners, ⑪finishBeanFactoryInitialization, ⑫finishRefresh를 다시 찾아갑니다. 전체 순서는 7편에 있습니다.
1. ApplicationContext가 BeanFactory 위에 더하는 것
ApplicationContext 인터페이스의 선언은 한 줄이 두 줄에 걸쳐 있습니다.
public interface ApplicationContext extends EnvironmentCapable, ListableBeanFactory, HierarchicalBeanFactory,
		MessageSource, ApplicationEventPublisher, ResourcePatternResolver {
spring-context/src/main/java/org/springframework/context/ApplicationContext.java 59–60행
여섯 인터페이스 가운데 ListableBeanFactory와 HierarchicalBeanFactory는 3편에서 본 BeanFactory 계열입니다. 나머지 넷이 "더하는 것"이고, 이 글은 그 가운데 셋을 봅니다.
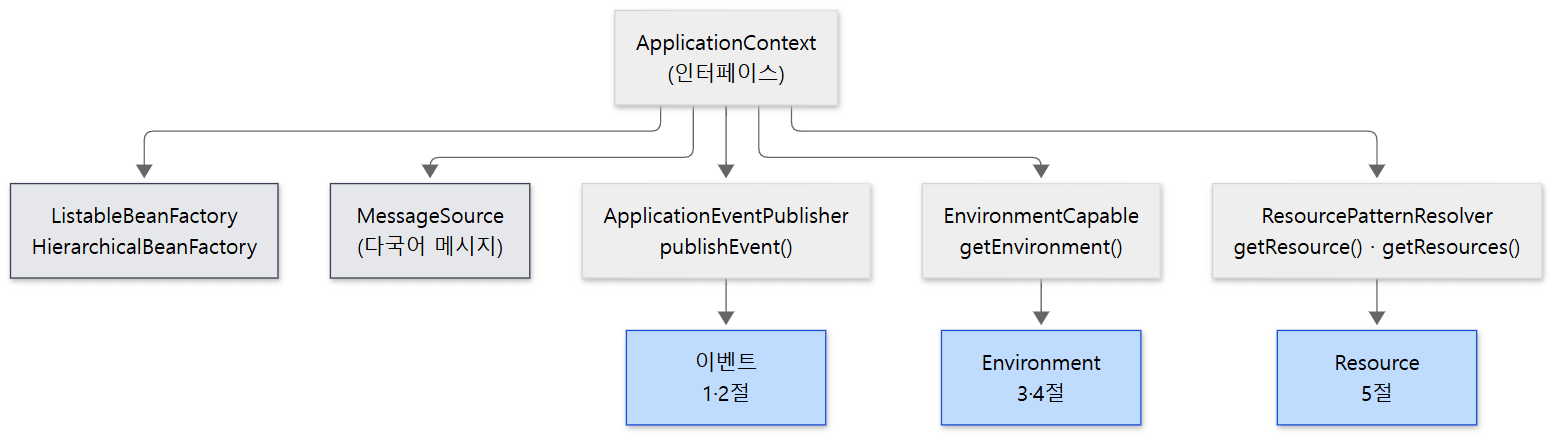 회색은 다른 글에서 다루거나 이 글에서 다루지 않는 것, 파란색이 이 글의 세 주제입니다.
| 인터페이스 | 더해 주는 메서드 | 이 글의 절 |
|---|---|---|
ApplicationEventPublisher |
publishEvent(Object) |
2, 3 |
EnvironmentCapable |
getEnvironment() |
4 |
ResourcePatternResolver (→ ResourceLoader) |
getResource(String), getResources(String) |
5 |
MessageSource |
getMessage(…) — 다국어 메시지 |
다루지 않음 |
구현 쪽은 AbstractApplicationContext입니다. 이 클래스의 선언을 보면 DefaultResourceLoader를 상속합니다(145–146행). 즉 컨텍스트는 "리소스 로더이기도 한" 객체입니다. 이벤트는 멀티캐스터에게, 패턴 검색은 ResourcePatternResolver에게 맡기고, Environment는 필드로 들고 있습니다(224행, 233행, 338–352행).
이 셋을 빈에서 쓰고 싶을 때 @Autowired로 받을 수 있는 이유도 한 곳에 있습니다. refresh() ③단계 prepareBeanFactory()가 컨텍스트 자신을 ResourceLoader·ApplicationEventPublisher·ApplicationContext 타입의 주입 후보로 등록합니다(748–751행). Environment는 "environment"라는 이름의 싱글톤으로 등록됩니다(764–766행).
2. 이벤트: publishEvent 한 번의 여정
이벤트와 발행자 — 인터페이스는 아주 작습니다
ApplicationEvent는 Java 표준 EventObject를 상속한 추상 클래스이고, 생성자에서 "누가 일으켰나"(source)와 시각을 받아 둘 뿐입니다(31행, 47–50행). 보내는 쪽 인터페이스 ApplicationEventPublisher는 메서드가 사실상 하나, publishEvent(Object)입니다(88행). ApplicationEvent를 받는 쪽은 그 메서드로 넘기는 default 메서드입니다(64–66행). 받는 쪽 ApplicationListener도 메서드가 하나, onApplicationEvent(E)입니다(43–49행). 제네릭 E로 "어떤 이벤트에 관심 있는지"를 적습니다.
publishEvent — 감싸고, 쌓아 두거나 보내고, 부모에게도
컨텍스트의 publishEvent()는 두 공개 메서드가 모두 protected 메서드 하나로 모입니다(381–396행). 그 본문입니다. 타입 힌트를 다루는 부분은 // ...로 줄였습니다.
	protected void publishEvent(Object event, @Nullable ResolvableType typeHint) {
		Assert.notNull(event, "Event must not be null");
		ResolvableType eventType = null;

		// Decorate event as an ApplicationEvent if necessary
		ApplicationEvent applicationEvent;
		if (event instanceof ApplicationEvent applEvent) {
			applicationEvent = applEvent;
			eventType = typeHint;
		}
		else {
			// ...
			applicationEvent = new PayloadApplicationEvent<>(this, event, payloadType);
		}
		// ...

		// Multicast right now if possible - or lazily once the multicaster is initialized
		if (this.earlyApplicationEvents != null) {
			this.earlyApplicationEvents.add(applicationEvent);
		}
		else if (this.applicationEventMulticaster != null) {
			this.applicationEventMulticaster.multicastEvent(applicationEvent, eventType);
		}

		// Publish event via parent context as well...
		if (this.parent != null) {
			if (this.parent instanceof AbstractApplicationContext abstractApplicationContext) {
				abstractApplicationContext.publishEvent(event, typeHint);
			}
			else {
				this.parent.publishEvent(event);
			}
		}
	}
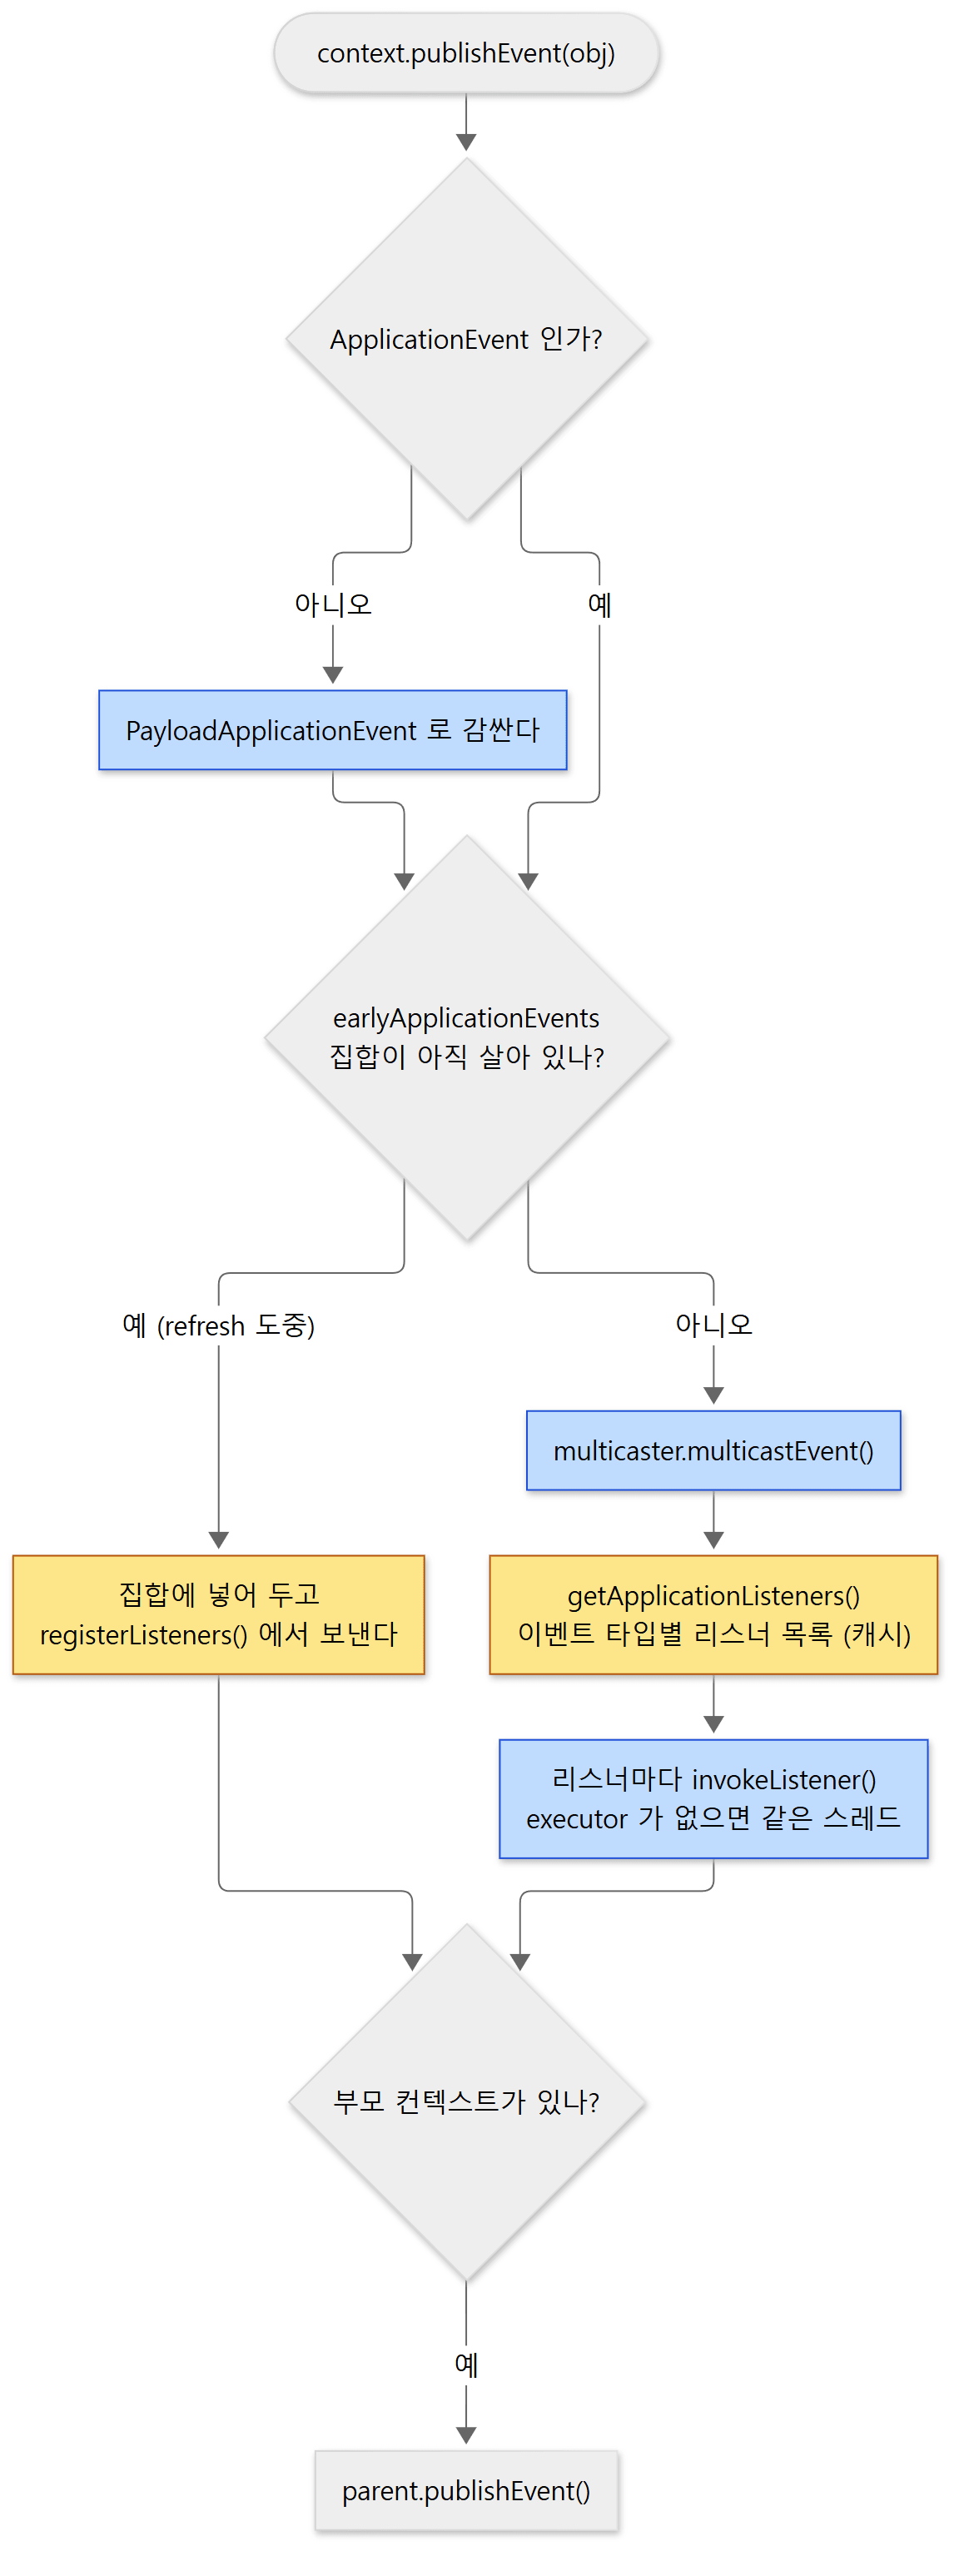 노란색은 보관소(집합과 캐시), 파란색은 절차입니다.
세 가지만 기억하면 됩니다.
- 평범한 객체도 이벤트가 됩니다.
ApplicationEvent가 아니면PayloadApplicationEvent로 감쌉니다(39행, 원래 객체는getPayload()로 꺼냅니다, 80행). 그래서record하나를 그냥publishEvent()에 넘겨도 됩니다. - 멀티캐스터가 아직 없으면 쌓아 둡니다.
earlyApplicationEvents는refresh()①단계prepareRefresh()에서 빈 집합으로 만들어지고(702행), ⑩단계registerListeners()에서null로 돌아갑니다(3절). 그 사이에 보낸 이벤트는 집합에 들어갔다가 ⑩단계에서 한꺼번에 나갑니다. - 부모 컨텍스트에도 보냅니다. 컨텍스트가 부모-자식으로 겹쳐 있으면 자식에서 보낸 이벤트가 부모의 리스너에게도 갑니다. 반대 방향은 없습니다.
멀티캐스터 — 리스너를 고르고, 같은 스레드에서 부른다
실제로 리스너를 부르는 곳은 SimpleApplicationEventMulticaster.multicastEvent()입니다.
	@Override
	public void multicastEvent(ApplicationEvent event, @Nullable ResolvableType eventType) {
		ResolvableType type = (eventType != null ? eventType : ResolvableType.forInstance(event));
		Executor executor = getTaskExecutor();
		for (ApplicationListener<?> listener : getApplicationListeners(event, type)) {
			if (executor != null && listener.supportsAsyncExecution()) {
				try {
					executor.execute(() -> invokeListener(listener, event));
				}
				catch (RejectedExecutionException ex) {
					// Probably on shutdown -> invoke listener locally instead
					invokeListener(listener, event);
				}
			}
			else {
				invokeListener(listener, event);
			}
		}
	}
executor를 따로 넣어 주지 않으면 null이고, 그러면 else 쪽으로 가서 이벤트를 보낸 바로 그 스레드에서 리스너가 차례로 실행됩니다. 클래스 설명 주석도 "기본으로 모든 리스너는 호출한 스레드에서 실행된다"고 적어 두었습니다(41–44행). invokeListener()는 오류 처리기가 있으면 감싸고 없으면 그대로 listener.onApplicationEvent(event)를 부릅니다(162–180행). 컨텍스트는 ⑧단계에서 "applicationEventMulticaster"라는 이름의 빈이 있으면 그것을 쓰고, 없으면 이 클래스를 만들어 그 이름으로 등록합니다(854–871행).
getApplicationListeners(event, type)가 "이 이벤트를 받을 리스너"를 고르는 곳입니다. 부모 클래스 AbstractApplicationEventMulticaster에 있고, 이벤트 타입과 source 타입을 열쇠로 한 캐시(retrieverCache)를 먼저 봅니다(72행, 188–223행). 캐시에 없으면 등록된 리스너 전부를 supportsEvent()로 거르고, AnnotationAwareOrderComparator.sort()로 정렬한 뒤 캐시에 넣습니다(233–327행, 정렬은 315행). @Order가 리스너 순서를 정하는 자리가 여기입니다. 리스너를 더하거나 뺄 때마다 캐시는 통째로 비워집니다(114행).
supportsEvent()는 리스너가 GenericApplicationListener이면 그 객체에게 직접 묻고, 평범한 ApplicationListener<E>이면 어댑터로 감싸서 제네릭 E를 읽어 비교합니다(393–399행). SmartApplicationListener(37행)와 그 자식 GenericApplicationListener(41행)는 제네릭 대신 supportsEventType()·getOrder() 같은 메서드로 "관심 있는 이벤트"와 순서를 답하는 확장 인터페이스입니다. 3절의 @EventListener 어댑터가 이것을 구현합니다.
헷갈리기 쉬운 곳
publishEvent()는 리스너가 끝나야 돌아옵니다. 기본 설정에서는 같은 스레드에서 동기로 돕니다. 리스너 하나가 오래 걸리면 보낸 쪽도 그만큼 기다리고, 리스너가 예외를 던지면publishEvent()를 부른 코드까지 예외가 올라옵니다(invokeListener()에 오류 처리기가 없으면 그대로 던집니다).- 멀티캐스터는 컨텍스트마다 하나입니다. 이벤트를 부모에게도 보내는 것은 컨텍스트의
publishEvent()가 하는 일이지 멀티캐스터가 하는 일이 아닙니다. - "지금 보낸다"와 "쌓아 둔다"의 경계는 ⑩단계입니다. 3절에서 이것이 만드는 함정을 예제로 봅니다.
3. 리스너는 언제 어떻게 등록되나
리스너가 멀티캐스터에 들어가는 길은 세 갈래이고, 들어가는 시점이 서로 다릅니다.
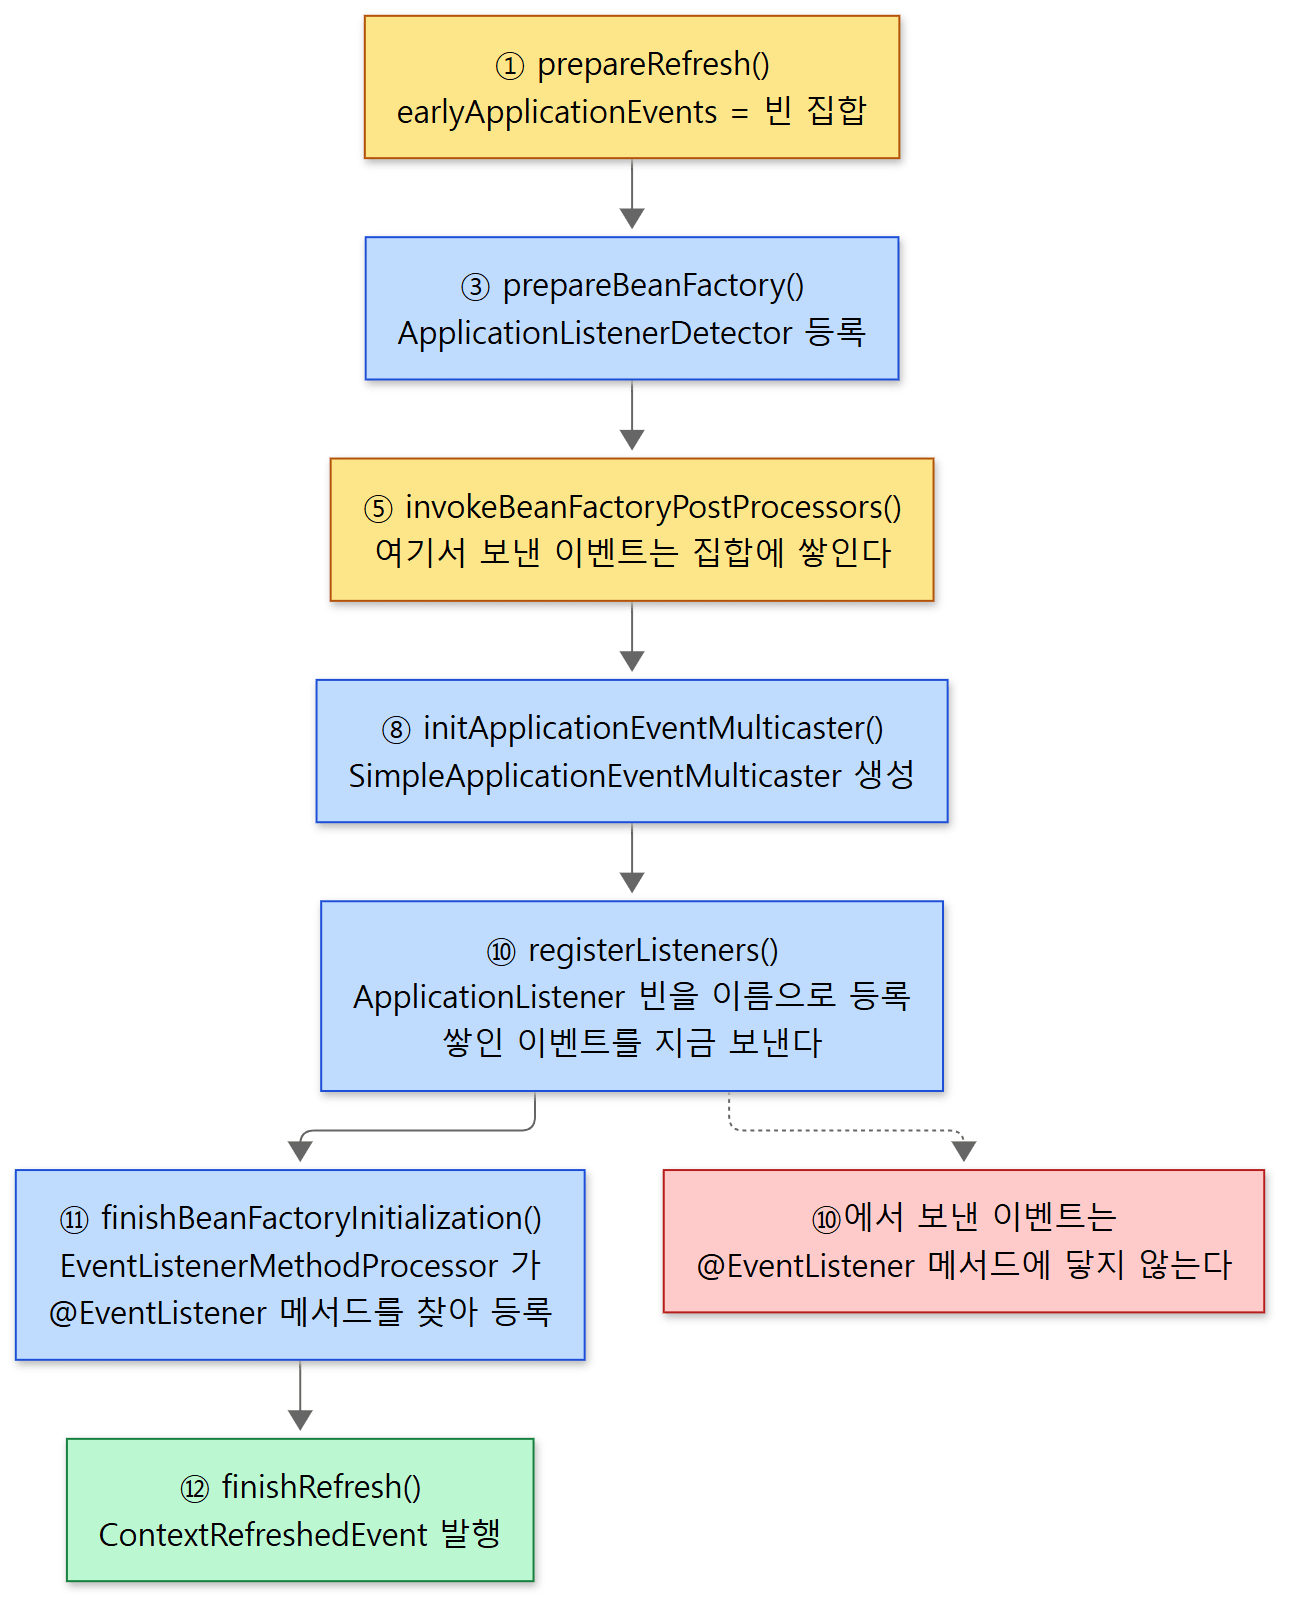 번호는 7편의 12단계 번호입니다. 빨간 상자가 이 절의 함정입니다.
길 1: ApplicationListener 빈 — ⑩단계 registerListeners()
	protected void registerListeners() {
		// Register statically specified listeners first.
		for (ApplicationListener<?> listener : getApplicationListeners()) {
			getApplicationEventMulticaster().addApplicationListener(listener);
		}

		// Do not initialize FactoryBeans here: We need to leave all regular beans
		// uninitialized to let post-processors apply to them!
		String[] listenerBeanNames = getBeanNamesForType(ApplicationListener.class, true, false);
		for (String listenerBeanName : listenerBeanNames) {
			getApplicationEventMulticaster().addApplicationListenerBean(listenerBeanName);
		}

		// Publish early application events now that we finally have a multicaster...
		Set<ApplicationEvent> earlyEventsToProcess = this.earlyApplicationEvents;
		this.earlyApplicationEvents = null;
		if (!CollectionUtils.isEmpty(earlyEventsToProcess)) {
			for (ApplicationEvent earlyEvent : earlyEventsToProcess) {
				getApplicationEventMulticaster().multicastEvent(earlyEvent);
			}
		}
	}
ApplicationListener를 구현한 빈은 여기서 이름으로 등록됩니다. 빈을 만들지 않고 이름만 적어 두는 이유는 주석대로 아직 후처리기가 다 적용되기 전이기 때문입니다. 그러고 나서 ①단계부터 쌓인 이벤트를 비웁니다. 이 시점에 멀티캐스터가 아는 리스너는 이름으로 등록된 ApplicationListener 빈뿐입니다.
길 2: 내부 빈도 놓치지 않기 — ③단계의 ApplicationListenerDetector
이름으로 찾는 getBeanNamesForType()은 최상위 빈만 봅니다. 그래서 ③단계 prepareBeanFactory()가 ApplicationListenerDetector라는 BeanPostProcessor를 등록해 두고(754행), 이 후처리기가 빈이 만들어질 때마다 "초기화 후" 훅에서 ApplicationListener인 싱글톤을 멀티캐스터에 객체로 더합니다(75–95행). 이름으로도 객체로도 등록된 리스너는 목록을 만들 때 하나로 맞춥니다(AbstractApplicationEventMulticaster 261–298행). 6편의 "후처리기로 끼어드는" 방식입니다.
길 3: @EventListener 메서드 — ⑪단계 끝의 EventListenerMethodProcessor
@EventListener는 8편의 AnnotationConfigUtils가 다른 어노테이션 처리기들과 함께 등록하는 두 빈이 처리합니다. EventListenerMethodProcessor와 DefaultEventListenerFactory입니다(AnnotationConfigUtils 192–202행).
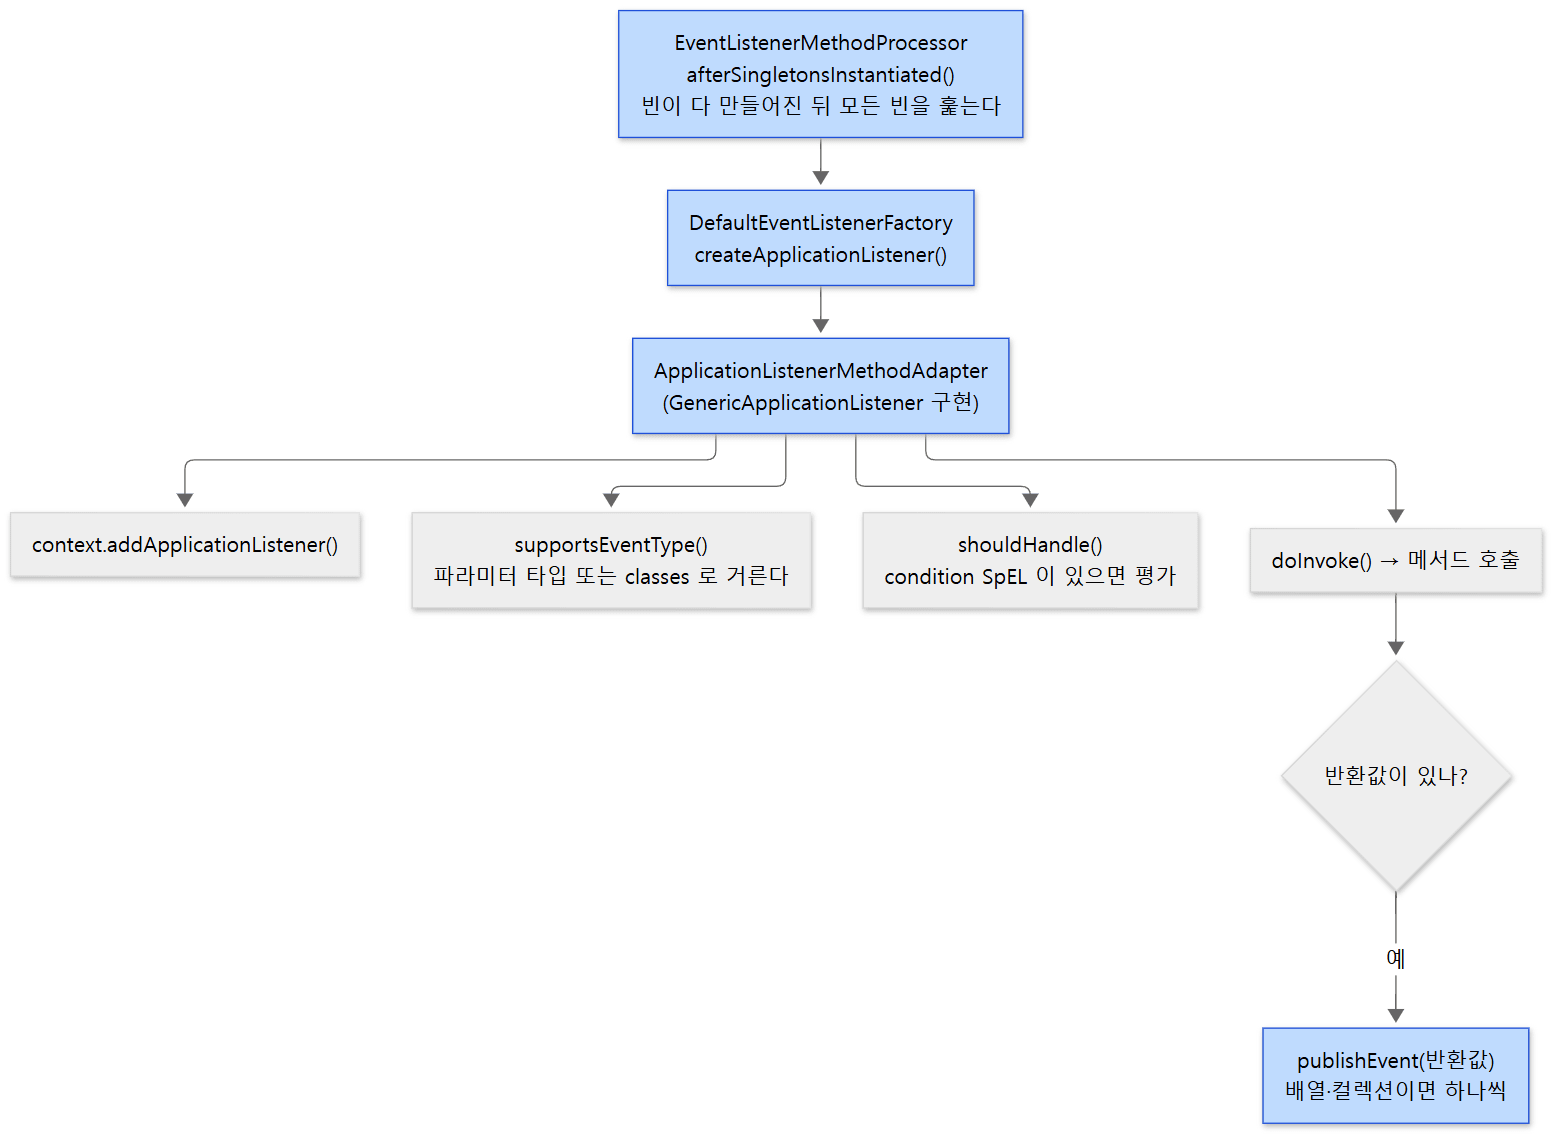 메서드 하나가 리스너 객체 하나가 됩니다.
EventListenerMethodProcessor는 SmartInitializingSingleton을 구현합니다(65–66행). 이 인터페이스의 afterSingletonsInstantiated()는 ⑪단계 preInstantiateSingletons()가 싱글톤을 전부 만든 뒤에 한 번 불러 줍니다(DefaultListableBeanFactory 1142–1150행). 그 안에서 모든 빈 이름을 훑어 클래스를 알아내고(108–150행), 클래스마다 @EventListener가 붙은 메서드를 찾아 메서드 하나마다 팩토리에게 리스너를 만들게 한 뒤 context.addApplicationListener()로 더합니다(182–195행).
DefaultEventListenerFactory는 모든 메서드를 받고(supportsMethod가 늘 true), ApplicationListenerMethodAdapter를 만듭니다(50–57행). 이 어댑터가 GenericApplicationListener를 구현한 "메서드를 감싼 리스너"입니다(75행). 생성자에서 여러 값을 미리 읽어 두는데, 이 글에 필요한 것은 셋입니다(112–126행). 관심 이벤트 타입(어노테이션의 classes가 있으면 그것, 없으면 첫 파라미터 타입, 128–151행), condition 문자열, 그리고 메서드의 @Order(없으면 가장 낮은 우선순위, 153–156행).
이벤트가 오면 processEvent()가 돕니다.
	public void processEvent(ApplicationEvent event) {
		@Nullable Object[] args = resolveArguments(event);
		if (shouldHandle(event, args)) {
			Object result = doInvoke(args);
			if (result != null) {
				handleResult(result);
			}
			else {
				logger.trace("No result object given - no result to handle");
			}
		}
	}
resolveArguments(): 메서드 파라미터가ApplicationEvent가 아니고 이벤트가PayloadApplicationEvent이면 안에 든 객체를 꺼내 넘깁니다(309–326행). 2절에서 감싼 것을 여기서 풉니다. 그래서@EventListener void on(Greeting g)처럼 평범한 타입을 그대로 받을 수 있습니다.shouldHandle():condition이 있으면 SpEL로 평가해false면 부르지 않습니다(291–301행). SpEL 자체는 15편에서 봅니다.handleResult(): 반환값이 있으면 그것을 새 이벤트로 다시publishEvent()합니다. 배열이나 컬렉션이면 요소 하나하나를 보냅니다(328–371행). 어노테이션 설명 주석에도 그렇게 적혀 있습니다(EventListener48–51행).
컨텍스트 자신이 보내는 이벤트 네 가지
컨텍스트도 자기 상태가 바뀔 때 이벤트를 보냅니다. 네 클래스 모두 ApplicationContextEvent를 상속하고(30행), source가 곧 그 컨텍스트입니다.
| 이벤트 | 보내는 곳 | 위치 |
|---|---|---|
ContextRefreshedEvent |
⑫단계 finishRefresh()의 마지막 줄 |
1017행 |
ContextStartedEvent |
start() |
1590–1593행 |
ContextStoppedEvent |
stop() |
1596–1599행 |
ContextClosedEvent |
doClose()의 첫 일 — 빈을 부수기 전에 |
1191행 |
"모든 빈이 준비된 뒤에 무언가 하고 싶다"면 ContextRefreshedEvent를 받는 것이 정석입니다. ⑪단계에서 싱글톤이 다 만들어지고 ⑫단계 끝에서 나가기 때문입니다.
예제 1: 두 방식의 리스너, 순서, 스레드, 반환값
이벤트 클래스 하나(OrderPlacedEvent)와 평범한 record 하나(Greeting)를 보냅니다. 리스너는 ApplicationListener 구현 빈(@Order(2))과 @EventListener 메서드들(@Order(1), 조건 있는 것, 반환값 있는 것, 컨텍스트 이벤트 네 가지를 받는 것)입니다. 그리고 ⑤단계에서 이벤트를 보내 보려고 BeanFactoryPostProcessor 빈도 하나 둡니다. 전체 코드는 ex/u08/EventExample.java이고 핵심만 적습니다.
// 이 글을 위해 쓴 예제입니다 (Spring의 소스가 아닙니다)
@Order(2)
@Component
static class OrderListener implements ApplicationListener<OrderPlacedEvent> {
    @Override
    public void onApplicationEvent(OrderPlacedEvent event) {
        System.out.println("  [ApplicationListener @Order(2)] order=" + event.getOrderId()
                + " thread=" + Thread.currentThread().getName());
    }
}

@Component
static class AnnotatedListeners {

    @Order(1)
    @EventListener
    public Greeting onOrder(OrderPlacedEvent event) {
        System.out.println("  [@EventListener @Order(1)] order=" + event.getOrderId()
                + " thread=" + Thread.currentThread().getName());
        return new Greeting("order " + event.getOrderId() + " received"); // 반환값은 새 이벤트가 된다
    }

    @EventListener
    public void onGreeting(Greeting greeting) {                 // 평범한 객체를 그대로 받는다
        System.out.println("    [@EventListener Greeting] " + greeting.text());
    }

    @EventListener(condition = "#event.orderId == 'A-2'")
    public void onSecondOrderOnly(OrderPlacedEvent event) {
        System.out.println("  [@EventListener condition] order=" + event.getOrderId());
    }
    // ... 컨텍스트 이벤트 네 가지를 classes 로 받아 클래스 이름을 찍는 onContextEvent 도 있다
}

// refresh() 5단계에서 이벤트를 보내는 빈 — 멀티캐스터가 아직 없는 시점
@Component
static class EarlyPublisher implements BeanFactoryPostProcessor, ApplicationEventPublisherAware {
    // ... ApplicationEventPublisherAware 로 받아 둔 publisher 로
    @Override
    public void postProcessBeanFactory(ConfigurableListableBeanFactory beanFactory) {
        System.out.println("publishEvent(EARLY) from BeanFactoryPostProcessor");
        publisher.publishEvent(new OrderPlacedEvent(this, "EARLY"));
    }
}
main은 컨텍스트를 만든 뒤 OrderPlacedEvent를 두 번(A-1, A-2), Greeting을 한 번 보내고, start()·stop()·close()를 차례로 부릅니다. 출력입니다.
main thread=main
publishEvent(EARLY) from BeanFactoryPostProcessor
  [ApplicationListener @Order(2)] order=EARLY thread=main
  [context event] ContextRefreshedEvent
publishEvent(OrderPlacedEvent A-1)
  [@EventListener @Order(1)] order=A-1 thread=main
    [@EventListener Greeting] order A-1 received
  [ApplicationListener @Order(2)] order=A-1 thread=main
publishEvent(OrderPlacedEvent A-2)
  [@EventListener @Order(1)] order=A-2 thread=main
    [@EventListener Greeting] order A-2 received
  [ApplicationListener @Order(2)] order=A-2 thread=main
  [@EventListener condition] order=A-2
publishEvent(Greeting) - plain object
    [@EventListener Greeting] hello
start() / stop() / close()
  [context event] ContextStartedEvent
  [context event] ContextStoppedEvent
  [context event] ContextClosedEvent
이 예제는 릴리스 버전인 Spring Framework 7.0.9로 실행해 위 출력을 확인했습니다(이 시리즈가 읽는 7.1.0-SNAPSHOT을 직접 빌드해 돌린 것은 아닙니다). 출력에서 확인되는 것은 다음과 같습니다.
- 모두
main스레드입니다. executor를 주지 않았으므로 2절의else가지입니다. @Order(1)메서드가@Order(2)클래스보다 먼저입니다. 두 방식의 리스너가 한 목록에서 함께 정렬됩니다.- 반환값
Greeting이 곧바로 이벤트가 됐고, 그것이@Order(2)리스너보다 먼저 처리됐습니다.handleResult()가publishEvent()를 부르는 순간multicastEvent()가 한 번 더 돌기 때문입니다(원래 이벤트의 리스너 순회는 그동안 멈춰 있습니다). 들여쓰기를 더 넣은 줄이 그것입니다. - 조건 리스너는
A-2에서만 불렸습니다.@Order를 안 적었으므로 가장 뒤입니다. EARLY이벤트는ApplicationListener빈에게만 갔습니다.@EventListener @Order(1)줄도Greeting줄도 없습니다. 이유는 그림의 빨간 상자입니다. ⑤단계에서 보낸 이벤트는 ⑩단계registerListeners()에서 나가는데,@EventListener메서드는 ⑪단계가 끝나야 리스너가 됩니다.- 컨텍스트 이벤트 네 가지가
refresh()끝,start(),stop(),close()에서 하나씩 나왔습니다.
헷갈리기 쉬운 곳
@EventListener는 "컨테이너가 다 켜진 뒤"에만 완전합니다. 위 5번이 그것입니다. 빈을 만드는 도중에 보낸 이벤트를@EventListener로 받으려 하면 조용히 빠집니다. 그런 이벤트는ApplicationListener를 구현한 빈으로 받아야 합니다.@EventListener메서드에@Order가 없으면 맨 뒤입니다.resolveOrder()의 기본값이LOWEST_PRECEDENCE입니다.ApplicationListener구현 클래스에@Order가 없어도 마찬가지입니다.@EventListener가 붙은 빈이 프록시로 감싸져 있으면 메서드는 프록시가 아니라 원래 클래스에서 찾습니다.afterSingletonsInstantiated()가AutoProxyUtils.determineTargetClass()로 대상 클래스를 알아내는 이유입니다(116행). 프록시는 10편에 있습니다.
4. Environment: 설정값은 어디서 오나
인터페이스 세 층
public interface Environment extends PropertyResolver {
spring-core/src/main/java/org/springframework/core/env/Environment.java 72행
| 인터페이스 | 맡은 것 | 대표 메서드 |
|---|---|---|
PropertyResolver |
프로퍼티 읽기 | getProperty(key), getProperty(key, default), getRequiredProperty(key), resolvePlaceholders(text) (30–110행) |
Environment |
위에 프로파일을 더한 것 | getActiveProfiles(), getDefaultProfiles(), matchesProfiles(…) (87–115행) |
ConfigurableEnvironment |
바꿀 수 있게 한 것 | setActiveProfiles(…), getPropertySources(), getSystemProperties(), merge(parent) (72–157행) |
컨텍스트가 기본으로 만드는 구현은 StandardEnvironment입니다(AbstractApplicationContext 350–352행). 이 클래스는 부모 AbstractEnvironment가 거의 다 하고, 자기는 출처 두 개를 넣는 일만 합니다.
PropertySource 목록 — 순서가 우선순위입니다
AbstractEnvironment는 필드 둘로 요약됩니다. 출처 목록 MutablePropertySources와, 그 목록을 뒤져 값을 찾는 PropertySourcesPropertyResolver입니다(109–111행, 135–139행). 생성자가 마지막에 customizePropertySources()를 부르고, StandardEnvironment는 그것을 이렇게 채웁니다.
	@Override
	protected void customizePropertySources(MutablePropertySources propertySources) {
		propertySources.addLast(
				new PropertiesPropertySource(SYSTEM_PROPERTIES_PROPERTY_SOURCE_NAME, getSystemProperties()));
		propertySources.addLast(
				new SystemEnvironmentPropertySource(SYSTEM_ENVIRONMENT_PROPERTY_SOURCE_NAME, getSystemEnvironment()));
	}
spring-core/src/main/java/org/springframework/core/env/StandardEnvironment.java 95–101행
"systemProperties"(System.getProperties(), AbstractEnvironment 440–441행)가 먼저, "systemEnvironment"(운영체제 환경 변수)가 그다음입니다. MutablePropertySources는 CopyOnWriteArrayList 하나를 감싼 클래스이고(43행), addFirst()는 맨 앞에, addLast()는 맨 뒤에 넣습니다(103–118행). 설명 주석이 각각 "highest precedence", "lowest precedence"라고 적고 있듯이 앞에 있을수록 우선입니다. PropertySource 자체는 이름과 원본 객체를 들고, 추상 메서드는 getProperty(name) 하나뿐인 클래스입니다(62행, 128행).
값을 찾는 쪽은 이 목록을 앞에서부터 훑어 처음 찾은 값을 돌려줍니다.
	protected <T> @Nullable T getProperty(String key, Class<T> targetValueType, boolean resolveNestedPlaceholders) {
		if (this.propertySources != null) {
			for (PropertySource<?> propertySource : this.propertySources) {
				// ...
				Object value = propertySource.getProperty(key);
				if (value != null) {
					if (resolveNestedPlaceholders) {
						if (value instanceof String string) {
							value = resolveNestedPlaceholders(string);
						}
						// ...
					}
					logKeyFound(key, propertySource, value);
					return convertValueIfNecessary(value, targetValueType);
				}
			}
		}
		// ...
		return null;
	}
spring-core/src/main/java/org/springframework/core/env/PropertySourcesPropertyResolver.java 73–100행
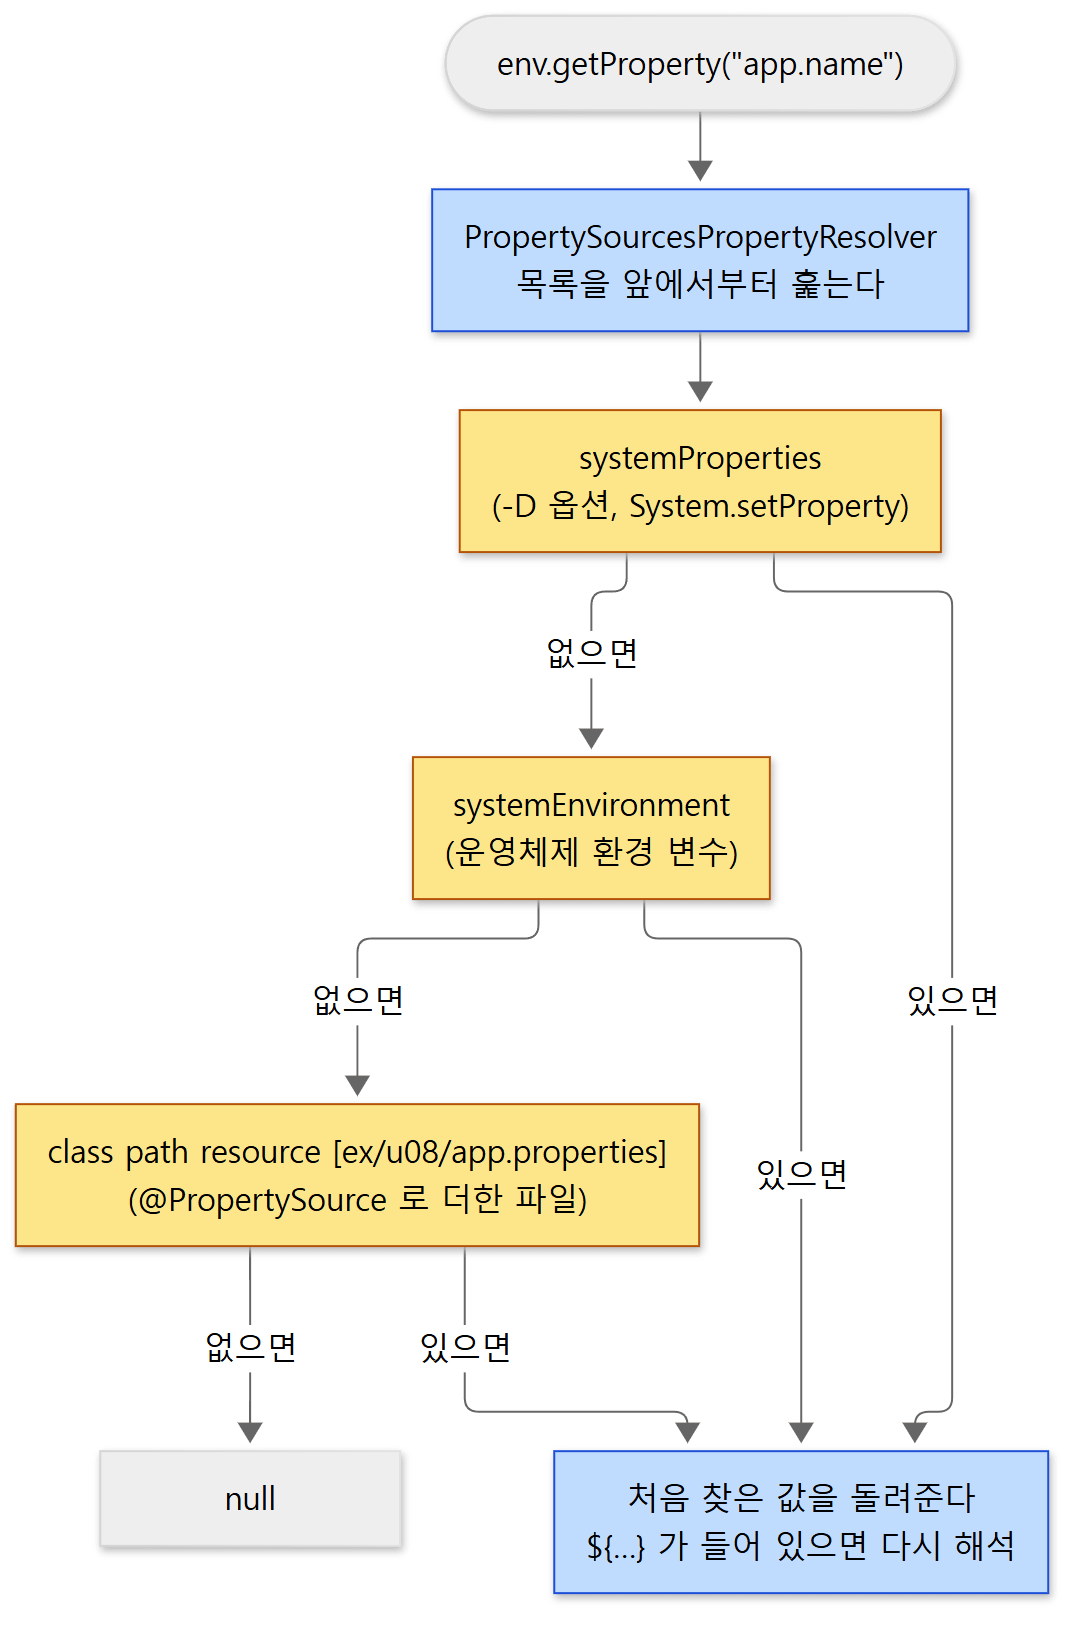 노란 상자가 PropertySource 하나하나입니다. 예제 2의 목록과 같습니다.
찾은 값이 문자열이면 resolveNestedPlaceholders()로 값 안의 ${…}를 다시 해석하고, 마지막에 요청한 타입으로 변환합니다(변환은 14편의 주제입니다). 모양이 비슷한 #{…}는 플레이스홀더가 아니라 표현식 언어 SpEL이고, 15편에서 봅니다.
${…} 해석의 규칙은 AbstractPropertyResolver에 있습니다. 접두사 ${, 접미사 }, 기본값 구분자 :, 이스케이프 \가 기본값이고(96–102행, 상수는 SystemPropertyUtils 39–51행), 실제 문자열 처리는 PropertyPlaceholderHelper에 맡깁니다(280–287행). resolvePlaceholders()는 못 찾은 자리를 그대로 두고, resolveRequiredPlaceholders()는 예외를 던집니다(245–258행). ${app.missing:fallback}의 :fallback이 "없으면 이 값"입니다.
@PropertySource는 어디에 끼어드나
8편의 ConfigurationClassParser가 @PropertySource를 만나면(314–320행) 결국 PropertySourceProcessor.addPropertySource()가 Environment의 목록에 넣는데, 첫 파일은 맨 뒤(addLast)에, 그다음 파일은 바로 앞 파일의 앞(addBefore)에 넣습니다(136–143행). 즉 파일끼리는 나중에 처리된 것이 이기지만, 어느 파일이든 시스템 프로퍼티와 환경 변수보다는 뒤입니다. -Dapp.name=…으로 준 값이 설정 파일을 이기는 이유가 이 addLast입니다.
프로파일 — 결국 문자열 집합 하나
프로파일의 저장소는 activeProfiles라는 Set<String> 하나입니다(105행). 읽을 때(doGetActiveProfiles()) 집합이 비어 있으면 프로퍼티 spring.profiles.active를 한 번 찾아 쉼표로 나눠 채웁니다(272–283행). doGetActiveProfilesProperty()가 읽는 키가 상수 ACTIVE_PROFILES_PROPERTY_NAME = "spring.profiles.active"이고(77행, 290–292행), 이것도 위의 PropertySource 목록에서 찾으므로 -Dspring.profiles.active=dev가 통합니다. 활성 프로파일이 하나도 없을 때 쓰는 기본 프로파일은 spring.profiles.default이고, 그것도 없으면 "default"라는 이름 하나입니다(88행, 100행).
9편의 @Profile이 부르는 matchesProfiles("dev & !prod")는 Profiles.of(...)로 식을 파싱해 acceptsProfiles(Profiles)에 넘기고(Environment 113–115행), 그것은 식의 이름 하나하나를 isProfileActive()에 묻습니다(397–412행). 파서는 (, ), &, |, ! 다섯 글자로 토큰을 나누는 작은 클래스입니다(ProfilesParser 55–59행).
@Value("${…}")는 누가 풀어 주나
5편에서 @Value의 문자열은 resolveEmbeddedValue()를 거친다고 했습니다(DefaultListableBeanFactory 1675–1683행). 그 메서드는 빈 팩토리에 등록된 StringValueResolver 목록을 차례로 적용할 뿐이고(AbstractBeanFactory 966–978행), 그 목록에 누가 넣느냐가 문제입니다. 답은 ⑪단계 finishBeanFactoryInitialization()의 첫머리에 있습니다.
		// Register a default embedded value resolver if no BeanFactoryPostProcessor
		// (such as a PropertySourcesPlaceholderConfigurer bean) registered any before:
		// at this point, primarily for resolution in annotation attribute values.
		if (!beanFactory.hasEmbeddedValueResolver()) {
			beanFactory.addEmbeddedValueResolver(strVal -> getEnvironment().resolvePlaceholders(strVal));
		}
아무도 등록하지 않았으면 컨텍스트가 Environment.resolvePlaceholders()를 람다로 등록합니다. 그래서 PropertySourcesPlaceholderConfigurer 빈이 없어도 @Value("${app.name}")는 Environment의 값으로 풀립니다. PropertySourcesPlaceholderConfigurer는 BeanFactoryPostProcessor로서 자기만의 PropertySources(Environment + 지정한 파일)를 꾸려 그 리졸버를 등록하는 클래스이고(69행, 130–157행), 이 커밋의 spring-context에서 그것을 기본으로 등록하는 코드는 없습니다(AnnotationConfigUtils에 없고, 예제 2에서 빈 개수 0으로 확인). 주석의 "such as a PropertySourcesPlaceholderConfigurer bean"은 사용자가 직접 등록했을 때의 이야기입니다.
예제 2: 파일과 시스템 프로퍼티가 겹칠 때, 프로파일, 기본값
ex/u08/EnvironmentExample.java입니다. 설정 파일 src/main/resources/ex/u08/app.properties에는 세 줄이 있습니다.
app.name=from-properties-file
app.only.in.file=only-here
app.greeting=Hello, ${app.name}!
// 이 글을 위해 쓴 예제입니다 (Spring의 소스가 아닙니다)
@Configuration
@PropertySource("classpath:ex/u08/app.properties")   // 파일을 Environment 의 PropertySource 로 더한다
static class AppConfig {
    @Bean @Profile("dev")  String devOnly()  { return "dev bean"; }
    @Bean @Profile("prod") String prodOnly() { return "prod bean"; }
}

@Component
static class Settings {
    @Value("${app.name}") String name;                  // 파일에도 있고 시스템 프로퍼티에도 있는 키
    @Value("${app.missing:fallback}") String missing;   // 어디에도 없는 키 — ':' 뒤가 기본값
    @Value("${app.greeting}") String greeting;          // 값 안에 또 ${…} 가 있는 키
}

public static void main(String[] args) {
    System.setProperty("app.name", "from-system-property");   // 파일과 같은 키를 시스템 프로퍼티로도 준다

    var context = new AnnotationConfigApplicationContext();
    context.getEnvironment().setActiveProfiles("dev");         // refresh() 전에 프로파일을 켠다
    context.register(AppConfig.class, Settings.class);
    context.refresh();
    // ... 아래 출력을 찍는다
}
active profiles = [dev]
property sources (first wins):
  systemProperties  <PropertiesPropertySource>
  systemEnvironment  <SystemEnvironmentPropertySource>
  class path resource [ex/u08/app.properties]  <ResourcePropertySource>
app.name = from-system-property
app.only.in.file = only-here
containsBean(devOnly) = true, containsBean(prodOnly) = false
matchesProfiles("dev & !prod") = true
@Value name = from-system-property
@Value missing = fallback
@Value greeting = Hello, from-system-property!
PropertySourcesPlaceholderConfigurer beans = 0
이 예제도 Spring Framework 7.0.9로 실행해 확인했습니다. 목록의 순서가 StandardEnvironment의 둘 + @PropertySource의 하나이고, 같은 키 app.name은 앞에 있는 시스템 프로퍼티가 이겼습니다. app.greeting의 ${app.name}도 시스템 프로퍼티 값으로 풀렸고(중첩 해석), 없는 키는 : 뒤의 기본값이 됐습니다. @Profile("prod") 빈은 등록되지 않았습니다.
헷갈리기 쉬운 곳
- 프로파일은
refresh()전에 켜야 합니다.@Profile판정은 설계도를 읽는 ⑤단계에서 일어납니다(9편). 그래서 예제는 생성자에 클래스를 넘기지 않고register()·refresh()를 따로 불렀습니다.-Dspring.profiles.active=dev로 주면 코드 없이도 됩니다. - 환경 변수 이름은 그대로 맞지 않을 수 있습니다.
SystemEnvironmentPropertySource는app.name을APP_NAME같은 꼴로도 찾아 주는 클래스입니다(68행). 자세한 변환 규칙은 이 글에서 확인하지 않았습니다. - 부모 컨텍스트가 있으면 Environment가 합쳐집니다.
setParent()가 부모의 Environment를 자식에merge()합니다(AbstractApplicationContext532–540행).
5. Resource: 파일·클래스패스·URL을 한 얼굴로
인터페이스
public interface Resource extends InputStreamSource {
spring-core/src/main/java/org/springframework/core/io/Resource.java 59행
InputStreamSource는 getInputStream() 하나짜리 인터페이스입니다(42–57행). Resource는 그 위에 "있나"(exists(), 67행), "어디인가"(getURL()·getURI()·getFile(), 113–132행), "얼마나 큰가"(contentLength()), "이름이 뭔가"(getFilename()·getDescription(), 236–245행), 그리고 통째로 읽는 getContentAsString(charset)(201행) 같은 편의 메서드를 더합니다. 구현은 "어디서 읽느냐"로 나뉩니다.
| 클래스 | 읽는 곳 | exists()가 하는 일 |
위치 |
|---|---|---|---|
ClassPathResource |
클래스패스(디렉터리나 JAR 안) | 클래스로더로 URL이 찾아지는지 | 47행, 153–155행 |
FileSystemResource |
파일 시스템 경로 | File.exists() / Files.exists() |
63행, 168–170행 |
UrlResource |
java.net.URL |
file:이면 파일로, 아니면 연결을 열어 본다 |
49행, AbstractFileResolvingResource 49행부터 |
FileUrlResource |
file: URL (UrlResource의 자식, 쓰기도 됨) |
위와 같음 | 47행 |
ByteArrayResource |
메모리의 바이트 배열 | 늘 true |
45행, 83–85행 |
문자열에서 Resource로 — DefaultResourceLoader.getResource()
ResourceLoader는 getResource(String)과 getClassLoader() 둘뿐인 인터페이스이고(43행, 98행, 110행), 접두사 상수 "classpath:"과 "classpath*:"를 들고 있습니다(50행, 68행). 기본 구현 DefaultResourceLoader의 getResource()가 문자열을 보고 클래스를 고르는 곳입니다.
	@Override
	public Resource getResource(String location) {
		Assert.notNull(location, "Location must not be null");

		for (ProtocolResolver protocolResolver : getProtocolResolvers()) {
			// ...
		}

		if (location.startsWith("/")) {
			return getResourceByPath(location);
		}
		else if (location.startsWith(CLASSPATH_URL_PREFIX)) {
			return new ClassPathResource(location.substring(CLASSPATH_URL_PREFIX.length()), getClassLoader());
		}
		else if (location.startsWith(CLASSPATH_ALL_URL_PREFIX)) {
			return new ClassPathAllResource(location.substring(CLASSPATH_ALL_URL_PREFIX.length()), getClassLoader());
		}
		else {
			try {
				// Try to parse the location as a URL...
				URL url = ResourceUtils.toURL(location);
				return (ResourceUtils.isFileURL(url) ? new FileUrlResource(url) : new UrlResource(url));
			}
			catch (MalformedURLException ex) {
				// No URL -> resolve as resource path.
				return getResourceByPath(location);
			}
		}
	}
spring-core/src/main/java/org/springframework/core/io/DefaultResourceLoader.java 154–185행
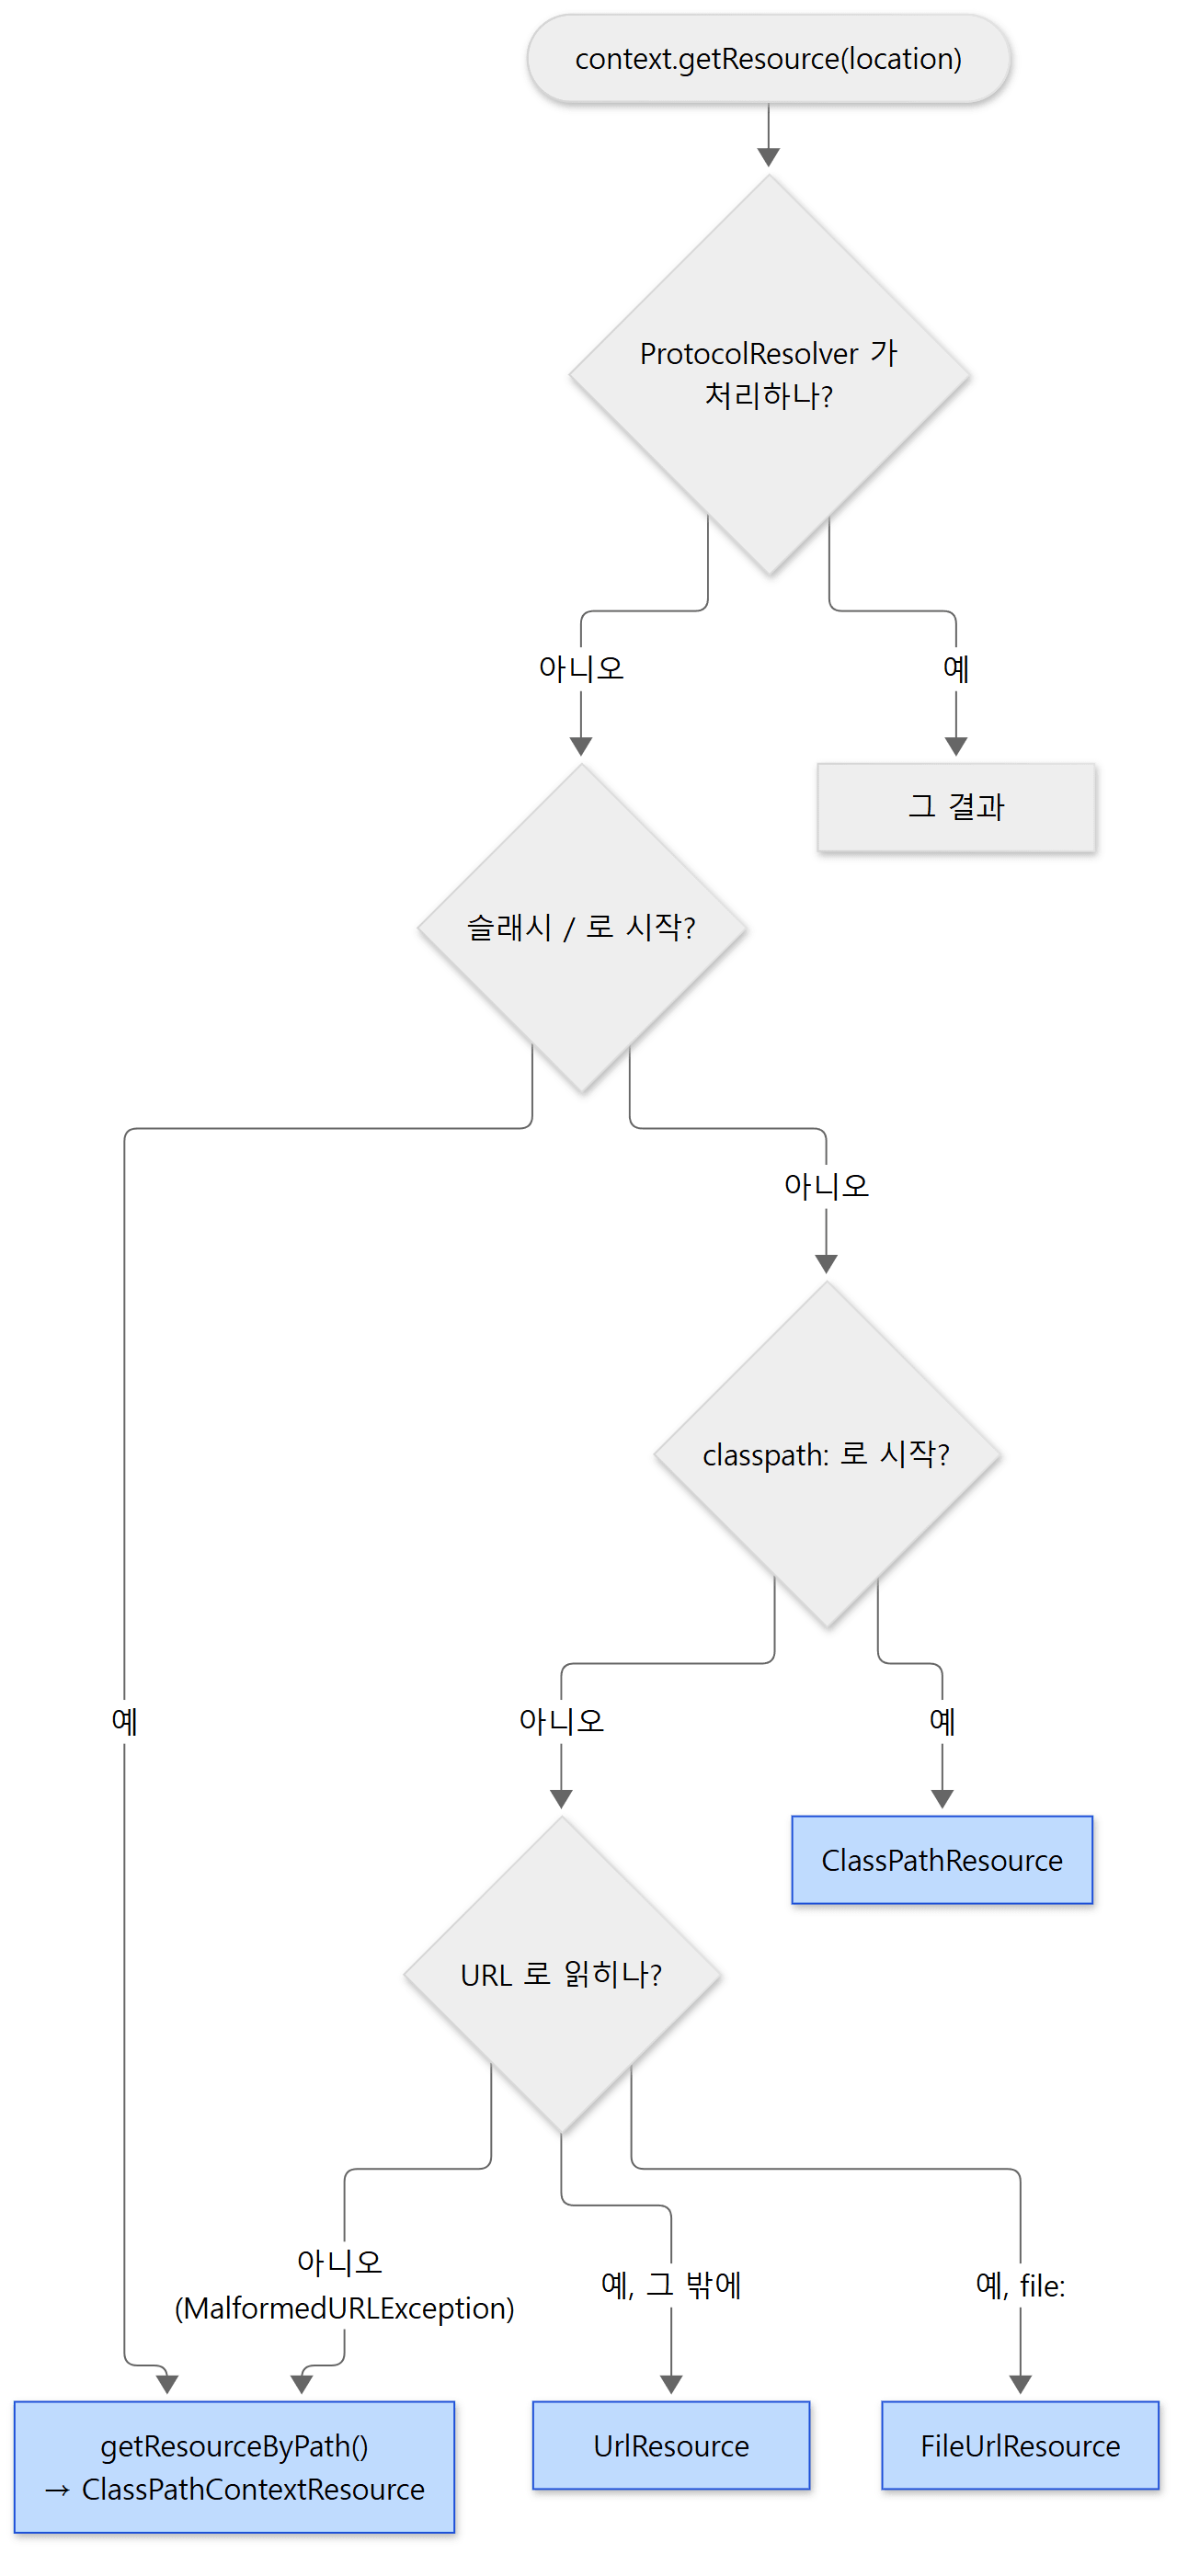 위에서부터 차례로 물어보고 처음 맞는 가지로 갑니다. 그림에서는 classpath*: 가지를 뺐습니다.
순서가 곧 규칙입니다. ① 끼워 넣은 ProtocolResolver가 먼저 기회를 얻고(64행, 118–120행), ② /로 시작하면 getResourceByPath(), ③ classpath:면 ClassPathResource, ④ classpath*:면 ClassPathAllResource(이 커밋에서 @since 7.1로 새로 들어온 것입니다, 203–208행), ⑤ 그 밖에는 일단 URL로 해석해 보고 되면 file:은 FileUrlResource, 나머지는 UrlResource, 안 되면 다시 getResourceByPath()입니다. getResourceByPath()의 기본 구현은 클래스패스로 보는 ClassPathContextResource를 돌려줍니다(198–200행, 297행). 이 메서드가 protected인 이유는 웹 컨텍스트 같은 자식이 "접두사 없는 경로"의 뜻을 바꾸기 위해서입니다.
여러 개 찾기 — ResourcePatternResolver와 classpath*:
ResourcePatternResolver는 ResourceLoader에 getResources(String) 하나를 더한 인터페이스입니다(58행, 69행). 구현 PathMatchingResourcePatternResolver는 getResources()에서 classpath*:로 시작하면 모듈 패스와 클래스패스 전부를 뒤지고, 그 안에 *·? 같은 패턴이 있으면 패턴 검색, 없으면 같은 이름의 항목 전부를 모읍니다. 그 밖의 문자열은 접두사 뒤에 패턴이 있을 때만 패턴 검색이고, 아니면 getResource() 결과 하나를 배열에 담아 돌려줍니다(365–397행). 단일 getResource()는 넘겨받은 ResourceLoader에 그대로 위임합니다(356–362행).
컨텍스트와의 연결은 세 줄입니다. AbstractApplicationContext는 생성자에서 new PathMatchingResourcePatternResolver(this)를 만들어 두고(251–253행, 514–516행), getResources()를 거기에 넘깁니다.
	@Override
	public Resource[] getResources(String locationPattern) throws IOException {
		return this.resourcePatternResolver.getResources(locationPattern);
	}
this를 넘겼으니 패턴 리졸버가 단일 리소스를 만들 때는 다시 컨텍스트(= DefaultResourceLoader)의 getResource()로 돌아옵니다. 컨텍스트는 "하나 찾기"는 스스로, "여러 개 찾기"는 위임하는 구조입니다. 8편의 @ComponentScan이 클래스 파일을 긁어모을 때 쓰는 것도 이 getResources("classpath*:…/**/*.class")입니다.
예제 3: 문자열 네 가지가 어떤 클래스가 되나
ex/u08/ResourceExample.java입니다. refresh() 없이 컨텍스트를 만들어 getResource()만 부릅니다.
// 이 글을 위해 쓴 예제입니다 (Spring의 소스가 아닙니다)
var context = new AnnotationConfigApplicationContext();   // getResource 는 refresh() 없이도 된다

String[] locations = {
        "classpath:ex/u08/app.properties",
        "file:./build.gradle.kts",
        "https://example.invalid/app.properties",   // 존재하지 않는 호스트
        "ex/u08/app.properties"                     // 접두사 없음
};
for (String location : locations) {
    Resource resource = context.getResource(location);
    System.out.println(location + "\n    -> " + resource.getClass().getSimpleName()
            + ", exists=" + resource.exists());
}

// ... 이어서 classpath: 리소스의 첫 줄을 getContentAsString 으로 읽고,
//     getResources("classpath*:ex/u08/*.properties") 의 개수와 파일 이름·클래스를 찍는다
classpath:ex/u08/app.properties
    -> ClassPathResource, exists=true
file:./build.gradle.kts
    -> FileUrlResource, exists=true
https://example.invalid/app.properties
    -> UrlResource, exists=false
ex/u08/app.properties
    -> ClassPathContextResource, exists=true
first line: # ex.u08 example properties
classpath*:ex/u08/*.properties -> 2 resources
    app.properties  <FileSystemResource>
    extra.properties  <FileSystemResource>
이 예제도 Spring Framework 7.0.9로 실행해 확인했습니다. 네 문자열이 위 그림의 네 가지로 갈라졌고, classpath*: 패턴은 src/main/resources/ex/u08/의 .properties 두 개를 찾았습니다. https://example.invalid/…의 exists()는 연결을 시도하다 실패해 false가 됐습니다(.invalid는 실제로 존재할 수 없는 도메인입니다).
헷갈리기 쉬운 곳
file:을 붙이면FileSystemResource가 아니라FileUrlResource입니다.getResource()가 URL 해석을 먼저 하기 때문입니다.FileSystemResource가 나오는 길은 패턴 검색이 디렉터리를 직접 훑을 때(doFindPathMatchingFileResources1012행)이거나 직접new할 때입니다. 위 출력의 마지막 두 줄이 그 경우입니다.- 접두사 없는 경로는 "현재 디렉터리의 파일"이 아닙니다. 기본 컨텍스트에서는 클래스패스로 봅니다(
ClassPathContextResource). 파일을 읽으려면file:을 붙여야 합니다. exists()가 공짜가 아닐 수 있습니다.UrlResource의exists()는 HTTP라면 실제로HEAD요청을 보냅니다(AbstractFileResolvingResource49행부터).
이 글에서 뺀 것
이름과 위치만 적어 둡니다. 비동기 리스너를 위한 setTaskExecutor()와 ApplicationListener.supportsAsyncExecution()(ApplicationListener 59–61행). 리스너 하나가 던진 예외를 삼키는 ErrorHandler(SimpleApplicationEventMulticaster 56행). @EventListener 메서드가 CompletionStage나 리액티브 타입을 돌려줄 때의 처리(ApplicationListenerMethodAdapter 328–347행). 트랜잭션이 끝난 뒤에 받는 @TransactionalEventListener(spring-tx, 17편). 컨텍스트 이벤트 가운데 7.0에서 더해진 ContextPausedEvent·ContextRestartedEvent(context.event 패키지). MessageSource(다국어 메시지)와 initMessageSource(). Environment의 validateRequiredProperties()와 명령행 인자를 PropertySource로 만드는 CommandLinePropertySource. 웹 컨텍스트가 initPropertySources()를 덮어써 서블릿 설정을 끼우는 길(AbstractApplicationContext 710–712행). ResourceEditor로 @Value("classpath:…")를 Resource 필드에 바로 넣는 길(734행). JAR 안을 뒤지는 doFindPathMatchingJarResources()(865행).
정리
| 개념 | 한 줄 요약 |
|---|---|
ApplicationContext |
BeanFactory 계열 + ApplicationEventPublisher + EnvironmentCapable + ResourcePatternResolver + MessageSource |
publishEvent() |
ApplicationEvent가 아니면 감싸고, 멀티캐스터가 없으면 쌓아 두고, 있으면 보내고, 부모에게도 보낸다 |
| 멀티캐스터 | 이벤트 타입별 리스너 목록을 캐시하고 @Order로 정렬해 차례로 부른다. executor가 없으면 보낸 스레드에서 동기로 |
ApplicationListener 빈 |
⑩단계 registerListeners()에서 이름으로 등록. 쌓인 이벤트는 그때 나간다 |
@EventListener |
⑪단계 끝 afterSingletonsInstantiated()에서 메서드마다 ApplicationListenerMethodAdapter로. 반환값은 새 이벤트 |
| 컨텍스트 이벤트 | Refreshed(⑫단계), Started, Stopped, Closed(빈을 부수기 전) |
Environment |
프로퍼티(PropertyResolver) + 프로파일. 기본 구현 StandardEnvironment |
PropertySource 목록 |
앞이 우선. 시스템 프로퍼티 → 환경 변수 → @PropertySource 파일 순 |
${key:default} |
PropertyPlaceholderHelper가 목록에서 찾고, 값 안의 ${…}도 다시 푼다 |
| 프로파일 | Set<String> 하나. 비어 있으면 spring.profiles.active를 읽는다. @Profile 판정은 refresh() 도중 |
@Value("${…}") |
등록된 리졸버가 없으면 ⑪단계에서 Environment.resolvePlaceholders()가 기본 리졸버로 등록된다 |
Resource |
getInputStream() 위에 exists()·getURL()·getFile(). 구현은 읽는 곳으로 나뉜다 |
getResource(String) |
/ → 경로, classpath: → ClassPathResource, URL이면 UrlResource/FileUrlResource, 아니면 경로 |
getResources(String) |
컨텍스트가 PathMatchingResourcePatternResolver에 위임. classpath*:는 클래스패스 전부 |
다음에 볼 것
이것으로 1편 지도의 Phase 1(컨테이너, U01–U08)과 Phase 2(AOP, U09–U10)를 다 읽었습니다. 다음부터는 Phase 3(기반 기술) 네 편이 이어집니다. 지도에서 "따로 진도를 나가지 않고 막힐 때 꺼내 본다"고 했던 층인데, 지금까지 열 편을 쓰면서 계속 이름만 부르고 넘어간 클래스들이 쌓였습니다. 이 글만 해도 리스너의 제네릭 타입을 비교하는 ResolvableType, @EventListener를 찾는 AnnotatedElementUtils, 프로퍼티 값을 타입에 맞게 바꾸는 convertValueIfNecessary(), condition을 계산하는 SpEL이 그렇습니다.