이 글에서 다루는 것
"nginx 소스 파헤치기" 연재의 열한 번째 글입니다. 9편에서 요청이 11단계 phase 를 지나 location 을 고르고 CONTENT phase 에서 콘텐츠 핸들러를 부르는 데까지, 10편에서는 그 핸들러가 정적 파일이었을 때 응답이 필터 사슬을 지나 sendfile 로 나가는 길을 봤습니다. 이번에는 콘텐츠 핸들러가 proxy_pass 인 경우입니다. nginx 가 응답을 스스로 만들지 않고, 뒤에 있는 다른 서버(백엔드)에 요청을 다시 보내 받은 응답을 클라이언트에게 돌려주는 리버스 프록시입니다.
2편의 지도에서 이 글은 "C. HTTP 요청 하나" 줄의 upstream·proxy 상자를 확대합니다.
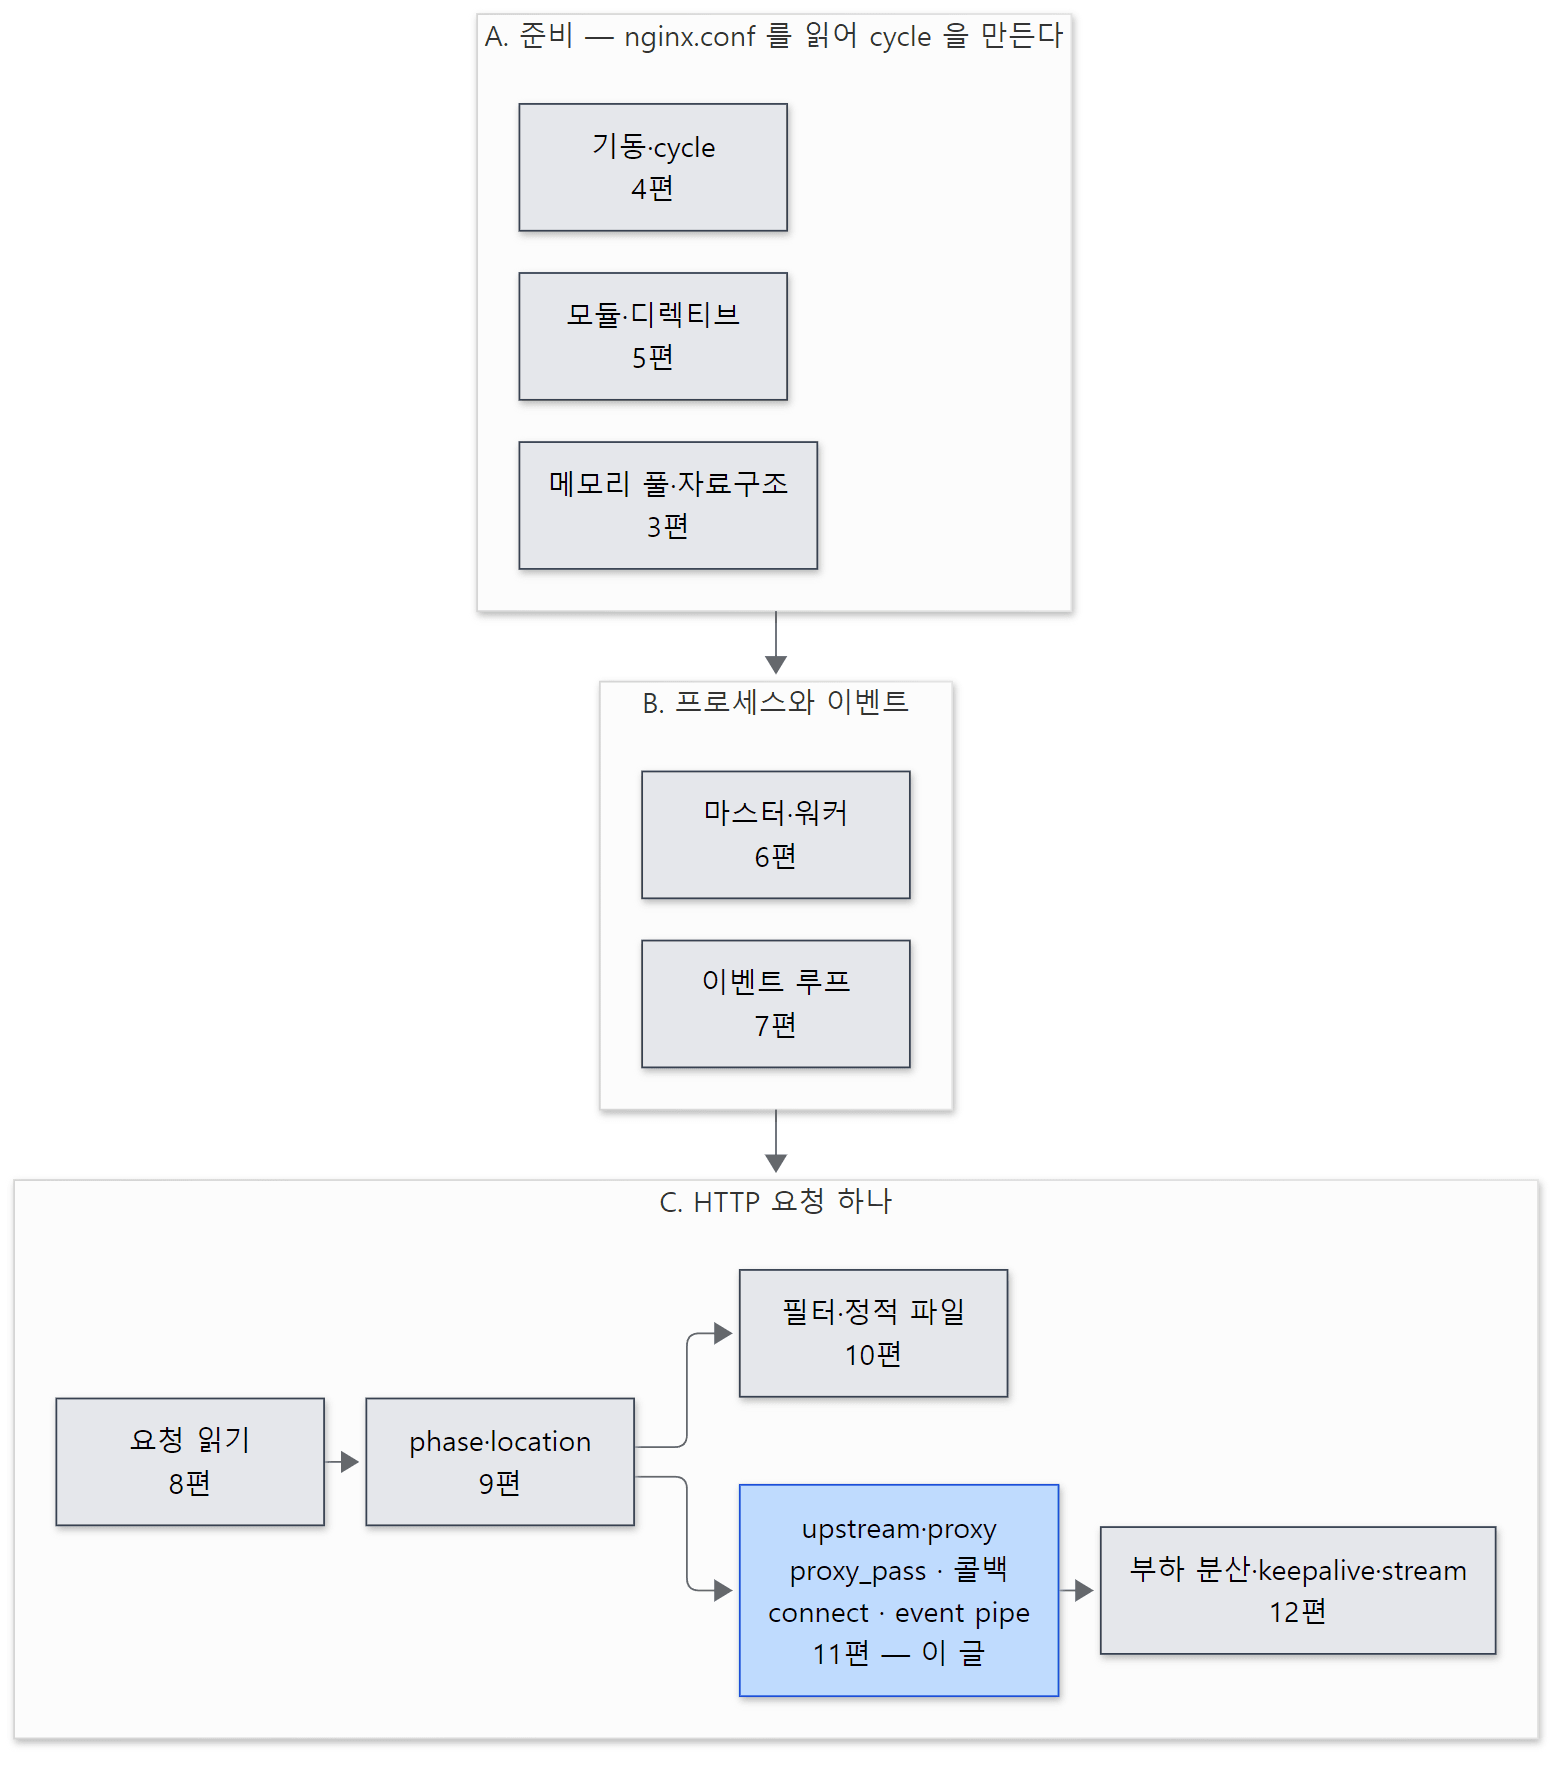 파란 상자가 이 글입니다. 9편의 CONTENT phase 에서 정적 파일(10편) 대신 이쪽으로 갈라지고, "어느 서버로 연결하나"는 12편이 맡습니다.
답하려는 질문은 네 가지입니다.
proxy_pass http://127.0.0.1:9000;한 줄은 소스에서 무엇을 걸어 두나 — 그리고 proxy 모듈과ngx_http_upstream.c는 일을 어떻게 나누나- 워커가 백엔드에 연결하고 응답을 기다리는 동안 왜 다른 요청이 멈추지 않나 — 요청 하나가 지나는 함수의 순서
- 백엔드가 실제로 받는 요청은 어떻게 생겼나 —
HTTP/1.1,Host, 그리고 보내지 않는Connection헤더 - 백엔드가 꺼져 있거나 느리면 어디서 502·504 가 정해지고 언제 다른 서버로 다시 시도하나,
proxy_buffering은 응답 흐름을 어떻게 바꾸나
| 항목 | 내용 |
|---|---|
| 대상 | nginx |
| 버전 | nginx 1.31.9 (master, 개발판) |
| 커밋 | 9a7439fd79 (2026-10-23) |
| 주로 읽는 파일 | src/http/modules/ngx_http_proxy_module.c, src/http/ngx_http_upstream.[ch], src/event/ngx_event_connect.c, src/event/ngx_event_pipe.c |
글에 나오는 줄 번호는 모두 이 커밋 기준입니다. 같은 커밋의 소스를 받고 예제용 도커 이미지를 만드는 방법은 1편에 있습니다.
ngx_http_upstream.c 하나가 7,405줄, ngx_http_proxy_module.c 가 5,472줄입니다. 캐시, 백엔드와의 TLS, WebSocket 업그레이드처럼 같은 파일에 사는 기능이 많습니다. 이 글은 HTTP/1.x 백엔드에 GET 요청 하나를 보내고 응답을 돌려받는 큰 줄기만 골랐고, 뺀 것은 글 끝의 "이 글에서 뺀 것"에 이름과 위치만 적어 두었습니다.
먼저 알아 둘 말
upstream 은 nginx 뒤에 있는 서버, 곧 백엔드를 nginx 가 부르는 이름입니다. 설정 파일의 upstream {} 블록이 그 묶음이고, 소스에서는 두 가지를 가리킵니다. 하나는 설정 쪽의 서버 묶음(ngx_http_upstream_srv_conf_t), 다른 하나는 요청마다 하나씩 만드는 ngx_http_upstream_t — "이 요청을 백엔드에 보내고 응답을 받아 오는 일" 전체의 상태를 담는 구조체입니다. 이 글의 주인공은 뒤의 것입니다.
콘텐츠 핸들러는 CONTENT phase 에서 응답 본문을 만드는 함수입니다. location 설정(ngx_http_core_loc_conf_t)의 handler 필드에 함수 포인터가 들어 있으면 CONTENT phase 는 다른 핸들러를 보지 않고 그것만 부릅니다(9편).
콜백(callback)은 "내가 알맞은 때에 불러 줄 테니 함수를 맡겨 두라"는 약속입니다. C 에서는 구조체의 함수 포인터 필드로 만듭니다. ngx_http_upstream_t 에는 create_request, process_header 같은 함수 포인터가 있고, proxy 모듈이 자기 함수를 거기에 넣습니다. 모듈이 함수 포인터 표로 끼어드는 방식은 5편에서 봤고, C 문법이 낯설면 httpd 2편이 도움이 됩니다.
peer 는 연결할 서버 주소 하나입니다. 요청마다 쓰는 ngx_peer_connection_t(u->peer)에는 고른 주소와 연결, 그리고 "서버를 골라 줘"(get)·"다 썼어"(free) 함수 포인터가 있습니다. 누가 어떤 규칙으로 고르는지는 12편에서 봅니다. 이 글에서는 "get 을 부르면 주소가 나온다"고만 생각하면 됩니다.
논블로킹 connect. 소켓을 논블로킹으로 두고 connect() 를 부르면, 연결이 끝날 때까지 기다리지 않고 바로 -1 과 EINPROGRESS("진행 중")를 돌려줍니다. 연결이 끝나면 그 소켓이 쓰기 가능해졌다는 이벤트가 옵니다. 워커 하나가 이벤트 루프 하나로 수천 연결을 돌리는 nginx(7편)에서는 백엔드 연결도 이렇게 해야 합니다.
event pipe 는 src/event/ngx_event_pipe.c 의 ngx_event_pipe_t 로, 백엔드 쪽 소켓에서 읽어 클라이언트 쪽 소켓으로 내보내는 "관"입니다. 그 사이에 버퍼 여러 개와, 버퍼가 모자라면 쓰는 임시 파일을 둡니다. proxy_buffering on(기본값)일 때 쓰입니다. 버퍼(ngx_buf_t)와 버퍼 사슬(ngx_chain_t)은 3편에서 봤습니다.
1. proxy_pass 한 줄이 거는 것
설정을 읽을 때: 콘텐츠 핸들러와 upstream 하나
proxy_pass 디렉티브를 만나면 설정 파서는 proxy 모듈의 ngx_http_proxy_pass() 를 부릅니다(디렉티브 이름으로 함수를 찾는 과정은 5편).
    if (plcf->upstream.upstream || plcf->proxy_lengths) {
        return "is duplicate";
    }

    clcf = ngx_http_conf_get_module_loc_conf(cf, ngx_http_core_module);

    clcf->handler = ngx_http_proxy_handler;

    if (clcf->name.len && clcf->name.data[clcf->name.len - 1] == '/') {
        clcf->auto_redirect = 1;
    }

    /* ... */
    ngx_memzero(&u, sizeof(ngx_url_t));

    u.url.len = url->len - add;
    u.url.data = url->data + add;
    u.default_port = port;
    u.uri_part = 1;
    u.no_resolve = 1;

    plcf->upstream.upstream = ngx_http_upstream_add(cf, &u, 0);
    if (plcf->upstream.upstream == NULL) {
        return NGX_CONF_ERROR;
    }
src/http/modules/ngx_http_proxy_module.c 4391–4465행
이 함수가 하는 일은 셋입니다.
- 이 location 의 콘텐츠 핸들러를
ngx_http_proxy_handler로 정합니다(4397행). 핸들러를 거는 곳이 proxy 모듈 자기 설정이 아니라 core 모듈의 location 설정(clcf)이라는 점이 중요합니다. 요청이 이 location 에 오면ngx_http_update_location_config()가r->content_handler = clcf->handler;로 옮겨 두고(src/http/ngx_http_core_module.c 1431–1433행), CONTENT phase 의 checker(phase 마다 그 phase 의 핸들러를 부르는 틀 함수, 9편)는 그것을 부르고 돌려받은 값으로ngx_http_finalize_request()를 부릅니다(1309–1313행). - location 이름이
/로 끝나면auto_redirect를 켭니다(4399–4401행).location /plain/에/plain으로 오면/plain/으로 301 을 돌려주는 동작이 여기서 옵니다. - URL 에서
http://를 떼고ngx_http_upstream_add()로 upstream 하나를 만들거나 찾습니다(4462행).upstream {}블록 없이 주소를 바로 적어도 nginx 안에서는 이름이127.0.0.1이고 서버가 하나뿐인 upstream 이 생깁니다. 같은 이름의upstream {}블록이 있으면 그것을 돌려줍니다(src/http/ngx_http_upstream.c 6859–6903행). 이렇게 블록 없이 생긴 것을 흔히 암묵적 upstream 이라고 부릅니다. 12편에서 보듯 이 판에서 기본으로 켜지는 upstream keepalive 는 이것에는 걸리지 않습니다.
URL 에 $ 변수가 있으면(proxy_pass http://$backend;) 4407행의 ngx_http_script_variables_count() 가 0 이 아니어서, upstream 을 미리 만들지 않고 URL 을 스크립트로 컴파일해 둔 뒤 요청마다 계산합니다(줄인 4409–4430행). 이 글은 변수가 없는 경우만 봅니다.
ngx_http_proxy_set_vars() 는 URL 에서 나중에 쓸 조각을 뽑아 둡니다. 포트가 기본값(80)이면 Host 로 보낼 값이 127.0.0.1, 아니면 127.0.0.1:9000 이고, URL 의 경로 부분(http://127.0.0.1:9000/v1/ 의 /v1/)은 vars.uri 에 들어갑니다(5446–5471행).
헷갈리기 쉬운 곳: proxy_pass 뒤에 경로를 붙이느냐 마느냐
proxy_pass http://127.0.0.1:9000; 과 proxy_pass http://127.0.0.1:9000/v1/; 은 끝에 경로가 있느냐만 다르지만, 백엔드로 가는 URI 가 다릅니다. 갈림길은 요청을 만드는 ngx_http_proxy_create_request() 의 요청 줄 부분(1393–1418행)에 있습니다.
- 경로가 없으면(
ctx->vars.uri.len == 0) 클라이언트가 보낸 URI 를 해석하기 전 모양 그대로(r->unparsed_uri) 붙입니다. 길이를 계산하는 1263–1265행에서unparsed_uri = 1이 정해집니다. - 경로가 있으면 location 이름의 길이(
loc_len)만큼 앞을 잘라 내고 그 자리에vars.uri를 붙인 뒤, 나머지와?args를 잇습니다.location /api/+proxy_pass …/v1/이면/api/users가/v1/users가 됩니다.
정규식 location 이나 if 안에서는 "location 이름의 길이만큼 잘라 낸다"는 계산이 성립하지 않으므로, 그런 곳에서 경로가 붙은 proxy_pass 를 쓰면 설정을 읽을 때 "proxy_pass" cannot have URI part in location given by regular expression … 으로 거절합니다(같은 함수의 4475–4491행).
예제 1: 백엔드가 받은 요청 줄
받은 요청 줄과 헤더를 그대로 본문으로 돌려주는 python3 백엔드(포트 9000)를 띄우고, 세 location 으로 요청을 보냈습니다. 이 예제는 기준 커밋(9a7439fd79)을 그대로 빌드한 nginx 1.31.9 로 도커 컨테이너(Debian bookworm, --with-debug)에서 실행했습니다. 예제 폴더는 ex/u11-proxy-basics 입니다.
# 이 글을 위해 쓴 예제입니다 (nginx 의 소스가 아닙니다)
# ... (앞부분 설정과 http { 는 줄이고, server {} 만 들여쓰기를 당겨 옮김)
server {
    listen 8080;

    # 1) URI 부분이 없는 proxy_pass — 클라이언트가 보낸 URI 를 그대로 넘긴다
    location /plain/ {
        proxy_pass http://127.0.0.1:9000;
    }

    # 2) URI 부분이 있는 proxy_pass — location 접두사 /api/ 를 /v1/ 로 바꿔 넘긴다
    location /api/ {
        proxy_pass http://127.0.0.1:9000/v1/;
    }

    # 3) proxy_set_header 로 헤더를 더하고 Host 를 바꾼다
    location /hdr/ {
        proxy_pass http://127.0.0.1:9000;
        proxy_set_header Host $host;
        proxy_set_header X-Real-IP $remote_addr;
    }
}
=== 1. proxy_pass without URI part: /plain/a?x=1 ===
request line: GET /plain/a?x=1 HTTP/1.1
  Host: 127.0.0.1:9000
  User-Agent: curl/7.88.1
  Accept: */*
=== 2. proxy_pass with URI part: /api/users?id=7 ===
request line: GET /v1/users?id=7 HTTP/1.1
  Host: 127.0.0.1:9000
  User-Agent: curl/7.88.1
  Accept: */*
/plain/a?x=1 은 그대로, /api/users?id=7 은 /v1/users?id=7 로 갔습니다. 두 경우 모두 요청 줄 끝이 HTTP/1.1 이고 Host 가 127.0.0.1:9000 입니다. 이 둘이 어디서 오는지는 4절에서 봅니다(3번 location 의 결과도 거기서).
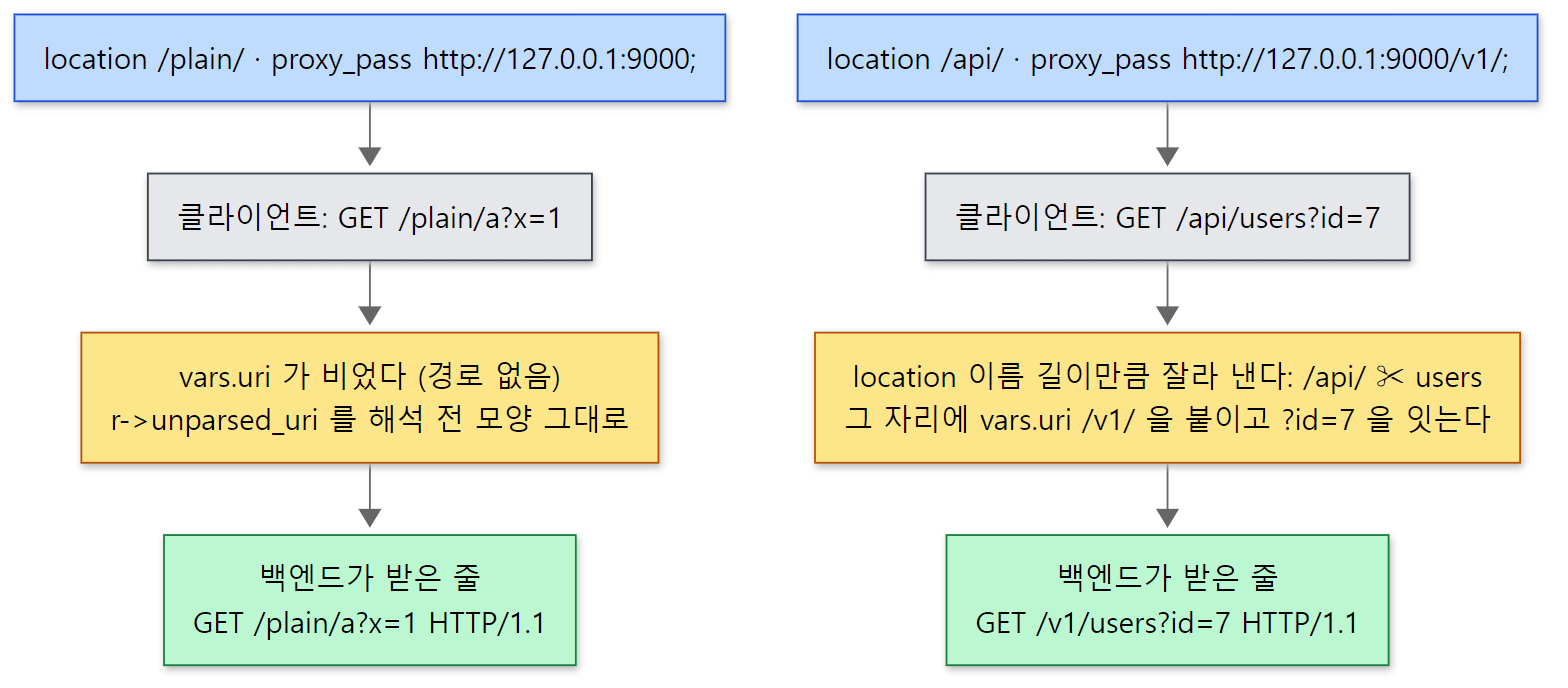 proxy_pass 뒤 경로가 있느냐 없느냐의 차이. 초록 칸은 위 예제 1 출력의 요청 줄입니다(ngx_http_proxy_module.c 1393–1418행).
2. 일을 나누는 방식 — ngx_http_upstream_t 와 콜백
proxy_pass 말고도 fastcgi_pass, uwsgi_pass, scgi_pass, grpc_pass, memcached_pass 가 모두 "백엔드에 연결해 요청을 보내고 응답을 받아 온다"는 같은 일을 합니다. 다른 것은 요청을 어떤 바이트로 만드느냐와 응답의 머리를 어떻게 읽느냐뿐입니다. nginx 는 같은 부분을 ngx_http_upstream.c 에 한 번 쓰고, 다른 부분만 모듈이 함수 포인터로 꽂게 했습니다.
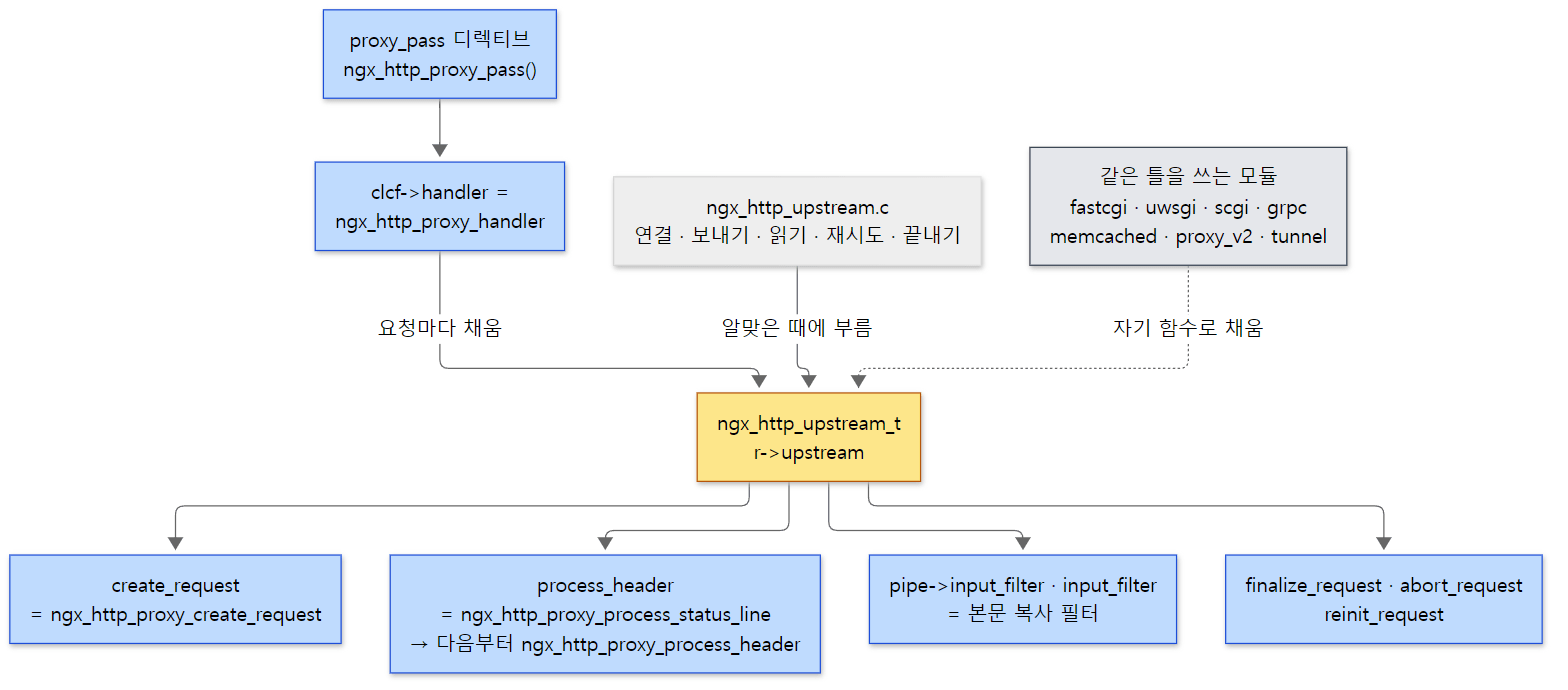 노란 상자가 요청마다 하나 생기는 구조체, 파란 상자가 proxy 모듈이 끼워 넣는 함수입니다.
ngx_http_upstream_s — 필요한 필드만
struct ngx_http_upstream_s {
    ngx_http_upstream_handler_pt     read_event_handler;
    ngx_http_upstream_handler_pt     write_event_handler;

    ngx_peer_connection_t            peer;

    ngx_event_pipe_t                *pipe;

    ngx_chain_t                     *request_bufs;

    ngx_output_chain_ctx_t           output;
    ngx_chain_writer_ctx_t           writer;

    ngx_http_upstream_conf_t        *conf;
    ngx_http_upstream_srv_conf_t    *upstream;
    /* ... */
    ngx_int_t                      (*input_filter_init)(void *data);
    ngx_int_t                      (*input_filter)(void *data, ssize_t bytes);
    void                            *input_filter_ctx;

    /* ... */
    ngx_int_t                      (*create_request)(ngx_http_request_t *r);
    ngx_int_t                      (*reinit_request)(ngx_http_request_t *r);
    ngx_int_t                      (*process_header)(ngx_http_request_t *r);
    void                           (*abort_request)(ngx_http_request_t *r);
    void                           (*finalize_request)(ngx_http_request_t *r,
                                         ngx_int_t rc);
    /* ... */
    unsigned                         buffering:1;
    unsigned                         keepalive:1;
    unsigned                         upgrade:1;
    unsigned                         error:1;

    unsigned                         request_sent:1;
    unsigned                         request_body_sent:1;
    unsigned                         request_body_blocked:1;
    unsigned                         header_sent:1;
    unsigned                         response_received:1;
};
src/http/ngx_http_upstream.h 342–426행
세 무리로 읽으면 됩니다.
- 맨 위의
read_event_handler·write_event_handler는 백엔드 연결에 이벤트가 왔을 때 부를 함수입니다. 3절에서 보듯 단계마다 바뀝니다.peer는 앞에서 말한ngx_peer_connection_t이고,pipe는 버퍼링할 때 쓰는 event pipe,request_bufs는 백엔드로 보낼 요청 바이트의 사슬입니다. - 가운데 함수 포인터들이 모듈이 채우는 콜백입니다.
create_request는 요청 바이트 만들기,process_header는 응답 머리 읽기,input_filter_init·input_filter는 본문을 받을 때 길이를 세고 덩이를 나누는 필터,finalize_request는 끝날 때 정리입니다.reinit_request는 다른 서버로 다시 시도할 때 모듈의 상태를 처음으로 돌립니다. - 맨 아래 비트 필드는 진행 상태입니다.
request_sent(요청을 보내기 시작했나),header_sent(클라이언트에 응답 헤더를 보냈나) 같은 값이 5절의 재시도 판단에 쓰입니다.keepalive는 이 연결을 다시 써도 되느냐는 표시로, 12편의 keepalive 모듈이 봅니다.
proxy 모듈이 채우는 곳 — ngx_http_proxy_handler()
1절에서 건 콘텐츠 핸들러입니다. 요청마다 불립니다.
    if (ngx_http_upstream_create(r) != NGX_OK) {
        return NGX_HTTP_INTERNAL_SERVER_ERROR;
    }
    /* ... */
    u->create_request = ngx_http_proxy_create_request;
    u->reinit_request = ngx_http_proxy_reinit_request;
    u->process_header = ngx_http_proxy_process_status_line;
    u->abort_request = ngx_http_proxy_abort_request;
    u->finalize_request = ngx_http_proxy_finalize_request;
    /* ... */
    u->buffering = plcf->upstream.buffering;

    u->pipe = ngx_pcalloc(r->pool, sizeof(ngx_event_pipe_t));
    if (u->pipe == NULL) {
        return NGX_HTTP_INTERNAL_SERVER_ERROR;
    }

    u->pipe->input_filter = ngx_http_proxy_copy_filter;
    u->pipe->input_ctx = r;

    u->input_filter_init = ngx_http_proxy_input_filter_init;
    u->input_filter = ngx_http_proxy_non_buffered_copy_filter;
    u->input_filter_ctx = r;
    /* ... */
    rc = ngx_http_read_client_request_body(r, ngx_http_upstream_init);

    if (rc >= NGX_HTTP_SPECIAL_RESPONSE) {
        return rc;
    }

    return NGX_DONE;
src/http/modules/ngx_http_proxy_module.c 894–976행
ngx_http_upstream_create()가 요청 풀에서ngx_http_upstream_t를 하나 할당해r->upstream에 답니다(516–545행). 요청 풀에서 나오므로 요청이 끝나면 함께 사라집니다.- 콜백 다섯 개를 채웁니다(931–935행).
process_header에는 상태 줄 파서가 먼저 들어갑니다. - event pipe 를 하나 할당하고, 버퍼링할 때와 하지 않을 때 쓸 본문 필터를 따로 겁니다(948–958행).
- 마지막으로
ngx_http_read_client_request_body(r, ngx_http_upstream_init)를 부릅니다. 이름 그대로 클라이언트의 요청 본문을 먼저 다 읽고, 다 읽으면 두 번째 인자인ngx_http_upstream_init을 불러 달라는 뜻입니다. GET 처럼 본문이 없으면 곧바로 부릅니다. 기본값proxy_request_buffering on이면 본문을 메모리나 임시 파일에 다 받아 둔 뒤에 백엔드 연결을 시작합니다.
핸들러는 NGX_DONE 을 돌려줍니다. "아직 끝나지 않았지만 내가 알아서 끝내겠다"는 뜻입니다. 요청이 바로 해제되지 않는 것은 ngx_http_read_client_request_body() 가 첫 줄에서 요청의 참조 수 r->main->count 를 하나 올려 두기 때문입니다(src/http/ngx_http_request_body.c 43행). 이 뒤로 요청은 백엔드 소켓의 이벤트에 끌려 움직입니다.
상태 줄을 읽으면 process_header 가 바뀐다
process_header 에 처음 들어가는 ngx_http_proxy_process_status_line() 은 HTTP/1.1 200 OK 한 줄을 읽고 나면 자기 자리를 헤더 파서로 바꿉니다.
    if (ctx->status.http_version < NGX_HTTP_VERSION_11) {

        if (ctx->status.code == NGX_HTTP_EARLY_HINTS) {
            ngx_log_error(NGX_LOG_ERR, r->connection->log, 0,
                          "upstream sent HTTP/1.0 response with early hints");
            return NGX_HTTP_UPSTREAM_INVALID_HEADER;
        }

        u->headers_in.connection_close = 1;
    }

    u->process_header = ngx_http_proxy_process_header;

    return ngx_http_proxy_process_header(r);
src/http/modules/ngx_http_proxy_module.c 1874–1887행
upstream 쪽은 응답 머리를 읽을 때마다 u->process_header(r) 만 부르면 되고, 지금 상태 줄 차례인지 헤더 차례인지는 proxy 모듈이 함수 포인터를 바꿔 기억합니다. 8편에서 클라이언트 요청을 읽을 때 ngx_http_process_request_line 이 끝나면 핸들러를 ngx_http_process_request_headers 로 바꾸던 것과 같은 수법입니다. 백엔드가 HTTP/1.0 으로 답하면 여기서 connection_close 를 켜 두어, 그 연결은 다시 쓰지 않습니다.
같은 틀을 쓰는 모듈들
ngx_http_upstream_create(r) 를 부르는 파일을 찾으면 이 커밋에서 8개입니다.
| 모듈 | 디렉티브 | 백엔드 프로토콜 |
|---|---|---|
ngx_http_proxy_module.c |
proxy_pass |
HTTP/1.0, 1.1 |
ngx_http_proxy_v2_module.c |
proxy_http_version 2 일 때 |
HTTP/2 |
ngx_http_fastcgi_module.c |
fastcgi_pass |
FastCGI (PHP-FPM 등) |
ngx_http_uwsgi_module.c |
uwsgi_pass |
uwsgi |
ngx_http_scgi_module.c |
scgi_pass |
SCGI |
ngx_http_grpc_module.c |
grpc_pass |
gRPC (HTTP/2) |
ngx_http_memcached_module.c |
memcached_pass |
memcached |
ngx_http_tunnel_module.c |
tunnel_pass (1.31.x 에서 들어옴) |
(이 글에서 보지 않음) |
memcached 를 뺀 일곱 모듈이 ngx_http_read_client_request_body(r, ngx_http_upstream_init) 로 upstream 을 시작합니다(memcached 는 요청 본문을 ngx_http_discard_request_body() 로 버리고 ngx_http_upstream_init() 을 바로 부릅니다). ngx_http_proxy_handler() 맨 앞의 888–892행은 proxy_http_version 2 이면 아예 ngx_http_proxy_v2_handler() 로 넘깁니다(HTTP/2 백엔드는 1.30.x 에도 있습니다). ngx_http_tunnel_module.c 는 1.30.6 에는 없는 파일로, 이 글에서는 다루지 않습니다.
헷갈리기 쉬운 곳: abort_request 는 아무도 부르지 않습니다
모든 upstream 모듈이 u->abort_request 를 채우지만, 이 커밋의 src/ 전체에서 이 포인터를 부르는 곳은 없습니다(grep -rn 'abort_request' src 로 보면 구조체 선언과 대입문, 각 모듈의 함수 정의뿐입니다). proxy 의 것도 디버그 로그 한 줄을 찍고 돌아오는 빈 함수입니다(2722–2728행). 실제로 끝낼 때 불리는 것은 finalize_request 이고, proxy 에서는 이것도 로그만 찍습니다. 정리는 대부분 upstream 쪽이 합니다(6절).
3. 한 요청의 여정 — init, connect, send, process_header
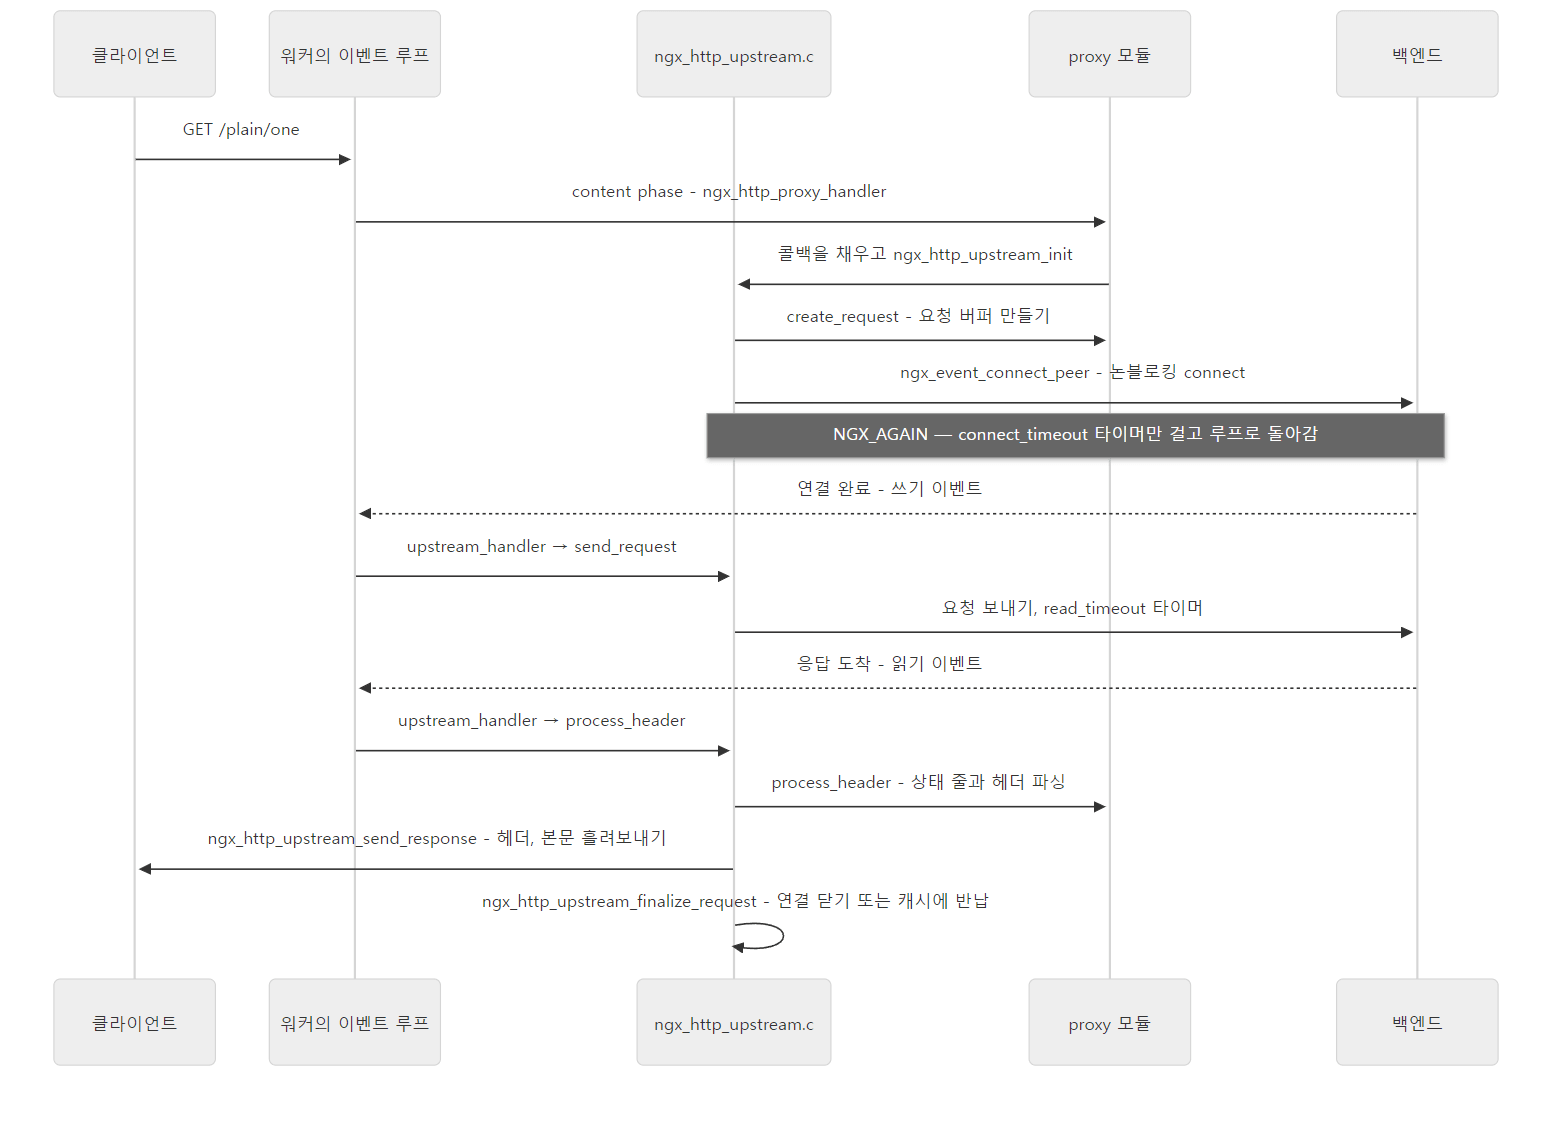 점선 화살표가 이벤트 루프가 깨워 주는 자리입니다. 그 사이마다 워커는 다른 연결을 돌립니다.
ngx_http_upstream_init_request() — 요청을 만들고, 서버를 고를 준비
ngx_http_upstream_init() 은 클라이언트 연결의 읽기 타이머를 지우고 ngx_http_upstream_init_request() 를 부릅니다(549–589행). 거기서 이 글에 필요한 줄은 이렇습니다.
    if (r->request_body) {
        u->request_bufs = r->request_body->bufs;
    }

    if (u->create_request(r) != NGX_OK) {
        ngx_http_finalize_request(r, NGX_HTTP_INTERNAL_SERVER_ERROR);
        return;
    }
    /* ... */
    if (uscf->peer.init(r, uscf) != NGX_OK) {
        ngx_http_upstream_finalize_request(r, u,
                                           NGX_HTTP_INTERNAL_SERVER_ERROR);
        return;
    }

    u->peer.start_time = ngx_current_msec;

    if (u->conf->next_upstream_tries
        && u->peer.tries > u->conf->next_upstream_tries)
    {
        u->peer.tries = u->conf->next_upstream_tries;
    }

    ngx_http_upstream_connect(r, u);
src/http/ngx_http_upstream.c 671–868행
- 요청 바이트를 먼저 다 만듭니다(675행, 4절). 연결하기 전에 만들어 두므로, 다른 서버로 다시 시도할 때도 같은 버퍼를 다시 보냅니다.
uscf->peer.init(r, uscf)는 이 요청이 쓸 서버 고르기 상태를 준비합니다(854행). 기본은 라운드 로빈이고,u->peer.get·u->peer.free가 여기서 채워집니다. 그 안은 12편입니다. 이때u->peer.tries(시도할 수 있는 횟수, 보통 서버 수)도 정해집니다.- 그리고
ngx_http_upstream_connect()입니다.
줄인 679–853행에는 proxy_bind, 소켓 옵션, 출력 사슬 준비, 그리고 proxy_pass http://$host 처럼 요청 때 주소를 정하는 경우의 DNS 조회(resolver)가 있습니다.
ngx_event_connect_peer() — 논블로킹 connect
src/event/ 에 있는 함수입니다. HTTP 만의 것이 아니라 stream·mail 모듈도 같은 함수로 백엔드에 연결합니다.
    rc = pc->get(pc, pc->data);
    if (rc != NGX_OK) {
        return rc;
    }
    /* ... */
    s = ngx_socket(pc->sockaddr->sa_family, type, 0);
    /* ... */
    c = ngx_get_connection(s, pc->log);
    /* ... */
    if (ngx_nonblocking(s) == -1) {
        ngx_log_error(NGX_LOG_ALERT, pc->log, ngx_socket_errno,
                      ngx_nonblocking_n " failed");

        goto failed;
    }
src/event/ngx_event_connect.c 34–105행
먼저 pc->get() 으로 서버를 고르고(34행), 소켓을 만들어 worker_connections 만큼 미리 만들어 둔 빈 연결 구조체 하나에 담고(7편), 논블로킹으로 바꿉니다. 백엔드 연결도 클라이언트 연결과 같은 연결 배열에서 꺼내므로 worker_connections 를 함께 씁니다. 프록시로 쓰는 워커는 요청 하나에 연결 두 개를 쓰는 셈입니다.
    rc = connect(s, pc->sockaddr, pc->socklen);

    if (rc == -1) {
        err = ngx_socket_errno;


        /* ... */

    if (ngx_add_conn) {
        if (rc == -1) {

            /* NGX_EINPROGRESS */

            return NGX_AGAIN;
        }

        ngx_log_debug0(NGX_LOG_DEBUG_EVENT, pc->log, 0, "connected");

        wev->ready = 1;

        return NGX_OK;
    }
src/event/ngx_event_connect.c 221–277행
ngx_add_conn 은 epoll 에서 연결의 읽기·쓰기를 한꺼번에 엣지 트리거로 등록하는 함수입니다(epoll 모듈이 이 포인터를 채웁니다. 등록 자체는 connect() 앞의 211–215행에서 이미 했습니다). 그 뒤 connect() 의 결과가 셋으로 갈립니다.
connect() 결과 |
돌려주는 값 | upstream 이 하는 일 |
|---|---|---|
| 바로 성공 | NGX_OK |
곧바로 요청 보내기 |
-1, EINPROGRESS |
NGX_AGAIN (-2) |
connect_timeout 타이머만 걸고 돌아감 |
-1, ECONNREFUSED 등 |
NGX_DECLINED |
ngx_http_upstream_next() 로 실패 처리 (5절) |
pc->get() 이 NGX_OK 가 아닌 값을 돌려주면 소켓을 만들기도 전에 그 값을 그대로 돌려줍니다(35–37행). 살아 있는 서버가 없으면 NGX_BUSY, 12편의 keepalive 모듈이 캐시에 있던 연결을 꺼내 주면 NGX_DONE 입니다.
헷갈리기 쉬운 곳: 같은 컴퓨터의 꺼진 포트도 "진행 중"으로 시작합니다
표의 세 번째 줄만 보면, 아무도 듣지 않는 127.0.0.1:9000 에 연결하면 connect() 가 바로 ECONNREFUSED 를 돌려줄 것 같습니다. 예제 1의 백엔드를 끈 채 요청을 보내고 디버그 로그를 보면 그렇지 않았습니다(ex/u11-proxy-basics 의 7번).
=== 7. backend stopped: where is 'Connection refused' noticed? ===
502
[debug] 157#157: *1 connect to 127.0.0.1:9000, fd:10 #2
[debug] 157#157: *1 http upstream connect: -2
[error] 157#157: *1 connect() failed (111: Connection refused) while connecting to upstream
[debug] 157#157: *1 http next upstream, 2
connect: -2, 곧 EINPROGRESS 로 시작했고, 거절은 이벤트 루프가 다시 깨워 준 뒤에 알았습니다(pid 와 연결 번호는 실행 환경에 따라 달라집니다). 그때 거절을 알아채는 것이 ngx_http_upstream_test_connect() 의 getsockopt(SO_ERROR) 입니다(3073–3083행). 요청을 보내기 전에(2185–2188행) 또는 응답을 읽기 전에(2485–2488행) 이것을 불러, 오류가 있으면 같은 문구 connect() failed 를 남기고 NGX_HTTP_UPSTREAM_FT_ERROR(값 2 — 로그의 http next upstream, 2)로 5절의 ngx_http_upstream_next() 를 부릅니다. 같은 문구가 두 곳에서 찍히므로, 어느 쪽인지는 바로 앞 줄의 http upstream connect: 값으로 가립니다.
ngx_http_upstream_connect() — 핸들러를 걸고 돌아간다
    c = u->peer.connection;

    c->requests++;

    c->data = r;

    c->write->handler = ngx_http_upstream_handler;
    c->read->handler = ngx_http_upstream_handler;

    u->write_event_handler = ngx_http_upstream_send_request_handler;
    u->read_event_handler = ngx_http_upstream_process_header;
    /* ... */
    if (rc == NGX_AGAIN) {
        ngx_add_timer(c->write, u->conf->connect_timeout);
        return;
    }
    /* ... */
    ngx_http_upstream_send_request(r, u, 1);
src/http/ngx_http_upstream.c 1652–1750행
백엔드 연결의 읽기·쓰기 이벤트 핸들러를 둘 다 ngx_http_upstream_handler 로 걸고(1658–1659행), 진짜 할 일은 u->write_event_handler·u->read_event_handler 에 따로 적어 둡니다(1661–1662행). NGX_AGAIN 이면 쓰기 이벤트에 connect_timeout 타이머를 걸고 그냥 돌아갑니다(1736–1739행). 워커는 이벤트 루프로 돌아가 다른 연결을 돌리고, 연결이 끝나면 epoll 이 쓰기 이벤트를 알려 줍니다.
ngx_http_upstream_handler() 는 이벤트의 방향을 보고 둘 중 하나를 부르는 배전반입니다.
    if (ev->write) {
        u->write_event_handler(r, u);

    } else {
        u->read_event_handler(r, u);
    }
src/http/ngx_http_upstream.c 1346–1351행
이벤트 핸들러는 한 번 걸어 두고, 단계가 바뀔 때는 u->…_event_handler 만 바꿉니다. 그 변화가 이 글 전체의 상태 기계입니다.
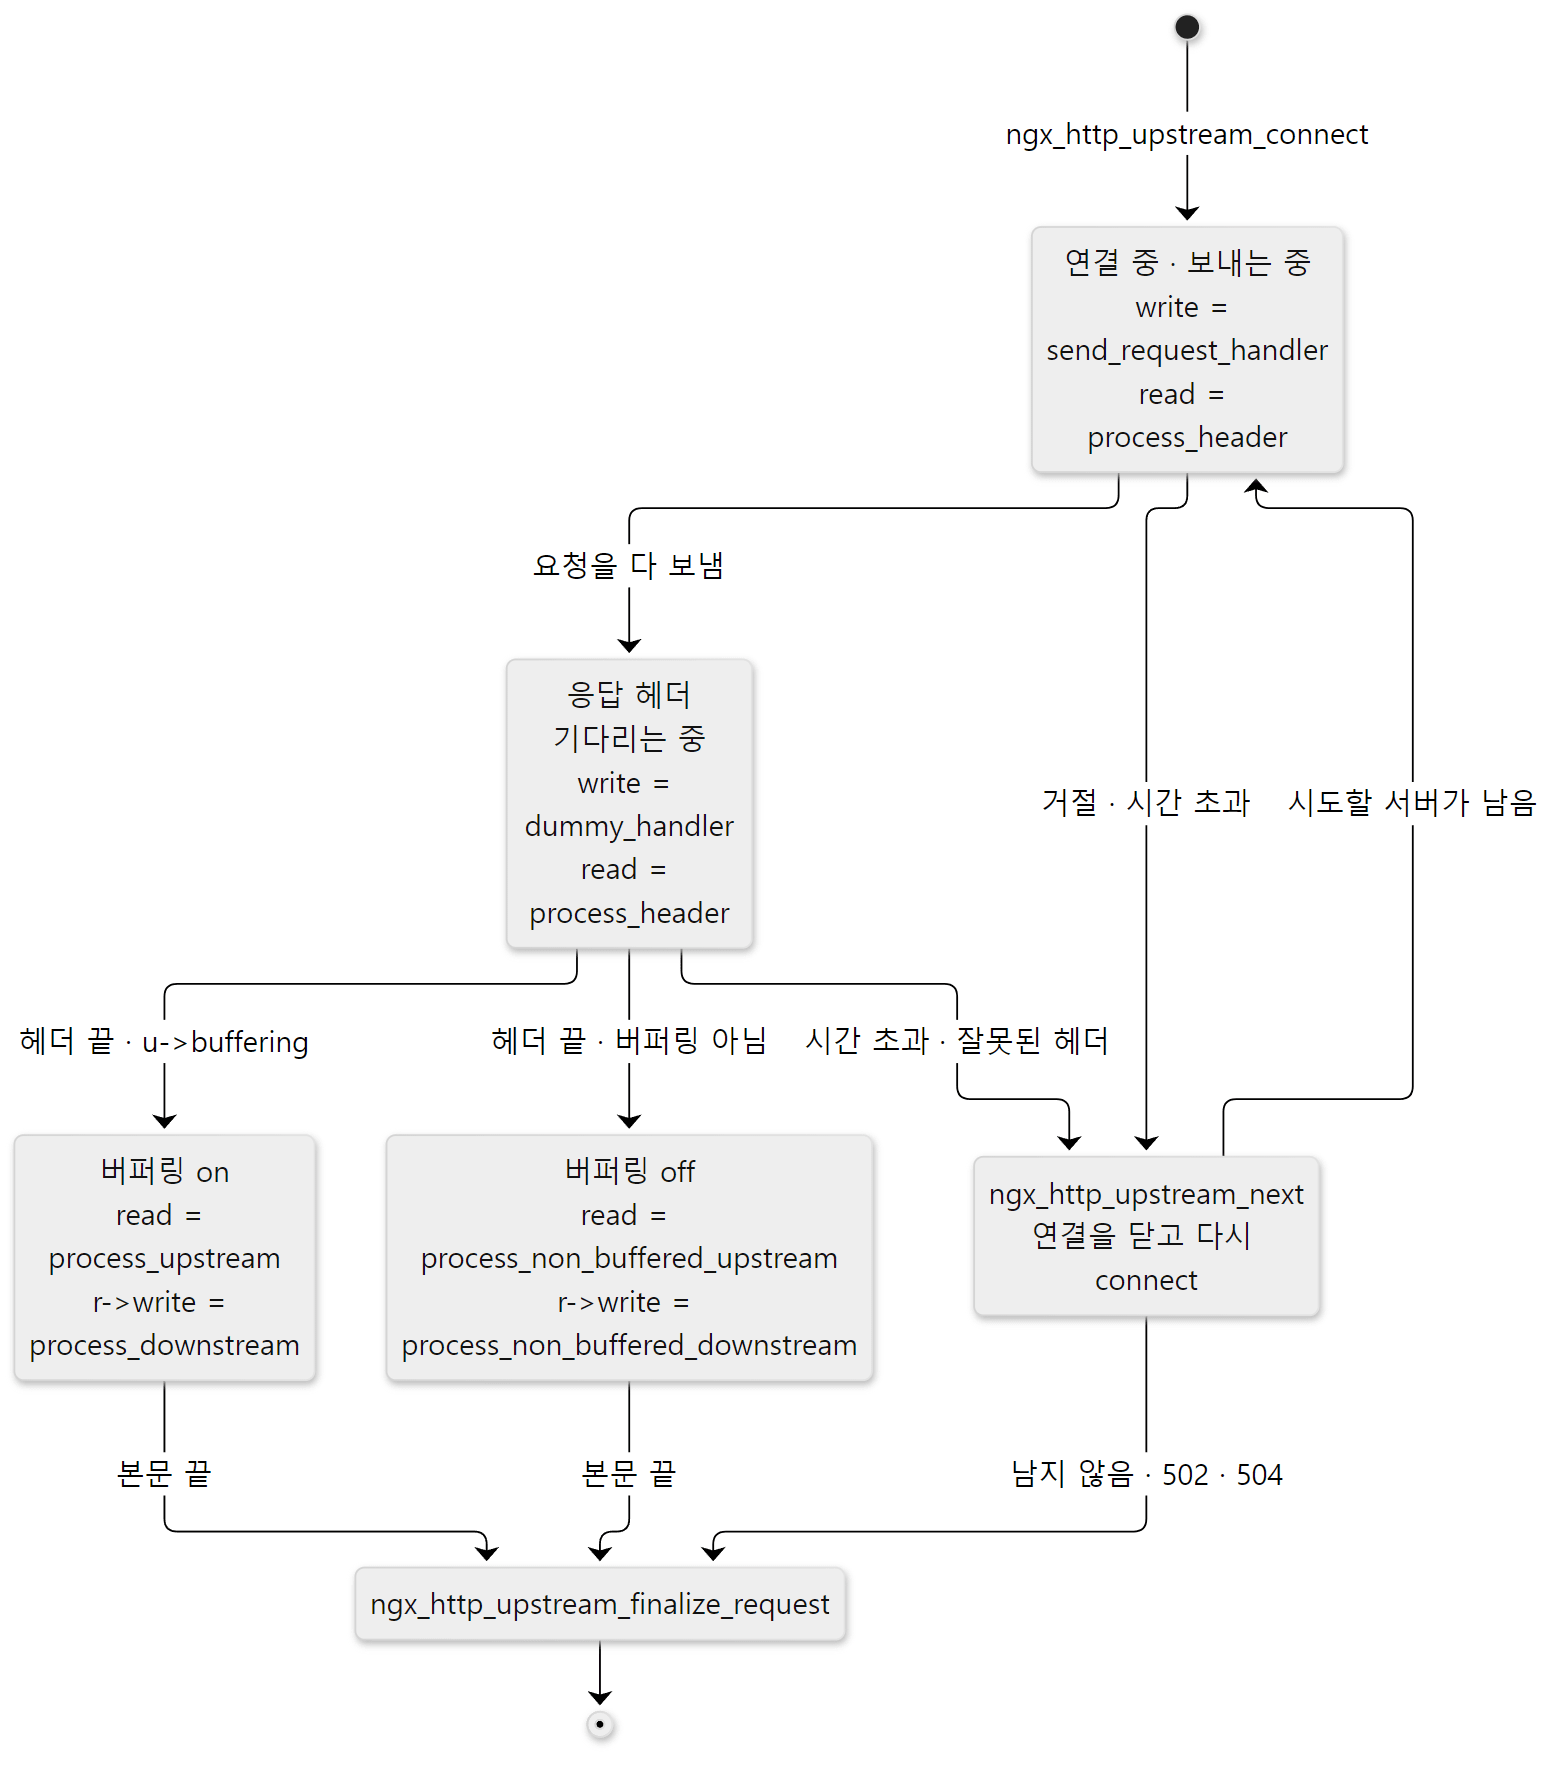 상자 안의 이름은 모두
ngx_http_upstream_ 을 뗀 함수 이름입니다. r->write 는 클라이언트 쪽 r->write_event_handler 입니다.
보내고, 읽기 타이머를 건다
쓰기 이벤트가 오면 ngx_http_upstream_send_request_handler() → ngx_http_upstream_send_request() 입니다. 처음 보낼 때는 ngx_http_upstream_test_connect() 로 connect 가 정말 성공했는지(SO_ERROR) 확인하고(2185–2188행), 요청 사슬을 씁니다. 다 썼으면 이렇게 끝납니다.
    if (!u->request_body_sent) {
        u->request_body_sent = 1;

        if (u->header_sent) {
            return;
        }

        if (u->conf->ignore_input) {
            ngx_http_upstream_process_header(r, u);
            return;
        }

        ngx_add_timer(c->read, u->conf->read_timeout);

        if (c->read->ready) {
            ngx_http_upstream_process_header(r, u);
            return;
        }
    }
src/http/ngx_http_upstream.c 2265–2283행
이제부터는 읽기 차례이므로 proxy_read_timeout 타이머를 겁니다(2277행). 다 보내지 못했으면(NGX_AGAIN) proxy_send_timeout 타이머를 걸고 다음 쓰기 이벤트를 기다립니다(2204–2235행). 세 타임아웃은 모두 ngx_http_proxy_merge_loc_conf() 에서 기본 60초입니다(3731–3738행).
응답 머리 읽기 — ngx_http_upstream_process_header()
    for ( ;; ) {

        n = c->recv(c, u->buffer.last, u->buffer.end - u->buffer.last);

        /* ... */

        if (n == 0) {
            ngx_log_error(NGX_LOG_ERR, c->log, 0,
                          "upstream prematurely closed connection");
        }

        if (n == NGX_ERROR || n == 0) {
            ngx_http_upstream_next(r, u, NGX_HTTP_UPSTREAM_FT_ERROR);
            return;
        }

        /* ... */
again:

        rc = u->process_header(r);

        if (rc == NGX_AGAIN) {

            if (u->buffer.last == u->buffer.end) {
                ngx_log_error(NGX_LOG_ERR, c->log, 0,
                              "upstream sent too big header");

                ngx_http_upstream_next(r, u,
                                       NGX_HTTP_UPSTREAM_FT_INVALID_HEADER);
                return;
            }

            continue;
        }
src/http/ngx_http_upstream.c 2537–2602행
처음 불릴 때 proxy_buffer_size(기본 한 페이지, 보통 4KB) 크기 버퍼 하나를 요청 풀에서 받고(2490–2501행), 읽을 수 있는 만큼 읽어 u->process_header(r) 에 넘깁니다. 모자라면(NGX_AGAIN) 다음 읽기 이벤트를 기다리고, 버퍼가 가득 찼는데도 헤더가 끝나지 않으면 upstream sent too big header 로 실패합니다. 응답 헤더 전체가 proxy_buffer_size 하나에 들어가야 한다는 뜻입니다.
헤더를 다 읽으면 상태 코드가 300 이상일 때 재시도(ngx_http_upstream_test_next())나 proxy_intercept_errors 를 먼저 보고(2632–2641행), ngx_http_upstream_process_headers() 가 백엔드의 헤더를 클라이언트로 보낼 r->headers_out 에 옮긴 뒤, ngx_http_upstream_send_response() 로 넘어갑니다(6절).
예제 2: 디버그 로그와 gdb 로 본 순서
같은 ex/u11-proxy-basics 에서 /plain/one 요청 하나의 디버그 로그 가운데 upstream 줄만 골랐습니다(앞의 시각과 pid 는 지웠습니다).
*11 http init upstream, client timer: 0
*11 http proxy header: "User-Agent: curl/7.88.1"
*11 http proxy header: "Accept: */*"
*11 http proxy header:
*11 connect to 127.0.0.1:9000, fd:10 #12
*11 http upstream connect: -2
*11 http upstream request: "/plain/one?"
*11 http upstream send request handler
*11 http upstream send request
*11 http upstream send request body
*11 http upstream request: "/plain/one?"
*11 http upstream process header
*11 http proxy status 200 "200 OK"
*11 http proxy header: "Server: BaseHTTP/0.6 Python/3.11.2"
*11 http proxy header: "Date: Sat, 07 Nov 2026 03:05:06 GMT"
*11 http proxy header: "Content-Type: text/plain"
*11 http proxy header: "Content-Length: 101"
*11 http proxy header: "X-Backend: echo"
*11 http proxy header done
*11 http upstream exit: 0000000000000000
*11 finalize http upstream request: 0
*11 close http upstream connection: 10
날짜는 실행마다 다르고, 연결 번호(*11, #12)와 fd 는 그 전에 받은 연결 수와 열린 파일에 따라 정해집니다(이 스크립트를 다시 돌렸을 때는 같게 나왔습니다). 위에서 본 함수들이 차례로 보입니다.
http init upstream은ngx_http_upstream_init()의 디버그 로그(555–556행),http proxy header:줄들은 4절의ngx_http_proxy_create_request()가 요청을 만들며 찍은 것입니다.connect to 127.0.0.1:9000, fd:10 #12는ngx_event_connect_peer()의 218–219행,http upstream connect: -2는 1608행입니다. -2 가NGX_AGAIN, 곧EINPROGRESS였습니다. 클라이언트 연결이*11, 새로 연 백엔드 연결이#12— 두 연결이 같은 번호 카운터를 나눠 씁니다.- 그다음 줄
http upstream request:는ngx_http_upstream_handler()의 1338행입니다. 이벤트 루프가 쓰기 이벤트로 다시 불러 준 자리입니다. 이어서send request handler→send request. - 두 번째
http upstream request:는 읽기 이벤트로 다시 불린 자리이고,process header→http proxy status 200→ 헤더 줄들 →header done입니다. - 본문 101바이트가 헤더와 함께 첫 읽기에 다 왔으므로 event pipe 는 더 읽을 것 없이
http upstream exit로 끝났고, 암묵적 upstream 이라 연결을 캐시에 넣지 않고 닫았습니다(close http upstream connection: 10).
같은 요청을 master_process off; daemon off; 로 프로세스 하나에서 돌리며 gdb 로 세 함수에 멈춰 호출 스택을 찍었습니다(gdb 가 주소 무작위화(ASLR)를 끄고 띄우므로 주소는 다시 돌려도 같게 나왔지만, 빌드가 다르면 달라집니다. 인자 목록은 지웠고, #8~#11(ngx_http_handler 에서 ngx_http_process_request_line 까지)은 ... 으로 줄였습니다).
Breakpoint 2, ngx_event_connect_peer at src/event/ngx_event_connect.c:34
#0  ngx_event_connect_peer at src/event/ngx_event_connect.c:34
#1  0x0000555555618faa in ngx_http_upstream_connect at src/http/ngx_http_upstream.c:1606
#2  0x0000555555617771 in ngx_http_upstream_init_request at src/http/ngx_http_upstream.c:868
#3  0x0000555555616a9f in ngx_http_upstream_init at src/http/ngx_http_upstream.c:588
#4  0x00005555556099d6 in ngx_http_read_client_request_body at src/http/ngx_http_request_body.c:84
#5  0x000055555567500c in ngx_http_proxy_handler at src/http/modules/ngx_http_proxy_module.c:970
#6  0x00005555555ed617 in ngx_http_core_content_phase at src/http/ngx_http_core_module.c:1311
#7  0x00005555555ec448 in ngx_http_core_run_phases at src/http/ngx_http_core_module.c:906
...
#12 0x00005555555f9765 in ngx_http_wait_request_handler at src/http/ngx_http_request.c:534
#13 0x00005555555cea51 in ngx_epoll_process_events at src/event/modules/ngx_epoll_module.c:901
#14 0x00005555555bb0b9 in ngx_process_events_and_timers at src/event/ngx_event.c:248
#15 0x00005555555ca62b in ngx_single_process_cycle at src/os/unix/ngx_process_cycle.c:322
#16 0x000055555557f1b2 in main at src/core/nginx.c:400
Breakpoint 3, ngx_http_proxy_process_status_line at src/http/modules/ngx_http_proxy_module.c:1812
#0  ngx_http_proxy_process_status_line at src/http/modules/ngx_http_proxy_module.c:1812
#1  0x000055555561b4bc in ngx_http_upstream_process_header at src/http/ngx_http_upstream.c:2588
#2  0x00005555556188f7 in ngx_http_upstream_handler at src/http/ngx_http_upstream.c:1350
#3  0x00005555555cea51 in ngx_epoll_process_events at src/event/modules/ngx_epoll_module.c:901
#4  0x00005555555bb0b9 in ngx_process_events_and_timers at src/event/ngx_event.c:248
#5  0x00005555555ca62b in ngx_single_process_cycle at src/os/unix/ngx_process_cycle.c:322
#6  0x000055555557f1b2 in main at src/core/nginx.c:400
(첫 번째 중단점 ngx_http_proxy_create_request 의 스택은 #1 ngx_http_upstream_init_request … :675 아래가 위 connect 의 #2 이하와 같아서 뺐습니다.) 두 스택을 나란히 보면 이 절의 요점이 보입니다.
- connect 까지는 클라이언트 요청을 읽던 바로 그 호출 안입니다.
ngx_http_wait_request_handler(8편) → phase 엔진(9편) →ngx_http_proxy_handler(970행) → … →ngx_event_connect_peer. 요청을 읽은 이벤트 하나로 연결 시작까지 갑니다. - 응답을 읽는 스택은 짧습니다.
ngx_epoll_process_events가 바로ngx_http_upstream_handler(1350행, 읽기 쪽)를 부릅니다. connect 를 건 호출은 이미 끝나 사라졌고, 그 사이에 워커는 다른 일을 할 수 있었습니다. 요청의 상태는 스택이 아니라r->upstream구조체에 남아 있습니다.
4. 백엔드로 나가는 요청 — ngx_http_proxy_create_request()
두 번 훑는다: 길이를 세고, 복사한다
ngx_http_proxy_create_request() 는 400줄이 넘지만 모양은 단순합니다. 같은 재료를 두 번 훑습니다. 처음에는 길이만 더하고(1251–1370행), 그 길이로 버퍼를 딱 한 번 할당한 뒤(ngx_create_temp_buf(r->pool, len), 1373행), 같은 순서로 다시 훑으며 복사합니다(1386–1543행). 버퍼를 늘려 가며 다시 할당하는 일이 없고, 할당은 요청 풀에서 하므로 해제도 따로 하지 않습니다.
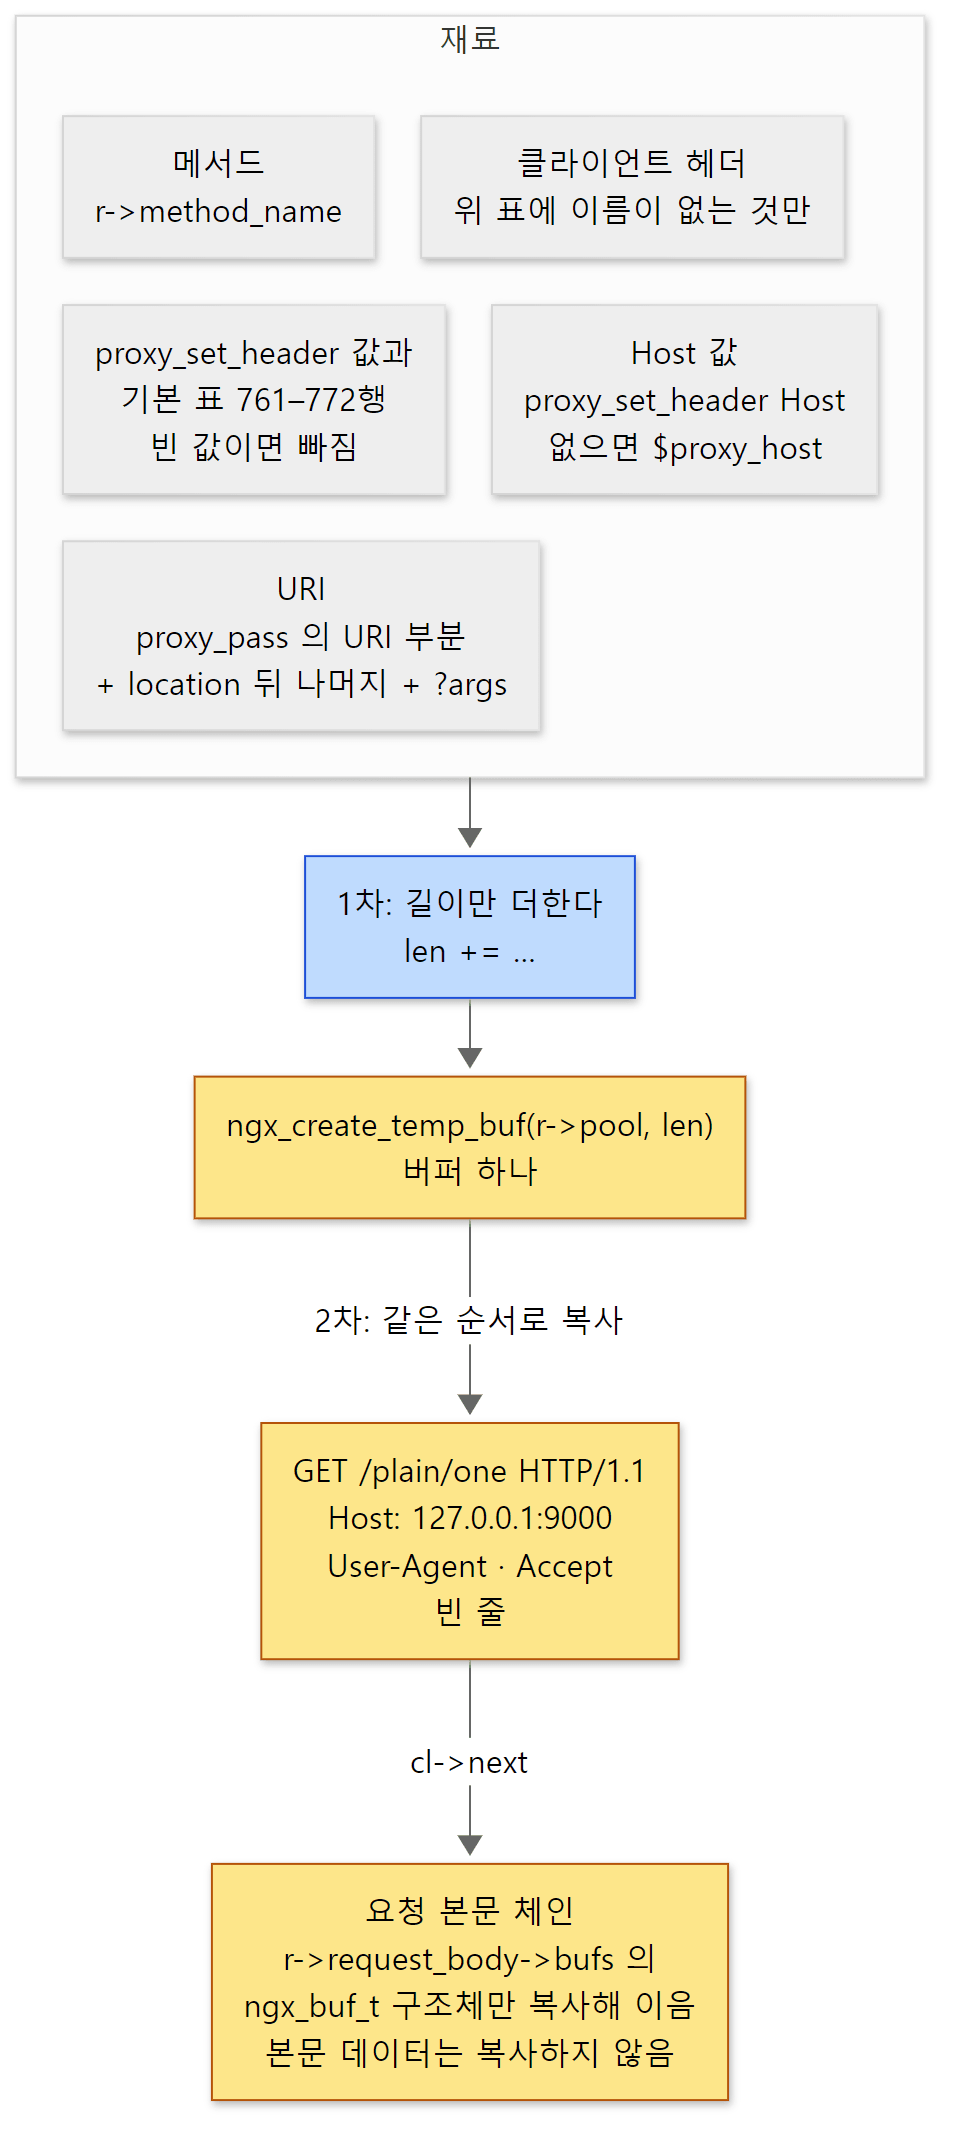 노란 상자가 메모리입니다. 본문 데이터는 복사하지 않고, 이미 읽어 둔 버퍼마다
ngx_buf_t 구조체를 복사한 것과 사슬 고리만 새로 만들어 잇습니다(1576–1598행).
기본 헤더 표 — 무엇을 지우고 무엇을 바꾸나
재료 가운데 "기본 표"가 이것입니다.
static char  ngx_http_proxy_version[] = " HTTP/1.0" CRLF;
static char  ngx_http_proxy_version_11[] = " HTTP/1.1" CRLF;


static ngx_keyval_t  ngx_http_proxy_headers[] = {
    { ngx_string("Host"), ngx_string("") },
    { ngx_string("Connection"), ngx_string("") },
    { ngx_string("Proxy-Connection"), ngx_string("") },
    { ngx_string("Content-Length"), ngx_string("$proxy_internal_body_length") },
    { ngx_string("Transfer-Encoding"), ngx_string("$proxy_internal_chunked") },
    { ngx_string("TE"), ngx_string("") },
    { ngx_string("Keep-Alive"), ngx_string("") },
    { ngx_string("Expect"), ngx_string("") },
    { ngx_string("Upgrade"), ngx_string("") },
    { ngx_null_string, ngx_null_string }
};
src/http/modules/ngx_http_proxy_module.c 757–772행
proxy_set_header 로 적은 값과 이 표가 합쳐집니다(같은 이름이면 설정이 이깁니다, ngx_http_proxy_init_headers() 4266–4287행). 그리고 이 표에 이름이 있는 클라이언트 헤더는 그대로 옮기지 않습니다(1361–1365행의 ngx_hash_find → continue). 값이 빈 문자열이면 그 헤더는 아예 쓰지 않습니다(1335–1337행). 그래서
Connection,Keep-Alive,Proxy-Connection,TE,Expect,Upgrade— 클라이언트가 보냈어도 지워집니다. 이것들은 클라이언트와 nginx 사이의 연결에만 해당하는 홉 단위 헤더라, 백엔드 연결에 그대로 넘기면 안 됩니다.Content-Length,Transfer-Encoding— nginx 가 다시 계산한 값($proxy_internal_body_length등)으로 바뀝니다.Host— 표에서는 빈 값이지만 따로 처리합니다. 아래 발췌의 1239–1243행처럼proxy_set_header Host가 없으면 1절의host_header, 곧$proxy_host가 들어갑니다.
요청 줄의 버전도 같은 함수에서 정해집니다.
    if (plcf->host_value == NULL
| (host.len == 0 && plcf->http_version == NGX_HTTP_VERSION_11))
    {
        host = ctx->vars.host_header;
    }
    /* ... */
    if (plcf->http_version == NGX_HTTP_VERSION_11) {
        b->last = ngx_cpymem(b->last, ngx_http_proxy_version_11,
                             sizeof(ngx_http_proxy_version_11) - 1);

    } else {
        b->last = ngx_cpymem(b->last, ngx_http_proxy_version,
                             sizeof(ngx_http_proxy_version) - 1);
    }
src/http/modules/ngx_http_proxy_module.c 1239–1429행
이 판에서 바뀐 기본값 — HTTP/1.1, 그리고 Connection 없음
proxy_http_version 의 기본값은 ngx_http_proxy_merge_loc_conf() 에서 NGX_HTTP_VERSION_11 입니다(4071–4072행). 오랫동안 nginx 는 백엔드에 HTTP/1.0 과 Connection: close 를 보냈고, 그래서 "upstream keepalive 를 쓰려면 proxy_http_version 1.1; 과 proxy_set_header Connection ""; 을 꼭 적어라"는 설명이 널리 퍼져 있습니다. 이 판에서는 둘 다 기본입니다. git log -S 로 따라가 보면 이렇게 바뀌었습니다.
| 커밋 | 날짜 (작성) | 바뀐 것 | 처음 들어간 태그 |
|---|---|---|---|
90a4fc793 |
2025-07-15 | "Proxy: refactored for HTTP/2 support." — 기본 표의 Connection: close 를 $proxy_internal_connection(HTTP/1.0 일 때만 close)으로 |
1.29.4 |
6bb27a631 |
2026-01-27 | "Proxy: enabled HTTP/1.1 by default for upstream connections." — 기본 버전을 1.1 로, Connection 을 빈 값(보내지 않음)으로 |
1.29.7, stable 1.30.0 |
dea68dbf1 |
2026-07-21 | "Upstream: special handling of the "Host" header in proxy and gRPC" — Host 를 표에서 빼 따로 처리, 빈 값이면 $proxy_host |
1.31.4 (1.30.x 에는 없음) |
stable 1.30.6 의 기본 표는 Host 가 $proxy_internal_host 이고 Connection 이 빈 값입니다. 곧 HTTP/1.1 과 Connection 을 보내지 않는 것은 1.30.x 에도 있고, Host 를 따로 다루는 방식만 1.31.x 의 것입니다.
헷갈리기 쉬운 곳: HTTP/1.0 으로 바꿔도 Connection: close 는 보내지 않습니다
proxy_http_version 1.0; 을 적으면 요청 줄은 1427–1428행의 " HTTP/1.0" CRLF 가 되지만, 기본 표의 Connection 은 여전히 빈 값이므로 Connection 헤더는 붙지 않습니다(6bb27a631 에서 $proxy_internal_connection 변수가 통째로 지워졌습니다). HTTP/1.0 은 헤더가 없으면 연결을 닫는 것이 기본이라 결과는 같습니다. 이 동작은 소스로만 확인했고, 예제로 돌려 보지는 않았습니다.
예제 1 이어서: 지워진 헤더, 바뀐 Host, 숨긴 Server
3번 location 에 클라이언트가 Host: shop.example, Connection: keep-alive, Keep-Alive: timeout=5 를 보냈습니다.
=== 3. proxy_set_header Host $host + X-Real-IP, client sends Connection: keep-alive ===
request line: GET /hdr/ HTTP/1.1
  Host: shop.example
  X-Real-IP: 127.0.0.1
  User-Agent: curl/7.88.1
  Accept: */*
=== 4. response headers seen by the client ===
HTTP/1.1 200 OK
Server: nginx/1.31.9
Date: Sat, 07 Nov 2026 03:05:06 GMT
Content-Type: text/plain
Content-Length: 98
Connection: keep-alive
X-Backend: echo
Date 값은 실행마다 다릅니다.
- 백엔드는
Connection도Keep-Alive도 받지 못했습니다.Host는proxy_set_header Host $host로 바꾼 값이고,X-Real-IP가 더해졌습니다. 설정으로 적은 헤더가 클라이언트 헤더보다 앞에 오는 것도 위의 복사 순서(설정 값 1447–1499행 → 클라이언트 헤더 1504–1539행) 그대로입니다. - 4번은 클라이언트가 받은 응답 헤더입니다. 백엔드가 보낸
Server: BaseHTTP/0.6 Python/3.11.2(예제 2의 디버그 로그) 대신Server: nginx/1.31.9가 보입니다. proxy 모듈의 숨길 헤더 목록ngx_http_proxy_hide_headers[]에Date,Server,X-Accel-*가 있어서(775–785행)ngx_http_upstream_process_headers()가 옮기지 않고(3189–3193행), 그 자리는 nginx 의 헤더 필터(10편)가 채웠습니다. 백엔드가 보낸X-Backend는 그대로 왔습니다. - 디버그 로그에는 만든 요청 전체도 남습니다(
http proxy header:%N"…", 1563–1565행)./plain/one은GET /plain/one HTTP/1.1,Host: 127.0.0.1:9000,User-Agent,Accept, 빈 줄 — 그림 속 버퍼 그대로였습니다.
5. 실패와 재시도 — ngx_http_upstream_next()
3절의 코드 곳곳에 ngx_http_upstream_next(r, u, NGX_HTTP_UPSTREAM_FT_…) 가 있었습니다. connect 가 거절됐을 때(1645–1648행), 쓰기·읽기 타이머가 터졌을 때(2418–2421행, 2480–2483행), 응답 헤더가 잘못됐을 때(2617–2620행)입니다. FT 는 failure type 의 줄임으로, 실패의 종류를 비트 하나씩으로 나타냅니다(ngx_http_upstream.h 20–35행). proxy_next_upstream error timeout http_502; 처럼 적는 값이 바로 이 비트들의 OR 이고, 기본값은 error timeout 입니다(3849–3853행).
    switch (ft_type) {

    case NGX_HTTP_UPSTREAM_FT_TIMEOUT:
    case NGX_HTTP_UPSTREAM_FT_HTTP_504:
        status = NGX_HTTP_GATEWAY_TIME_OUT;
        break;

    /* ... */
    default:
        status = NGX_HTTP_BAD_GATEWAY;
    }

    /* ... */
    timeout = u->conf->next_upstream_timeout;

    if (u->request_sent
        && (r->method & (NGX_HTTP_POST|NGX_HTTP_LOCK|NGX_HTTP_PATCH)))
    {
        ft_type |= NGX_HTTP_UPSTREAM_FT_NON_IDEMPOTENT;
    }

    if (u->peer.tries == 0
| ((u->conf->next_upstream & ft_type) != ft_type)
| (u->request_sent && r->request_body_no_buffering)
| (timeout && ngx_current_msec - u->peer.start_time >= timeout))
src/http/ngx_http_upstream.c 4655–4710행
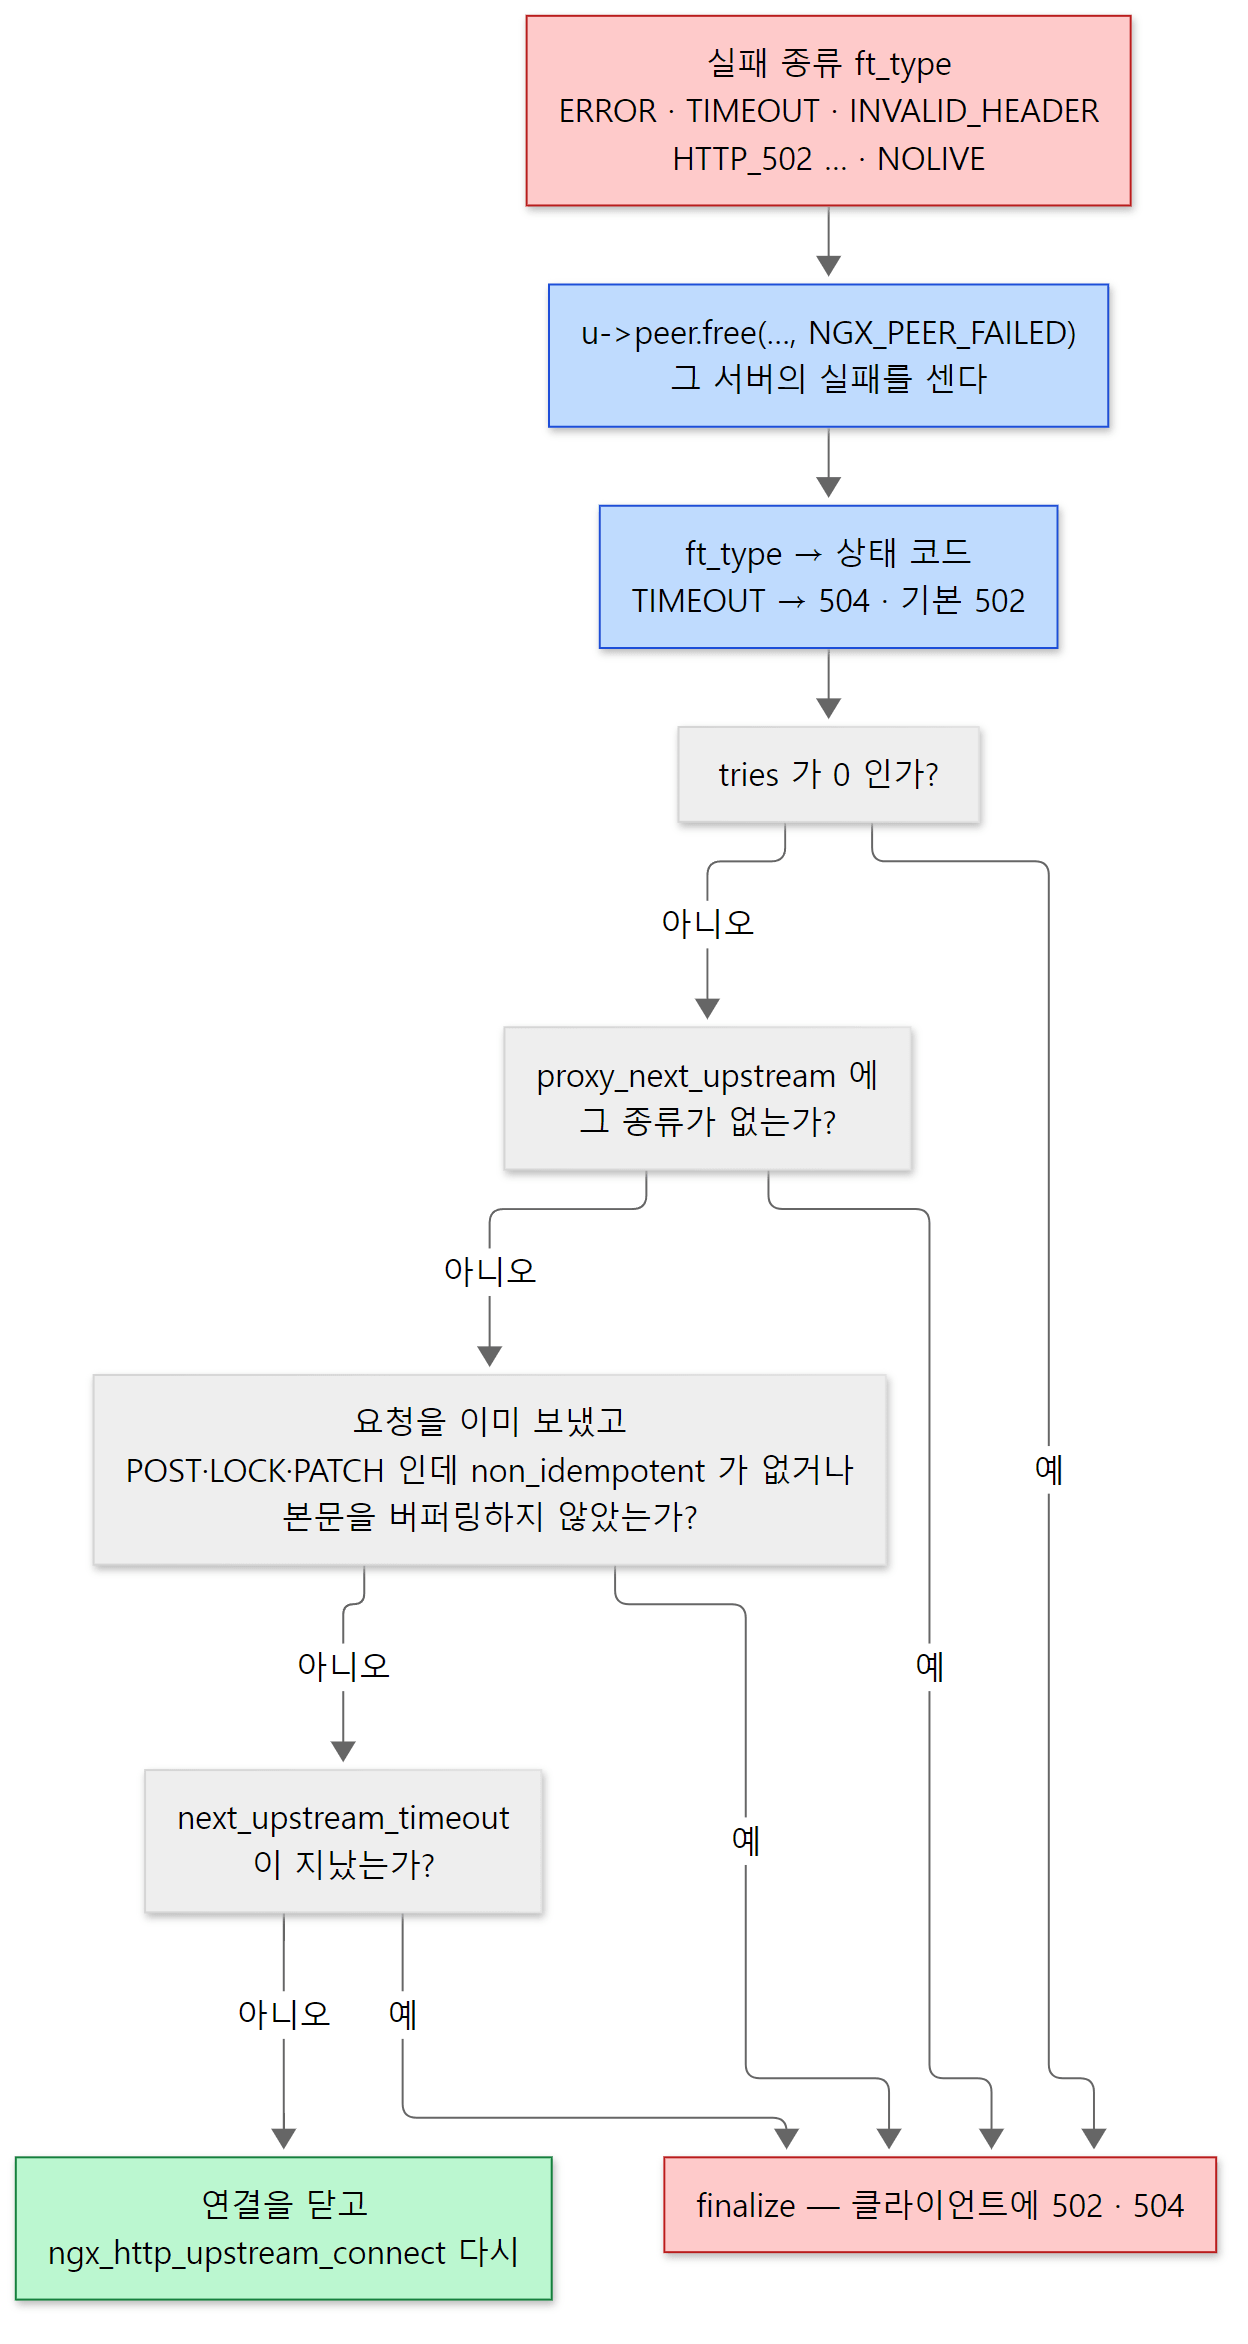 네 질문은 4707–4710행의
if 하나를 풀어 쓴 것입니다. 세 번째 질문의 POST 부분은 4701–4705행이 ft_type 에 NON_IDEMPOTENT 비트를 더해 두 번째 질문의 비트 검사에 걸리게 하는 방식입니다.
순서가 중요합니다.
- 먼저 그 서버의 실패를 셉니다(4622–4643행,
u->peer.free(..., NGX_PEER_FAILED)). 다시 시도하든 안 하든 셉니다. 403·404 만 실패로 세지 않습니다(NGX_PEER_NEXT). 몇 번 실패하면 그 서버를 잠시 빼는지는 라운드 로빈의max_fails·fail_timeout이고 12편에서 봅니다. - 상태 코드를 정합니다. 시간 초과는 504, 거절·잘못된 헤더 같은 나머지는 502 입니다(
http_500·http_503·http_403·http_404·http_429로 넘어온 것은 그 코드를 그대로 씁니다 — 위 발췌에서 줄인 4662–4686행). 클라이언트가 받는 "502 Bad Gateway"와 "504 Gateway Time-out"이 여기서 나옵니다. - 다시 시도할 수 있는지 봅니다. 시도할 서버가 남았고(
tries), 그 실패 종류가proxy_next_upstream에 있고, 이미 보낸 POST 가 아니고(백엔드가 처리했을지 모르는 요청을 두 번 보내지 않도록),proxy_next_upstream_timeout안이면 다시 시도합니다. - 다시 시도하면 지금 연결을 닫고
ngx_http_upstream_connect()를 또 부릅니다(4746–4768행).pc->get()이 다음 서버를 고르고, 4절에서 만들어 둔 같은 요청 버퍼를 보냅니다. 요청을 이미 보냈던 연결이면ngx_http_upstream_reinit()이 버퍼 위치를 되돌리고u->reinit_request로 모듈 상태를 처음으로 돌립니다(1697–1703행).
예제 3: 502, 504, 그리고 다음 서버
ex/u11-proxy-errors 는 9000 에 살아 있는 백엔드, 9002 에 응답 전에 3초 쉬는 백엔드를 띄우고 9001 은 비워 둡니다.
# 이 글을 위해 쓴 예제입니다 (nginx 의 소스가 아닙니다)
# ... (앞부분 설정과 http { 는 줄이고, 그 안쪽만 들여쓰기를 당겨 옮김)
log_format up '$request_uri -> $status  upstream_addr="$upstream_addr" '
              'upstream_status="$upstream_status"';
# ... (access_log 줄임)

# 9001 에는 아무도 듣고 있지 않다. 9000 은 살아 있다
upstream pair {
    server 127.0.0.1:9001;
    server 127.0.0.1:9000;
}

upstream pair_nonext {
    server 127.0.0.1:9001;
    server 127.0.0.1:9000;
}

server {
    listen 8080;

    location /down/ {
        proxy_pass http://127.0.0.1:9001;     # 꺼진 백엔드 → 502
    }

    location /slow/ {
        proxy_pass http://127.0.0.1:9002;     # 3초 쉬는 백엔드
        proxy_read_timeout 1s;                # 1초만 기다린다 → 504
    }

    location /next/ {
        proxy_pass http://pair;               # 실패하면 다음 서버로 (기본값 error timeout)
    }

    location /nonext/ {
        proxy_pass http://pair_nonext;
        proxy_next_upstream off;              # 다음 서버로 넘어가지 않는다
    }
}
=== 1. backend down ===
/down/ -> 502 in 0.001147s
=== 2. slow backend, proxy_read_timeout 1s ===
/slow/ -> 504 in 1.006190s
=== 3. upstream with a dead server, proxy_next_upstream default ===
/next/a -> 200 in 0.015762s
/next/b -> 200 in 0.040978s
/next/c -> 200 in 0.012087s
=== 4. same, proxy_next_upstream off ===
/nonext/a -> 502 in 0.000660s
/nonext/b -> 200 in 0.035330s
/nonext/c -> 200 in 0.003075s
=== access.log ===
/down/ -> 502  upstream_addr="127.0.0.1:9001" upstream_status="502"
/slow/ -> 504  upstream_addr="127.0.0.1:9002" upstream_status="504"
/next/a -> 200  upstream_addr="127.0.0.1:9001, 127.0.0.1:9000" upstream_status="502, 200"
/next/b -> 200  upstream_addr="127.0.0.1:9000" upstream_status="200"
/next/c -> 200  upstream_addr="127.0.0.1:9000" upstream_status="200"
/nonext/a -> 502  upstream_addr="127.0.0.1:9001" upstream_status="502"
/nonext/b -> 200  upstream_addr="127.0.0.1:9000" upstream_status="200"
/nonext/c -> 200  upstream_addr="127.0.0.1:9000" upstream_status="200"
걸린 시간과 error.log 의 pid(32#32)는 실행마다 다릅니다(access.log 맨 앞의 기동 확인용 / 줄은 뺐습니다). error.log 에서 해당하는 줄입니다(클라이언트·요청 정보 뒷부분은 줄였습니다).
[error] 32#32: *2 connect() failed (111: Connection refused) while connecting to upstream, client: 127.0.0.1, ... upstream: "http://127.0.0.1:9001/down/" ...
[error] 32#32: *4 upstream timed out (110: Connection timed out) while reading response header from upstream, client: 127.0.0.1, ... upstream: "http://127.0.0.1:9002/slow/" ...
[error] 32#32: *6 connect() failed (111: Connection refused) while connecting to upstream, client: 127.0.0.1, ... upstream: "http://127.0.0.1:9001/next/a" ...
[warn] 32#32: *6 upstream server temporarily disabled while connecting to upstream, client: 127.0.0.1, ... upstream: "http://127.0.0.1:9001/next/a" ...
[error] 32#32: *11 connect() failed (111: Connection refused) while connecting to upstream, client: 127.0.0.1, ... upstream: "http://127.0.0.1:9001/nonext/a" ...
[warn] 32#32: *11 upstream server temporarily disabled while connecting to upstream, client: 127.0.0.1, ... upstream: "http://127.0.0.1:9001/nonext/a" ...
- 1번(502):
connect() failed (111: Connection refused)는 3절에서 본 대로ngx_http_upstream_test_connect()가 찍은 것이고, 뒤의 "while connecting to upstream" 은 그 함수가 정해 둔log->action입니다(3080행). 서버가 하나뿐이라tries가 0 이 되어 바로 502 입니다. - 2번(504): 1초 만에 끝났습니다.
proxy_read_timeout타이머가 터져ngx_http_upstream_process_header()가FT_TIMEOUT으로 next 를 불렀고(2480–2483행), "upstream timed out" 은ngx_http_upstream_next()의 4645–4648행입니다. "while reading response header from upstream" 이 2478행의 action 입니다. - 3번:
/next/a의upstream_addr에 서버가 둘,upstream_status에502, 200이 남았습니다. 9001 에서 실패(502 로 기록)하고 같은 요청 안에서 9000 으로 다시 시도해 성공한 것입니다.$upstream_addr가 쉼표로 이어지는 것은 시도할 때마다ngx_http_upstream_connect()가r->upstream_states배열에 칸을 하나씩 더하기 때문입니다(1591행). 그 뒤upstream server temporarily disabled(라운드 로빈 1068행 — 12편)로 9001 이 잠시 빠져서/next/b,/next/c는 처음부터 9000 으로 갔습니다. - 4번:
proxy_next_upstream off이면 9001 에서 실패한/nonext/a가 다시 시도하지 않고 502 로 끝납니다.next_upstream비트가 비어 있어 4708행의 검사에 걸린 것입니다.
헷갈리기 쉬운 곳: 예제를 돌리다 60초를 기다린 일
이 예제의 첫 판은 백엔드를 python 의 HTTPServer(한 번에 연결 하나만 처리)로 만들었습니다. 그랬더니 4번의 /nonext/b 가 60초 뒤에 504 로 끝났습니다. 원인은 이 판의 upstream keepalive 기본값이었습니다. upstream {} 블록으로 만든 pair 는 keepalive 가 기본으로 켜져 있어서(12편) /next/c 가 끝난 뒤에도 9000 으로 가는 연결을 열어 둔 채 캐시에 넣었고, 한 번에 연결 하나만 보는 python 서버는 그 연결의 다음 요청을 기다리느라 pair_nonext 가 새로 연 연결을 받지 못했습니다. 그래서 기본 proxy_read_timeout 60초가 터졌습니다. 백엔드를 ThreadingHTTPServer 로 바꾸자 위 결과가 나왔습니다. nginx 쪽이 아니라 백엔드 쪽 한계였지만, "nginx 가 백엔드 연결을 열어 두는 것"이 백엔드에 어떤 부담이 되는지 보여 준 일이었습니다.
6. 응답 흘려보내기 — proxy_buffering on 과 off
헤더를 다 읽으면 ngx_http_upstream_send_response() 입니다.
    rc = ngx_http_send_header(r);

    if (rc == NGX_ERROR || rc > NGX_OK || r->post_action) {
        ngx_http_upstream_finalize_request(r, u, rc);
        return;
    }

    u->header_sent = 1;
    /* ... */
    if (!u->buffering) {
        /* ... */
        u->read_event_handler = ngx_http_upstream_process_non_buffered_upstream;
        r->write_event_handler =
                             ngx_http_upstream_process_non_buffered_downstream;
        /* ... */
    u->read_event_handler = ngx_http_upstream_process_upstream;
    r->write_event_handler = ngx_http_upstream_process_downstream;

    ngx_http_upstream_process_upstream(r, u);
src/http/ngx_http_upstream.c 3297–3622행
응답 헤더는 버퍼링과 상관없이 먼저 헤더 필터 사슬에 넘깁니다(3297행의 ngx_http_send_header()). 소켓으로 실제 나가는 때는 10편의 write 필터가 정합니다. 그다음 갈림길이 u->buffering, 곧 proxy_buffering(기본 on, 3707–3708행)입니다.
- off: 헤더를 읽던 버퍼(
proxy_buffer_size하나)를 그대로 씁니다. 읽는 대로input_filter를 거쳐ngx_http_output_filter()로 넘기고, 클라이언트가 못 받으면 백엔드에서 더 읽지 않습니다(ngx_http_upstream_process_non_buffered_request(), 3956–4085행). 버퍼가 하나뿐이므로 백엔드는 느린 클라이언트의 속도에 묶입니다. - on: event pipe 를 꾸립니다(줄인 3503–3617행). 버퍼 개수와 크기는
proxy_buffers(기본 8개 × 한 페이지, 3753–3754행), 모자라면 쓸 임시 파일은proxy_temp_path아래, 최대proxy_max_temp_file_size입니다. 그리고 백엔드 쪽 읽기 이벤트는process_upstream, 클라이언트 쪽 쓰기 이벤트는process_downstream으로 걸고, 둘 다 결국ngx_event_pipe()를 부릅니다.
event pipe 의 한 바퀴
ngx_event_pipe() 는 "내보내고, 읽고"를 더 할 일이 없을 때까지 되풀이합니다(src/event/ngx_event_pipe.c 29–58행). 재미있는 곳은 읽을 버퍼를 구하는 순서입니다.
            if (p->free_raw_bufs) {
                /* ... */
            } else if (p->allocated < p->bufs.num) {
                /* ... */
                b = ngx_create_temp_buf(p->pool, p->bufs.size);
                /* ... */
            } else if (!p->cacheable
                       && !p->downstream_error
                       && p->downstream->data == p->output_ctx
                       && p->downstream->write->ready
                       && !p->downstream->write->delayed)
            {
                /* ... */
                p->upstream_blocked = 1;
                /* ... */
                break;

            } else if (p->cacheable
| p->temp_file->offset < p->max_temp_file_size)
            {
                /* ... */
                rc = ngx_event_pipe_write_chain_to_temp_file(p);
                /* ... */
            } else {
                /* ... */
                ngx_log_debug0(NGX_LOG_DEBUG_EVENT, p->log, 0,
                               "no pipe bufs to read in");

                break;
            }
src/event/ngx_event_pipe.c 224–301행
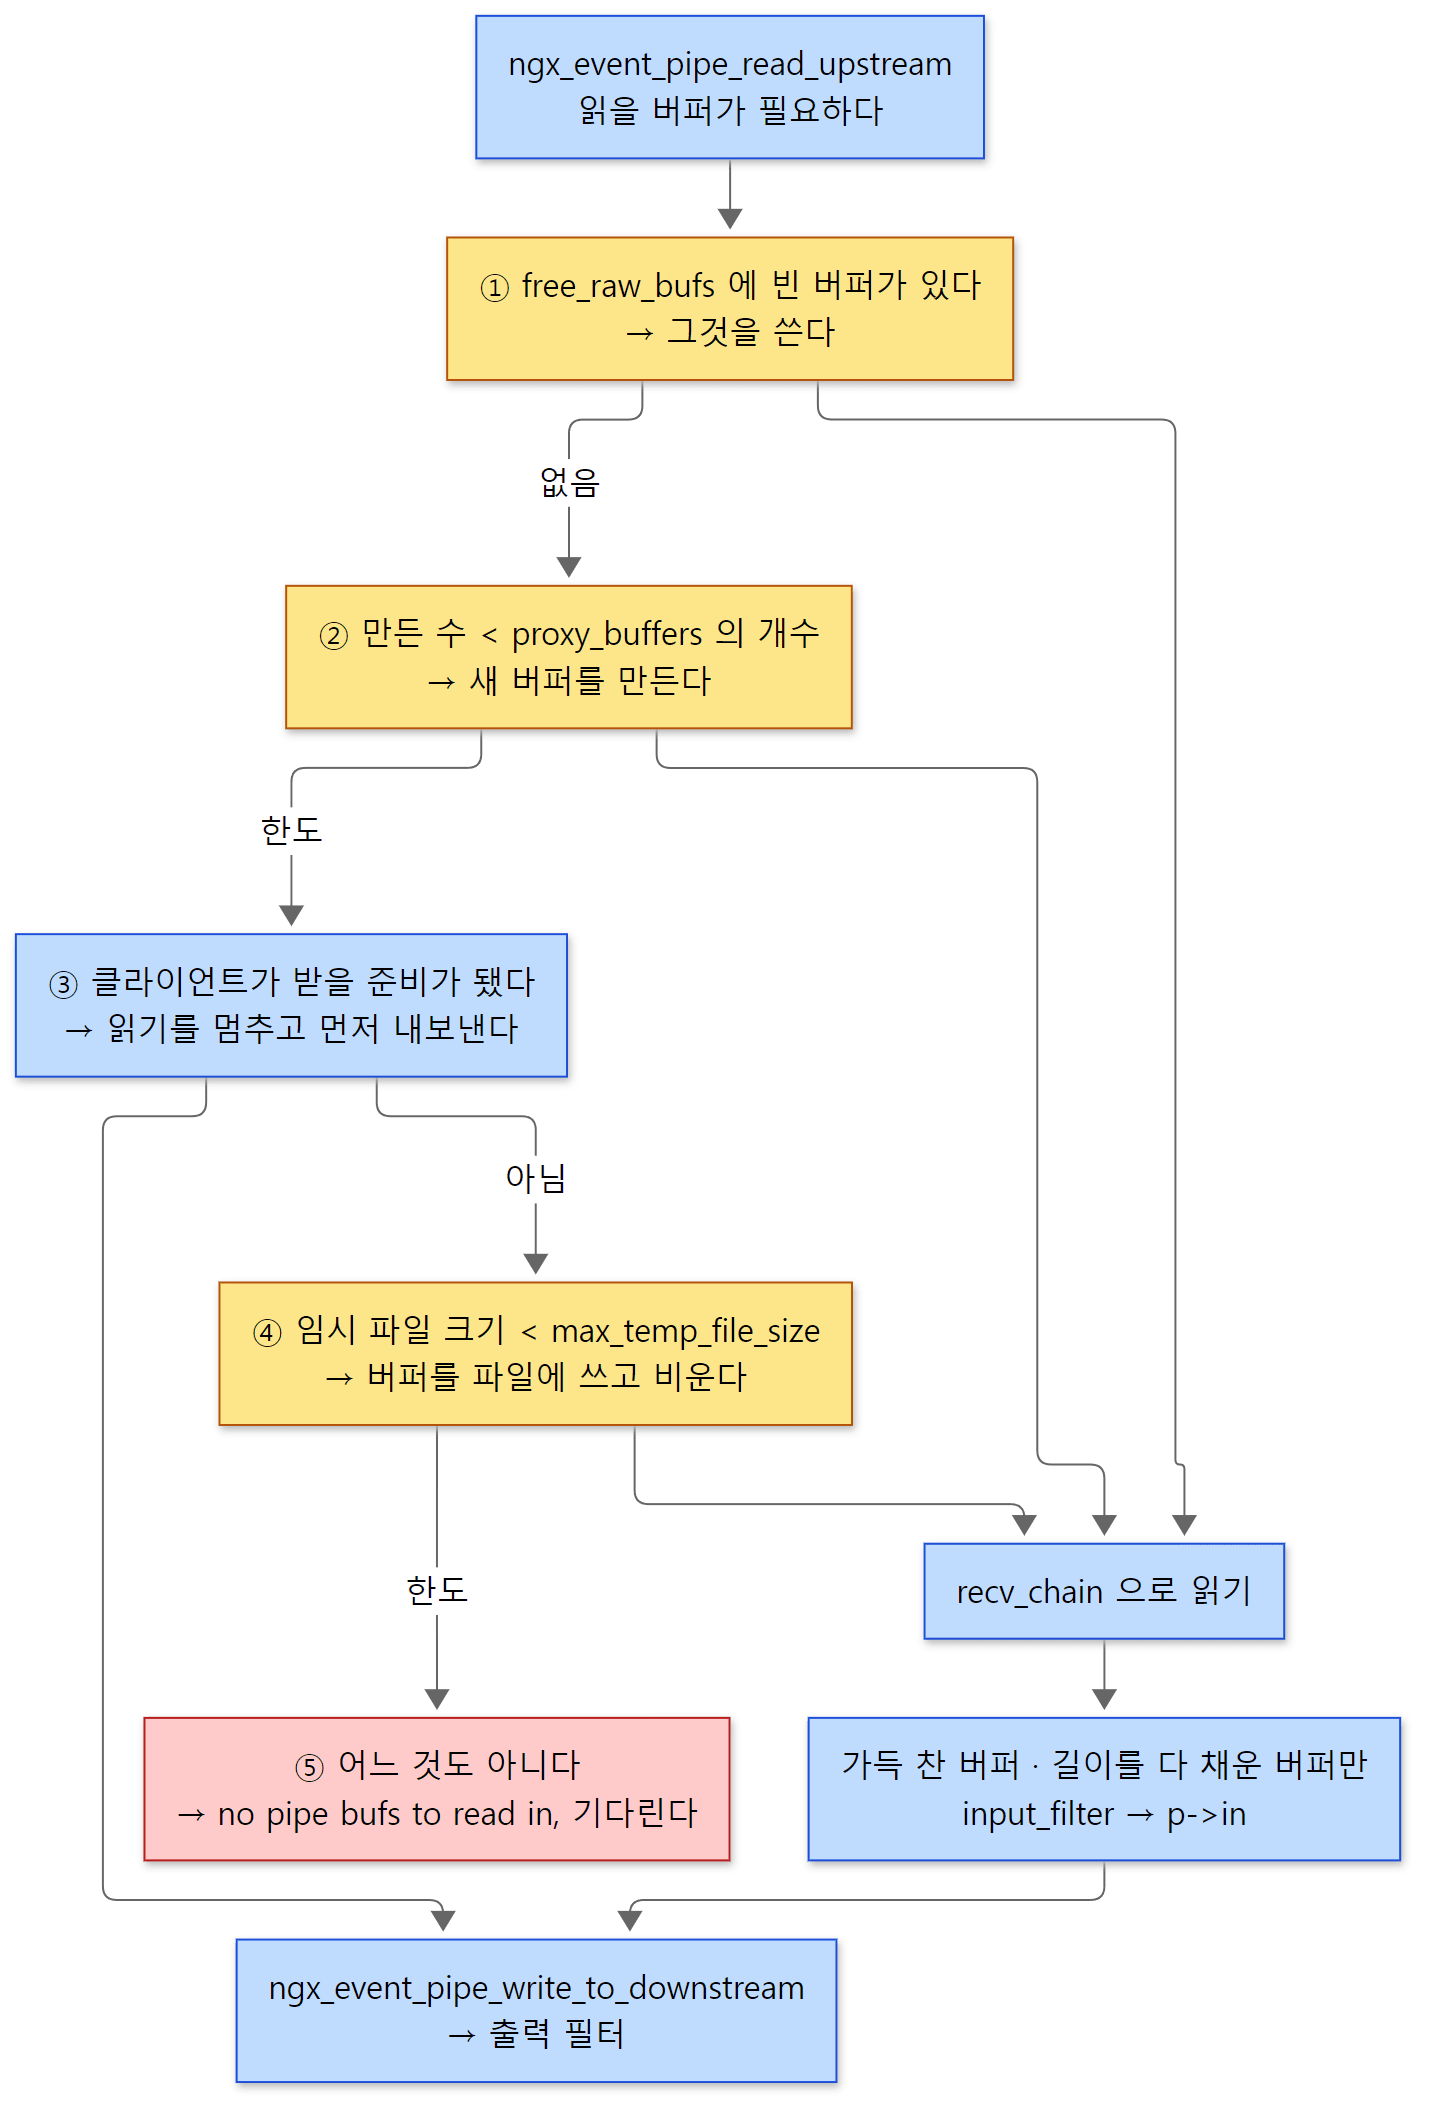 노란 상자가 메모리·파일을 쓰는 자리, 빨간 상자가 버퍼도 임시 파일 자리도 없어 읽기를 멈추고 기다리는 자리입니다(③도 읽기를 멈추지만, 먼저 내보내려고 멈추는 것입니다).
여기서 버퍼링의 뜻이 드러납니다. 클라이언트가 느려도 백엔드에서는 계속 읽습니다. 메모리 버퍼를 다 쓰면(②의 한도) 클라이언트가 받을 수 있는지 보고(③), 못 받으면 버퍼를 임시 파일로 옮겨 비운 뒤 계속 읽습니다(④). 백엔드는 응답을 빨리 넘기고 다음 일을 할 수 있습니다. 응용 서버의 작업 스레드나 프로세스는 nginx 의 연결보다 훨씬 비싸므로, 느린 클라이언트를 nginx 가 대신 상대해 주는 것입니다.
그리고 덜 찬 버퍼는 클라이언트로 내보내지 않습니다. 읽은 바이트를 버퍼에 나눠 담는 루프(336–360행)는 버퍼가 가득 찼을 때만 p->input_filter() 를 불러 내보낼 목록(p->in)에 올립니다. 덜 찬 버퍼는 free_raw_bufs 로 돌아가 다음 읽기를 기다립니다. 예외는 응답 길이를 알고 있어 그 버퍼가 남은 길이를 다 채웠을 때(435–450행)와 백엔드가 연결을 닫았을 때(457–474행)뿐입니다. 큰 응답을 덩어리째 옮기기에는 좋지만, 조금씩 흘러나오는 응답은 버퍼가 찰 때까지 멈춰 있게 됩니다.
예제 4: 한 줄씩 나오는 응답, 그리고 임시 파일
ex/u11-proxy-buffering 의 백엔드는 /stream 에 Content-Length: 12 를 먼저 보내고 one, two, end 세 줄을 1초 간격으로 씁니다. 클라이언트는 줄마다 요청을 보낸 뒤 몇 초 만에 받았는지 찍습니다. /small/ 은 proxy_buffers 2 4k 로 메모리 버퍼를 일부러 작게 했고, 그쪽에는 32MB 응답을 요청하고 2초 동안 읽지 않는 클라이언트(slowclient.py)를 붙였습니다.
# 이 글을 위해 쓴 예제입니다 (nginx 의 소스가 아닙니다)
# ... (앞부분 설정과 http { · access_log off 줄임)
proxy_temp_path /tmp/u11b/proxy_temp;

# ... (server { listen 8080; 줄임 — location 만 들여쓰기를 당겨 옮김)
location /buf/ {
    proxy_pass http://127.0.0.1:9000;     # proxy_buffering 기본값 on
}

location /nobuf/ {
    proxy_pass http://127.0.0.1:9000;
    proxy_buffering off;                  # 받는 대로 클라이언트에 넘긴다
}

location /small/ {
    proxy_pass http://127.0.0.1:9000;
    proxy_buffer_size 4k;                 # 메모리 버퍼를 일부러 작게
    proxy_buffers 2 4k;
    proxy_busy_buffers_size 4k;
}
=== 1. proxy_buffering on (default): /buf/stream ===
  +2.0s  one
  +2.1s  two
  +2.1s  end
=== 2. proxy_buffering off: /nobuf/stream ===
  +0.0s  one
  +1.1s  two
  +2.1s  end
=== 3. 32MB through 2 x 4k buffers to a client that does not read for 2s ===
  client read 33554555 bytes (headers included) after sleeping 2s
[warn] 21#21: *6 an upstream response is buffered to a temporary file /tmp/u11b/proxy_temp/0000000001 while reading upstream, client: 127.0.0.1, server: , request: "GET /small/big HTTP/1.0", upstream: "http://127.0.0.1:9000/small/big", host: "x"
--- files left in the temp dir
0
시각은 실행마다 조금씩 다릅니다.
- 버퍼링 on: 세 줄이 모두 2초 뒤에 한꺼번에 왔습니다. 백엔드는 0초에
one을 보냈지만 4바이트는 4KB 버퍼를 채우지 못하고, 남은 길이(12바이트)에도 못 미치므로p->in에 오르지 않았습니다. 마지막end가 와서 12바이트를 다 채운 2초에야 내보냈습니다. 서버가 보내는 이벤트 스트림(SSE)이나 긴 폴링 응답에proxy_buffering off가 필요하다고 하는 이유가 이것입니다. - 버퍼링 off: 백엔드가 쓴 대로 0초, 1초, 2초에 왔습니다.
- 임시 파일: 메모리 버퍼 두 개가 다 차고 클라이언트는 읽지 않으니, ④로 가서
an upstream response is buffered to a temporary file …경고를 남기고 파일에 썼습니다. 이 경고 문구는ngx_http_upstream_send_response()가 캐시가 아닐 때p->temp_file->warn에 넣어 둔 것입니다(3541–3543행). 클라이언트는 2초 뒤부터 32MB 를 빠짐없이 받았습니다.
헷갈리기 쉬운 곳: 임시 파일은 디렉터리에서 보이지 않습니다
예제 끝에 proxy_temp 아래 파일 수를 셌더니 0 이었습니다. 요청이 끝나서 지운 것이 아니라 만들자마자 이름을 지운 파일입니다. 캐시용(persistent)이 아닌 임시 파일은 열자마자 디렉터리에서 이름을 지웁니다(unlink).
    fd = open((const char *) name, O_CREAT|O_EXCL|O_RDWR,
              access ? access : 0600);

    if (fd != -1 && !persistent) {
        (void) unlink((const char *) name);
    }
src/os/unix/ngx_files.c 283–288행
유닉스에서는 연 파일을 unlink() 해도 열린 fd 로는 계속 읽고 쓸 수 있고, 마지막 fd 를 닫을 때 디스크 공간이 돌아옵니다. 워커가 죽어도 찌꺼기 파일이 남지 않습니다. 대신 디스크가 차는 원인을 ls 로 찾을 수 없으니 lsof 같은 도구로 워커의 열린 파일을 봐야 합니다(이 부분은 예제로 확인하지 않았습니다).
끝내기 — ngx_http_upstream_finalize_request()
본문이 끝나면(p->upstream_done, 4491–4496행) upstream 을 끝냅니다.
    u->finalize_request(r, rc);

    if (u->peer.free && u->peer.sockaddr) {
        u->peer.free(&u->peer, u->peer.data, 0);
        u->peer.sockaddr = NULL;
        /* ... */
    if (u->peer.connection) {

        /* ... */
        ngx_log_debug1(NGX_LOG_DEBUG_HTTP, r->connection->log, 0,
                       "close http upstream connection: %d",
                       u->peer.connection->fd);

        if (u->peer.connection->pool) {
            ngx_destroy_pool(u->peer.connection->pool);
        }

        ngx_close_connection(u->peer.connection);
    }
src/http/ngx_http_upstream.c 4821–4861행
모듈의 finalize_request 를 부르고, u->peer.free() 로 서버 고르기 쪽에 "다 썼다"고 알린 뒤, 연결이 남아 있으면 닫습니다. 그래서 암묵적 upstream 인 예제 2는 close http upstream connection 으로 끝났습니다. keepalive 가 켜진 upstream 이면 free 가 그 연결을 캐시에 넣고 u->peer.connection 을 비워 두므로, 여기서 닫지 않습니다 — 그 바꿔치기가 12편의 주제입니다. 마지막으로 ngx_http_send_special(r, NGX_HTTP_LAST) 로 응답 끝을 필터 사슬에 알리고 ngx_http_finalize_request() 로 요청을 끝냅니다(4940–4955행).
이 글에서 뺀 것
- 응답 캐시(
proxy_cache):ngx_http_upstream_cache()ngx_http_upstream.c 875행부터,src/http/ngx_http_file_cache.c - 백엔드와의 TLS(
proxy_pass https://):ngx_http_upstream_ssl_init_connection()1757행부터 - WebSocket 등
Upgrade(101 응답 뒤 양방향 전달):ngx_http_upstream_upgrade()3627행,ngx_http_upstream_process_upgraded()3713행 - 요청 본문 읽기와
proxy_request_buffering off:src/http/ngx_http_request_body.c,ngx_http_upstream_send_request_body()2288행 - 응답이 chunked 일 때의 본문 필터:
ngx_http_proxy_chunked_filter()ngx_http_proxy_module.c 2209행,ngx_http_proxy_non_buffered_chunked_filter()2471행 X-Accel-Redirect(백엔드가 nginx 에 내부 리다이렉트를 시키기):ngx_http_upstream_process_headers()3106–3168행- 103 Early Hints:
ngx_http_upstream_process_early_hints()2663행 proxy_redirect·proxy_cookie_*(응답 헤더 고치기):ngx_http_proxy_rewrite_redirect()2888행,ngx_http_proxy_rewrite_cookie()2920행- 요청 때 주소를 정하는
proxy_pass http://$var와 resolver:ngx_http_proxy_eval()981행,ngx_http_upstream_resolve_handler()ngx_http_upstream.c 1244행 - HTTP/2 백엔드:
src/http/modules/ngx_http_proxy_v2_module.c
정리
| 개념 | 한 줄 요약 |
|---|---|
proxy_pass |
core 모듈의 location 설정에 handler = ngx_http_proxy_handler 를 걸고, ngx_http_upstream_add() 로 upstream 을 만들거나 찾는다(블록 없으면 암묵적 upstream) |
proxy_pass 의 경로 |
없으면 r->unparsed_uri 그대로, 있으면 location 접두사를 그 경로로 바꾼다 |
ngx_http_upstream_t |
요청마다 하나. 공통 일(연결·보내기·읽기·재시도·끝내기)은 upstream 이, 프로토콜은 모듈의 콜백이 맡는다 |
| 콜백 | create_request, process_header(상태 줄 → 헤더로 스스로 바뀜), input_filter, finalize_request, reinit_request. abort_request 는 부르는 곳이 없다 |
| 시작 | ngx_http_read_client_request_body(r, ngx_http_upstream_init) — 본문을 먼저 읽고 upstream 시작 |
| 연결 | ngx_event_connect_peer() — pc->get() 으로 고르고 논블로킹 connect. EINPROGRESS 면 NGX_AGAIN, 타이머만 걸고 이벤트 루프로 |
| 이벤트 핸들러 | 백엔드 연결의 두 이벤트 모두 ngx_http_upstream_handler, 단계마다 u->read/write_event_handler 만 바꾼다 |
| 요청 만들기 | 길이를 세고 버퍼 하나를 할당해 복사하는 두 번 훑기. 본문은 데이터를 복사하지 않고 버퍼 구조체와 사슬 고리만 새로 만들어 잇는다 |
| 기본값 (이 판) | proxy_http_version 1.1, Connection·Keep-Alive 등은 보내지 않음, Host 는 따로 처리(없으면 $proxy_host) |
| 타임아웃 | connect·send·read 모두 기본 60초. 시간 초과는 504, 거절·잘못된 헤더는 502 |
ngx_http_upstream_next() |
실패를 세고, 상태 코드를 정하고, tries·proxy_next_upstream·POST·시간을 보고 다시 connect 하거나 끝낸다 |
proxy_buffering on |
event pipe — 버퍼 여러 개, 모자라면 이름 없는 임시 파일. 백엔드에서 계속 읽는다. 덜 찬 버퍼는 내보내지 않는다 |
proxy_buffering off |
버퍼 하나로 읽는 대로 내보낸다. 백엔드가 클라이언트 속도에 묶인다 |
| 끝내기 | finalize_request → peer.free → 남은 연결 닫기(keepalive 면 12편의 모듈이 캐시에 넣는다) |
다음에 볼 것
이 글에서는 pc->get() 을 "부르면 주소가 나온다"로 넘겼고, finalize 에서 연결을 닫는 대신 캐시에 넣는 경우도 미뤘습니다. 다음 글이 그 둘입니다. upstream {} 블록의 서버들 가운데 smooth weighted round robin 이 어떻게 하나를 고르고, max_fails·fail_timeout 이 5절의 "temporarily disabled" 를 어떻게 만들고, keepalive 모듈이 get/free 를 감싸 연결을 다시 쓰는지 봅니다. 그리고 같은 upstream 생각을 TCP 에 쓴 stream {} 모듈로 연재를 마칩니다. 12편: 부하 분산, upstream keepalive, stream 모듈 — 그리고 연재를 마치며에서 이어집니다.
같은 일을 httpd 에서는 httpd 14편: mod_proxy에서 봤습니다. 공통 틀과 프로토콜별 부분을 나눈 생각은 같습니다 — httpd 는 mod_proxy 가 스킴 핸들러 훅을 열고 mod_proxy_http 가 그 훅에 줄을 섰고, nginx 는 ngx_http_upstream_t 의 콜백 필드에 proxy 모듈이 함수를 꽂습니다. 크게 다른 것은 기다리는 방식입니다. httpd 의 mod_proxy_http 는 작업 스레드 하나가 백엔드 응답을 받아 클라이언트로 흘려보내는 동안 그 연결을 맡지만, nginx 는 connect 와 읽기마다 이벤트 루프로 돌아가므로 워커 하나가 수많은 프록시 요청을 함께 돌립니다. 백엔드 연결을 다시 쓰는 연결 풀(httpd 는 워커마다 apr_reslist)은 nginx 에서는 12편의 keepalive 모듈입니다. Tomcat 에서 커넥터가 받은 요청을 컨테이너로 넘기는 Tomcat 7편의 CoyoteAdapter 는 같은 프로세스 안의 넘김이라, 네트워크 너머로 다시 보내는 upstream 과는 자리가 다릅니다.