이 글에서 다루는 것
"nginx 소스 파헤치기" 연재의 열 번째 글입니다. 9편에서는 요청 하나가 11단계 phase 를 지나며 location 을 고르고, 마지막 CONTENT phase 에서 콘텐츠 핸들러(응답 본문을 만드는 함수)를 부르는 데까지 따라갔습니다. 이번에는 그 핸들러가 응답을 만들기 시작한 뒤, 응답이 어떤 모양으로, 누구를 거쳐 소켓까지 가는지를 봅니다.
2편의 지도에서 이 글은 C. HTTP 요청 하나의 필터·정적 파일 상자를 확대합니다.
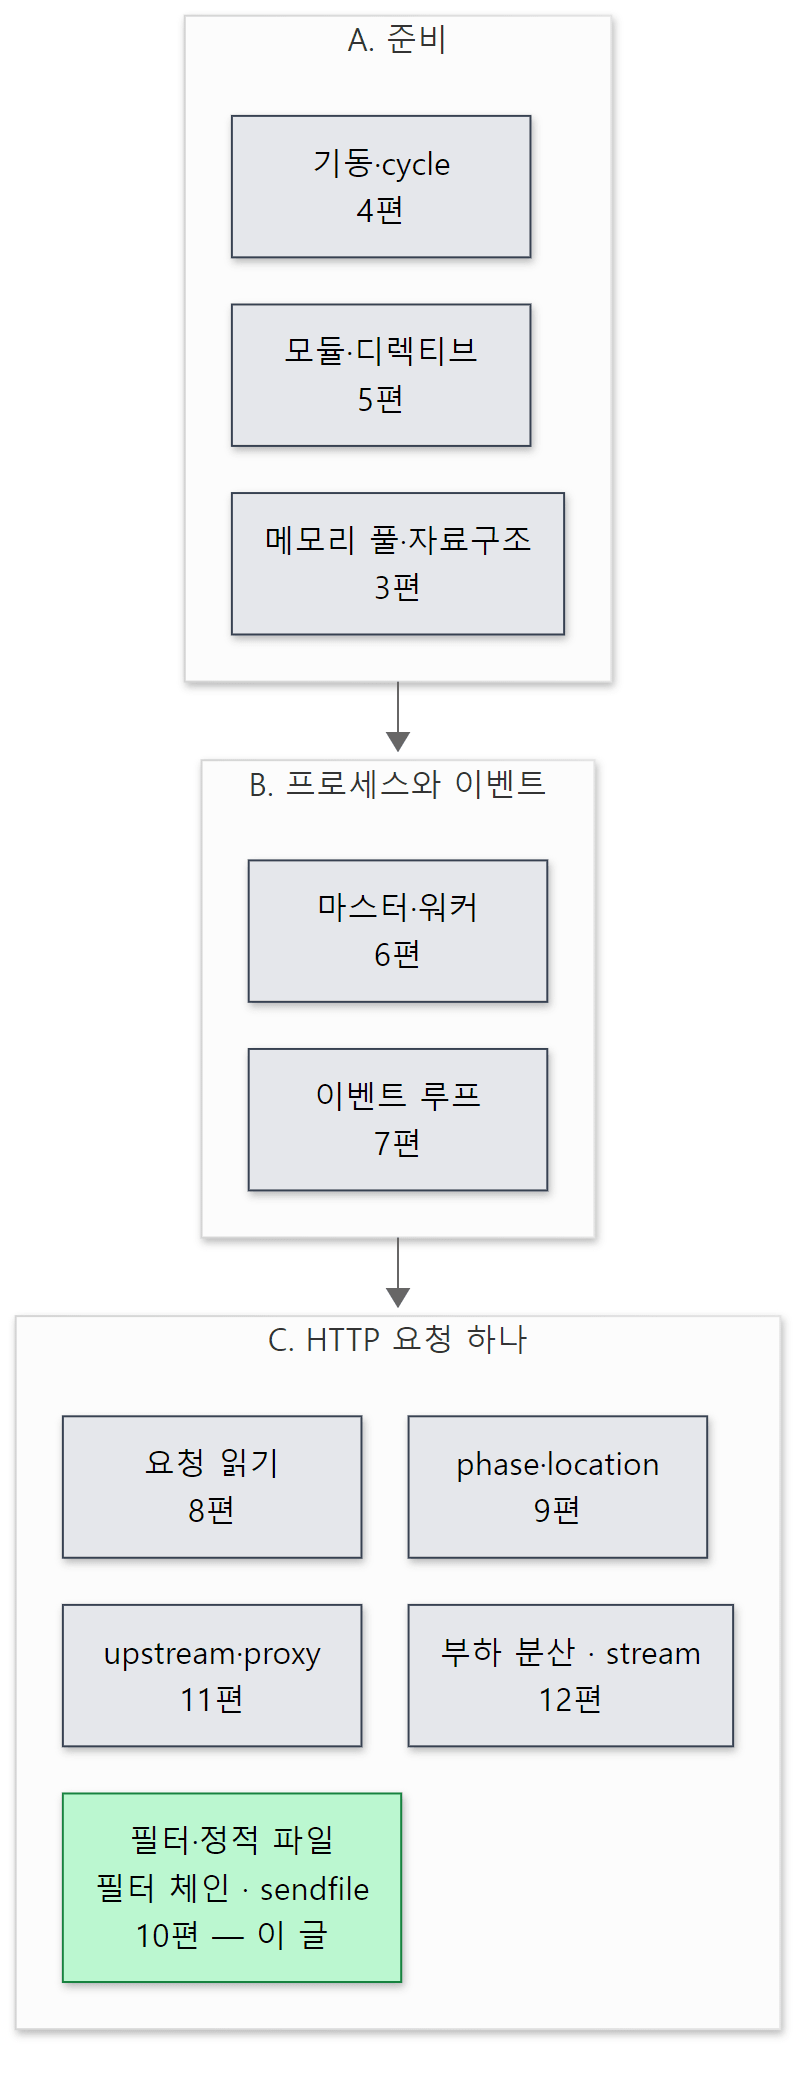 2편 지도에서 초록 상자가 이 글입니다. 옆의 upstream·proxy 상자(백엔드에서 받아 온 응답)도 이 글의 필터 사슬을 똑같이 지나갑니다 — 11편에서 봅니다.
답하려는 질문은 네 가지입니다.
root /var/www;아래의 파일 하나를 nginx 는 어떻게 응답으로 만드는가. 파일 내용은 언제 읽는가gzip on;,sub_filter처럼 응답을 바꾸는 기능은 필터로 만들어져 있다는데, 필터는 어떤 순서로 줄을 서고 그 순서는 누가 정하는가- 같은 파일인데 어떤 때는
Content-Length가, 어떤 때는Transfer-Encoding: chunked가 붙는 이유는 무엇인가 sendfile on;은 소스의 어디에서 무엇을 바꾸는가. 바꾸면 시스템 콜이 어떻게 달라지는가
| 항목 | 내용 |
|---|---|
| 대상 | nginx |
| 버전 | nginx 1.31.9 (master, 개발판) |
| 커밋 | 9a7439fd79 (2026-10-23) |
| 주로 읽는 파일 | src/http/modules/ngx_http_static_module.c, src/http/ngx_http_core_module.c, src/http/ngx_http_header_filter_module.c, src/http/modules/ngx_http_chunked_filter_module.c, src/http/ngx_http_copy_filter_module.c, src/core/ngx_output_chain.c, src/http/ngx_http_write_filter_module.c, src/os/unix/ngx_linux_sendfile_chain.c, auto/modules |
글에 나오는 줄 번호는 모두 이 커밋 기준입니다. 같은 커밋의 소스를 받고 예제용 도커 이미지를 만드는 방법은 1편에 있습니다.
응답 쪽 코드는 필터 모듈만 스무 개 가까이 되고, 각각이 자기 일(압축, 문자셋 변환, SSI …)을 합니다. 이 글은 모든 응답이 지나는 뼈대 — static 핸들러, 필터 사슬을 잇는 방법, 그리고 사슬의 맨 끝을 지키는 header·chunked·copy·write 필터와 sendfile — 만 골랐습니다. 빼놓은 것은 글 끝의 "이 글에서 뺀 것"에 이름과 위치만 적어 두었습니다.
먼저 알아 둘 말
콘텐츠 핸들러(content handler)는 응답 본문을 만드는 함수입니다. root 아래의 파일을 내주는 ngx_http_static_handler(), proxy_pass 의 ngx_http_proxy_handler(), stub_status 의 ngx_http_stub_status_handler() 가 모두 콘텐츠 핸들러입니다. 9편에서 본 CONTENT phase 가 이것을 부릅니다.
ngx_buf_t 와 ngx_chain_t. 3편에서 본 버퍼 구조체와, 버퍼를 줄줄이 잇는 단방향 연결 리스트입니다. ngx_buf_t 는 데이터를 꼭 들고 있지 않고 데이터가 어디 있는지(메모리의 pos~last, 또는 파일의 file_pos~file_last)를 적습니다. 응답은 처음부터 끝까지 이 사슬에 담겨 움직입니다.
필터(filter)는 응답을 받아 무언가를 하고 다음 필터에 넘기는 함수입니다. nginx 는 필터를 두 줄로 세웁니다. 헤더 필터는 응답 헤더(r->headers_out)를 한 번 보고, 본문 필터는 본문 사슬(ngx_chain_t)이 올 때마다 불립니다. 압축(gzip), 문자열 바꾸기(sub_filter), Range 요청 자르기, chunked 인코딩이 모두 필터입니다.
필터 사슬(filter chain)은 필터들을 잇는 방법입니다. nginx 는 목록이나 배열을 쓰지 않고, 필터마다 "내 다음 필터"를 가리키는 함수 포인터 하나를 static 변수로 들고 있게 해서 이어 붙입니다. 3절에서 봅니다.
chunked 전송(chunked transfer encoding)은 응답 길이를 미리 모를 때 HTTP/1.1 이 쓰는 방법입니다. 본문을 조각(chunk)으로 나눠 조각마다 앞에 16진수 길이를 붙이고, 길이 0 인 조각으로 끝을 알립니다.
sendfile 은 리눅스 시스템 콜로, 파일의 내용을 사용자 공간 메모리로 복사하지 않고 커널 안에서 곧바로 소켓으로 보냅니다. read() 로 읽어 write() 로 쓰면 데이터가 커널 → nginx 메모리 → 커널로 두 번 복사되는데, 이것을 줄이는 방법이라 흔히 "zero-copy"라고 부릅니다.
1. 큰 그림 — 응답 하나가 지나는 길
코드에 들어가기 전에 길 전체를 한 장으로 봅니다. 아래는 정적 파일 100,000바이트를 sendfile on; 으로 내보낼 때 실제로 일어나는 순서입니다(6절의 예제 3에서 strace 로 확인합니다).
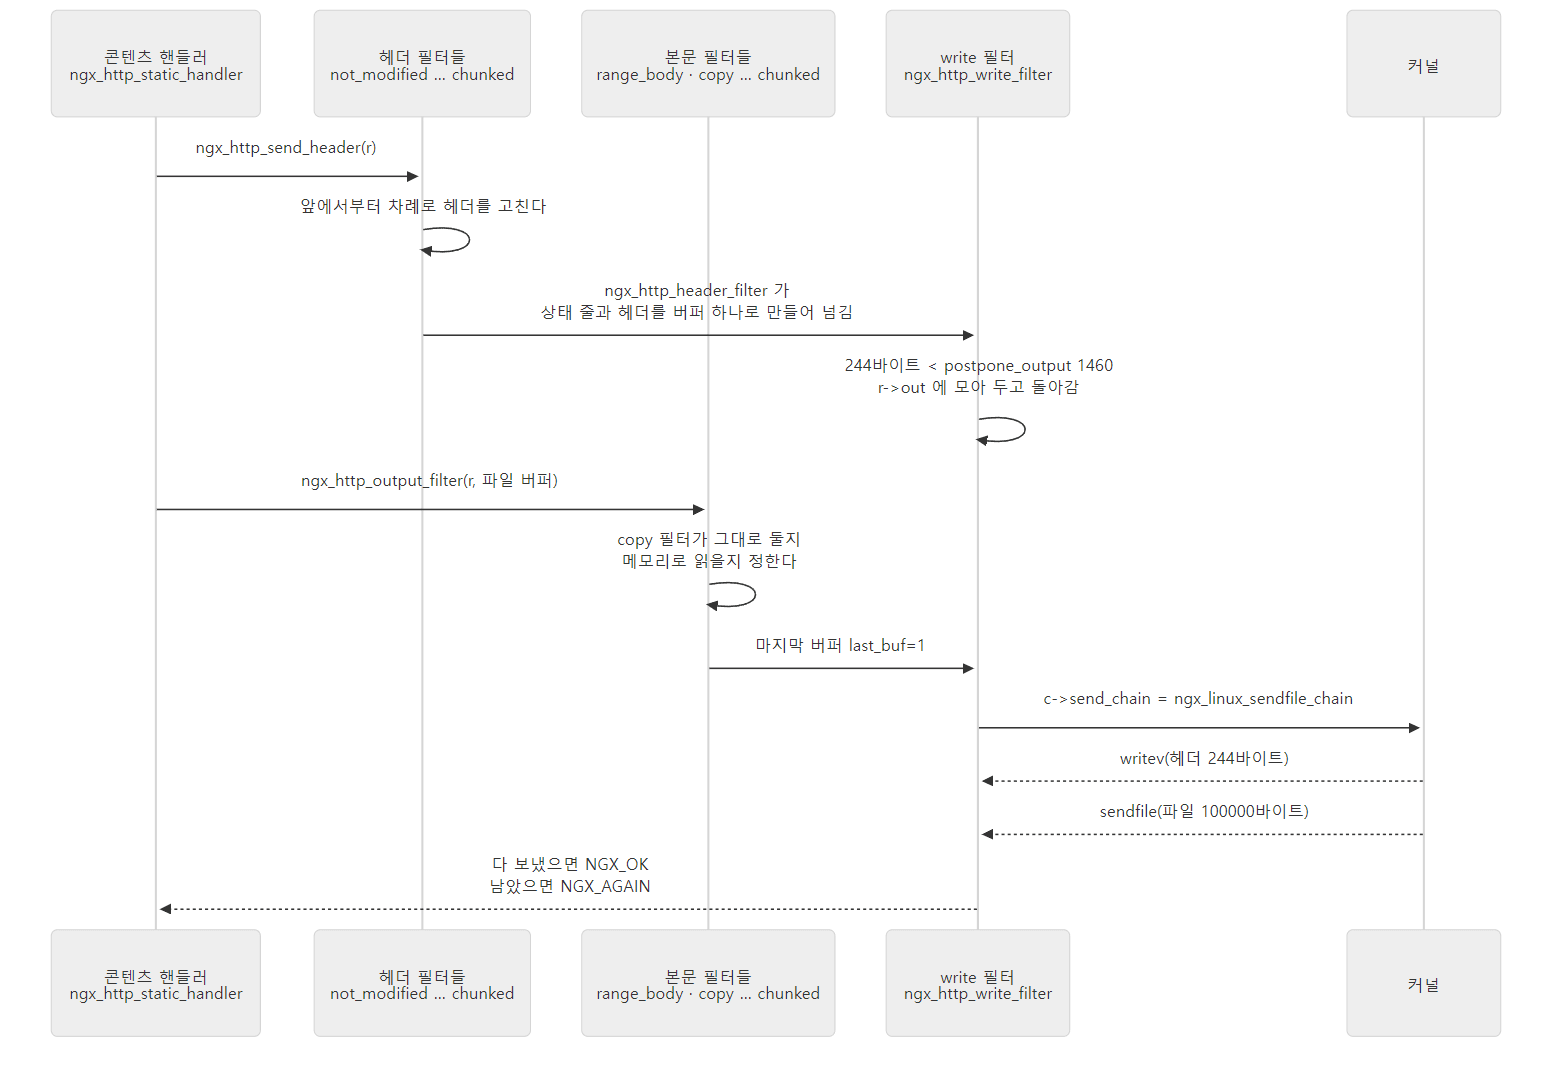 콘텐츠 핸들러가 부르는 함수는 두 개뿐입니다 — 헤더를 보내는
ngx_http_send_header() 와 본문을 보내는 ngx_http_output_filter(). 나머지는 전부 필터가 합니다.
이 그림에서 기억할 것은 세 가지입니다.
- 헤더와 본문은 따로 출발합니다. 핸들러가 헤더를 먼저 보내고, 그다음에 본문을 보냅니다. 각각 자기 필터 줄을 지나갑니다.
- 두 줄은 맨 끝에서 만납니다. 헤더 줄의 마지막 필터(
ngx_http_header_filter())는 헤더를 버퍼 하나로 만들어 본문 줄의 마지막 필터인 write 필터에 직접 넘깁니다. 그래서 헤더도 결국 본문과 같은 출구로 나갑니다. - write 필터는 바로 보내지 않을 수 있습니다. 작은 헤더는 모아 두었다가 본문과 함께 보냅니다. 소켓이 가득 차면 남은 것을 들고 있다가 나중에 마저 보냅니다.
nginx.conf 에서 보던 것과 이으면 이렇습니다.
| nginx.conf | 소스에서 하는 곳 |
|---|---|
root, index, try_files |
콘텐츠 핸들러 쪽 — ngx_http_static_module.c, ngx_http_index_module.c, ngx_http_try_files_module.c (2절) |
gzip, sub_filter, charset, add_header, ssi |
헤더·본문 필터 사슬의 중간 (3절) |
chunked_transfer_encoding |
chunked 필터 (4절) |
output_buffers, directio, aio |
copy 필터와 ngx_output_chain() (5절) |
sendfile, sendfile_max_chunk, tcp_nopush, postpone_output, limit_rate |
write 필터와 ngx_linux_sendfile_chain() (6절) |
2. 정적 파일 핸들러 — 파일을 읽지 않고 "어디 있는지"만 적는다
CONTENT phase 에 핸들러를 거는 법
ngx_http_static_module 에는 디렉티브가 하나도 없습니다(모듈 정의의 module directives 칸이 NULL, 32–45행). root 는 core 모듈의 디렉티브이고, static 모듈은 설정을 다 읽은 뒤 불리는 postconfiguration 콜백에서 자기 핸들러를 CONTENT phase 배열에 밀어 넣을 뿐입니다.
static ngx_int_t
ngx_http_static_init(ngx_conf_t *cf)
{
    ngx_http_handler_pt        *h;
    ngx_http_core_main_conf_t  *cmcf;

    cmcf = ngx_http_conf_get_module_main_conf(cf, ngx_http_core_module);

    h = ngx_array_push(&cmcf->phases[NGX_HTTP_CONTENT_PHASE].handlers);
    if (h == NULL) {
        return NGX_ERROR;
    }

    *h = ngx_http_static_handler;

    return NGX_OK;
}
src/http/modules/ngx_http_static_module.c 281–297행
index 모듈(ngx_http_index_module.c 461행), autoindex, gzip_static 도 같은 배열에 자기 핸들러를 넣습니다. 그러면 GET / 처럼 디렉터리를 요청했을 때 누가 먼저 불릴까요. 9편에서 본 ngx_http_init_phase_handlers() 가 phase 별 배열을 한 줄짜리 ph[] 로 펼 때 거꾸로 옮깁니다.
        n += cmcf->phases[i].handlers.nelts;

        for (j = cmcf->phases[i].handlers.nelts - 1; j >= 0; j--) {
            ph->checker = checker;
            ph->handler = h[j];
            ph->next = n;
            ph++;
        }
postconfiguration 은 ngx_modules.c 의 모듈 순서대로 불리고(src/http/ngx_http.c 303–315행), 이 빌드의 순서는 static → gzip_static → autoindex → index 입니다(3절의 예제 1에서 확인). 배열에는 그 순서로 들어가고, 펼 때 뒤집히므로 요청 때는 index → autoindex → gzip_static → static 순서로 불립니다. 각 핸들러는 자기 일이 아니면 NGX_DECLINED 를 돌려 다음으로 넘깁니다 — static 핸들러는 URI 가 / 로 끝나면 사양하고(67–69행), index 핸들러는 / 로 끝나지 않으면 사양합니다(ngx_http_index_module.c 112–114행). index 핸들러는 index.html 을 찾으면 그 URI 로 내부 리다이렉트(ngx_http_internal_redirect(), 9편)를 걸어 요청을 처음 phase 부터 다시 돌립니다. 예제 1의 3번(3절)에서 이 길이 디버그 로그로 보입니다.
try_files 는 CONTENT 가 아니라 그 앞의 PRECONTENT phase 에 걸립니다(ngx_http_try_files_module.c 411행). 파일이 있는지 보고 URI 를 바꾸거나 내부 리다이렉트할 뿐, 응답 본문은 결국 위의 콘텐츠 핸들러들이 만듭니다.
헷갈리기 쉬운 곳: proxy_pass 는 이 배열을 거치지 않습니다
proxy_pass, fastcgi_pass, stub_status 처럼 location 에 적는 핸들러는 phase 배열에 들어가지 않고 location 설정의 clcf->handler 에 저장됩니다. 요청이 그 location 으로 정해지면 r->content_handler 에 옮겨지고(src/http/ngx_http_core_module.c 1432행), CONTENT phase 의 checker 는 이것이 있으면 배열을 보지 않고 곧바로 부릅니다(1309–1313행). 그래서 proxy_pass 가 있는 location 에서는 같은 이름의 파일이 디스크에 있어도 static 핸들러가 불리지 않습니다. 자세한 것은 11편에서 봅니다.
ngx_http_static_handler() — 파일을 열고, 버퍼에 위치만 적는다
핸들러 본체는 230줄쯤입니다. 앞부분은 URI 를 파일 경로로 바꾸고(ngx_http_map_uri_to_path() — root 와 URI 를 이어 붙입니다, 78행) 파일을 엽니다.
    if (ngx_open_cached_file(clcf->open_file_cache, &path, &of, r->pool)
        != NGX_OK)
    {
        switch (of.err) {
src/http/modules/ngx_http_static_module.c 103–106행
ngx_open_cached_file() 은 open_file_cache 디렉티브로 켜는 열린 파일 캐시를 거쳐 파일을 엽니다. 캐시를 켜지 않았으면(cache == NULL) 그냥 열고 fstat 한 결과를 of 에 채웁니다(src/core/ngx_open_file_cache.c 159행). 실패하면 of.err 를 보고 404(ENOENT)·403(EACCES)·500 을 고르고, 디렉터리면 끝에 / 를 붙인 Location 으로 301 을 돌려줍니다(148–204행). 여기까지 오면 정규 파일 하나가 열려 있습니다. 나머지가 이 글의 출발점입니다.
    r->headers_out.status = NGX_HTTP_OK;
    r->headers_out.content_length_n = of.size;
    r->headers_out.last_modified_time = of.mtime;

    /* ... */

    r->allow_ranges = 1;

    /* we need to allocate all before the header would be sent */

    b = ngx_calloc_buf(r->pool);
    /* ... */
    b->file = ngx_pcalloc(r->pool, sizeof(ngx_file_t));
    /* ... */

    rc = ngx_http_send_header(r);

    if (rc == NGX_ERROR || rc > NGX_OK || r->header_only) {
        return rc;
    }

    b->file_pos = 0;
    b->file_last = of.size;

    b->in_file = b->file_last ? 1 : 0;
    b->last_buf = (r == r->main) ? 1 : 0;
    b->last_in_chain = 1;
    b->sync = (b->last_buf || b->in_file) ? 0 : 1;

    b->file->fd = of.fd;
    b->file->name = path;
    b->file->log = log;
    b->file->directio = of.is_directio;

    out.buf = b;
    out.next = NULL;

    return ngx_http_output_filter(r, &out);
}
src/http/modules/ngx_http_static_module.c 229–278행
차례로 읽으면 이렇습니다.
- 헤더 값을 채웁니다. 상태 200,
Content-Length가 될content_length_n,Last-Modified가 될last_modified_time, 그리고 줄인 자리에서 ETag 와Content-Type(확장자를types {}에서 찾습니다). 이 단계에서는 문자열을 만들지 않고r->headers_out의 필드만 채웁니다.allow_ranges = 1은 "이 응답은Range요청에 맞춰 잘라도 된다"는 표시로, range 필터가 봅니다. - 버퍼를 미리 잡습니다. 주석대로 헤더를 보내기 전에 메모리를 다 잡아 둡니다. 헤더를 보낸 뒤에 할당이 실패하면 클라이언트에게 오류 응답을 보낼 방법이 없기 때문입니다.
- 헤더를 보냅니다(
ngx_http_send_header()).HEAD요청이면r->header_only가 서서 여기서 끝납니다. 304(조건부 요청)도 헤더 필터 안에서header_only가 세워져 여기서 돌아갑니다. - 버퍼에 파일의 위치를 적습니다.
in_file = 1,file_pos = 0,file_last = 파일 크기,file->fd. 파일 내용은 한 바이트도 읽지 않았습니다. 메인 요청이면last_buf = 1(응답의 마지막 버퍼라는 표시)입니다. - 본문을 보냅니다(
ngx_http_output_filter()). 사슬은 버퍼 하나짜리이고, 사슬 고리out은 핸들러의 지역 변수입니다.
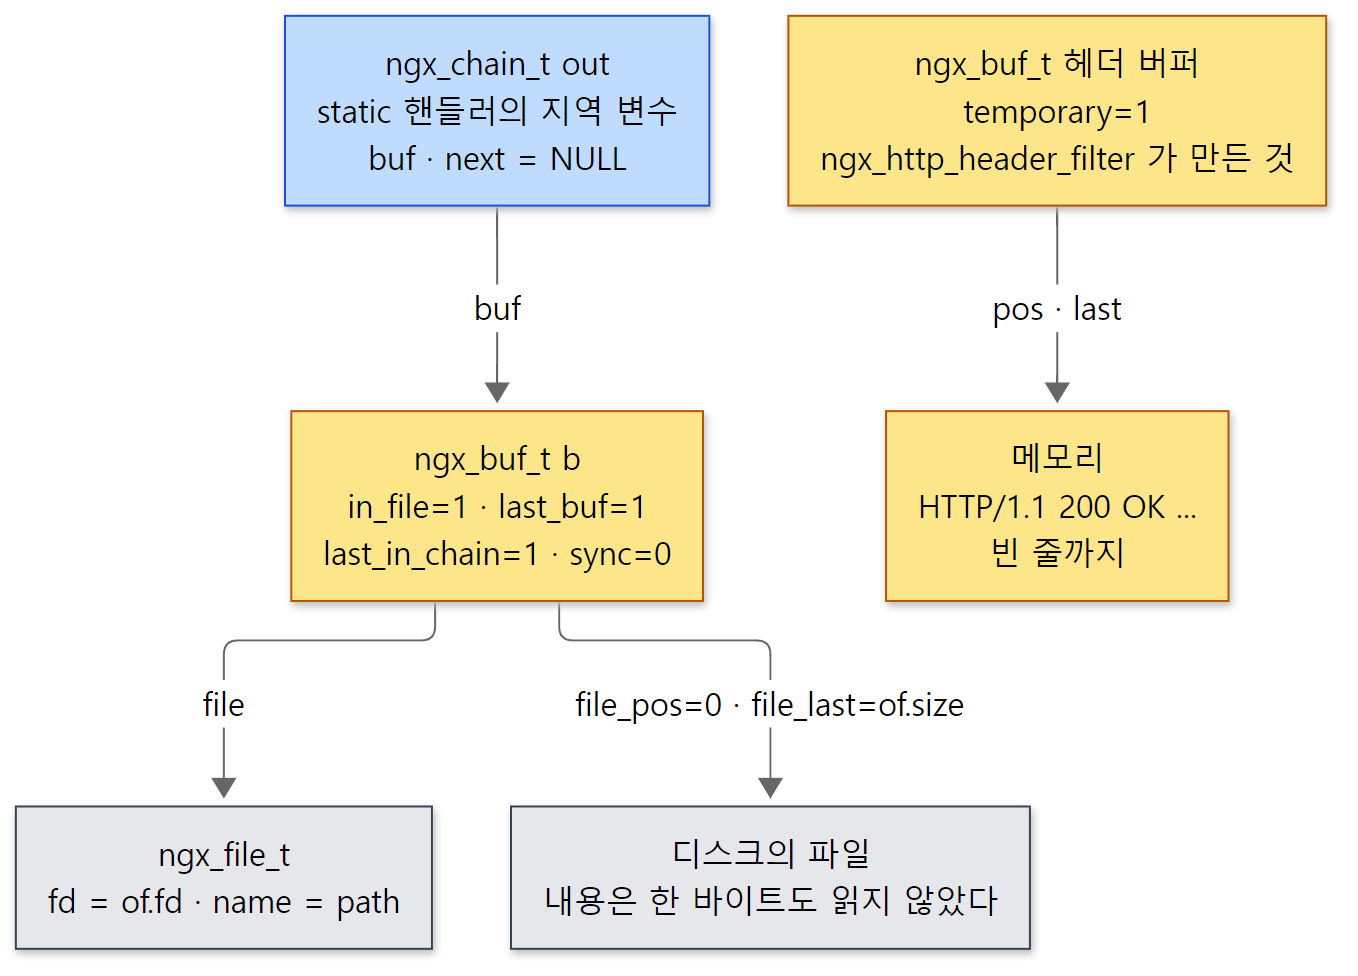 노란 상자가 버퍼(메모리에 있는 구조체), 회색이 그 버퍼가 가리키는 대상입니다. 본문 버퍼는 파일을, 헤더 버퍼는 메모리를 가리킵니다.
헷갈리기 쉬운 곳: 지역 변수 out 을 넘겨도 되나
out 은 함수가 끝나면 사라지는 스택 변수입니다. 그런데 소켓이 가득 차서 다 못 보내면 나중에 마저 보내야 합니다. 이것이 괜찮은 이유는 넘겨받은 사슬 고리를 그대로 들고 있는 필터가 없기 때문입니다. 들고 있어야 하는 필터는 고리를 새로 할당해 버퍼만 옮겨 담습니다. 예를 들어 write 필터는 ngx_alloc_chain_link(r->pool) 로 고리를 만들어 cl->buf = ln->buf 만 복사합니다(src/http/ngx_http_write_filter_module.c 136–144행). 버퍼 b 자체는 요청 풀에서 잡았으므로 요청이 끝날 때까지 삽니다. 필터를 직접 짤 때도 지켜야 하는 규칙입니다.
3. 필터 사슬 — 함수 포인터 두 개로 이은 연결 리스트
필터의 모양과 사슬의 머리
필터 함수의 모양은 두 가지뿐입니다.
typedef ngx_int_t (*ngx_http_output_header_filter_pt)(ngx_http_request_t *r);
typedef ngx_int_t (*ngx_http_output_body_filter_pt)
    (ngx_http_request_t *r, ngx_chain_t *chain);
src/http/ngx_http_core_module.h 535–537행
헤더 필터는 요청만 받고(헤더는 r->headers_out 에 있으므로), 본문 필터는 요청과 이번에 내보낼 사슬을 받습니다. 그리고 각 줄의 맨 앞을 가리키는 전역 변수가 있습니다.
ngx_http_output_header_filter_pt  ngx_http_top_header_filter;
ngx_http_output_header_filter_pt  ngx_http_top_early_hints_filter;
ngx_http_output_body_filter_pt    ngx_http_top_body_filter;
ngx_http_request_body_filter_pt   ngx_http_top_request_body_filter;
(early_hints 는 103 Early Hints 응답용, request_body 는 요청 본문을 읽을 때의 사슬입니다. 이 글에서는 다루지 않습니다.) 핸들러가 부르는 두 함수는 이 머리를 부르는 것이 거의 전부입니다. ngx_http_send_header() 는 헤더를 두 번 보내려 하는지 검사한 뒤 return ngx_http_top_header_filter(r); 로 끝나고(src/http/ngx_http_core_module.c 1903–1922행), ngx_http_output_filter() 는 이렇습니다.
ngx_int_t
ngx_http_output_filter(ngx_http_request_t *r, ngx_chain_t *in)
{
    ngx_int_t          rc;
    ngx_connection_t  *c;

    c = r->connection;

    ngx_log_debug2(NGX_LOG_DEBUG_HTTP, c->log, 0,
                   "http output filter \"%V?%V\"", &r->uri, &r->args);

    rc = ngx_http_top_body_filter(r, in);

    if (rc == NGX_ERROR) {
        /* NGX_ERROR may be returned by any filter */
        c->error = 1;
    }

    return rc;
}
src/http/ngx_http_core_module.c 1956–1975행
다음 필터는 각 파일의 static 변수에
그러면 "다음" 필터는 어디 있을까요. 필터 모듈마다 파일 맨 위에 static 변수 두 개를 둡니다. chunked 필터를 예로 듭니다.
static ngx_http_output_header_filter_pt  ngx_http_next_header_filter;
static ngx_http_output_body_filter_pt    ngx_http_next_body_filter;
src/http/modules/ngx_http_chunked_filter_module.c 55–56행
static 이므로 모든 필터 파일에 같은 이름의 변수가 있어도 서로 다른 변수입니다. 그리고 모듈의 postconfiguration 콜백에서 이 두 줄을 실행합니다.
static ngx_int_t
ngx_http_chunked_filter_init(ngx_conf_t *cf)
{
    ngx_http_next_header_filter = ngx_http_top_header_filter;
    ngx_http_top_header_filter = ngx_http_chunked_header_filter;

    ngx_http_next_body_filter = ngx_http_top_body_filter;
    ngx_http_top_body_filter = ngx_http_chunked_body_filter;

    return NGX_OK;
}
src/http/modules/ngx_http_chunked_filter_module.c 333–343행
"지금 맨 앞에 있는 것을 내 다음으로 기억하고, 내가 맨 앞이 된다." 연결 리스트의 앞에 끼워 넣기(push front)와 똑같습니다. 노드가 구조체가 아니라 함수이고, next 포인터가 각 파일의 static 변수에 흩어져 있을 뿐입니다. 필터 함수는 자기 일을 한 뒤 ngx_http_next_body_filter(r, out) 를 불러 다음으로 넘깁니다.
사슬의 맨 끝 두 개는 앞에 아무것도 없으므로 next 없이 머리만 차지합니다. 맨 먼저 초기화되기 때문입니다.
static ngx_int_t
ngx_http_write_filter_init(ngx_conf_t *cf)
{
    ngx_http_top_body_filter = ngx_http_write_filter;

    return NGX_OK;
}
src/http/ngx_http_write_filter_module.c 365–371행
헤더 줄의 끝인 ngx_http_header_filter_init() 도 next 없이 ngx_http_top_header_filter = ngx_http_header_filter; 로 머리를 차지합니다(같은 함수에서 103 Early Hints 사슬의 머리 ngx_http_top_early_hints_filter 도 채웁니다, src/http/ngx_http_header_filter_module.c 734–741행).
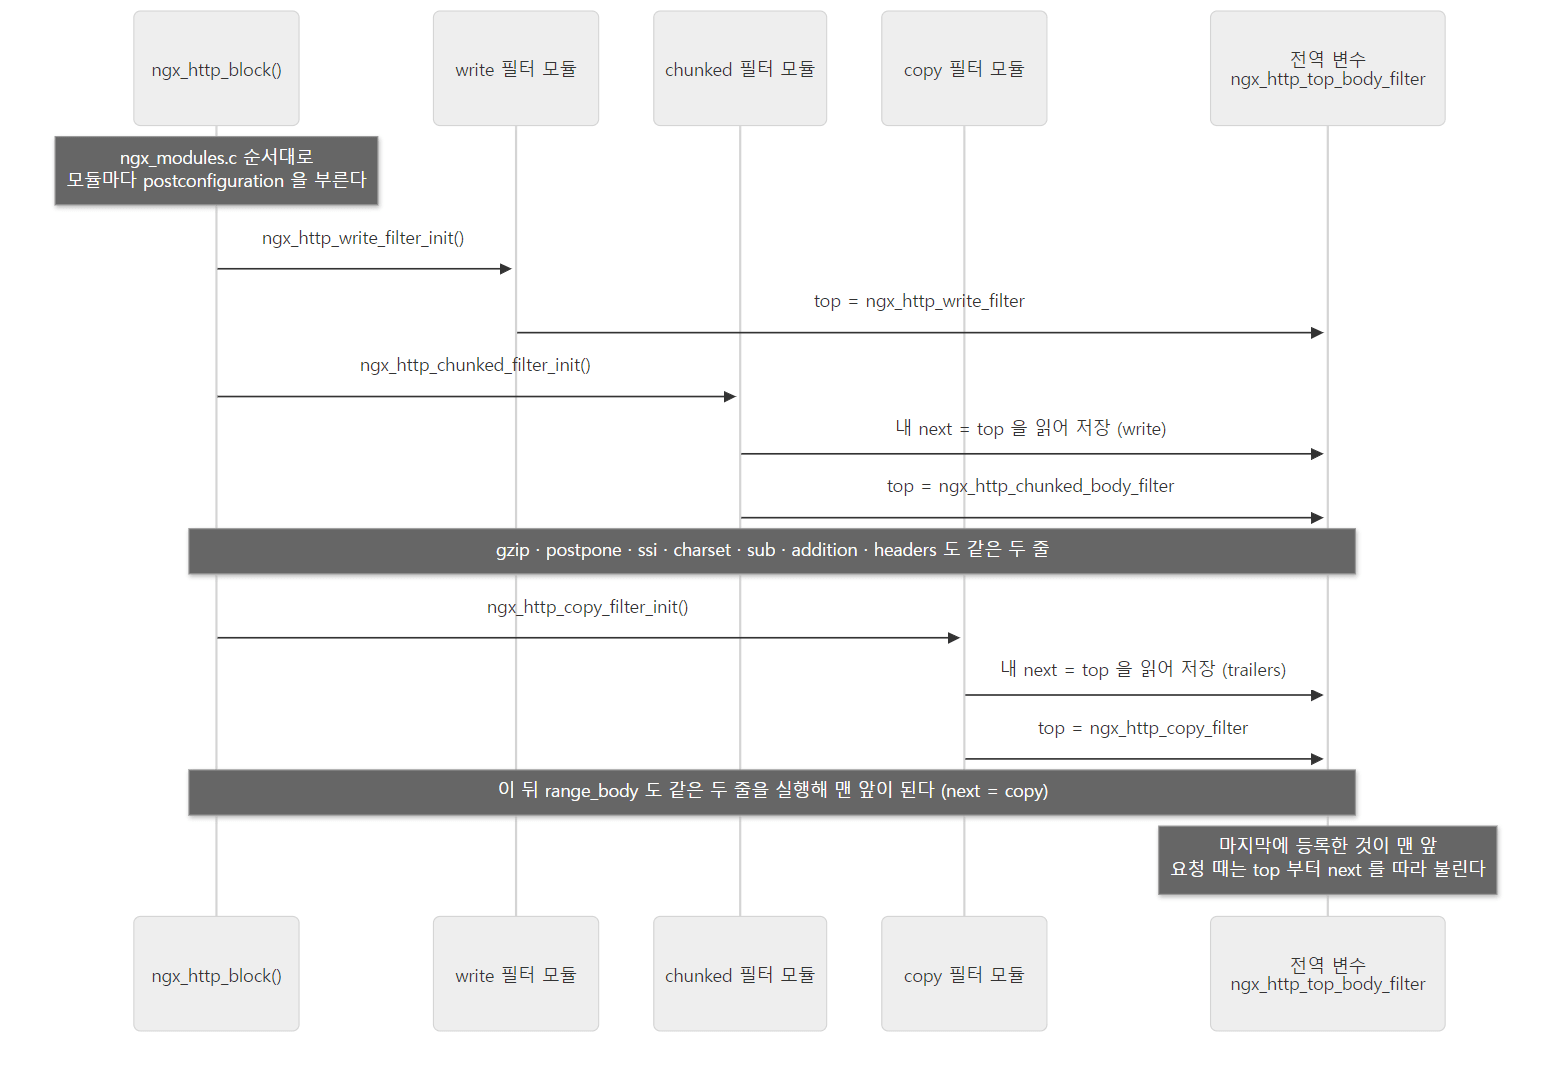 본문 줄만 그렸습니다. 헤더 줄도 같은 방법으로, 같은
postconfiguration 안에서 만들어집니다.
순서는 configure 가 정한다
postconfiguration 은 모듈 배열 순서대로 불리므로, 사슬의 순서는 모듈 배열의 순서를 뒤집은 것입니다. 그 배열은 configure 가 만드는 objs/ngx_modules.c 이고, 필터 순서는 auto/modules 에 # the filter order is important 라는 주석과 함께 손으로 적혀 있습니다(auto/modules 145–166행 — ngx_http_write_filter 부터 ngx_http_slice_filter 까지 21개). 이 목록은 위가 사슬의 끝(소켓 쪽) 입니다. 직접 짠 필터 모듈(configure 의 --add-module 로 넣는 HTTP_AUX_FILTER 종류)은 이 목록의 headers 와 copy 사이에 들어갑니다 — 모듈 배열을 $HTTP_MODULES $HTTP_FILTER_MODULES $HTTP_AUX_FILTER_MODULES $HTTP_INIT_FILTER_MODULES 순서로 이어 붙이고(auto/modules 1499–1501행), copy·range_body·not_modified 가 마지막 묶음(HTTP_INIT_FILTER, 397행부터)이기 때문입니다.
예제 1: ngx_modules.c 와 gdb 로 사슬을 직접 보기
이 글의 예제는 기준 커밋(9a7439fd79)을 그대로 빌드한 nginx 1.31.9 로 도커 컨테이너(Debian bookworm, --with-debug)에서 실행했습니다. ex/u10-filter-chain 은 gdb 를 쓰기 쉽게 master_process off; daemon off; 로 프로세스 하나만 띄웁니다.
# 이 글을 위해 쓴 예제입니다 (nginx 의 소스가 아닙니다)
# 프로세스 하나(master_process off)로 돌려 gdb 로 필터 사슬과 호출 경로를 본다
master_process off;
daemon off;
worker_processes 1;
error_log /tmp/u10/error.log debug;
pid /tmp/u10/nginx.pid;

events {
    worker_connections 64;
}

http {
    access_log off;
    sendfile on;

    server {
        listen 8080;
        root /tmp/u10/www;
    }
}
먼저 이 빌드의 모듈 배열에서 콘텐츠 핸들러와 필터만 뽑았습니다.
=== 1. content handlers and filters in ngx_modules.c (init order) ===
113:    &ngx_http_static_module,
114:    &ngx_http_gzip_static_module,
115:    &ngx_http_autoindex_module,
116:    &ngx_http_index_module,
150:    &ngx_http_write_filter_module,
151:    &ngx_http_header_filter_module,
152:    &ngx_http_chunked_filter_module,
153:    &ngx_http_v2_filter_module,
154:    &ngx_http_range_header_filter_module,
155:    &ngx_http_gzip_filter_module,
156:    &ngx_http_postpone_filter_module,
157:    &ngx_http_ssi_filter_module,
158:    &ngx_http_charset_filter_module,
159:    &ngx_http_sub_filter_module,
160:    &ngx_http_addition_filter_module,
161:    &ngx_http_userid_filter_module,
162:    &ngx_http_headers_filter_module,
163:    &ngx_http_copy_filter_module,
164:    &ngx_http_range_body_filter_module,
165:    &ngx_http_not_modified_filter_module,
auto/modules 의 목록에서 이 빌드에 없는 것(v3, xslt, image, gunzip, slice — configure 에서 켜지 않았습니다)이 빠졌을 뿐, 순서는 같습니다. 이제 gdb 로 nginx 를 띄우고 100,000바이트 파일을 요청해, sendfile() 을 부르는 ngx_linux_sendfile() 에서 멈춥니다. 멈춘 자리에서 사슬의 머리와 각 파일의 static 변수 ngx_http_next_*_filter 를 차례로 찍었습니다(gdb 에서는 '파일이름'::변수 로 static 변수를 읽습니다. 명령은 예제 폴더의 chain.gdb).
=== header filter chain (top first) ===
$1 = (ngx_http_output_header_filter_pt) 0x55555564f534 <ngx_http_not_modified_header_filter>
$2 = (ngx_http_output_header_filter_pt) 0x55555564d05e <ngx_http_headers_filter>
$3 = (ngx_http_output_header_filter_pt) 0x55555564b862 <ngx_http_userid_filter>
$4 = (ngx_http_output_header_filter_pt) 0x55555564b2ab <ngx_http_addition_header_filter>
$5 = (ngx_http_output_header_filter_pt) 0x555555648f84 <ngx_http_sub_header_filter>
$6 = (ngx_http_output_header_filter_pt) 0x555555645a96 <ngx_http_charset_header_filter>
$7 = (ngx_http_output_header_filter_pt) 0x55555563f5e6 <ngx_http_ssi_header_filter>
$8 = (ngx_http_output_header_filter_pt) 0x55555563cd1b <ngx_http_gzip_header_filter>
$9 = (ngx_http_output_header_filter_pt) 0x55555563adba <ngx_http_range_header_filter>
$10 = (ngx_http_output_header_filter_pt) 0x5555556366ce <ngx_http_v2_header_filter>
$11 = (ngx_http_output_header_filter_pt) 0x5555556358a2 <ngx_http_chunked_header_filter>
$12 = (ngx_http_output_header_filter_pt) 0x555555633fa4 <ngx_http_header_filter>
=== body filter chain (top first) ===
$13 = (ngx_http_output_body_filter_pt) 0x55555563bf4e <ngx_http_range_body_filter>
$14 = (ngx_http_output_body_filter_pt) 0x55555564e9ab <ngx_http_copy_filter>
$15 = (ngx_http_output_body_filter_pt) 0x55555564d34e <ngx_http_trailers_filter>
$16 = (ngx_http_output_body_filter_pt) 0x55555564b46c <ngx_http_addition_body_filter>
$17 = (ngx_http_output_body_filter_pt) 0x5555556494fb <ngx_http_sub_body_filter>
$18 = (ngx_http_output_body_filter_pt) 0x5555556465c6 <ngx_http_charset_body_filter>
$19 = (ngx_http_output_body_filter_pt) 0x55555563f9c4 <ngx_http_ssi_body_filter>
$20 = (ngx_http_output_body_filter_pt) 0x55555563ed8c <ngx_http_postpone_filter>
$21 = (ngx_http_output_body_filter_pt) 0x55555563d05a <ngx_http_gzip_body_filter>
$22 = (ngx_http_output_body_filter_pt) 0x555555635a98 <ngx_http_chunked_body_filter>
$23 = (ngx_http_output_body_filter_pt) 0x555555632c15 <ngx_http_write_filter>
함수 주소는 gdb 가 주소 공간 무작위화(ASLR)를 끄고 띄우므로 다시 돌려도 같게 나왔지만 환경이 다르면 달라질 수 있습니다. 이름의 순서는 소스가 정한 대로입니다. 두 줄을 표로 옮기면 이렇습니다(위에서 아래로 불리는 순서).
| 순서 | 헤더 줄 | 본문 줄 | 하는 일 |
|---|---|---|---|
| 1 | not_modified |
range_body |
헤더: If-Modified-Since·If-None-Match 를 보고 304 로 바꾼다 / 본문: Range 에 맞춰 자른다 |
| 2 | headers |
copy |
헤더: add_header·expires / 본문: 파일을 메모리로 읽을지 정한다(5절) |
| 3 | userid |
trailers |
헤더: userid 쿠키 / 본문: add_trailer (헤더 모듈의 본문 쪽 함수) |
| 4 | addition |
addition |
add_before_body·add_after_body |
| 5 | sub |
sub |
sub_filter |
| 6 | charset |
charset |
charset·source_charset 변환 |
| 7 | ssi |
ssi |
ssi on |
| 8 | gzip |
postpone |
헤더: gzip 을 쓸지 정한다 / 본문: 서브요청 출력의 순서를 맞춘다(뒤에서 봅니다) |
| 9 | range_header |
gzip |
헤더: Range 를 해석해 206 으로 바꾼다 / 본문: 압축 |
| 10 | v2 |
chunked |
헤더: HTTP/2 연결이면 HEADERS 프레임으로 / 본문: chunked 인코딩 |
| 11 | chunked |
write |
헤더: chunked 를 쓸지 정한다 / 본문: 모아 두었다 보낸다(6절) |
| 12 | header |
— | 상태 줄과 헤더를 문자열로 만든다(4절) |
같은 자리에서 bt 를 찍으면 본문 줄을 실제로 타고 내려온 흔적이 그대로 보입니다(위 사슬과 비교해 보세요).
=== call path at sendfile() ===
#0  ngx_linux_sendfile (c=0x5555557881d0, file=0x55555577e4b8, size=100000) at src/os/unix/ngx_linux_sendfile_chain.c:244
#1  0x00005555555cf541 in ngx_linux_sendfile_chain (c=0x5555557881d0, in=0x55555577e6d0, limit=2097152) at src/os/unix/ngx_linux_sendfile_chain.c:177
#2  0x0000555555633bc4 in ngx_http_write_filter (r=0x55555577d750, in=0x7fffffffe590) at src/http/ngx_http_write_filter_module.c:299
#3  0x0000555555635aea in ngx_http_chunked_body_filter (r=0x55555577d750, in=0x7fffffffe590) at src/http/modules/ngx_http_chunked_filter_module.c:117
#4  0x000055555563d0c6 in ngx_http_gzip_body_filter (r=0x55555577d750, in=0x7fffffffe590) at src/http/modules/ngx_http_gzip_filter_module.c:310
#5  0x000055555563eec7 in ngx_http_postpone_filter (r=0x55555577d750, in=0x7fffffffe590) at src/http/ngx_http_postpone_filter_module.c:91
#6  0x000055555563fa80 in ngx_http_ssi_body_filter (r=0x55555577d750, in=0x7fffffffe590) at src/http/modules/ngx_http_ssi_filter_module.c:440
#7  0x000055555564661d in ngx_http_charset_body_filter (r=0x55555577d750, in=0x7fffffffe590) at src/http/modules/ngx_http_charset_filter_module.c:557
#8  0x0000555555649546 in ngx_http_sub_body_filter (r=0x55555577d750, in=0x7fffffffe590) at src/http/modules/ngx_http_sub_filter_module.c:299
#9  0x000055555564b4ec in ngx_http_addition_body_filter (r=0x55555577d750, in=0x7fffffffe590) at src/http/modules/ngx_http_addition_filter_module.c:149
#10 0x000055555564d3ca in ngx_http_trailers_filter (r=0x55555577d750, in=0x7fffffffe590) at src/http/modules/ngx_http_headers_filter_module.c:295
#11 0x00005555555872da in ngx_output_chain (ctx=0x55555577e650, in=0x7fffffffe590) at src/core/ngx_output_chain.c:70
#12 0x000055555564ed3a in ngx_http_copy_filter (r=0x55555577d750, in=0x7fffffffe590) at src/http/ngx_http_copy_filter_module.c:174
#13 0x000055555563bfbc in ngx_http_range_body_filter (r=0x55555577d750, in=0x7fffffffe590) at src/http/modules/ngx_http_range_filter_module.c:666
#14 0x00005555555eed8d in ngx_http_output_filter (r=0x55555577d750, in=0x7fffffffe590) at src/http/ngx_http_core_module.c:1967
#15 0x000055555565dafc in ngx_http_static_handler (r=0x55555577d750) at src/http/modules/ngx_http_static_module.c:277
#16 0x00005555555ed698 in ngx_http_core_content_phase (r=0x55555577d750, ph=0x5555557a22f0) at src/http/ngx_http_core_module.c:1318
#17 0x00005555555ec448 in ngx_http_core_run_phases (r=0x55555577d750) at src/http/ngx_http_core_module.c:906
#18 0x00005555555ec3b5 in ngx_http_handler (r=0x55555577d750) at src/http/ngx_http_core_module.c:889
...
#23 0x00005555555cea51 in ngx_epoll_process_events (cycle=0x555555784120, timer=60000, flags=1) at src/event/modules/ngx_epoll_module.c:901
#24 0x00005555555bb0b9 in ngx_process_events_and_timers (cycle=0x555555784120) at src/event/ngx_event.c:248
#25 0x00005555555ca62b in ngx_single_process_cycle (cycle=0x555555784120) at src/os/unix/ngx_process_cycle.c:322
#26 0x000055555557f1b2 in main (argc=3, argv=0x7fffffffed38) at src/core/nginx.c:400
(#19~#22 는 8편에서 본 요청 읽기 함수들이라 줄였습니다. 포인터 값은 gdb 아래에서는 다시 돌려도 같았지만, 환경이 다르면 달라집니다.) 몇 가지가 눈에 띕니다.
#15→#14: static 핸들러의 마지막 줄(277행)에서ngx_http_output_filter()로 들어갔습니다. 이 모든 일이 epoll 이 깨운 한 번의 이벤트 처리 안에서(#23) 일어났습니다. 요청을 다 읽은 바로 그 호출 안에서 응답까지 보냈습니다.sub,charset,ssi,gzip은 이 location 에서 켜지 않았는데도 모두 불렸습니다. 사슬은 설정과 상관없이 하나뿐이고, 각 필터가 할 일이 없으면 — 대개는 헤더 필터 단계에서 만들어 두는 자기 컨텍스트(ngx_http_get_module_ctx())가 없으면 — 아무것도 하지 않고 곧바로 다음을 부릅니다. 예를 들어#8의 299행은sub필터의if (ctx == NULL) { return ngx_http_next_body_filter(r, in); }입니다(src/http/modules/ngx_http_sub_filter_module.c 296–300행).#12→#11→#10: copy 필터는 다음 필터를 직접 부르지 않고ngx_output_chain()에 맡깁니다. 70행은 "복사할 필요가 없는 버퍼 하나"일 때의 지름길입니다(5절).#2의 299행은 write 필터가c->send_chain()을 부르는 줄이고, 그것이 리눅스에서는ngx_linux_sendfile_chain()입니다(6절).
마지막으로 gdb 없이 같은 설정으로 띄워 GET / 를 보내고, 디버그 로그에서 콘텐츠 핸들러와 필터에 관한 줄만 골랐습니다(index.html 하나를 넣어 두었습니다).
=== 3. debug log: GET / ===
index page
*2 content phase: 14
*2 internal redirect: "/index.html?"
*2 content phase: 14
*2 content phase: 15
*2 content phase: 16
*2 content phase: 17
*2 http filename: "/tmp/u10/www/index.html"
*2 http static fd: 9
*2 http write filter: l:0 f:0 s:235
*2 http output filter "/index.html?"
*2 http copy filter: "/index.html?"
*2 http postpone filter "/index.html?" 00007FFE225518C0
*2 http write filter: l:1 f:0 s:246
*2 http copy filter: 0 "/index.html?"
(포인터 값은 실행마다 다릅니다.) 2절에서 말한 순서가 그대로 보입니다. content phase: 14 가 index 핸들러이고, URI 가 / 로 끝나므로 index.html 을 찾아 내부 리다이렉트를 겁니다. 다시 돈 요청에서는 14(index)가 사양하고, 15(autoindex)·16(gzip_static)도 사양한 뒤, 17(static)이 파일을 열었습니다. 그다음 헤더가 먼저 write 필터에 와서 모아졌고(l:0 ... s:235), 본문이 output → copy → postpone 을 거쳐 write 필터에서 함께 나갔습니다(l:1 ... s:246 — 헤더 235 + 본문 11바이트). content phase: N 은 CONTENT phase checker 가 찍는 줄입니다(src/http/ngx_http_core_module.c 1315–1316행).
헷갈리기 쉬운 곳: 목록의 순서와 부르는 순서는 반대입니다
auto/modules 와 ngx_modules.c 는 write 필터를 맨 위에 적지만, write 필터는 맨 마지막에 불립니다. 초기화를 먼저 한 것이 사슬의 끝으로 밀려나기 때문입니다. "필터 순서" 라는 말을 볼 때 어느 쪽 순서인지 먼저 확인해야 합니다. 또 헤더 줄과 본문 줄의 순서는 같지 않습니다 — 각 모듈이 필요한 줄에만 끼기 때문입니다(not_modified 는 헤더에만, postpone·copy 는 본문에만 낍니다).
4. 헤더 필터 — 상태 줄과 헤더를 문자열로, 그리고 길이를 모를 때
ngx_http_header_filter() — 길이를 먼저 세고 한 번에 만든다
헤더 줄의 마지막 ngx_http_header_filter() 는 400줄이 넘지만 하는 일은 단순합니다. r->headers_out 의 필드를 HTTP/1.x 헤더 문자열로 만듭니다. 방법이 nginx 다운데, 같은 조건문을 두 번 지납니다. 처음(208–440행)에는 들어갈 바이트 수 len 만 더하고, 그 크기로 버퍼를 ngx_create_temp_buf(r->pool, len) 로 한 번만 잡은 뒤(442행), 두 번째(447–617행)에 실제로 씁니다. 상태 줄의 앞부분은 요청이 HTTP/1.0 이어도 언제나 "HTTP/1.1 " 입니다(448행).
풀에서 잡은 메모리는 따로 풀 수 없으므로(3편), 늘려 가며 다시 잡는 방식은 낭비가 큽니다. 길이를 먼저 세는 것은 풀을 쓰는 C 코드의 흔한 습관입니다. 상태 줄 "200 OK" 같은 글자는 ngx_http_status_lines[] 표(58행부터)에서 상태 코드로 찾아 옵니다. 함수의 끝은 이렇습니다.
    ngx_log_debug2(NGX_LOG_DEBUG_HTTP, c->log, 0,
                   "%*s", (size_t) (b->last - b->pos), b->pos);

    /* the end of HTTP header */
    *b->last++ = CR; *b->last++ = LF;

    r->header_size = b->last - b->pos;

    if (r->header_only) {
        b->last_buf = 1;
    }

    out.buf = b;
    out.next = NULL;

    return ngx_http_write_filter(r, &out);
}
src/http/ngx_http_header_filter_module.c 613–629행
마지막 줄이 1절 그림의 "두 줄이 만나는 곳"입니다. 헤더 버퍼는 본문 필터 사슬을 처음부터 타지 않고 write 필터를 이름으로 직접 부릅니다. 헤더 버퍼에 gzip 이나 chunked 가 손댈 일은 없기 때문입니다. HEAD 요청이나 304 처럼 본문이 없으면 이 버퍼가 곧 마지막 버퍼(last_buf = 1)입니다.
헷갈리기 쉬운 곳: 서브요청과 HTTP/0.9 는 헤더를 만들지 않습니다
함수 첫머리(176–188행)에서 r->header_sent = 1 을 세운 뒤, 서브요청(요청 처리 중에 nginx 안에서 만드는 작은 요청 — 7절, r != r->main)이거나 HTTP/0.9 요청이면 아무것도 만들지 않고 NGX_OK 를 돌려줍니다. 서브요청의 응답은 메인 요청 응답의 본문 일부가 되어야 하므로 자기 헤더가 있으면 안 됩니다. 또 HTTP/2 연결이면 이 함수까지 오지 않습니다 — 사슬에서 바로 앞의 ngx_http_v2_header_filter() 가 HEADERS 프레임을 만들고 다음 필터를 부르지 않습니다. 같은 사슬이 HTTP/1.1 과 HTTP/2 를 함께 다루는 방법입니다.
chunked 헤더 필터 — 길이를 모르면
static 핸들러는 content_length_n 에 파일 크기를 적었습니다. 그런데 sub_filter 가 본문의 글자를 바꾸거나 gzip 이 압축하면 길이가 달라집니다. 그래서 이런 필터는 헤더 필터 단계에서 길이를 지웁니다(ngx_http_clear_content_length(r) — content_length_n = -1; sub 는 ngx_http_sub_filter_module.c 266–269행, gzip 은 ngx_http_gzip_filter_module.c 289–291행). 헤더 줄에서 그 뒤에 오는 chunked 헤더 필터가 이것을 봅니다.
    if (r->headers_out.content_length_n == -1
| r->expect_trailers)
    {
        clcf = ngx_http_get_module_loc_conf(r, ngx_http_core_module);

        if (r->http_version >= NGX_HTTP_VERSION_11
            && clcf->chunked_transfer_encoding)
        {
            if (r->expect_trailers) {
                ngx_http_clear_content_length(r);
            }

            r->chunked = 1;

            ctx = ngx_pcalloc(r->pool, sizeof(ngx_http_chunked_filter_ctx_t));
            if (ctx == NULL) {
                return NGX_ERROR;
            }

            ngx_http_set_ctx(r, ctx, ngx_http_chunked_filter_module);

        } else if (r->headers_out.content_length_n == -1) {
            r->keepalive = 0;
        }
    }
src/http/modules/ngx_http_chunked_filter_module.c 76–100행
HTTP/1.1 이고 chunked_transfer_encoding 이 켜져 있으면(기본 on, ngx_http_core_module.c 4044–4045행) r->chunked = 1 을 세웁니다. 그러면 바로 뒤의 ngx_http_header_filter() 가 Transfer-Encoding: chunked 를 적고(557–560행), 본문 줄의 chunked 필터가 버퍼 사슬 앞뒤에 길이 줄과 CRLF 를 끼웁니다. HTTP/1.0 이라 chunked 를 쓸 수 없으면 keepalive = 0 으로 바꿔 연결을 닫아서 응답의 끝을 알립니다.
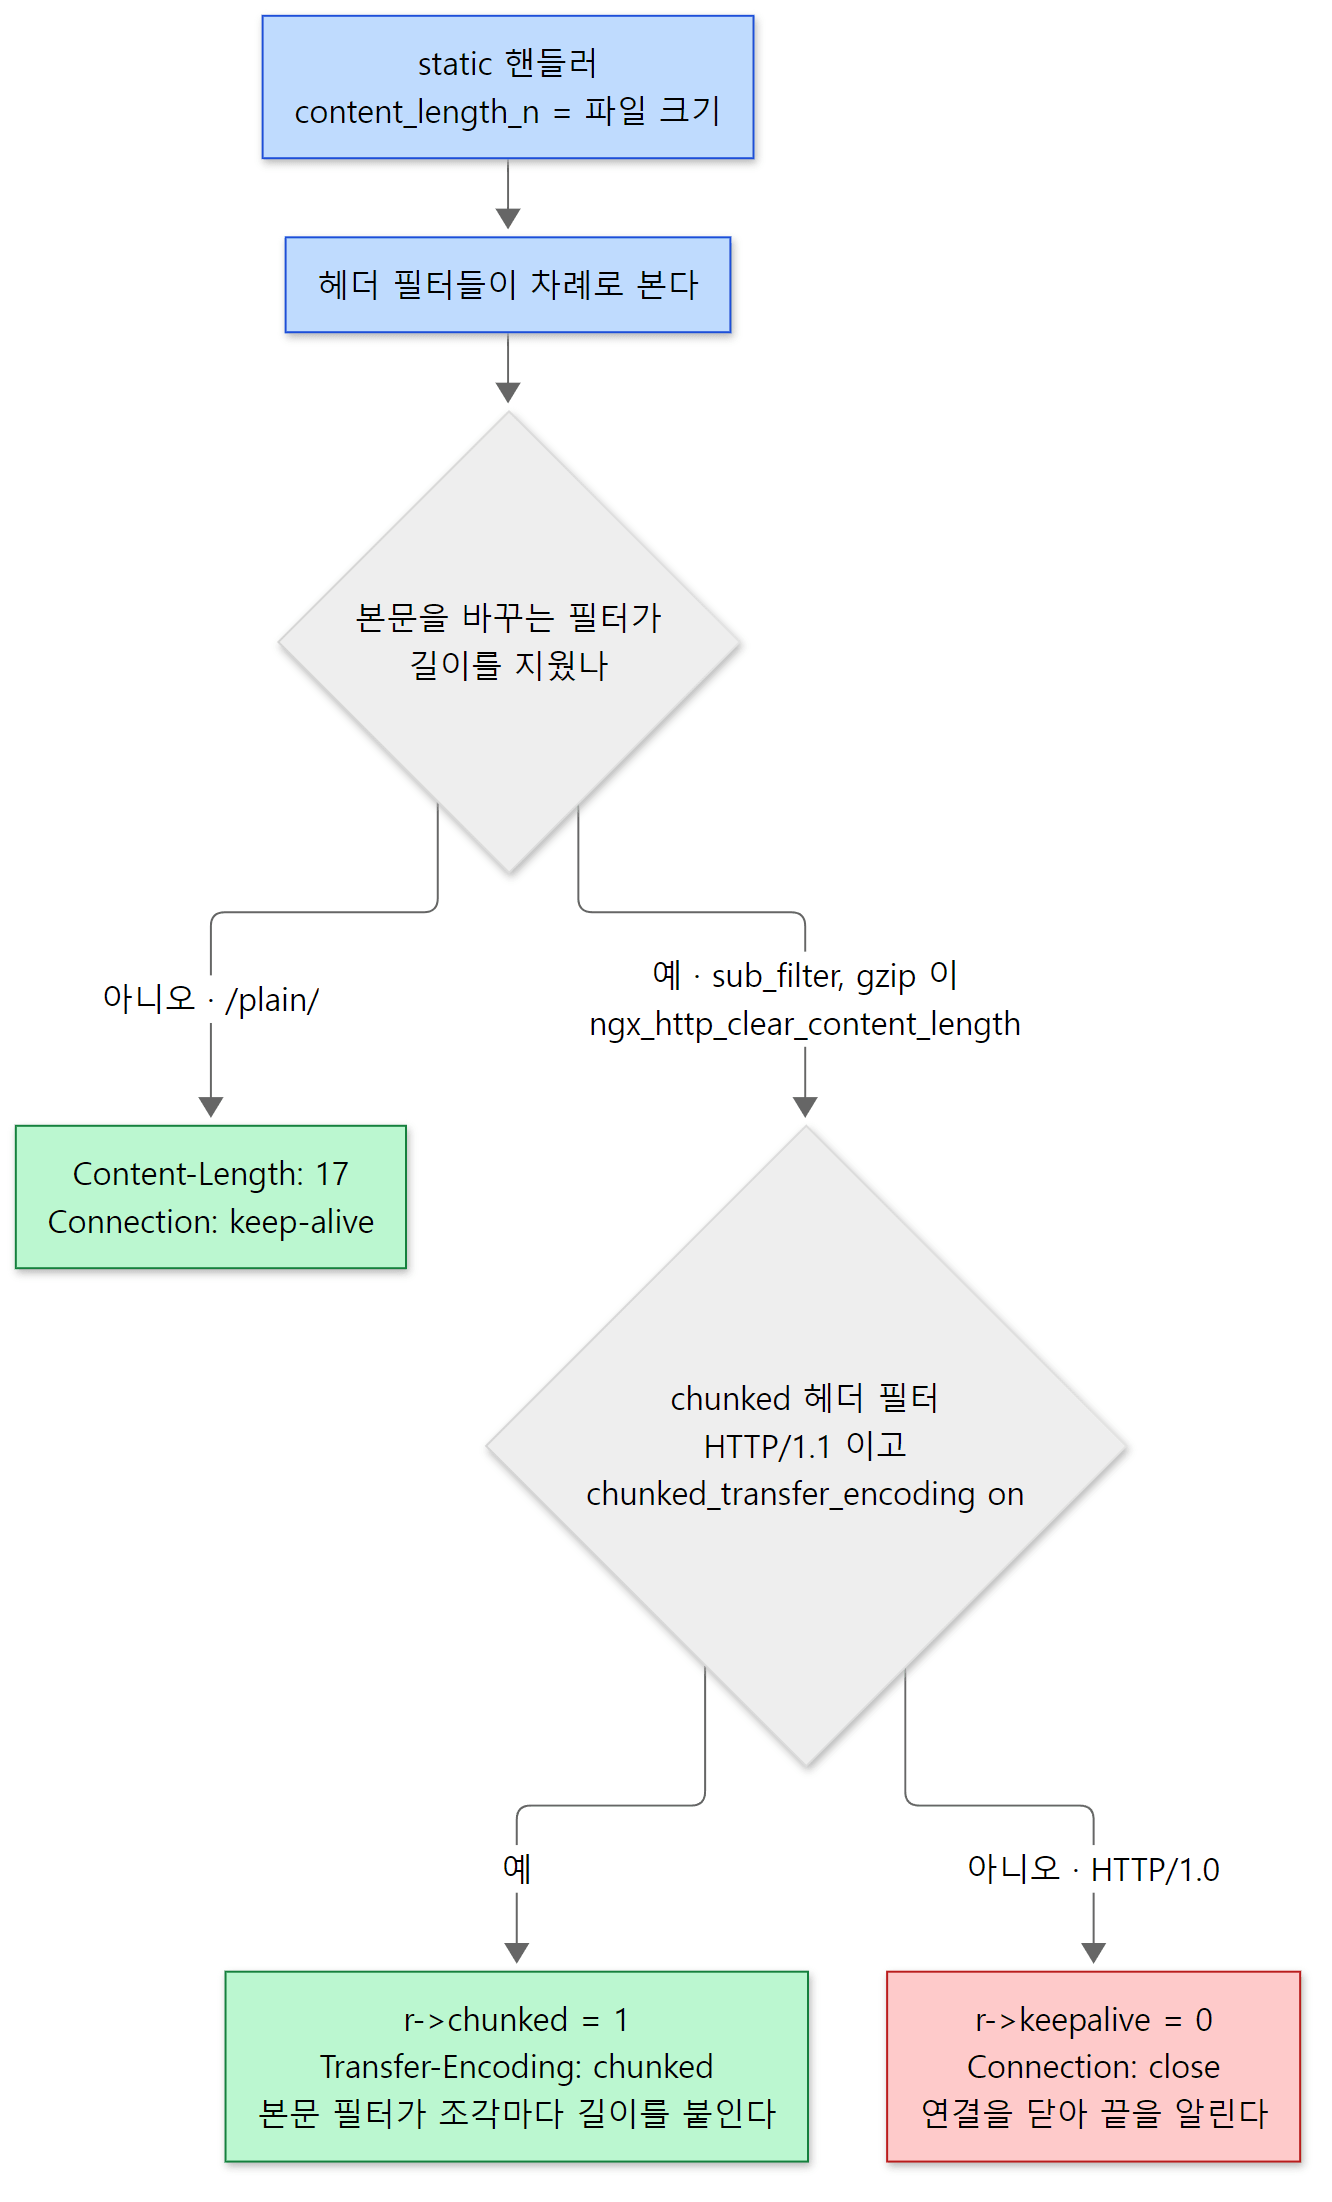 빨간 상자는 연결을 재사용하지 못하는 경우입니다. 헤더 줄에서 sub·gzip 이 chunked 보다 앞에 있어야 이 판단이 맞게 됩니다 — 3절의 순서가 중요한 이유입니다.
본문 쪽 chunked 필터는 들어온 사슬의 크기를 모두 더해 "%xO" CRLF(16진수 길이) 버퍼를 맨 앞에 붙이고, 마지막 버퍼(last_buf)를 만나면 CRLF "0" CRLF CRLF 로 끝을 붙입니다(ngx_http_chunked_filter_module.c 156–219행). 본문 데이터 자체는 복사하지 않고 고리만 새로 만들어 앞뒤에 끼웁니다.
예제 2: 본문을 바꾸는 필터가 헤더를 바꾼다
ex/u10-body-filters 는 같은 17바이트 파일(hello from nginx + 줄바꿈)을 세 location 에서 내보냅니다. 설정에서 server {} 블록만 옮겼습니다. 그 밖에는 예제 1과 같은 기본 줄(worker_processes 1;, pid, events {}, access_log off;)과 error_log ... debug;, http {} 의 root /tmp/u10/www; sendfile on; 뿐입니다(이 예제는 master_process off 없이 보통처럼 띄웁니다).
    server {
        listen 8080;

        # 아무 필터도 내용을 바꾸지 않는다 -> Content-Length
        location /plain/ {
        }

        # sub_filter 가 본문을 바꾼다 -> 길이를 모른다 -> chunked
        location /sub/ {
            sub_filter 'nginx' 'NGINX';
            sub_filter_types text/plain;
        }

        # gzip 이 본문을 압축한다
        location /gz/ {
            gzip on;
            gzip_types text/plain;
            gzip_min_length 1;
        }
    }
run.sh 는 curl 로 받아 길이에 관한 헤더만 골라 찍습니다(2번만 전체를 --raw 로 받아 chunked 인코딩을 풀지 않고 보여 줍니다).
=== 1. GET /plain/a.txt ===
HTTP/1.1 200 OK
Content-Length: 17
Connection: keep-alive
=== 2. GET /sub/a.txt (raw, chunked not decoded) ===
HTTP/1.1 200 OK
Server: nginx/1.31.9
Date: Sat, 07 Nov 2026 03:13:27 GMT
Content-Type: text/plain
Transfer-Encoding: chunked
Connection: keep-alive

11
hello from NGINX

0

--- debug log ---
*2 http write filter: l:0 f:0 s:237
*2 http write filter: l:1 f:0 s:254
*2 sendfile: @0 17
*2 sendfile: 17 of 17 @0
*3 http write filter: l:0 f:0 s:156
*3 read: 10, 0000556D22E176D8, 17, 0
*3 http chunk: 11
*3 http chunk: 5
*3 http chunk: 1
*3 http write filter: l:1 f:0 s:184
*3 sendfile: @0 11
*3 sendfile: 11 of 11 @0
*3 sendfile: @16 1
*3 sendfile: 1 of 1 @16
=== 3. GET /sub/a.txt with HTTP/1.0 ===
HTTP/1.1 200 OK
Connection: close
=== 4. GET /gz/a.txt (Accept-Encoding: gzip) ===
HTTP/1.1 200 OK
Transfer-Encoding: chunked
Connection: keep-alive
Content-Encoding: gzip
hello from nginx
=== 5. GET /gz/a.txt (no Accept-Encoding) ===
HTTP/1.1 200 OK
Content-Length: 17
Connection: keep-alive
(날짜, 포인터 값, 연결 번호 *N 은 실행마다 다릅니다. 디버그 로그는 시각과 pid 를 잘라 냈습니다.)
/plain/— 길이를 아무도 지우지 않아Content-Length: 17입니다. 디버그 로그의*2가 이 요청으로, 파일 17바이트가sendfile로 나갔습니다./sub/—Content-Length가 사라지고Transfer-Encoding: chunked가 붙었습니다. 본문 앞의11은 16진수로 17(바뀐 뒤에도 길이는 17바이트), 끝의0이 마지막 조각입니다. 로그의http chunk: 11,5,1은 chunked 필터가 받은 버퍼 셋의 크기를 10진수로 찍은 것입니다("http chunk: %O", 129–130행). sub 필터가hello from(11) ·NGINX(5) · 줄바꿈(1) 세 버퍼로 나눴고, chunked 필터는 셋을 합쳐 조각 하나(11)로 내보냈습니다.- HTTP/1.0 으로 같은 것을 받으면 chunked 도
Content-Length도 없이Connection: close입니다. 이 요청은 keep-alive 를 청하지 않았으므로 처음부터r->keepalive가 0 이었습니다. 청했더라도 위 코드의keepalive = 0이 연결을 닫게 합니다. gzip도 같습니다.Content-Encoding: gzip이 붙고 길이를 모르니 chunked 입니다(압축을 풀면 원래 글이 나옵니다).Content-Encoding이Connection뒤에 오는 이유는, gzip 헤더 필터가 이것을r->headers_out.headers목록에 넣고ngx_http_header_filter()는 고정 헤더를 먼저 쓴 다음 목록을 쓰기 때문입니다(587–611행).Accept-Encoding이 없으면 gzip 헤더 필터가 컨텍스트를 만들지 않고 넘어가서/plain/과 같은 응답이 됩니다. 같은 location 이라도 요청에 따라 필터가 일을 할지 말지 정한다는 것이 보입니다.
헷갈리기 쉬운 곳: 메모리로 읽었는데 sendfile 이 또 나옵니다
2번의 로그를 자세히 보면 이상한 곳이 있습니다. sub 필터가 글자를 보려면 내용이 메모리에 있어야 하므로 파일을 read 로 17바이트 읽었습니다(read: 10, ..., 17, 0). 그런데 내보낼 때는 sendfile: @0 11 과 sendfile: @16 1 이 찍혔습니다. 바뀌지 않은 앞 11바이트와 끝 1바이트는 파일에서 다시 sendfile 로 보냈습니다. 바뀐 NGINX 5바이트는 파일에 없는 메모리 버퍼이므로 chunked 의 길이 줄들과 함께 writev 쪽으로 갑니다(이 grep 에는 writev 줄을 넣지 않았습니다).
소스를 보면 이유가 있습니다. copy 필터가 파일을 메모리로 읽을 때, sendfile 이 켜져 있으면 새 버퍼에 메모리 위치와 파일 위치를 둘 다 적어 둡니다(dst->in_file = 1; dst->file_pos = ..., src/core/ngx_output_chain.c 640–648행). sub 필터는 바꾸지 않은 구간의 버퍼를 만들 때 그 파일 위치도 같이 잘라 옮기고(ngx_http_sub_filter_module.c 416–419행), 맨 끝의 전송 함수는 in_file 이 선 버퍼를 sendfile 로 보냅니다(6절). 버퍼가 "메모리에도 있고 파일에도 있다"고 동시에 말할 수 있는 것이 ngx_buf_t 의 비트 플래그 설계입니다.
5. copy 필터와 ngx_output_chain() — 파일을 메모리로 읽을까, 그대로 보낼까
static 핸들러는 파일 위치만 적은 버퍼를 넘겼습니다. 그런데 sub·gzip 처럼 내용을 봐야 하는 필터가 사슬 아래에 있거나, sendfile 이 꺼져 있으면 누군가는 파일을 읽어야 합니다. 그 일을 맡은 것이 본문 줄의 거의 맨 앞(2번째)에 있는 copy 필터입니다. 맨 앞에 있어야 아래의 모든 필터가 "필요하면 메모리에 있는" 버퍼를 받을 수 있습니다.
copy 필터는 요청마다 처음 불릴 때 ngx_output_chain_ctx_t 를 만들어 설정을 옮겨 담습니다.
        ctx->sendfile = c->sendfile;
        ctx->need_in_memory = r->main_filter_need_in_memory
| r->filter_need_in_memory;
        ctx->need_in_temp = r->filter_need_temporary;

        ctx->alignment = clcf->directio_alignment;

        ctx->pool = r->pool;
        ctx->bufs = conf->bufs;
        ctx->tag = (ngx_buf_tag_t) &ngx_http_copy_filter_module;

        ctx->output_filter = (ngx_output_chain_filter_pt)
                                  ngx_http_next_body_filter;
        ctx->filter_ctx = r;
src/http/ngx_http_copy_filter_module.c 116–129행
ctx->sendfile— 연결의c->sendfile입니다. 이것은 location 을 정할 때sendfile디렉티브와 운영체제 지원 여부(NGX_IO_SENDFILE)로 정해집니다(src/http/ngx_http_core_module.c 1370–1375행).ctx->need_in_memory— 4절에서 sub·gzip 헤더 필터가 세운filter_need_in_memory/main_filter_need_in_memory입니다. 헤더 필터가 본문보다 먼저 돈다는 순서 덕분에, 본문의 첫 버퍼가 copy 필터에 올 때는 이미 이 값이 정해져 있습니다.ctx->bufs—output_buffers디렉티브. 기본 2개 × 32KB 입니다(ngx_conf_merge_bufs_value(conf->bufs, prev->bufs, 2, 32768), 419행, 2015년에 1개에서 2개로 늘었습니다).ctx->output_filter— 다음 본문 필터.ngx_output_chain()은 HTTP 를 모르는src/core의 함수라서, 다음 필터를 이렇게 함수 포인터로 건네받습니다(upstream 쪽도 같은 함수를 씁니다).
버퍼마다 묻는다 — 그대로 보내도 되나
ngx_output_chain() 의 핵심 질문은 ngx_output_chain_as_is() 입니다.
static ngx_inline ngx_int_t
ngx_output_chain_as_is(ngx_output_chain_ctx_t *ctx, ngx_buf_t *buf)
{
    ngx_uint_t  sendfile;

    if (ngx_buf_special(buf)) {
        return 1;
    }

    /* ... */

    sendfile = ctx->sendfile;

    /* ... */

    if (!sendfile) {

        if (!ngx_buf_in_memory(buf)) {
            return 0;
        }

        buf->in_file = 0;
    }

    if (ctx->need_in_memory && !ngx_buf_in_memory(buf)) {
        return 0;
    }

    if (ctx->need_in_temp && (buf->memory || buf->mmap)) {
        return 0;
    }

    return 1;
}
src/core/ngx_output_chain.c 249–306행
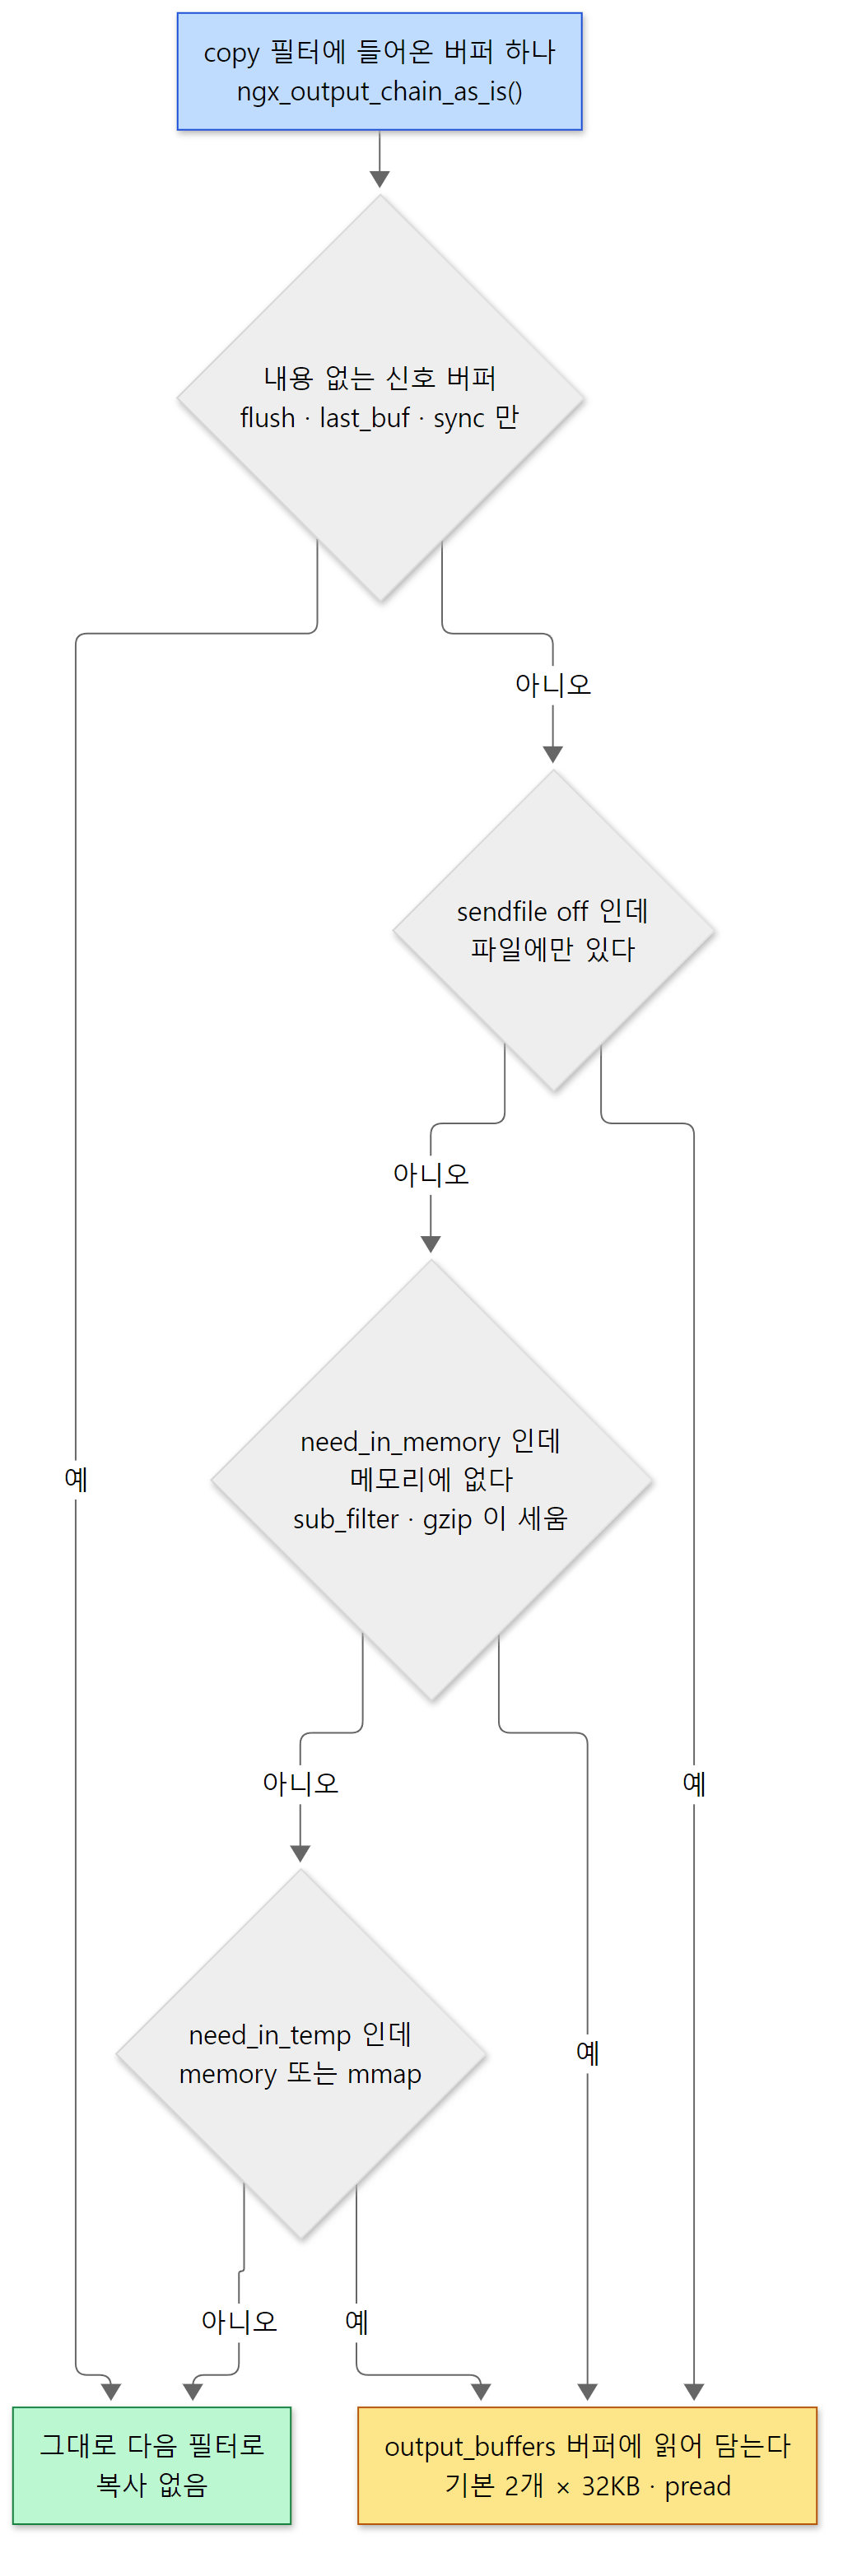 초록이 "복사 없이 통과", 노랑이 "버퍼에 읽어 담기"입니다. 코드에서 줄인 자리는 스레드 풀 설정(
#if (NGX_THREADS)), 쓰이지 않는 NGX_SENDFILE_LIMIT(소스 13–15행에서 #if 0 으로 막혀 있습니다), 그리고 directio 인 파일이면 sendfile = 0 으로 바꾸는 부분입니다.
정적 파일 + sendfile on + 내용을 보는 필터 없음, 이 흔한 경우에는 마지막 return 1 에 닿습니다. 그리고 들어온 버퍼가 하나뿐이고 쌓아 둔 것도 없으면 ngx_output_chain() 첫머리의 지름길로 곧장 다음 필터를 부릅니다("the short path" 라는 주석이 달린 48–72행). 예제 1의 bt 에서 본 70행이 이 지름길입니다.
as_is 가 0 이면 본 루프(86–245행)로 갑니다. 들어온 버퍼를 ctx->in 에 쌓아 두고, 빈 버퍼(ctx->free)가 있거나 아직 bufs.num 개까지 잡지 않았으면 버퍼를 얻어 ngx_output_chain_copy_buf() 로 파일을 읽어 담습니다(읽기는 ngx_read_file() → pread). 담은 버퍼를 다음 필터에 넘기고, 다음 필터가 다 쓴 버퍼는 ngx_chain_update_chains() 로 free 목록에 돌려받아 다시 씁니다. 버퍼 두 개를 번갈아 쓰는 생산자–소비자이고, 둘 다 아직 소켓에 못 나가 바쁘면(busy) 더 읽지 않고 멈춥니다(182–184행). 그래서 파일이 아무리 커도 이 복사에 쓰는 버퍼는 output_buffers 만큼(기본 64KB)으로 묶입니다.
마지막 조각이 버퍼보다 작으면 그 크기만큼만 잡습니다(ngx_output_chain_get_buf(), 439–464행). 다만 이미 비어 있는 버퍼가 free 목록에 있으면 그것을 먼저 쓰므로 새로 잡지 않습니다 — 6절 예제의 마지막 1,696바이트가 앞의 32KB 버퍼와 같은 주소에 읽힌 것이 이 경우입니다.
헷갈리기 쉬운 곳: 내용을 바꾸는 필터를 copy 보다 위에 두면
직접 필터를 만들어 본문 내용을 보려 한다면, 그 필터는 사슬에서 copy 필터 아래(나중에 불리는 쪽)에 있어야 하고, 헤더 필터에서 r->filter_need_in_memory = 1 을 세워야 합니다. 그래야 copy 필터가 파일을 읽어 줍니다. 3절에서 본 대로 --add-module 로 넣은 필터는 headers 와 copy 사이에 자리를 잡으므로 이 조건이 저절로 맞습니다. 이 자리를 지키지 않으면 in_file 버퍼를 받아 pos~last 를 읽으려다 빈 메모리를 보게 됩니다.
6. write 필터와 sendfile — 모아 두었다가, 한 번에, 커널 안에서
write 필터 — 보낼 때가 됐나
본문 줄의 맨 끝 ngx_http_write_filter() 는 응답을 연결에 내보내는(c->send_chain 을 부르는) 곳입니다(예외로 Expect: 100-continue 에 답하는 중간 응답은 ngx_http_request_body.c 974행에서 c->send() 로 직접 씁니다). 먼저 지난번에 못 보내고 남겨 둔 r->out 과 이번에 들어온 in 을 이어 붙이며 크기를 셉니다(69–206행). 그다음 지금 보낼지를 정합니다.
    ngx_log_debug3(NGX_LOG_DEBUG_HTTP, c->log, 0,
                   "http write filter: l:%ui f:%ui s:%O", last, flush, size);

    clcf = ngx_http_get_module_loc_conf(r, ngx_http_core_module);

    /*
     * avoid the output if there are no last buf, no flush point,
     * there are the incoming bufs and the size of all bufs
     * is smaller than "postpone_output" directive
     */

    if (!last && !flush && in && size < (off_t) clcf->postpone_output) {
        return NGX_OK;
    }
src/http/ngx_http_write_filter_module.c 208–221행
디버그 로그의 http write filter: l:… f:… s:… 가 이 줄입니다. l 은 마지막 버퍼가 있나(last_buf), f 는 flush 해야 하나(flush 나 recycled 비트 — 다시 쓸 버퍼는 빨리 비워 줘야 하므로), s 는 모인 바이트 수입니다. 셋 다 아니고 postpone_output(기본 1460, ngx_http_core_module.c 3979–3980행 — 이더넷 한 패킷에 실리는 TCP 데이터 크기쯤)보다 작으면 보내지 않고 돌아갑니다. 헤더 244바이트가 바로 나가지 않고 본문을 기다리는 이유가 이것입니다. 작은 패킷 여러 개 대신 큰 패킷 하나를 보내려는 것입니다.
보내기로 했으면 limit_rate 를 계산하고(258–292행) 연결의 send_chain 을 부릅니다.
    sent = c->sent;

    ngx_log_debug1(NGX_LOG_DEBUG_HTTP, c->log, 0,
                   "http write filter limit %O", limit);

    chain = c->send_chain(c, r->out, limit);
src/http/ngx_http_write_filter_module.c 294–299행
c->send_chain 은 연결을 받을 때 ngx_send_chain(= ngx_io.send_chain)으로 채워지고(src/event/ngx_event_accept.c 214행), 리눅스에서 ngx_io 는 ngx_linux_sendfile_chain 을 담은 표입니다(src/os/unix/ngx_linux_init.c 16–30행). TLS 연결이면 핸드셰이크 뒤에 ngx_ssl_send_chain 으로 바뀝니다. 여기도 함수 포인터 하나로 운영체제와 TLS 의 차이를 감춥니다.
send_chain 은 못 보내고 남은 사슬을 돌려줍니다. write 필터는 보낸 고리를 풀어 주고, 남은 것은 r->out 에 들고 c->buffered 에 표시한 뒤 NGX_AGAIN 을 돌려줍니다(338–349행). 핸들러가 끝나 요청을 마무리하려 할 때(ngx_http_finalize_request()) c->buffered 가 서 있으면 요청을 닫지 않고 쓰기 이벤트 핸들러를 ngx_http_writer() 로 바꿉니다(src/http/ngx_http_request.c 2889–2896행). 소켓이 다시 쓸 수 있게 되면 epoll(7편)이 깨우고, ngx_http_writer() 가 ngx_http_output_filter(r, NULL) — 새 데이터 없이 사슬을 한 번 더 — 를 불러 남은 것을 밀어냅니다(3151행). 워커는 그동안 기다리지 않고 다른 연결을 처리합니다.
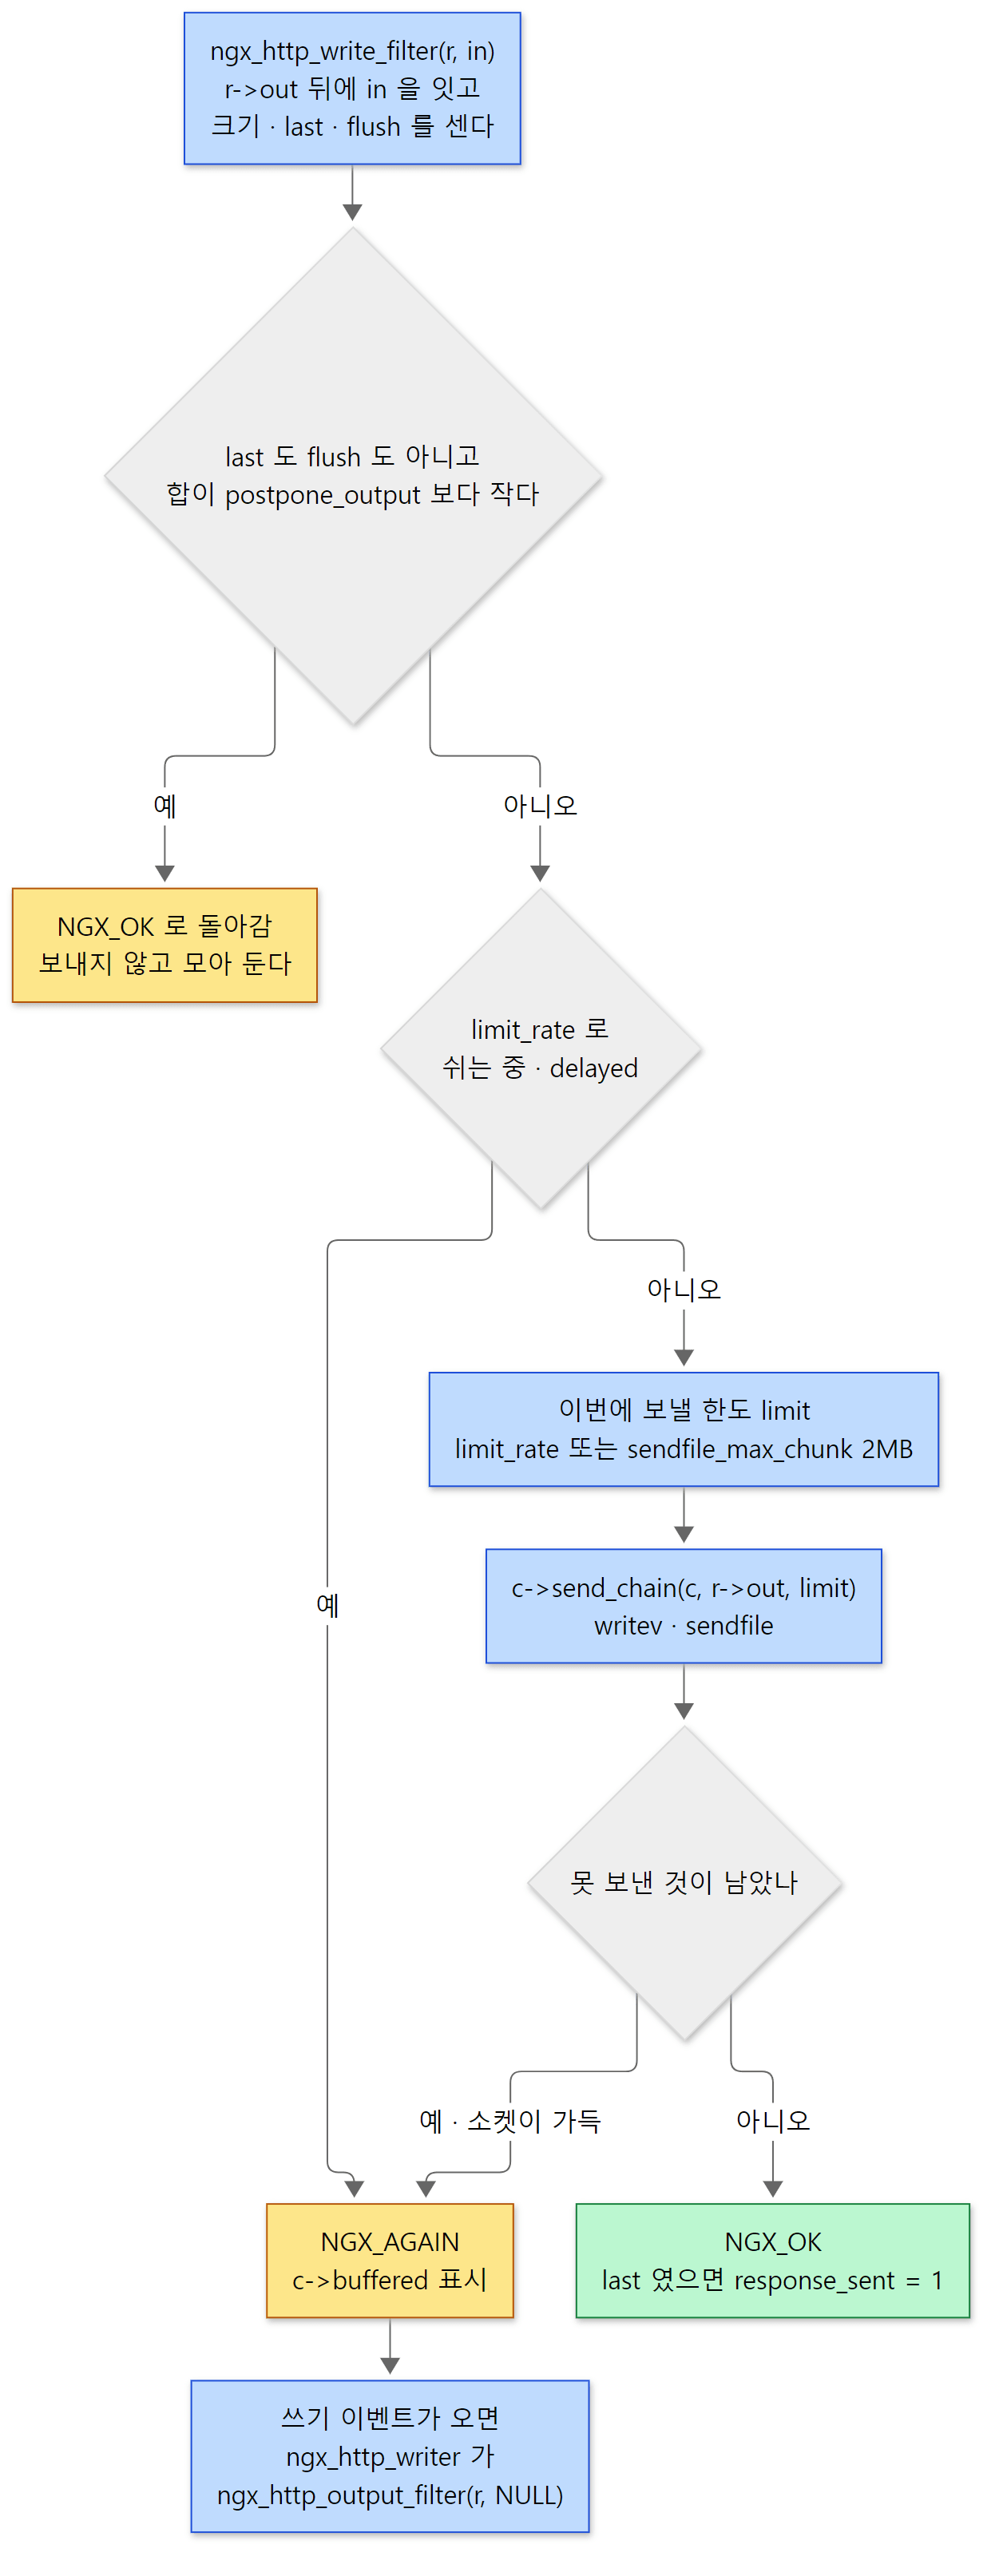 노란 상자 둘이 "아직 보내지 않은 것을 들고 있는" 경우입니다. 들고 있는 곳은 둘 다
r->out 입니다.
limit_rate 가 없을 때의 한도는 sendfile_max_chunk(기본 2MB, 3957–3958행 — 2021년 1.21.4 에서 0(무제한)에서 2MB 로 바뀌었습니다)입니다. 아주 큰 파일 하나가 sendfile 한 번에 워커를 오래 붙잡지 않게 하는 장치입니다. 한도까지 보냈는데 아직 남았고 소켓도 쓸 수 있으면, 이벤트를 기다리지 않고 다음 바퀴에 바로 이어 가도록 쓰기 이벤트를 ngx_posted_next_events 에 올려 둡니다(334–336행, posted 이벤트는 7편).
ngx_linux_sendfile_chain() — 메모리는 writev, 파일은 sendfile
전송 함수는 사슬을 앞에서부터 보며 두 가지를 번갈아 합니다.
        /* create the iovec and coalesce the neighbouring bufs */

        cl = ngx_output_chain_to_iovec(&header, in, limit - send, c->log);

        /* ... */

        send += header.size;

        /* set TCP_CORK if there is a header before a file */

        if (c->tcp_nopush == NGX_TCP_NOPUSH_UNSET
            && header.count != 0
            && cl
            && cl->buf->in_file)
        {
            /* ... */
        }

        /* get the file buf */

        if (header.count == 0 && cl && cl->buf->in_file && send < limit) {
            file = cl->buf;

            /* coalesce the neighbouring file bufs */

            file_size = (size_t) ngx_chain_coalesce_file(&cl, limit - send);

            send += file_size;
            /* ... */
            n = ngx_linux_sendfile(c, file, file_size);

            /* ... */

        } else {
            n = ngx_writev(c, &header);

            /* ... */
        }
src/os/unix/ngx_linux_sendfile_chain.c 85–198행
ngx_output_chain_to_iovec()가 사슬 앞쪽의 메모리 버퍼들을iovec배열로 모읍니다.in_file버퍼를 만나면 거기서 멈춥니다(src/os/unix/ngx_writev_chain.c 127–129행).writev()는 흩어진 메모리 조각 여러 개를 시스템 콜 한 번에 보내는 함수입니다.- 모은 메모리 버퍼가 있으면(
header.count != 0)writev로 보냅니다. - 메모리 버퍼가 없고 앞이 파일 버퍼면, 같은 파일의 이어진 구간을 모아(
ngx_chain_coalesce_file())sendfile로 보냅니다. - 루프를 돌며 한도(
limit)에 닿거나 다 보내거나 소켓이 가득 찰 때(NGX_AGAIN)까지 반복합니다.
그래서 정적 파일 응답은 헤더 writev 한 번 + 파일 sendfile 한 번이 됩니다. 가운데 TCP_CORK 부분은 tcp_nopush on; 일 때만 들어갑니다(tcp_nopush 기본 off 면 연결이 NGX_TCP_NOPUSH_DISABLED 로 표시되어 조건이 거짓입니다, ngx_http_core_module.c 1426–1428행). 켜면 헤더 writev 와 파일 sendfile 사이에 TCP 가 반쪽짜리 패킷을 내보내지 않도록 소켓을 "막아" 둡니다.
예제 3: strace 로 sendfile on/off 비교
ex/u10-sendfile-strace 는 100,000바이트 파일 하나를 세 포트에서 내보냅니다. 예제 1처럼 master_process off; daemon off; 로 프로세스 하나만 띄우고 error_log ... debug;, root /tmp/u10/www; 를 둡니다. 서버 블록은 이렇습니다.
    server {
        listen 8080;
        sendfile on;
    }

    server {
        listen 8081;
        sendfile off;
    }

    # 초당 40KB 로 제한한다 -> write 필터가 타이머로 쉬어 가며 보낸다
    server {
        listen 8082;
        sendfile on;
        limit_rate 40k;
    }
nginx 를 strace -f -tt -s 20 -e trace=openat,pread64,writev,sendfile,setsockopt 아래에서 띄우고 요청마다 그 사이의 시스템 콜과 디버그 로그를 뽑았습니다. strace 줄 맨 앞의 숫자(15)는 strace 가 찍은 pid 이고, 이것과 fd 번호(소켓 9, 파일 10), 시각은 실행마다 다릅니다 — 다시 돌렸을 때는 소켓 10, 파일 11 이었습니다. 먼저 sendfile on 입니다.
=== 1. sendfile on (port 8080) ===
got 100000 bytes
15    03:13:27.797948 openat(AT_FDCWD, "/tmp/u10/www/big.bin", O_RDONLY|O_NONBLOCK) = 10
15    03:13:27.798600 writev(9, [{iov_base="HTTP/1.1 200 OK\r\nSer"..., iov_len=244}], 1) = 244
15    03:13:27.798856 sendfile(9, 10, [0] => [100000], 100000) = 100000
15    03:13:27.803233 setsockopt(9, SOL_TCP, TCP_NODELAY, [1], 4) = 0
--- debug log ---
*2 http static fd: 10
*2 http write filter: l:0 f:0 s:244
*2 http write filter: l:1 f:0 s:100244
*2 writev: 244 of 244
*2 sendfile: @0 100000
*2 sendfile: 100000 of 100000 @0
openat— static 핸들러가 파일을 열었습니다(fd 10). 읽지는 않습니다.http write filter: l:0 f:0 s:244— 헤더 버퍼만 왔고 1460 보다 작아 모아 두었습니다. 이 순간에는 시스템 콜이 없습니다.l:1 f:0 s:100244— 파일 버퍼(last_buf)가 와서 보낼 때가 됐습니다. 244 + 100,000 바이트.writev(9, ..., 244)로 헤더,sendfile(9, 10, ..., 100000)으로 파일 전체가 한 번에 나갔습니다. nginx 의 메모리에는 파일 내용이 한 번도 올라오지 않았습니다.- 끝의
setsockopt(TCP_NODELAY)는 응답을 마치고 연결을 keep-alive 로 돌릴 때ngx_http_set_keepalive()가 하는 것입니다(src/http/ngx_http_request.c 3546행).
같은 파일을 sendfile off 로 받으면 이렇게 바뀝니다.
=== 2. sendfile off (port 8081) ===
got 100000 bytes
15    03:13:28.435653 openat(AT_FDCWD, "/tmp/u10/www/big.bin", O_RDONLY|O_NONBLOCK) = 10
15    03:13:28.436817 pread64(10, "\372\371\275YUU\300Xf\222D\242\203\327\231\202\26~\226\303"..., 32768, 0) = 32768
15    03:13:28.437223 writev(9, [{iov_base="HTTP/1.1 200 OK\r\nSer"..., iov_len=244}, {iov_base="\372\371\275YUU\300Xf\222D\242\203\327\231\202\26~\226\303"..., iov_len=32768}], 2) = 33012
15    03:13:28.437644 pread64(10, "%\354\306\364\275r\371\223\215\357\224\321\371\365\377P\2475\370n"..., 32768, 32768) = 32768
15    03:13:28.437859 writev(9, [{iov_base="%\354\306\364\275r\371\223\215\357\224\321\371\365\377P\2475\370n"..., iov_len=32768}], 1) = 32768
15    03:13:28.438043 pread64(10, "\333\322\343\330)K O\354R\230\232'\344\261\234\367\265\225\341"..., 32768, 65536) = 32768
15    03:13:28.438257 writev(9, [{iov_base="\333\322\343\330)K O\354R\230\232'\344\261\234\367\265\225\341"..., iov_len=32768}], 1) = 32768
15    03:13:28.438416 pread64(10, "\326-\356\275v\243m\22\216\276\202\t\227v\200\350\t\335\\\361"..., 1696, 98304) = 1696
15    03:13:28.438585 writev(9, [{iov_base="\326-\356\275v\243m\22\216\276\202\t\227v\200\350\t\335\\\361"..., iov_len=1696}], 1) = 1696
15    03:13:28.440912 setsockopt(9, SOL_TCP, TCP_NODELAY, [1], 4) = 0
--- debug log ---
*3 http static fd: 10
*3 http write filter: l:0 f:0 s:244
*3 read: 10, 0000561603137340, 32768, 0
*3 http write filter: l:0 f:1 s:33012
*3 writev: 33012 of 33012
*3 read: 10, 0000561603137340, 32768, 32768
*3 http write filter: l:0 f:1 s:32768
*3 writev: 32768 of 32768
*3 read: 10, 0000561603137340, 32768, 65536
*3 http write filter: l:0 f:1 s:32768
*3 writev: 32768 of 32768
*3 read: 10, 0000561603137340, 1696, 98304
*3 http write filter: l:1 f:1 s:1696
*3 writev: 1696 of 1696
(파일 내용은 /dev/urandom 으로 만든 것이라 실행마다 다르고, 시각·포인터도 실행마다 다릅니다.)
pread64(..., 32768, 0)— copy 필터가output_buffers의 32KB 버퍼에 파일을 읽었습니다. 5절의as_is가 0 을 돌려준 경우(sendfile꺼짐 + 파일에만 있음)입니다.writev에 iovec 이 두 개 — 모아 둔 헤더 244바이트와 방금 읽은 32,768바이트가 한 번에 나갔습니다. 헤더를 모아 둔 보람이 여기서 보입니다.- 이제
f:1입니다. copy 필터의 버퍼는 다시 쓸 버퍼(recycled = 1, ngx_output_chain.c 495행)라서 write 필터가postpone_output을 기다리지 않고 곧바로 비웁니다. read:줄의 버퍼 주소가 네 번 모두 같습니다. 같은 32KB 버퍼를 비우자마자 다시 채운 것입니다(버퍼를 2개까지 쓸 수 있지만 소켓이 바로바로 비워 줘서 하나로 충분했습니다).- 마지막은 남은 1,696바이트만 읽었고, 이 버퍼가
last_buf를 물려받아l:1이 되었습니다.
read + writev 쌍이 네 번, 즉 데이터가 커널 → nginx 메모리 → 커널로 오갔습니다. sendfile on 에서는 sendfile 한 번이었습니다.
헷갈리기 쉬운 곳: sendfile 의 기본값은 off 입니다
배포판에 딸려 오는 nginx.conf 에는 거의 항상 sendfile on; 이 적혀 있습니다. 이 저장소의 견본 설정도 그렇습니다(conf/nginx.conf 27행). 그래서 기본으로 켜져 있다고 여기기 쉽지만, 소스의 기본값은 off 입니다.
    ngx_conf_merge_value(conf->sendfile, prev->sendfile, 0);
    ngx_conf_merge_size_value(conf->sendfile_max_chunk,
                              prev->sendfile_max_chunk, 2 * 1024 * 1024);
src/http/ngx_http_core_module.c 3956–3958행
설정 파일을 처음부터 직접 쓰면 sendfile 은 꺼진 채이고, 예제 3의 2번처럼 pread + writev 로 나갑니다. 정적 파일을 많이 내주는 서버라면 sendfile on; 을 직접 적었는지 한 번 확인해 볼 만합니다.
예제 3 (이어서): limit_rate — write 필터가 타이머로 쉬어 간다
8082 포트는 limit_rate 40k 입니다. 소켓은 비어 있지만 write 필터가 스스로 보내는 양을 줄이고, 쉬는 동안은 타이머를 겁니다.
=== 3. limit_rate 40k (port 8082) ===
got 100000 bytes in 2.055803s
03:35:56 *4 http write filter limit 40960
03:35:56 *4 sendfile: 40960 of 40960 @0
03:35:56 *4 event timer add: 10: 1005:4919948
03:35:57 *4 http writer handler: "/big.bin?"
03:35:57 *4 http write filter limit 40716
03:35:57 *4 sendfile: 40960 of 40960 @40960
03:35:57 *4 event timer add: 10: 1000:4920973
03:35:58 *4 http writer handler: "/big.bin?"
03:35:58 *4 http write filter limit 40716
03:35:58 *4 sendfile: 18080 of 18080 @81920
03:35:58 *4 event timer add: 10: 441:4921430
(시각·타이머 키·연결 번호는 실행마다 다릅니다.)
- 처음 한도는
limit_rate × (지난 초 + 1) − 보낸 양= 40,960 × 1 − 0 = 40,960 입니다(271–272행). 헤더 244바이트를writev로 보낸 뒤 파일을 보냅니다. - 보낸 뒤
(보낸 양) × 1000 / limit_rate밀리초 = 41,204 × 1000 / 40,960 ≈ 1005ms 짜리 타이머를 겁니다(326–331행).c->write->delayed = 1이 서 있는 동안 write 필터는NGX_AGAIN만 돌려줍니다. - 1초 뒤 타이머가 만료되면
ngx_http_request_handler()가delayed와timedout을 함께 지우고(src/http/ngx_http_request.c 2664–2667행 — 그래서 이 만료는 클라이언트 시간 초과로 처리되지 않습니다)ngx_http_writer()를 부릅니다(http writer handler). 같은 계산으로 다음 4만 바이트를 보냅니다. 세 번째 18,080바이트로 끝나고, 응답에 2초가 걸렸습니다.
헷갈리기 쉬운 곳: 한도보다 더 보냈습니다
두 번째 한도는 40716 인데 sendfile 은 40,960바이트를 보냈습니다. 계산이 틀린 것이 아니라 ngx_chain_coalesce_file() 이 한도에서 자르면서 파일 위치를 페이지 경계(4096바이트)에 맞춰 올리기 때문입니다.
        if (size > limit - total) {
            size = limit - total;

            aligned = (cl->buf->file_pos + size + ngx_pagesize - 1)
                       & ~((off_t) ngx_pagesize - 1);

            if (aligned <= cl->buf->file_last) {
                size = aligned - cl->buf->file_pos;
            }

            total += size;
            break;
        }
40,960 + 40,716 = 81,676 을 4096 의 배수로 올리면 81,920 이므로 40,960바이트를 보냅니다. 첫 번째도 같은 이유로, 헤더 244바이트 뒤에 남은 한도 40,716 이 40,960 으로 올라갔습니다. 페이지 단위로 보내야 커널의 페이지 캐시를 깔끔하게 쓸 수 있다는 판단으로 보입니다(이유를 적은 주석은 없어 소스로 확인한 것은 아닙니다). 대신 다음 계산이 더 보낸 만큼 줄여 주므로 평균 속도는 맞습니다.
7. postpone 필터 — 서브요청의 출력 순서
마지막으로 본문 줄 8번째의 postpone 필터를 짧게 봅니다. 서브요청(subrequest)은 요청 처리 중에 nginx 안에서 만드는 작은 요청입니다. SSI 의 <!--# include virtual="/footer" -->, add_after_body, auth_request 가 서브요청을 씁니다. 메인 요청과 서브요청들이 같은 연결로 출력을 내보내는데, 서브요청이 upstream 을 기다리는 동안 메인 요청이 뒤쪽 본문을 먼저 내보내면 순서가 뒤섞입니다.
postpone 필터는 지금 연결에 쓸 차례인 요청을 c->data 로 기억합니다. 차례가 아닌 요청의 출력은 그 요청의 postponed 목록(ngx_http_postponed_request_t — 요청 하나 또는 출력 사슬 하나를 담는 고리, src/http/ngx_http_request.h 367–371행)에 넣어 두고, 차례가 오면 꺼내 보냅니다.
    if (r != c->data) {

        if (in) {
            if (ngx_http_postpone_filter_add(r, in) != NGX_OK) {
                return NGX_ERROR;
            }

            return NGX_OK;
        }

        /* ... */

        return NGX_OK;
    }

    if (r->postponed == NULL) {

        if (in || c->buffered) {
            return ngx_http_next_body_filter(r->main, in);
        }

        return NGX_OK;
    }
src/http/ngx_http_postpone_filter_module.c 69–95행
서브요청이 없는 보통 요청은 언제나 r == c->data 이고 postponed 도 비어 있으므로 91행에서 곧장 다음 필터로 갑니다. 예제 1의 bt 에서 #5 ngx_http_postpone_filter ... :91 이 바로 그 줄입니다. 눈여겨볼 것은 다음 필터를 r 이 아니라 r->main 으로 부른다는 점입니다. postpone 아래(gzip, chunked, write)는 메인 요청 하나의 출력으로 다루므로, 서브요청의 출력도 메인 요청의 r->out 에 모이고 메인 응답의 chunked 조각이 됩니다. 4절에서 서브요청이 자기 헤더를 만들지 않던 것과 짝이 맞습니다.
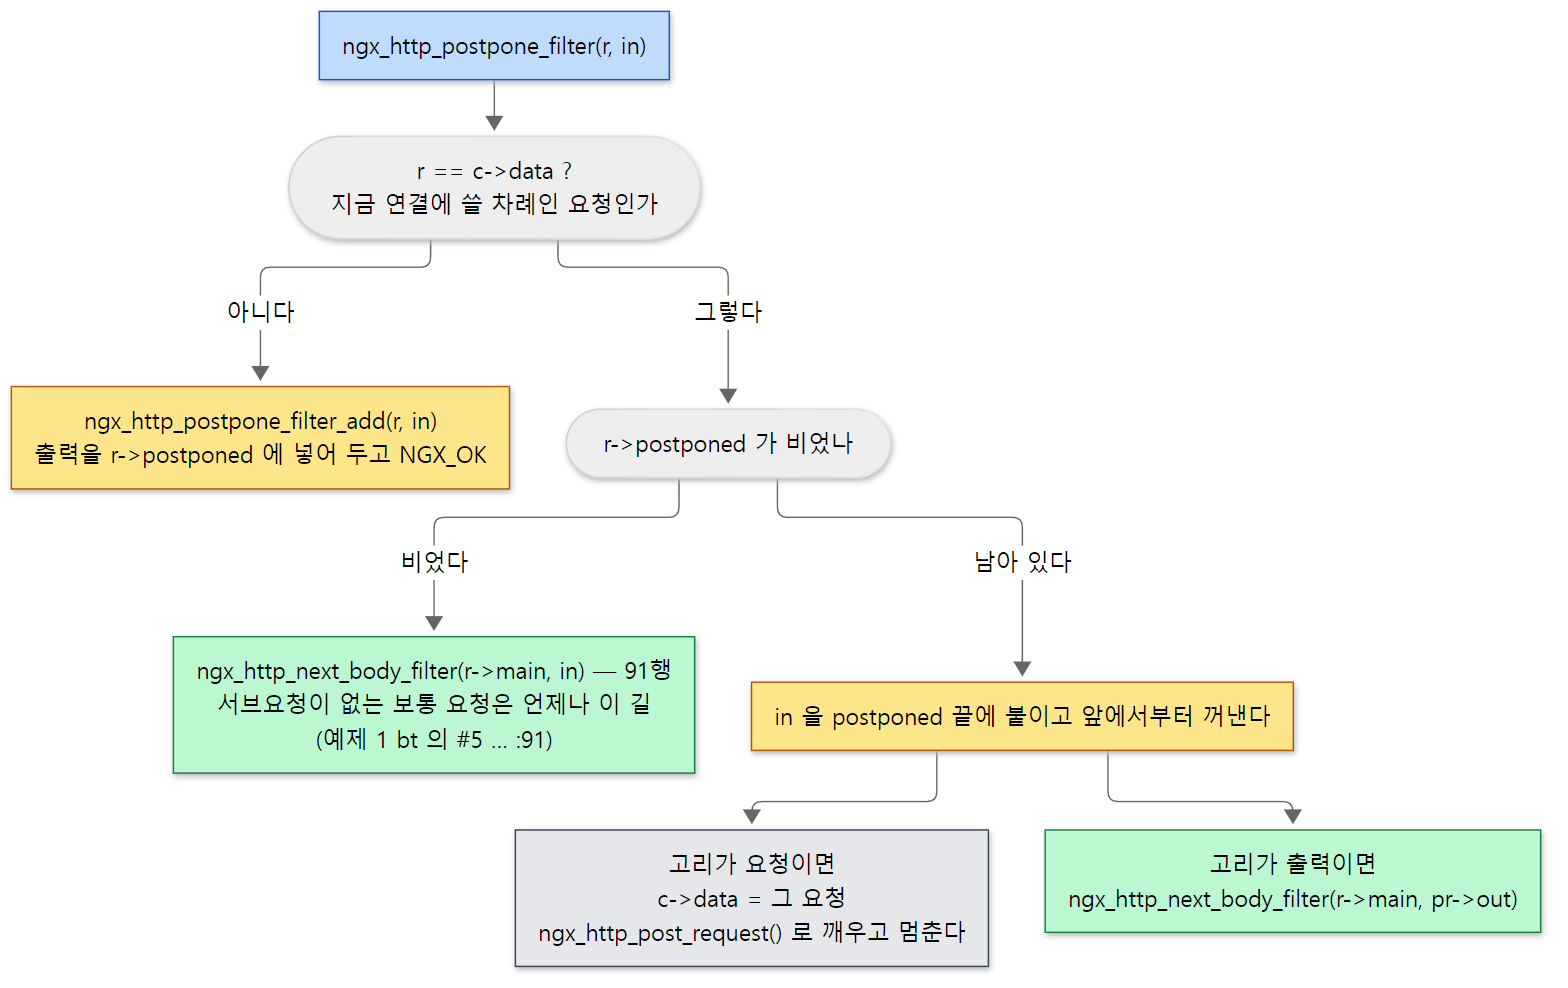 ngx_http_postpone_filter_module.c 60–130행을 갈림길로 그린 것. 다음 필터는 언제나 r->main 으로 부릅니다.
이 글에서 뺀 것
큰 줄기를 위해 이름만 적고 넘어간 것들입니다.
Range요청과 206 —ngx_http_range_header_filter()·ngx_http_range_body_filter()(src/http/modules/ngx_http_range_filter_module.c). 파일 버퍼는file_pos·file_last만 고치면 잘리므로 여기서도 복사가 없습니다.- 304 Not Modified —
ngx_http_not_modified_header_filter()(src/http/modules/ngx_http_not_modified_filter_module.c). 헤더 줄 맨 앞에서 상태를 304 로 바꾸면 맨 끝의ngx_http_header_filter()가header_only를 세우고(249행) static 핸들러는 파일 버퍼를 보내지 않고 돌아갑니다(2절의 3번). - gzip 본문 필터의 zlib 스트림과 버퍼 관리,
gzip_static(미리 압축한.gz파일을 내주는 콘텐츠 핸들러). - 스레드 풀과 aio —
aio threads이면pread와sendfile을 스레드 풀에 맡깁니다(ngx_http_copy_thread_handler(),ngx_linux_sendfile_thread()). 이 빌드는--with-threads --with-file-aio로 만들었지만 예제에서는 켜지 않았습니다. directio— 큰 파일을 페이지 캐시를 거치지 않고 읽는 것. 켜면sendfile을 쓰지 않습니다(ngx_output_chain_as_is()282–284행).- 열린 파일 캐시
open_file_cache의 구조(src/core/ngx_open_file_cache.c— rbtree 와 LRU 큐). - HTTP/2·HTTP/3 의 응답 —
ngx_http_v2_header_filter()가 HEADERS 프레임을 만들고, 본문은 스트림의send_chain으로 DATA 프레임이 됩니다(src/http/v2/ngx_http_v2_filter_module.c). - 응답 트레일러
add_trailer와ngx_http_chunked_create_trailers(), 103 Early Hints(ngx_http_top_early_hints_filter).
정리
| 개념 | 한 줄 요약 |
|---|---|
| 콘텐츠 핸들러 | CONTENT phase 배열 또는 r->content_handler. 하는 일은 ngx_http_send_header() 와 ngx_http_output_filter() 두 번 부르기 |
| static 핸들러 | 파일을 열고 ngx_buf_t 에 in_file·file_pos·file_last 만 적는다. 내용은 읽지 않는다 |
| 핸들러 순서 | phase 배열을 펼 때 뒤집혀서 index → autoindex → gzip_static → static |
| 필터 사슬 | 맨 앞은 전역 ngx_http_top_*_filter, 다음은 파일마다의 static ngx_http_next_*_filter. postconfiguration 에서 앞에 끼워 넣기 |
| 필터 순서 | auto/modules → ngx_modules.c 의 초기화 순서를 뒤집은 것. 목록 맨 위의 write 가 맨 마지막에 불린다 |
| header 필터 | 길이를 먼저 세고 버퍼 하나에 헤더를 만든 뒤 write 필터를 직접 부른다 |
| chunked | 길이가 지워졌고(-1) HTTP/1.1 이면 Transfer-Encoding: chunked, HTTP/1.0 이면 Connection: close |
| copy 필터 | ngx_output_chain() 으로 버퍼마다 "그대로 보내도 되나"를 묻고, 아니면 output_buffers 에 읽어 담는다 |
| write 필터 | r->out 에 모아 두다가 last·flush·postpone_output 이면 send_chain. 남으면 NGX_AGAIN 과 ngx_http_writer() |
| sendfile | 메모리 버퍼는 writev, 파일 버퍼는 sendfile. 소스 기본값은 off |
| postpone 필터 | 서브요청 출력을 차례대로. 아래 필터는 r->main 으로 부른다 |
다음에 볼 것
정적 파일 하나가 버퍼에 담겨 필터 사슬을 따라 소켓까지 가는 길을 봤습니다. 핸들러는 버퍼를 만들어 넘기기만 했고, 언제 읽을지·언제 보낼지·어떻게 보낼지는 사슬의 끝이 정했습니다.
다음 글에서는 응답이 디스크가 아니라 다른 서버에서 올 때를 봅니다. proxy_pass 가 콘텐츠 핸들러를 거는 법, upstream 이 백엔드에 논블로킹으로 연결해 요청을 보내고 응답 헤더를 파싱하는 콜백들, 그리고 받은 본문을 버퍼링해 이 글의 필터 사슬로 흘려보내는 ngx_event_pipe 를 11편: upstream과 proxy — 리버스 프록시의 한 요청에서 이어 갑니다.
httpd 는 같은 문제를 이렇게 풀었습니다. httpd 의 버킷도 "데이터가 어디 있는지"를 적고 FILE 버킷은 마지막에 sendfile 로 나가는 등, ngx_buf_t 와 생각이 같습니다(httpd 11편). 다른 점은 필터를 세우는 법입니다. httpd 는 필터마다 종류 번호(RESOURCE 10 … NETWORK 60)를 주고 요청마다 ap_add_output_filter() 로 필요한 필터만 꽂습니다. nginx 는 configure 때 정한 사슬 하나를 모든 요청이 지나가고, 할 일이 없는 필터는 스스로 비켜 줍니다. 꽂고 빼는 비용이 없는 대신, 순서를 바꾸려면 다시 빌드해야 합니다. 정적 파일을 응답으로 만드는 httpd 쪽 핸들러(default_handler())는 httpd 12편에 있습니다.