이 글에서 다루는 것
"nginx 소스 파헤치기" 연재의 아홉 번째 글입니다. 8편에서는 연결에서 요청 줄과 헤더를 읽어 ngx_http_request_t 하나를 만들고, Host 헤더로 server {} 블록을 고르는 데까지 봤습니다. 8편의 마지막 함수 ngx_http_process_request()는 맨 끝에서 ngx_http_handler(r)를 부릅니다. 이번 글은 거기서 시작합니다.
답하려는 질문은 네 가지입니다.
- 요청 하나는 어떤 단계(phase)를 어떤 순서로 지나고, 모듈은 그 단계에 어떻게 끼어드는가
location블록들은 메모리에서 어떤 모양이 되고,=,^~,~, 접두사가 겹치면 누가 이기는가rewrite ... last와break는 소스에서 무엇이 다르고,try_files·error_page·index가 "다른 URI로 다시 처리"할 때는 어디로 되돌아가는가$uri같은 변수와rewrite의 정규식은 요청마다 어떻게 계산되는가
| 항목 | 내용 |
|---|---|
| 대상 | nginx |
| 버전 | nginx 1.31.9 (master, 개발판) |
| 커밋 | 9a7439fd79 (2026-10-23) |
| 주로 읽는 파일 | src/http/ngx_http_core_module.c·.h, src/http/ngx_http.c, src/http/modules/ngx_http_rewrite_module.c, src/http/ngx_http_script.c, src/http/ngx_http_variables.c |
글에 나오는 줄 번호는 모두 이 커밋 기준입니다. 같은 커밋의 소스를 받고 예제용 도커 이미지를 만드는 방법은 1편에 있습니다.
2편의 지도에서 이 글은 "C. HTTP 요청 하나" 안의 phase·location 상자를 확대합니다. ngx_http_core_module.c만 5,500줄이 넘으므로, 이 글은 처음 읽는 사람이 따라올 수 있는 큰 줄기만 골랐습니다. 빼놓은 것은 글 끝의 "이 글에서 뺀 것"에 이름과 위치만 적어 두었습니다.
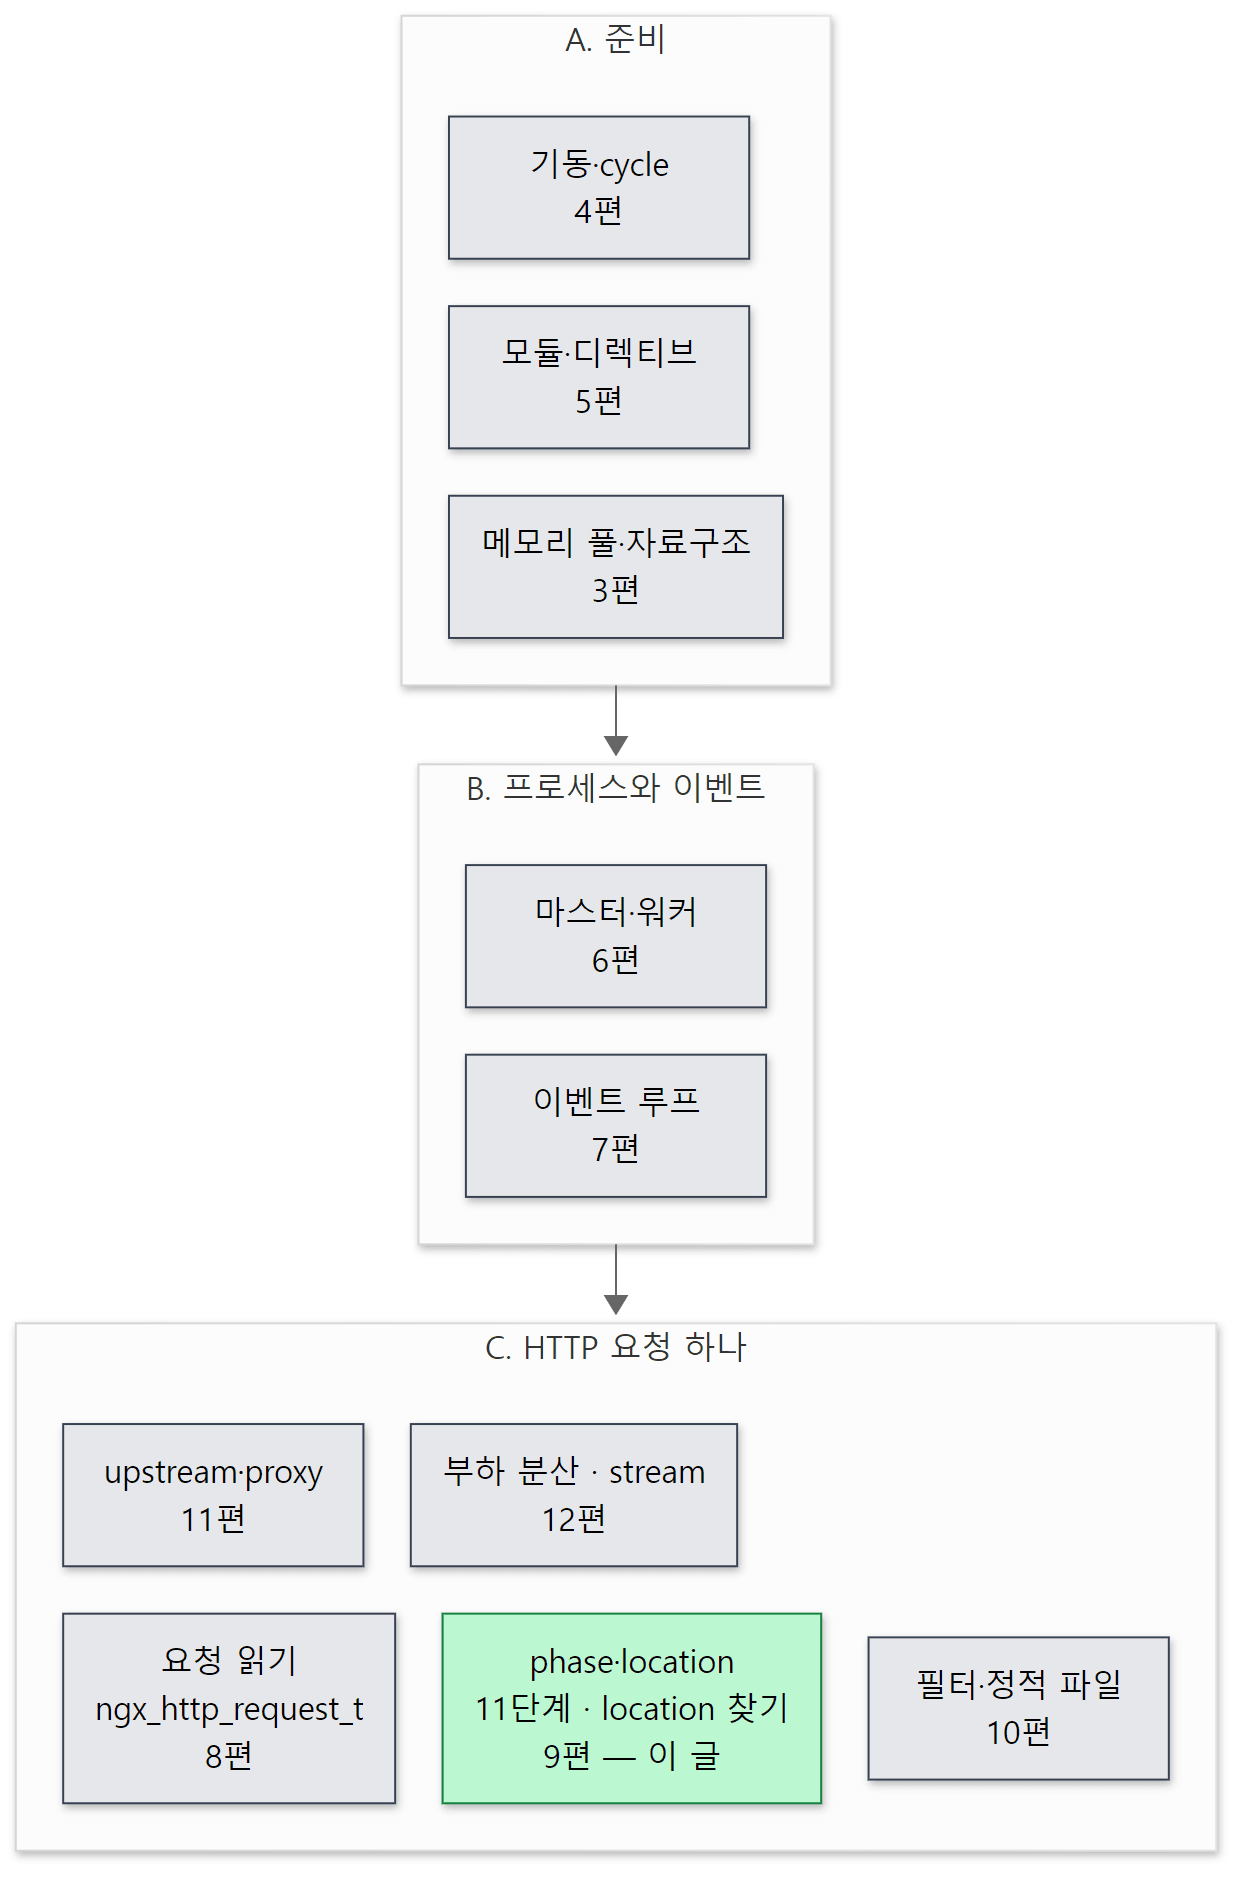 2편 지도에서 이 글이 다루는 곳입니다. 요청을 다 읽은 뒤(8편), 응답을 만들어 내보내기(10·11편) 전의 길목입니다.
먼저 알아 둘 말
phase(단계)는 nginx가 요청 하나를 처리하는 순서를 열한 칸으로 나눈 것입니다. "주소를 바꾸는 칸", "location을 고르는 칸", "접근을 검사하는 칸", "응답을 만드는 칸" 같은 식입니다. 순서는 nginx 코어가 정해 두었고, 모듈은 "이 칸에서 불러 달라"고 함수를 등록합니다.
phase 핸들러는 모듈이 한 phase에 등록한 함수입니다. 모양은 ngx_int_t handler(ngx_http_request_t *r) 하나로 같고, 돌려주는 값으로 "처리했다"(NGX_OK), "내 일이 아니다"(NGX_DECLINED), "아직 못 끝냈으니 나중에"(NGX_AGAIN), 또는 HTTP 상태 코드(403 등)를 알립니다.
checker는 코어가 phase마다 하나씩 가진 함수로, 핸들러를 대신 불러 주고 그 반환값을 해석합니다. 같은 NGX_OK라도 phase에 따라 "다음 phase로 건너뛰기"가 되기도 하고 "응답을 끝내기"가 되기도 합니다. 함수 포인터를 두 겹으로 쓰는 셈입니다(C의 함수 포인터가 낯설면 httpd 2편을 먼저 보면 좋습니다).
loc_conf는 "location 하나에 대한 모든 모듈의 설정"을 담은 포인터 배열입니다. 칸 번호가 모듈 번호(ctx_index)입니다. 요청에도 r->loc_conf가 있고, location을 고른다는 것은 이 포인터를 고른 location의 배열로 바꿔 끼우는 일입니다. 모듈은 ngx_http_get_module_loc_conf(r, 모듈), 즉 (r)->loc_conf[module.ctx_index]로 자기 설정을 꺼냅니다(ngx_http_config.h 58행). 이 배열이 만들어지는 과정은 5편에서 봅니다.
콘텐츠 핸들러(content handler)는 응답 본문을 만드는 함수입니다. proxy_pass, fastcgi_pass, stub_status처럼 location 하나를 통째로 맡는 디렉티브는 phase에 등록하지 않고 그 location의 설정에 핸들러를 박아 둡니다.
내부 리다이렉트(internal redirect)는 처리 도중에 URI를 바꿔 다시 처리하는 것입니다. 브라우저는 모릅니다. named location은 location @이름 {}처럼 URI로는 찾을 수 없고 내부 리다이렉트의 목적지로만 쓰이는 location입니다.
변수는 $uri, $arg_beta처럼 요청마다 값이 달라지는 이름입니다. 설정을 읽을 때 이름을 번호(인덱스)로 바꿔 두고, 요청이 처음 물을 때 계산합니다(5절).
1. 11개의 phase — 순서는 코어가, 내용은 모듈이
phase는 열거형 하나로 정해져 있습니다.
typedef enum {
    NGX_HTTP_POST_READ_PHASE = 0,

    NGX_HTTP_SERVER_REWRITE_PHASE,

    NGX_HTTP_FIND_CONFIG_PHASE,
    NGX_HTTP_REWRITE_PHASE,
    NGX_HTTP_POST_REWRITE_PHASE,

    NGX_HTTP_PREACCESS_PHASE,

    NGX_HTTP_ACCESS_PHASE,
    NGX_HTTP_POST_ACCESS_PHASE,

    NGX_HTTP_PRECONTENT_PHASE,

    NGX_HTTP_CONTENT_PHASE,

    NGX_HTTP_LOG_PHASE
} ngx_http_phases;
src/http/ngx_http_core_module.h 110–129행
0부터 10까지 열한 개입니다. 빈 줄로 묶은 것이 힌트입니다 — FIND_CONFIG·REWRITE·POST_REWRITE가 한 덩어리, ACCESS·POST_ACCESS가 한 덩어리입니다. 각 phase에 누가 들어가는지는 소스 전체에서 cmcf->phases[...].handlers에 ngx_array_push하는 곳을 찾으면 나옵니다.
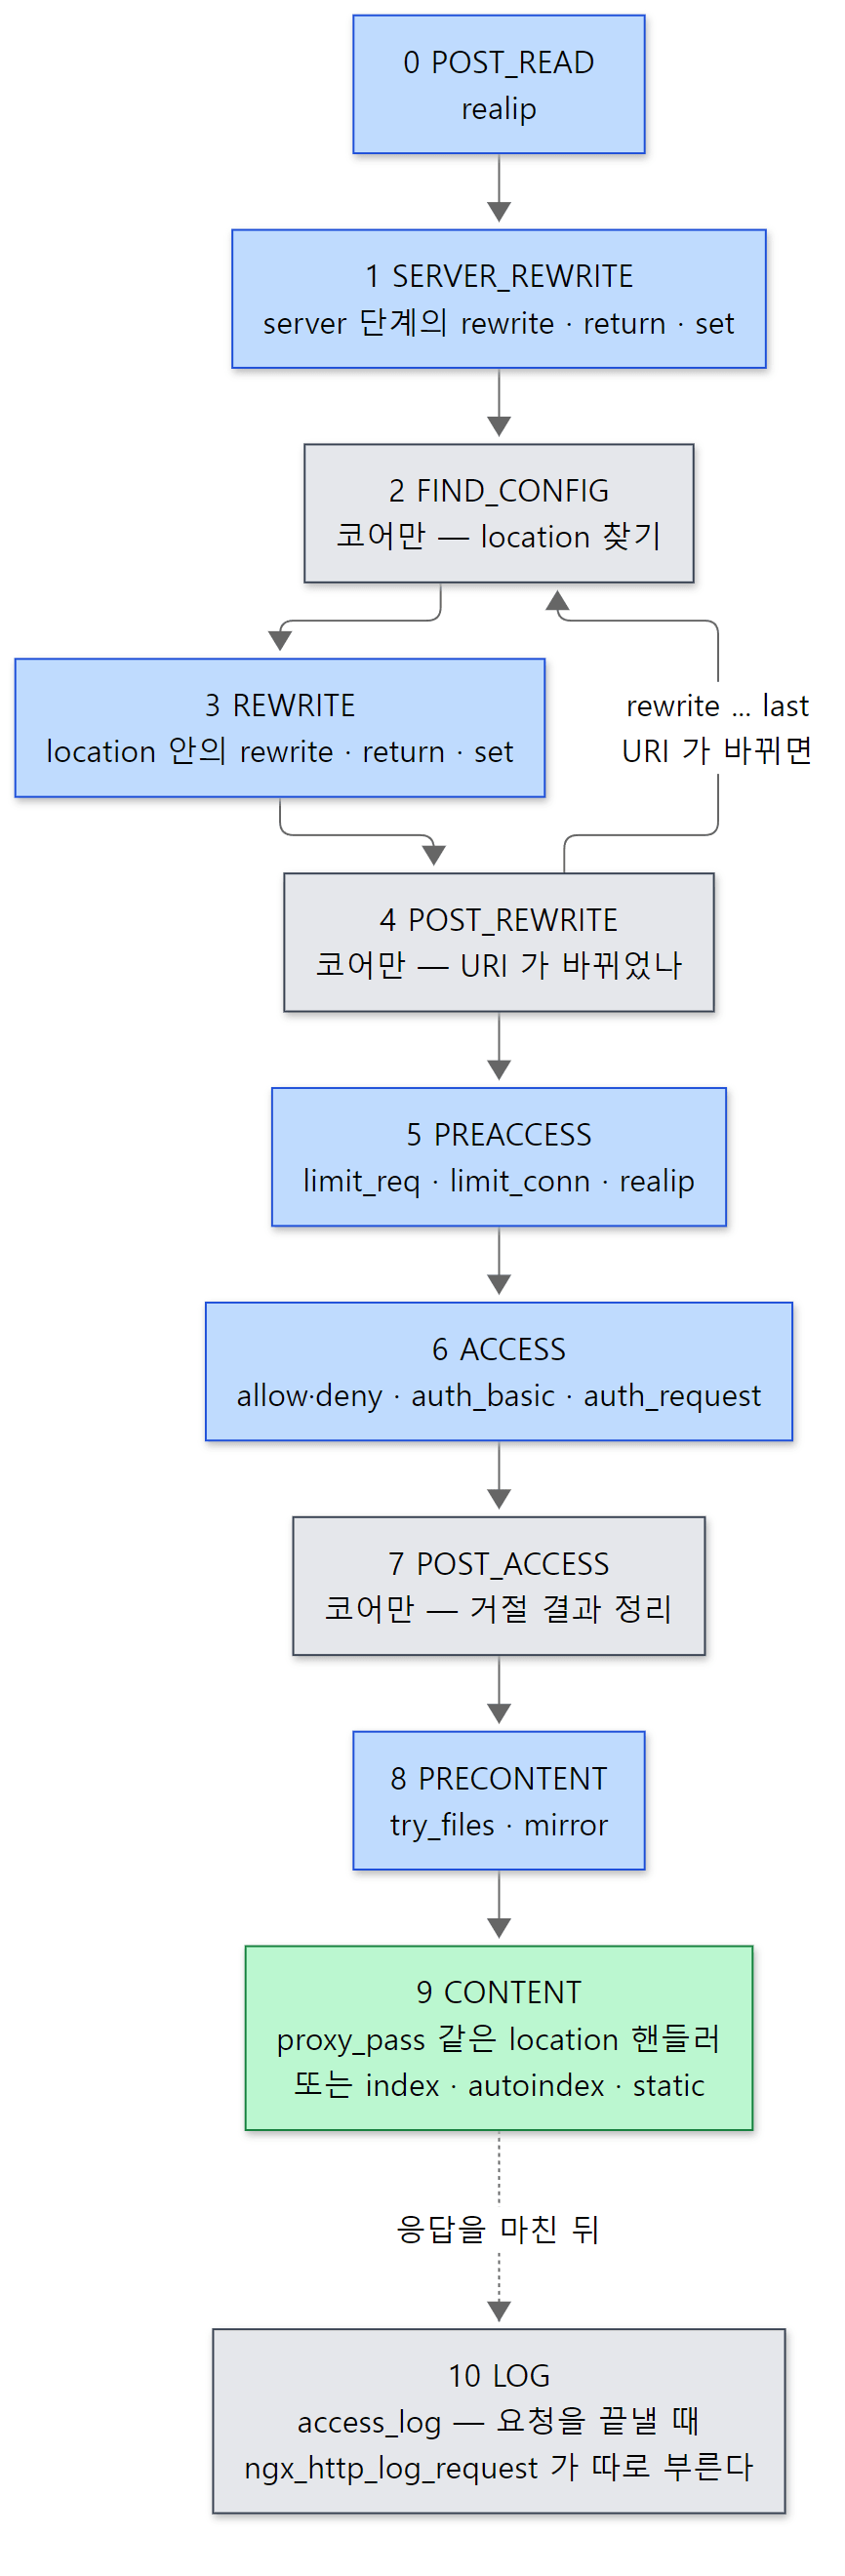 파란 상자는 모듈이 핸들러를 등록하는 phase, 회색 상자는 코어만 일하는 phase입니다. 초록 상자 CONTENT는 응답을 만드는 칸이고, LOG는
access_log가 등록하지만 아래의 ph[] 배열 밖에서 따로 불리므로 회색으로 두었습니다. 모듈 이름은 이 글의 빌드(1편의 configure 인자) 기준입니다.
| phase | nginx.conf 에서 보던 것 | 등록하는 곳 (기준 커밋) |
|---|---|---|
| 0 POST_READ | real_ip_header |
ngx_http_realip_module.c 526행 |
| 1 SERVER_REWRITE | server {} 바로 아래의 rewrite, return, set, if |
ngx_http_rewrite_module.c 279행 |
| 2 FIND_CONFIG | location 고르기 |
(코어) |
| 3 REWRITE | location {} 안의 rewrite, return, set, if |
ngx_http_rewrite_module.c 286행 |
| 4 POST_REWRITE | rewrite ... last 뒤에 location 다시 찾기 |
(코어) |
| 5 PREACCESS | limit_req, limit_conn |
ngx_http_limit_req_module.c 1094행 등 |
| 6 ACCESS | allow/deny, auth_basic, auth_request |
ngx_http_access_module.c 455행 등 |
| 7 POST_ACCESS | satisfy any의 결과 정리 |
(코어) |
| 8 PRECONTENT | try_files, mirror |
ngx_http_try_files_module.c 411행 등 |
| 9 CONTENT | proxy_pass, 정적 파일, index, autoindex |
ngx_http_static_module.c 289행 등 |
| 10 LOG | access_log |
ngx_http_log_module.c 2016행 |
모듈이 끼어드는 코드는 정말 짧습니다. rewrite 모듈의 postconfiguration 콜백은 같은 함수를 두 phase에 한 번씩 넣는데, 그 앞 절반이 이렇습니다.
    h = ngx_array_push(&cmcf->phases[NGX_HTTP_SERVER_REWRITE_PHASE].handlers);
    if (h == NULL) {
        return NGX_ERROR;
    }

    *h = ngx_http_rewrite_handler;
src/http/modules/ngx_http_rewrite_module.c 279–284행
cmcf는 core 모듈의 main 설정이고, 그 안의 phases[NGX_HTTP_LOG_PHASE + 1](178행)이 phase마다 하나씩 있는 ngx_http_phase_t이고, 그 안의 필드 handlers 하나가 핸들러를 모으는 ngx_array_t입니다(3편의 동적 배열, 150–152행). 등록은 이것이 전부입니다. 매크로도, 순서 지정 인자도 없습니다.
httpd 10편의 httpd와 비교하면 차이가 분명합니다. httpd는 단계마다 이름 붙은 훅이 있고 훅마다 "처음 답한 쪽이 이긴다"(RUN_FIRST), "모두 돌린다"(RUN_ALL) 같은 규칙이 매크로로 박혀 있으며, 모듈이 APR_HOOK_FIRST 같은 값으로 순서를 고릅니다. nginx는 모든 핸들러가 같은 모양이고 phase마다 다른 규칙은 checker 쪽에 있으며, 모듈이 순서를 고르지 못합니다. 같은 phase 안의 순서는 configure가 만든 모듈 목록(objs/ngx_modules.c, 5편)으로 정해집니다. 그리고 httpd에서는 설정을 고르는 map_to_storage도 훅이었지만, nginx의 FIND_CONFIG는 모듈에게 열려 있지 않습니다.
2. 설정 때 한 번 — phases[]를 한 줄짜리 ph[] 배열로 편다
phase마다 따로 있는 배열을 요청마다 열한 번 뒤지는 대신, nginx는 http 블록을 다 읽은 뒤 이 배열들을 한 줄짜리 배열 하나로 펴 둡니다. 그 한 칸이 ngx_http_phase_handler_t입니다.
typedef struct ngx_http_phase_handler_s  ngx_http_phase_handler_t;

typedef ngx_int_t (*ngx_http_phase_handler_pt)(ngx_http_request_t *r,
    ngx_http_phase_handler_t *ph);

struct ngx_http_phase_handler_s {
    ngx_http_phase_handler_pt  checker;
    ngx_http_handler_pt        handler;
    ngx_uint_t                 next;
};


typedef struct {
    ngx_http_phase_handler_t  *handlers;
    ngx_uint_t                 server_rewrite_index;
    ngx_uint_t                 location_rewrite_index;
} ngx_http_phase_engine_t;
src/http/ngx_http_core_module.h 131–147행
| 필드 | 뜻 |
|---|---|
checker |
이 칸을 처리할 코어 함수. 같은 phase의 칸들은 같은 checker |
handler |
모듈이 등록한 핸들러. 코어만 일하는 칸은 NULL |
next |
"이 phase를 건너뛰라"는 답이 나왔을 때 갈 칸 번호. 보통 다음 phase의 첫 칸 |
이 배열을 만드는 ngx_http_init_phase_handlers()는 ngx_http_block()이 모든 모듈의 postconfiguration을 부른 뒤에 불립니다(ngx_http.c 303–331행). 먼저 코어 칸 수와 모듈 핸들러 수를 더해 할당하는데(470–479행), 두 가지가 눈에 띕니다. 세는 루프가 i < NGX_HTTP_LOG_PHASE까지만 돌아 LOG phase는 이 배열에 들어가지 않고(3절), sizeof(void *)만큼 더 할당한 자리를 ngx_pcalloc()이 0으로 채워 맨 끝에 checker == NULL인 끝 표시 칸이 생깁니다. 그다음 phase를 차례로 돌며 칸을 채웁니다.
        case NGX_HTTP_FIND_CONFIG_PHASE:
            find_config_index = n;

            ph->checker = ngx_http_core_find_config_phase;
            n++;
            ph++;

            continue;

        /* ... */

        case NGX_HTTP_POST_REWRITE_PHASE:
            if (use_rewrite) {
                ph->checker = ngx_http_core_post_rewrite_phase;
                ph->next = find_config_index;
                n++;
                ph++;
            }

            continue;

        case NGX_HTTP_ACCESS_PHASE:
            checker = ngx_http_core_access_phase;
            n++;
            break;

        /* ... */

        default:
            checker = ngx_http_core_generic_phase;
        }

        n += cmcf->phases[i].handlers.nelts;

        for (j = cmcf->phases[i].handlers.nelts - 1; j >= 0; j--) {
            ph->checker = checker;
            ph->handler = h[j];
            ph->next = n;
            ph++;
        }
- 코어 칸 끼워 넣기:
FIND_CONFIG·POST_REWRITE·POST_ACCESS는 핸들러 없이 checker만 있는 칸을 넣고continue합니다.POST_REWRITE의next = find_config_index— "URI가 바뀌었으면 location을 다시 찾으러 가라"가 이 한 줄입니다. - checker 고르기: 두 rewrite phase는
ngx_http_core_rewrite_phase,ACCESS는 access checker,CONTENT는 content checker(줄인 자리), 나머지는ngx_http_core_generic_phase입니다. next는 다음 phase의 첫 칸:n에 이 phase의 핸들러 수를 먼저 더한 뒤 넣습니다.ACCESS에서n++을 한 번 더 하는 것은 뒤에 올POST_ACCESS칸까지 건너뛰게 하려는 것입니다(3절의satisfy any).- 거꾸로 복사: 안쪽
for가nelts - 1에서 0으로 내려가므로 나중에 등록한 핸들러가 먼저 불립니다.
예제 1: gdb로 ph[] 배열을 찍어 보기
실행 중인 nginx의 배열을 직접 찍어 봤습니다. 이 예제는 기준 커밋(9a7439fd79)을 그대로 빌드한 nginx 1.31.9 로 도커 컨테이너(Debian bookworm, --with-debug)에서 실행했습니다. 예제 폴더는 ex/u09-phase-engine이고, 설정의 http {} 부분은 이렇습니다(error_log ... debug, events {} 같은 나머지는 폴더의 nginx.conf에 있습니다).
http {
    access_log /tmp/u09/access.log;
    root /tmp/u09/www;

    server {
        listen 8080;

        location / {
        }

        location /admin/ {
            deny all;
        }
    }
}
gdb가 붙기 쉽도록 -g 'daemon off; master_process off;'로 프로세스 하나에서 띄우고, ngx_http_core_run_phases에 중단점을 건 뒤 curl로 /index.html을 요청했습니다. 멈추면 gdb 스크립트(phases.gdb)가 r->main_conf에서 core 모듈의 main 설정을 꺼내 phase_engine.handlers를 checker가 NULL인 칸까지 info symbol로 한 칸씩 찍습니다. run.sh가 그 출력을 다듬어(in section .text와 실행 파일 경로를 지우고) 칸마다 checker <- handler를 한 줄로 모았습니다.
=== 1. ph[] array (gdb, master_process off) ===
server_rewrite_index=1 location_rewrite_index=3
ph[ 0] next= 1  ngx_http_core_generic_phase  <- ngx_http_realip_handler
ph[ 1] next= 2  ngx_http_core_rewrite_phase  <- ngx_http_rewrite_handler
ph[ 2] next= 0  ngx_http_core_find_config_phase
ph[ 3] next= 4  ngx_http_core_rewrite_phase  <- ngx_http_rewrite_handler
ph[ 4] next= 2  ngx_http_core_post_rewrite_phase
ph[ 5] next= 8  ngx_http_core_generic_phase  <- ngx_http_realip_handler
ph[ 6] next= 8  ngx_http_core_generic_phase  <- ngx_http_limit_req_handler
ph[ 7] next= 8  ngx_http_core_generic_phase  <- ngx_http_limit_conn_handler
ph[ 8] next=12  ngx_http_core_access_phase  <- ngx_http_access_handler
ph[ 9] next=12  ngx_http_core_access_phase  <- ngx_http_auth_basic_handler
ph[10] next=12  ngx_http_core_access_phase  <- ngx_http_auth_request_handler
ph[11] next=12  ngx_http_core_post_access_phase
ph[12] next=14  ngx_http_core_generic_phase  <- ngx_http_try_files_handler
ph[13] next=14  ngx_http_core_generic_phase  <- ngx_http_mirror_handler
ph[14] next=18  ngx_http_core_content_phase  <- ngx_http_index_handler
ph[15] next=18  ngx_http_core_content_phase  <- ngx_http_autoindex_handler
ph[16] next=18  ngx_http_core_content_phase  <- ngx_http_gzip_static_handler
ph[17] next=18  ngx_http_core_content_phase  <- ngx_http_static_handler
ph[18] checker=NULL (end)
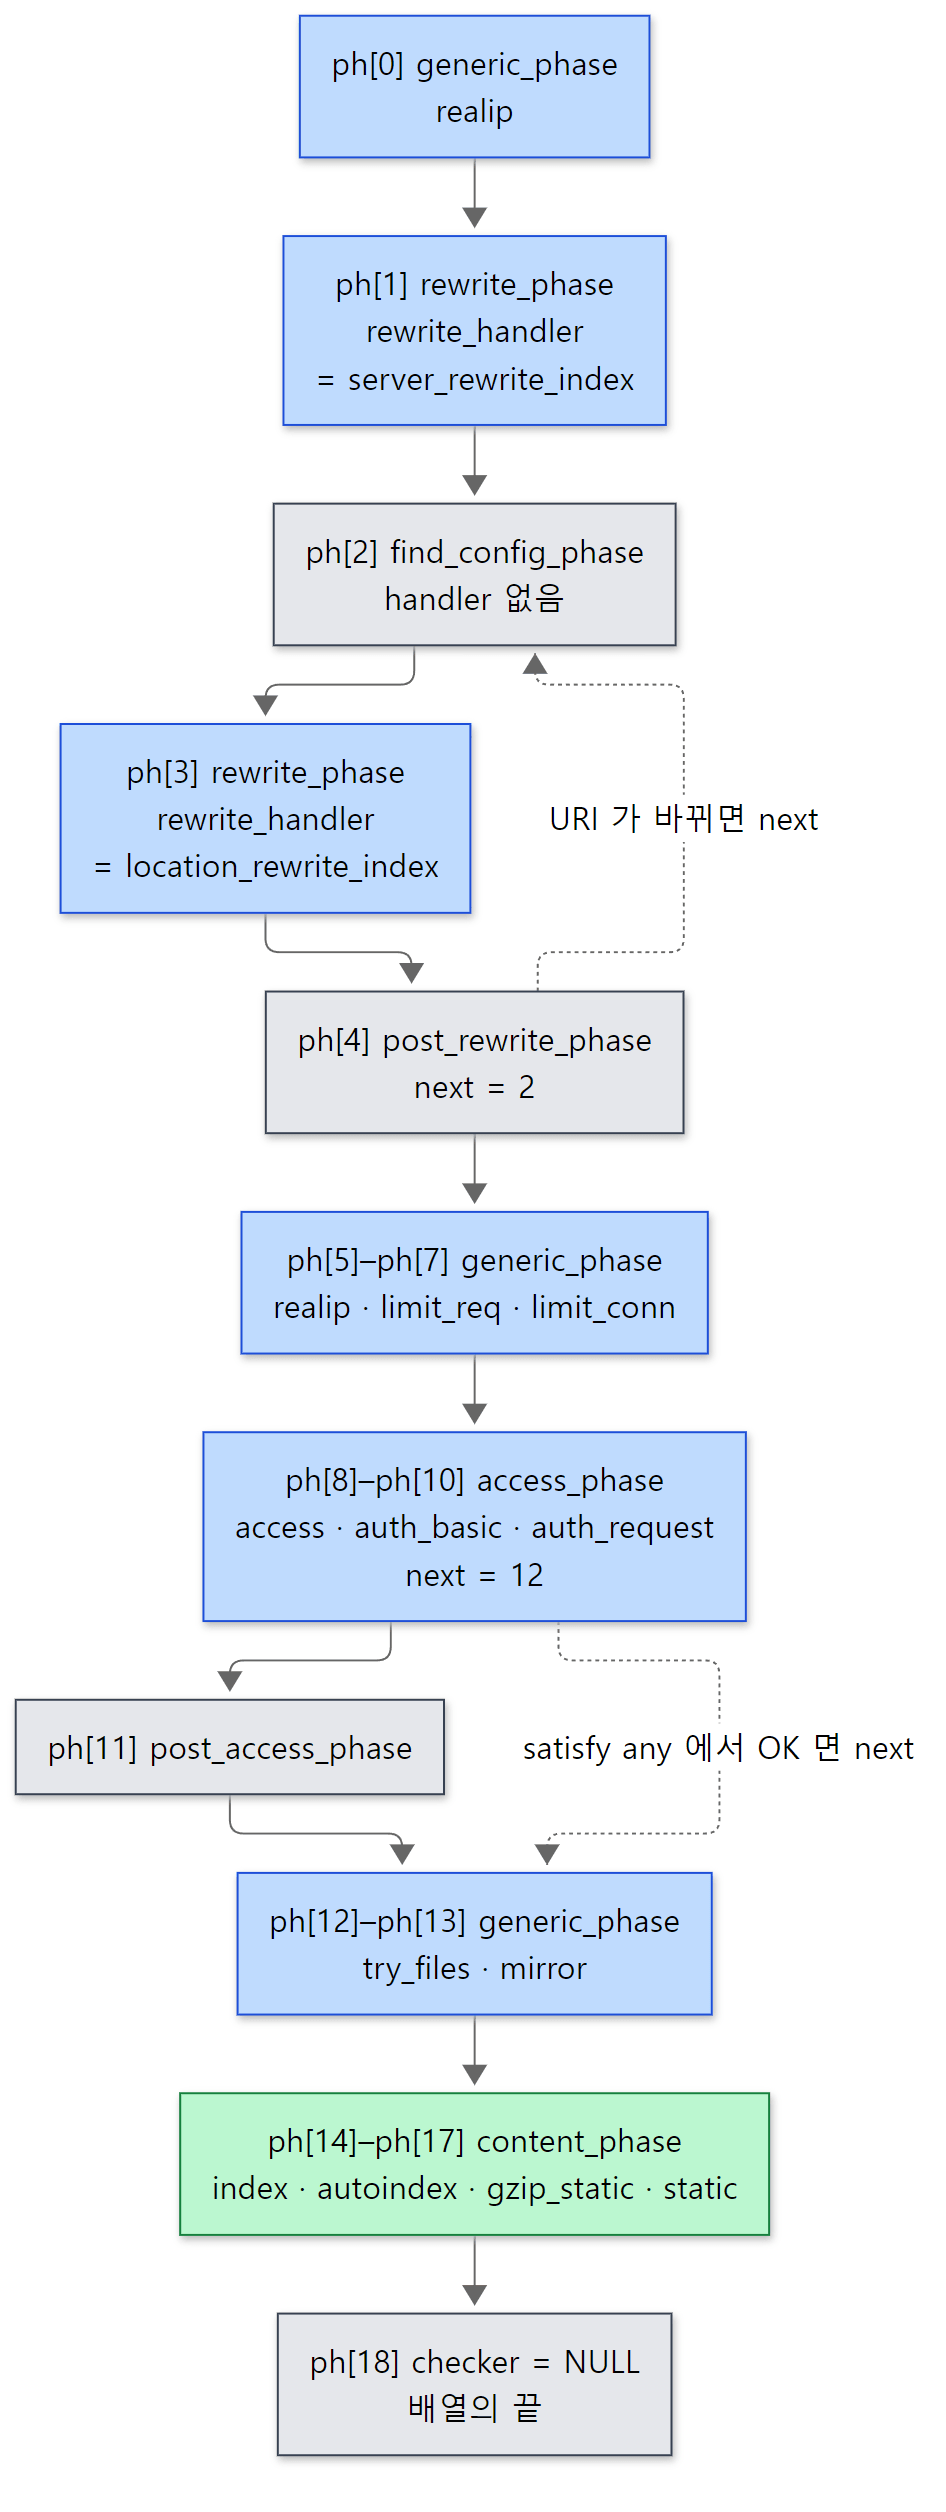 예제 1의 출력을 그림으로 옮겼습니다. 칸 번호는 이 빌드의 모듈 구성에서 나온 것이고, 모듈을 더하거나 빼면 바뀝니다.
server_rewrite_index=1,location_rewrite_index=3은 두 rewrite phase의 첫 칸입니다. 6절에서 내부 리다이렉트와 named location이 이 번호로 되돌아옵니다.- realip가 두 번 나옵니다(ph[0], ph[5]). realip 모듈이
POST_READ와PREACCESS두 곳에 같은 함수를 등록합니다(ngx_http_realip_module.c526–533행). - 거꾸로 불리는 것이 보입니다. 이 빌드의
ngx_modules.c에서 모듈 순서는static(113행) →gzip_static→autoindex→index(116행),auth_request(119행) →auth_basic→access(121행)인데, 배열에서는index가static보다,access가auth_request보다 앞입니다.index가 먼저라야/로 끝나는 요청을index.html로 돌릴 수 있고,static은 남은 것을 마지막에 받습니다. - 설정에
limit_req,auth_basic,try_files가 없는데도 칸이 있습니다. 배열은 http 블록 전체에 하나이고 컴파일된 모듈은 모두 등록하기 때문입니다. 설정이 없는 location에서는 그 핸들러가 곧바로NGX_DECLINED를 돌려줍니다.
3. 요청 때 매번 — ngx_http_core_run_phases()와 checker
8편의 ngx_http_process_request() 맨 끝(ngx_http_request.c 2217행)에서 불리는 ngx_http_handler()가 출발점입니다. keep-alive 같은 정리를 한 뒤 r->phase_handler를 정하고, r->write_event_handler = ngx_http_core_run_phases로 걸어 둔 다음 그 함수를 바로 부릅니다(854–890행). r->phase_handler는 "지금 ph[]의 몇 번째 칸에 있나"를 기억하는 정수로, 새 요청은 0, 내부 리다이렉트로 다시 들어온 요청(r->internal)은 server_rewrite_index입니다(6절). write_event_handler는 멈췄다가 깨어날 때를 위한 것입니다. 그 실행 루프가 이 글에서 가장 짧고 가장 중요한 함수입니다.
void
ngx_http_core_run_phases(ngx_http_request_t *r)
{
    ngx_int_t                   rc;
    ngx_http_phase_handler_t   *ph;
    ngx_http_core_main_conf_t  *cmcf;

    cmcf = ngx_http_get_module_main_conf(r, ngx_http_core_module);

    ph = cmcf->phase_engine.handlers;

    while (ph[r->phase_handler].checker) {

        rc = ph[r->phase_handler].checker(r, &ph[r->phase_handler]);

        if (rc == NGX_OK) {
            return;
        }
    }
}
src/http/ngx_http_core_module.c 893–912행
루프는 phase_handler를 직접 늘리지 않습니다. checker가 r->phase_handler를 옮기고, 루프는 checker의 반환값만 봅니다. 여기서 반환값의 뜻이 핸들러와 다릅니다 — checker의 NGX_AGAIN은 "계속 돌려라", NGX_OK는 "이번엔 여기까지"입니다. NGX_OK로 빠져나가는 경우는 응답을 끝냈거나, 핸들러가 무언가(요청 본문, 서브요청, limit_req의 지연 …)를 기다려야 할 때입니다. 뒤쪽이면 r->phase_handler가 그대로이므로 나중에 write_event_handler로 다시 들어왔을 때 멈춘 칸에서 이어 갑니다. 7편의 이벤트 루프 위에서 블로킹 없이 단계를 밟아 가는 방법입니다.
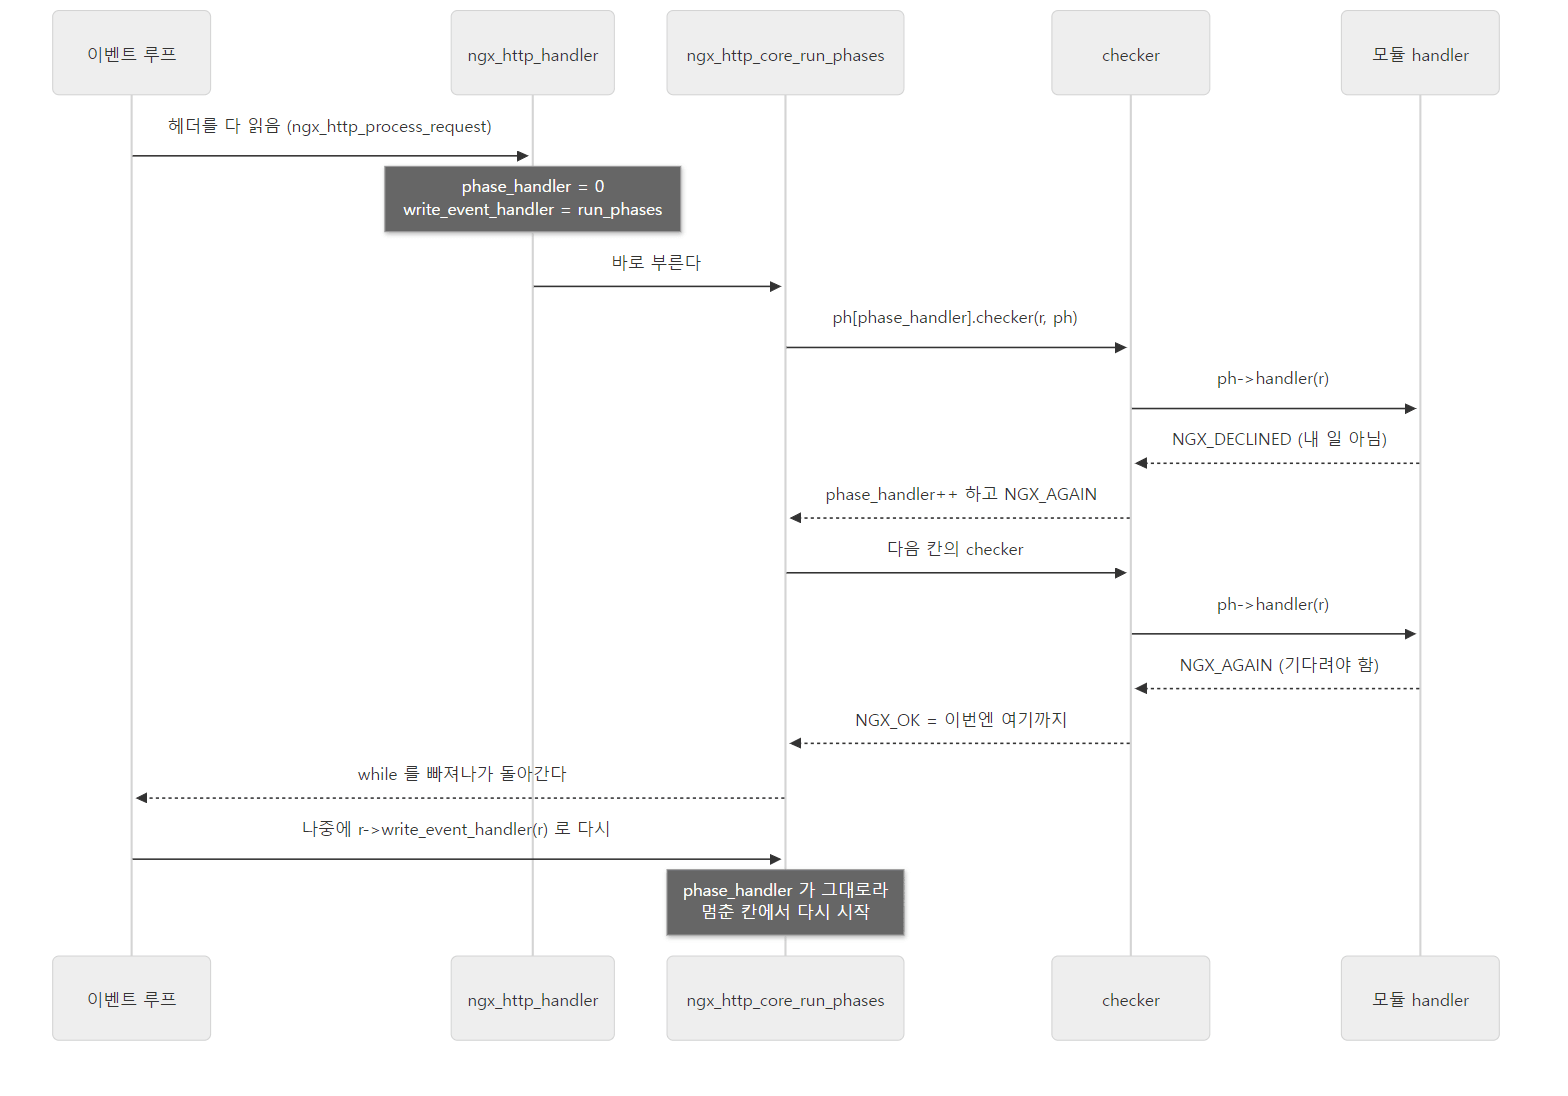 generic·access checker 기준입니다. checker마다 같은 반환값을 다르게 읽습니다(아래 표).
checker 일곱 개 — 같은 반환값, 다른 해석
기본형인 ngx_http_core_generic_phase()입니다.
    rc = ph->handler(r);

    if (rc == NGX_OK) {
        r->phase_handler = ph->next;
        return NGX_AGAIN;
    }

    if (rc == NGX_DECLINED) {
        r->phase_handler++;
        return NGX_AGAIN;
    }

    if (rc == NGX_AGAIN || rc == NGX_DONE) {
        return NGX_OK;
    }

    /* rc == NGX_ERROR || rc == NGX_HTTP_...  */

    ngx_http_finalize_request(r, rc);

    return NGX_OK;
}
src/http/ngx_http_core_module.c 928–949행
핸들러가 NGX_OK면 이 phase의 남은 핸들러를 건너뛰고 next로, NGX_DECLINED면 같은 phase의 다음 핸들러로 갑니다. NGX_AGAIN/NGX_DONE이면 루프를 멈추고, 그 밖의 값이면 그 값으로 요청을 끝냅니다. 나머지 checker는 이 틀에서 조금씩 다릅니다.
| checker | 쓰는 phase | generic과 다른 점 | 위치 |
|---|---|---|---|
ngx_http_core_generic_phase |
POST_READ, PREACCESS, PRECONTENT | (기준) | 915–949행 |
ngx_http_core_rewrite_phase |
SERVER_REWRITE, REWRITE | DECLINED만 다음으로. NGX_OK·NGX_AGAIN도 요청을 끝내는 값 |
952–976행 |
ngx_http_core_find_config_phase |
FIND_CONFIG | 핸들러 없음. location을 찾아 r->loc_conf를 바꾼다 |
979–1071행 |
ngx_http_core_post_rewrite_phase |
POST_REWRITE | r->uri_changed면 FIND_CONFIG로 되돌아간다 |
1074–1115행 |
ngx_http_core_access_phase |
ACCESS | 서브요청은 통째로 건너뜀. satisfy에 따라 OK·403을 다르게 읽는다 |
1118–1192행 |
ngx_http_core_post_access_phase |
POST_ACCESS | 적어 둔 r->access_code가 있으면 그 코드로 끝낸다 |
1195–1226행 |
ngx_http_core_content_phase |
CONTENT | 콘텐츠 핸들러가 있으면 그것만. 아무도 맡지 않으면 403 또는 404 | 1301–1351행 |
rewrite checker가 NGX_OK를 "끝"으로 읽는 것은 rewrite 모듈의 처지 때문입니다. return 200 "...";처럼 본문이 있는 return은 그 자리에서 ngx_http_send_response()로 응답을 보내고 그 결과(보통 NGX_OK)를, 본문 없는 return 404;는 상태 코드를 돌려줍니다(ngx_http_script.c 1577–1585행). 아무 일도 없으면 NGX_DECLINED입니다(5절). 어느 쪽이든 "처리했으니 다음 phase로"라는 경우가 없고, NGX_OK는 "응답을 이미 보냈으니 마무리하라"는 뜻입니다.
find_config checker는 4절의 ngx_http_core_find_location()을 부른 뒤, 고른 location의 internal 플래그를 검사하고(바깥 요청이면 404) using configuration "..."을 디버그 로그에 남깁니다(998–1008행). 이어 부르는 ngx_http_update_location_config()는 고른 location의 설정(에러 로그, sendfile, keep-alive 제한 …)을 요청과 연결에 옮겨 적는데, 마지막 줄이 콘텐츠 핸들러입니다.
    if (clcf->handler) {
        r->content_handler = clcf->handler;
    }
src/http/ngx_http_core_module.c 1431–1433행
proxy_pass 디렉티브를 읽을 때 박아 둔 clcf->handler = ngx_http_proxy_handler;(ngx_http_proxy_module.c 4397행)가 여기서 요청의 콘텐츠 핸들러가 됩니다. content checker는 이것이 있으면 맨 앞(1309–1313행)에서 그것만 부르고 끝내므로, 그 location에서는 index·static이 불리지 않습니다. 그다음 이야기는 11편에서 이어집니다.
satisfy any — ACCESS의 next가 POST_ACCESS를 건너뛰는 이유
satisfy all(기본값)이면 접근 모듈 하나라도 거절하면 끝, satisfy any면 하나라도 허락하면 통과입니다. access checker는 clcf->satisfy를 보고 반환값을 다르게 읽습니다(1146–1181행). satisfy any에서 NGX_OK는 "남은 검사는 볼 것도 없다"이므로 ph->next로 갑니다. 2절에서 ACCESS의 next를 POST_ACCESS 다음 칸(ph[12])으로 맞춰 둔 이유가 이것입니다. 거절은 r->access_code에 적어 두기만 하고 다음 핸들러에게 기회를 주며, 끝까지 아무도 허락하지 않으면 POST_ACCESS 칸이 적어 둔 코드로 요청을 끝냅니다. 반대로 satisfy all에서는 NGX_OK가 phase_handler++(다음 검사로)이고, 거절은 공통 코드(1185–1191행)가 바로 끝냅니다.
예제 1 이어서: 디버그 로그로 본 칸 순서
같은 설정으로 nginx를 보통대로 띄우고 요청 두 개의 디버그 로그에서 phase 줄만 골랐습니다. 줄 앞의 날짜·pid는 지웠고, *2 같은 연결 번호는 실행마다 다릅니다.
=== 2. debug log: GET /index.html ===
status=200
*2 generic phase: 0
*2 rewrite phase: 1
*2 test location: "/"
*2 test location: "admin/"
*2 using configuration "/"
*2 rewrite phase: 3
*2 post rewrite phase: 4
*2 generic phase: 5
...
*2 post access phase: 11
*2 generic phase: 12
*2 generic phase: 13
*2 content phase: 14
*2 content phase: 15
*2 content phase: 16
*2 content phase: 17
*2 http finalize request: 0, "/index.html?" a:1, c:1
*2 http log handler
=== 3. debug log: GET /admin/ (deny all) ===
status=403
...
*3 using configuration "/admin/"
*3 rewrite phase: 3
*3 post rewrite phase: 4
*3 generic phase: 5
*3 generic phase: 6
*3 generic phase: 7
*3 access phase: 8
*3 access forbidden by rule, client: 127.0.0.1, server: , request: "GET /admin/ HTTP/1.1", host: "127.0.0.1:8080"
*3 http finalize request: 403, "/admin/?" a:1, c:1
*3 http finalize request: 0, "/admin/?" a:1, c:1
(...는 칸 번호가 하나씩 늘어나는 같은 모양의 줄이나, 앞 요청과 같은 줄을 줄인 자리입니다.)
generic phase: N같은 줄은 checker가 찍습니다(예: 925–926행). 숫자는 phase 번호가 아니라 ph[] 칸 번호(r->phase_handler)라서 예제 1의 배열과 그대로 맞습니다.find_config칸(2)은 번호 대신test location·using configuration을 남깁니다./index.html은content phase: 14~17을 모두 지납니다. index·autoindex·gzip_static이 차례로NGX_DECLINED, 마지막 static이 파일을 보냈습니다. 정적 파일이 나가는 길은 10편에서 봅니다./admin/은access phase: 8에서 끝납니다. access 모듈이 403을 돌려주자 checker가 바로 요청을 끝냈고 auth_basic(9)·auth_request(10)는 불리지 않았습니다. "access forbidden by rule"은satisfy all일 때 access 모듈이 찍는 줄입니다(ngx_http_access_module.c283–286행).- 마지막의
http log handler가 LOG phase입니다. ph[] 밖에서, 요청을 해제하는ngx_http_free_request()가 4029행에서ngx_http_log_request()를 불러 원래의phases[NGX_HTTP_LOG_PHASE]배열을 그대로 돕니다(ngx_http_request.c4084–4089행). 성공이든 오류든, 어느 칸에서 끝났든 요청이 해제될 때 한 번 남습니다(r->logged가 아직 0일 때. 서브요청은log_subrequest on일 때만ngx_http_finalize_request()안에서 따로 남깁니다, 2830–2838행).
헷갈리기 쉬운 곳: 아무도 응답하지 않으면 404, "/"로 끝나면 403
CONTENT phase의 마지막 칸까지 모두 NGX_DECLINED면 content checker가 직접 끝냅니다. URI가 /로 끝나면 "directory index of ... is forbidden"을 남기고 403, 아니면 "no handler found"를 남기고 404입니다(1334–1351행). 디렉터리에 index.html이 없을 때 404가 아니라 403이 나오는 이유가 이것입니다. 파일이 없는 보통의 404는 여기가 아니라 static 모듈이 파일 열기 실패로 정합니다.
4. location 찾기 — 설정 때 트리로, 요청 때 내려가기
이제 FIND_CONFIG 칸 안으로 들어갑니다. "=, ^~, ~, 그냥 접두사가 겹치면 누가 이기나"가 여기 있습니다.
4-1. 수식어 한 글자가 플래그가 된다
location 블록을 만나면 ngx_http_core_location()이 불려 모든 모듈의 create_loc_conf로 새 loc_conf 배열을 만들고(3174–3205행), 수식어를 읽어 core 모듈 설정에 플래그를 세웁니다(3209–3301행).
| 설정 | 플래그 | 뜻 |
|---|---|---|
location = /img |
exact_match = 1 |
URI가 정확히 같을 때만 |
location ^~ /img/static/ |
noregex = 1 |
접두사. 이것이 가장 긴 접두사면 정규식을 보지 않는다 |
location ~ \.png$, ~* |
regex != NULL |
정규식(설정을 읽을 때 컴파일). ~*는 대소문자 무시 |
location $is_beta |
predicate = 변수 번호 + 1 |
1.31.x에서 새로 생긴 predicate location |
location @fallback |
named = 1 |
이름으로만 찾는 location |
location /img/ |
(없음) | 보통 접두사 |
$로 시작하는 predicate location은 이 판의 새 기능입니다. 커밋 5f54125dd("Predicate locations", 작성 2026-03-29, 커밋 2026-08-26)로 들어왔고, 1.30.6 stable의 ngx_http_core_module.h에는 predicate라는 낱말이 없습니다. 커밋 메시지는 "이름이 $로 시작하면 요청 때 계산하는 문자열로 보고, 값이 빈 문자열도 "0"도 아니면 맞은 것으로 친다. 접두사와 정규식 다음에 시험한다"고 설명합니다. 다만 소스는 $ 뒤의 이름 전체를 변수 이름 하나로 보고 ngx_http_get_variable_index()로 번호를 받아 predicate에 1을 더해 적어 둡니다(3279–3291행). 아래에서 소스와 예제로 확인합니다.
그다음 ngx_http_add_location()이 부모의 locations 큐에 넣으면서 둘로 나눕니다(909–921행). 보통 접두사(^~ 포함)는 inclusive("그 이름으로 시작하는 URI를 모두 받는 것"), 나머지(=, 정규식, predicate, named, 이름 없는 것)는 전부 exact 쪽입니다.
4-2. 정렬하고, 떼어 내고, 트리로
http 블록을 다 읽으면 ngx_http_block()이 server마다 ngx_http_init_locations()와 ngx_http_init_static_location_trees()를 부릅니다(ngx_http.c 280–291행).
- 정렬: 비교 함수
ngx_http_cmp_locations()(970–1055행)는 큐를 접두사·정확 일치(이름순) → 정규식 → predicate → named(이름순) → 이름 없는 것(if블록 등) 순서로 세웁니다. 정규식과 predicate는 "do not sort" 주석과 함께 0을 돌려주는데,ngx_queue_sort()가 안정 정렬(stable merge sort)이므로 설정에 적은 순서가 그대로 남습니다. - 떼어 내기:
ngx_http_init_locations()가 정렬된 큐의 뒤쪽에서 named, predicate, regex 덩어리를 잘라 포인터 배열로 만듭니다 —cscf->named_locations,pclcf->predicate_locations,pclcf->regex_locations(756–826행). 중첩 location은 재귀로 같은 일을 합니다(709행). - 트리 만들기: 남은 접두사·정확 일치 가운데 이름이 같은
=와 접두사를 한 칸으로 합치고(같은 종류가 둘이면 "duplicate location" 오류), 한 접두사로 시작하는 location들을 그 접두사 밑으로 옮긴 뒤, 정렬된 목록의 가운데를 뿌리로 삼아 균형 잡힌 이진 트리를 만듭니다(1058–1233행).
struct ngx_http_location_tree_node_s {
    ngx_http_location_tree_node_t   *left;
    ngx_http_location_tree_node_t   *right;
    ngx_http_location_tree_node_t   *tree;

    ngx_http_core_loc_conf_t        *exact;
    ngx_http_core_loc_conf_t        *inclusive;

    u_short                          len;
    u_char                           auto_redirect;
    u_char                           name[1];
};
src/http/ngx_http_core_module.h 478–489행
left·right는 보통의 이진 탐색 트리이고, 특이한 것은 세 번째 자식 tree 입니다. /img/로 시작하는 location들은 /img/ 노드의 tree 밑에 따로 트리를 이루고, 그 노드들의 name에는 부모가 맞춰 본 앞부분을 뗀 나머지만 저장합니다(prefix + len, 1227행). 한 노드에 exact와 inclusive가 같이 있을 수 있어 location = /x와 location /x가 노드 하나를 나눠 씁니다. name[1]은 구조체 끝에 이름을 붙여 할당하는 C의 옛 관용구입니다(1177–1178행).
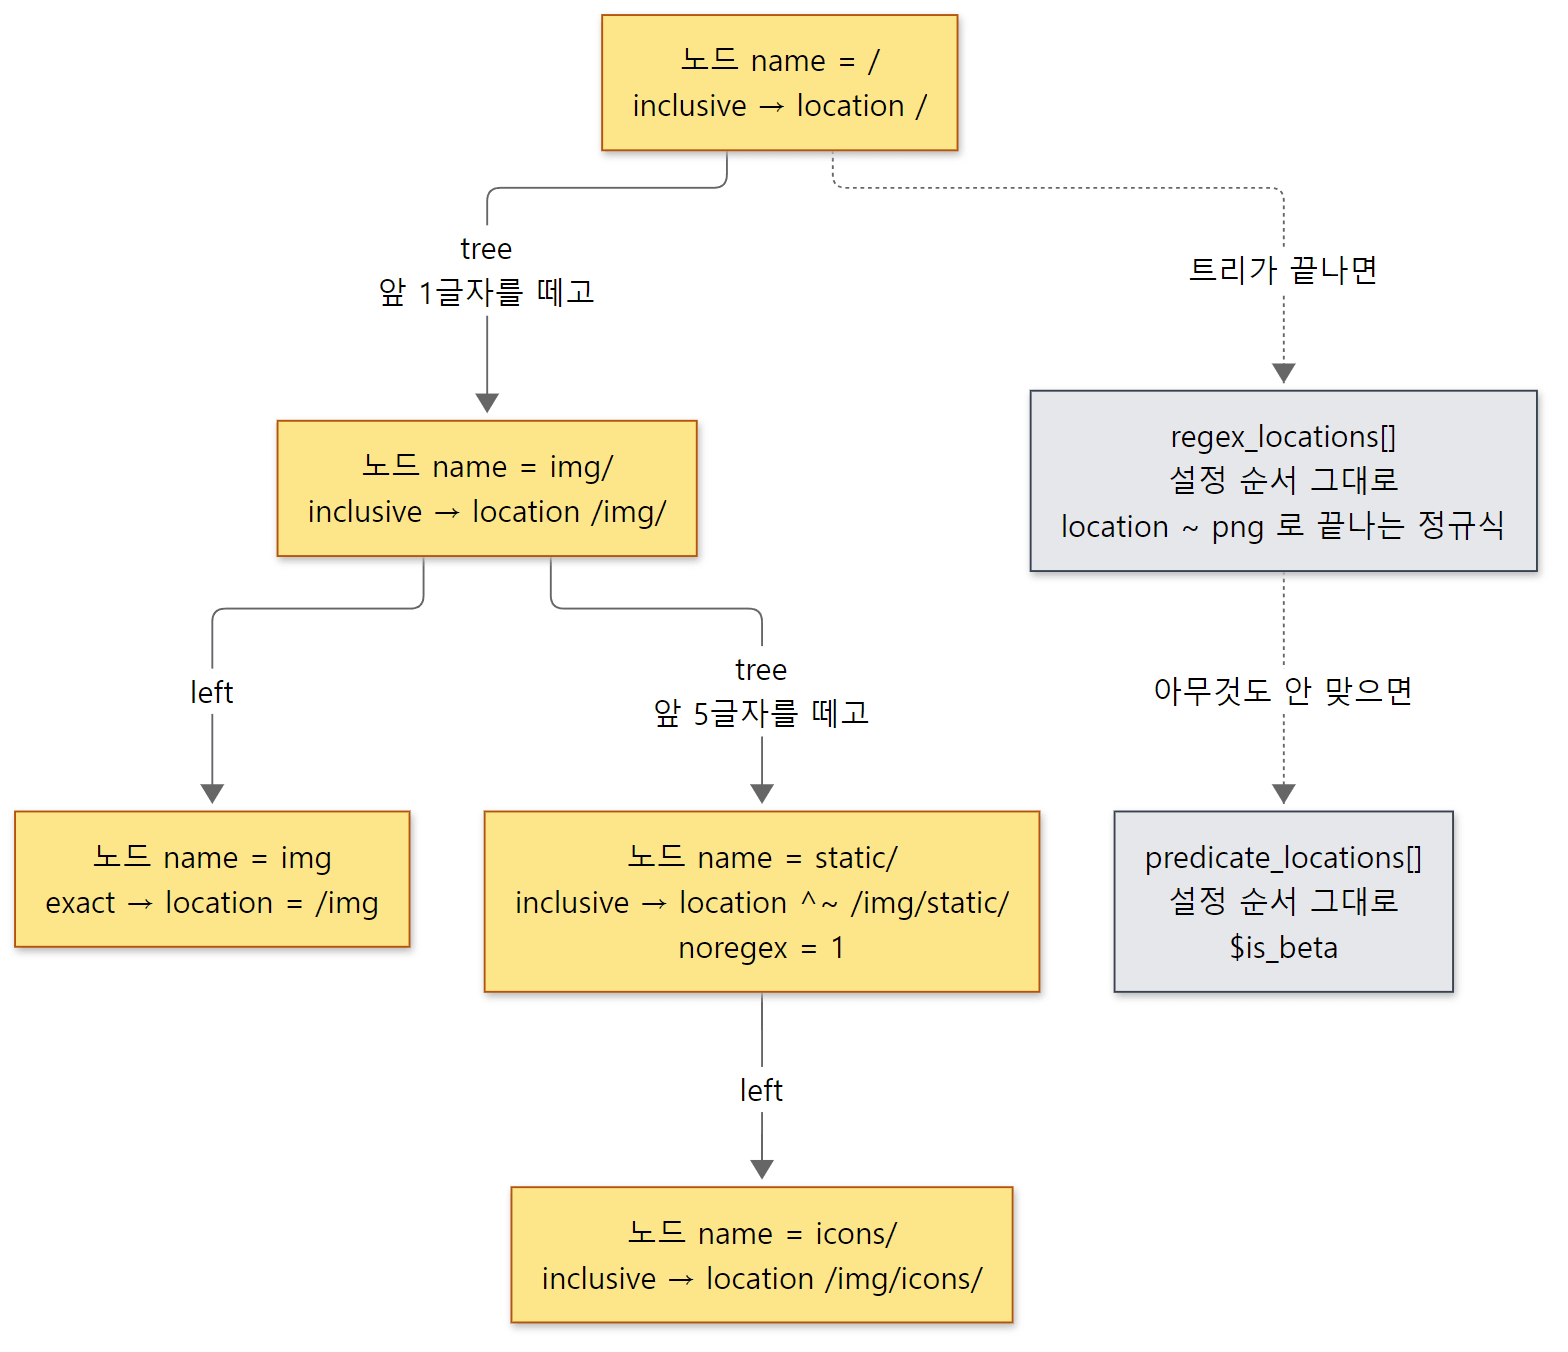 예제 2의 설정으로 만들어지는 트리입니다. 노란 상자는 설정 때 만들어 둔 노드이고, name은 부모가 맞춘 앞부분을 뗀 나머지입니다.
4-3. 요청 때: 트리 내려가기
ngx_http_core_find_static_location()의 루프입니다(디버그 로그 줄은 줄였습니다).
    for ( ;; ) {

        if (node == NULL) {
            return rv;
        }

        /* ... "test location: \"%*s\"" 디버그 로그 ... */

        n = (len <= (size_t) node->len) ? len : node->len;

        rc = ngx_filename_cmp(uri, node->name, n);

        if (rc != 0) {
            node = (rc < 0) ? node->left : node->right;

            continue;
        }

        if (len > (size_t) node->len) {

            if (node->inclusive) {

                r->loc_conf = node->inclusive->loc_conf;
                rv = NGX_AGAIN;

                node = node->tree;
                uri += n;
                len -= n;

                continue;
            }

            /* exact only */

            node = node->right;

            continue;
        }

        if (len == (size_t) node->len) {

            if (node->exact) {
                r->loc_conf = node->exact->loc_conf;
                return NGX_OK;

            } else {
                r->loc_conf = node->inclusive->loc_conf;
                return NGX_AGAIN;
            }
        }

        /* ... len < node->len: auto_redirect 검사 뒤 왼쪽으로 ... */
    }
src/http/ngx_http_core_module.c 1557–1620행
- 앞부분이 다르면
left/right로 갑니다. - 노드 이름이 URI 앞부분과 같고 URI가 더 길면,
inclusive노드일 때 일단 그 location을r->loc_conf에 걸어 두고(rv = NGX_AGAIN) 맞춘 부분을 떼어 낸 채tree로 내려갑니다. 더 긴 접두사가 밑에서 나오면 덮어씁니다. "가장 긴 접두사가 이긴다"의 구현이고, 문자열을 매번 처음부터 비교하지 않고 떼어 낸 나머지만 비교합니다. - 길이까지 같으면
exact가 있을 때NGX_OK(정확 일치, 끝), 없으면 그 접두사로NGX_AGAIN입니다.
비교 함수 ngx_filename_cmp()는 바이트를 하나씩 비교하며 대소문자를 가리고(대소문자를 무시하는 파일 시스템용 빌드에서만 tolower), /를 가장 작은 글자로 칩니다(ngx_string.c 926–963행). 정렬과 탐색이 같은 함수를 쓰므로 트리가 어긋나지 않습니다.
4-4. 그다음 정규식, 그다음 predicate
트리 탐색을 감싸는 ngx_http_core_find_location()이 나머지 규칙을 정합니다.
    rc = ngx_http_core_find_static_location(r, pclcf->static_locations);

    if (rc == NGX_AGAIN) {

        clcf = ngx_http_get_module_loc_conf(r, ngx_http_core_module);

        noregex = clcf->noregex;

        /* look up nested locations */

        rc = ngx_http_core_find_location(r);
    }

    if (rc == NGX_OK || rc == NGX_DONE || rc == NGX_ERROR) {
        return rc;
    }

    /* rc == NGX_DECLINED or rc == NGX_AGAIN in nested location */

#if (NGX_PCRE)

    if (noregex == 0 && pclcf->regex_locations) {

        /* ... 설정 순서대로 ngx_http_regex_exec(), 처음 맞으면 r->loc_conf 를 바꾸고 NGX_OK ... */
    }
#endif

    if (noregex == 0 && pclcf->predicate_locations) {

        for (clcfp = pclcf->predicate_locations; *clcfp; clcfp++) {

            /* ... */

            vv = ngx_http_get_flushed_variable(r, (*clcfp)->predicate - 1);
            if (vv == NULL) {
                return NGX_ERROR;
            }

            if (vv->len && (vv->len != 1 || vv->data[0] != '0')) {
                r->loc_conf = (*clcfp)->loc_conf;

                /* ... 중첩 location 을 찾고 NGX_OK ... */
            }
        }
    }

    return rc;
src/http/ngx_http_core_module.c 1460–1533행
정리하면 이렇습니다.
- 접두사 트리에서 정확 일치(
=)면 끝입니다. - 접두사 일치면 그 location 안의 중첩 location을 먼저 재귀로 찾습니다.
- 가장 긴 접두사에
^~(noregex)가 있으면 정규식도 predicate도 건너뜁니다. - 아니면 정규식을 설정 순서대로 시험해 처음 맞는 것을 씁니다. 가장 긴 접두사를 찾았어도 정규식이 맞으면 정규식이 이깁니다.
- 정규식이 안 맞으면 predicate를 설정 순서대로 계산해 처음 참인 것을 씁니다.
- 그래도 없으면 2단계에서 걸어 둔 접두사가 남고, 접두사도 없었으면 server의 기본 설정 그대로입니다.
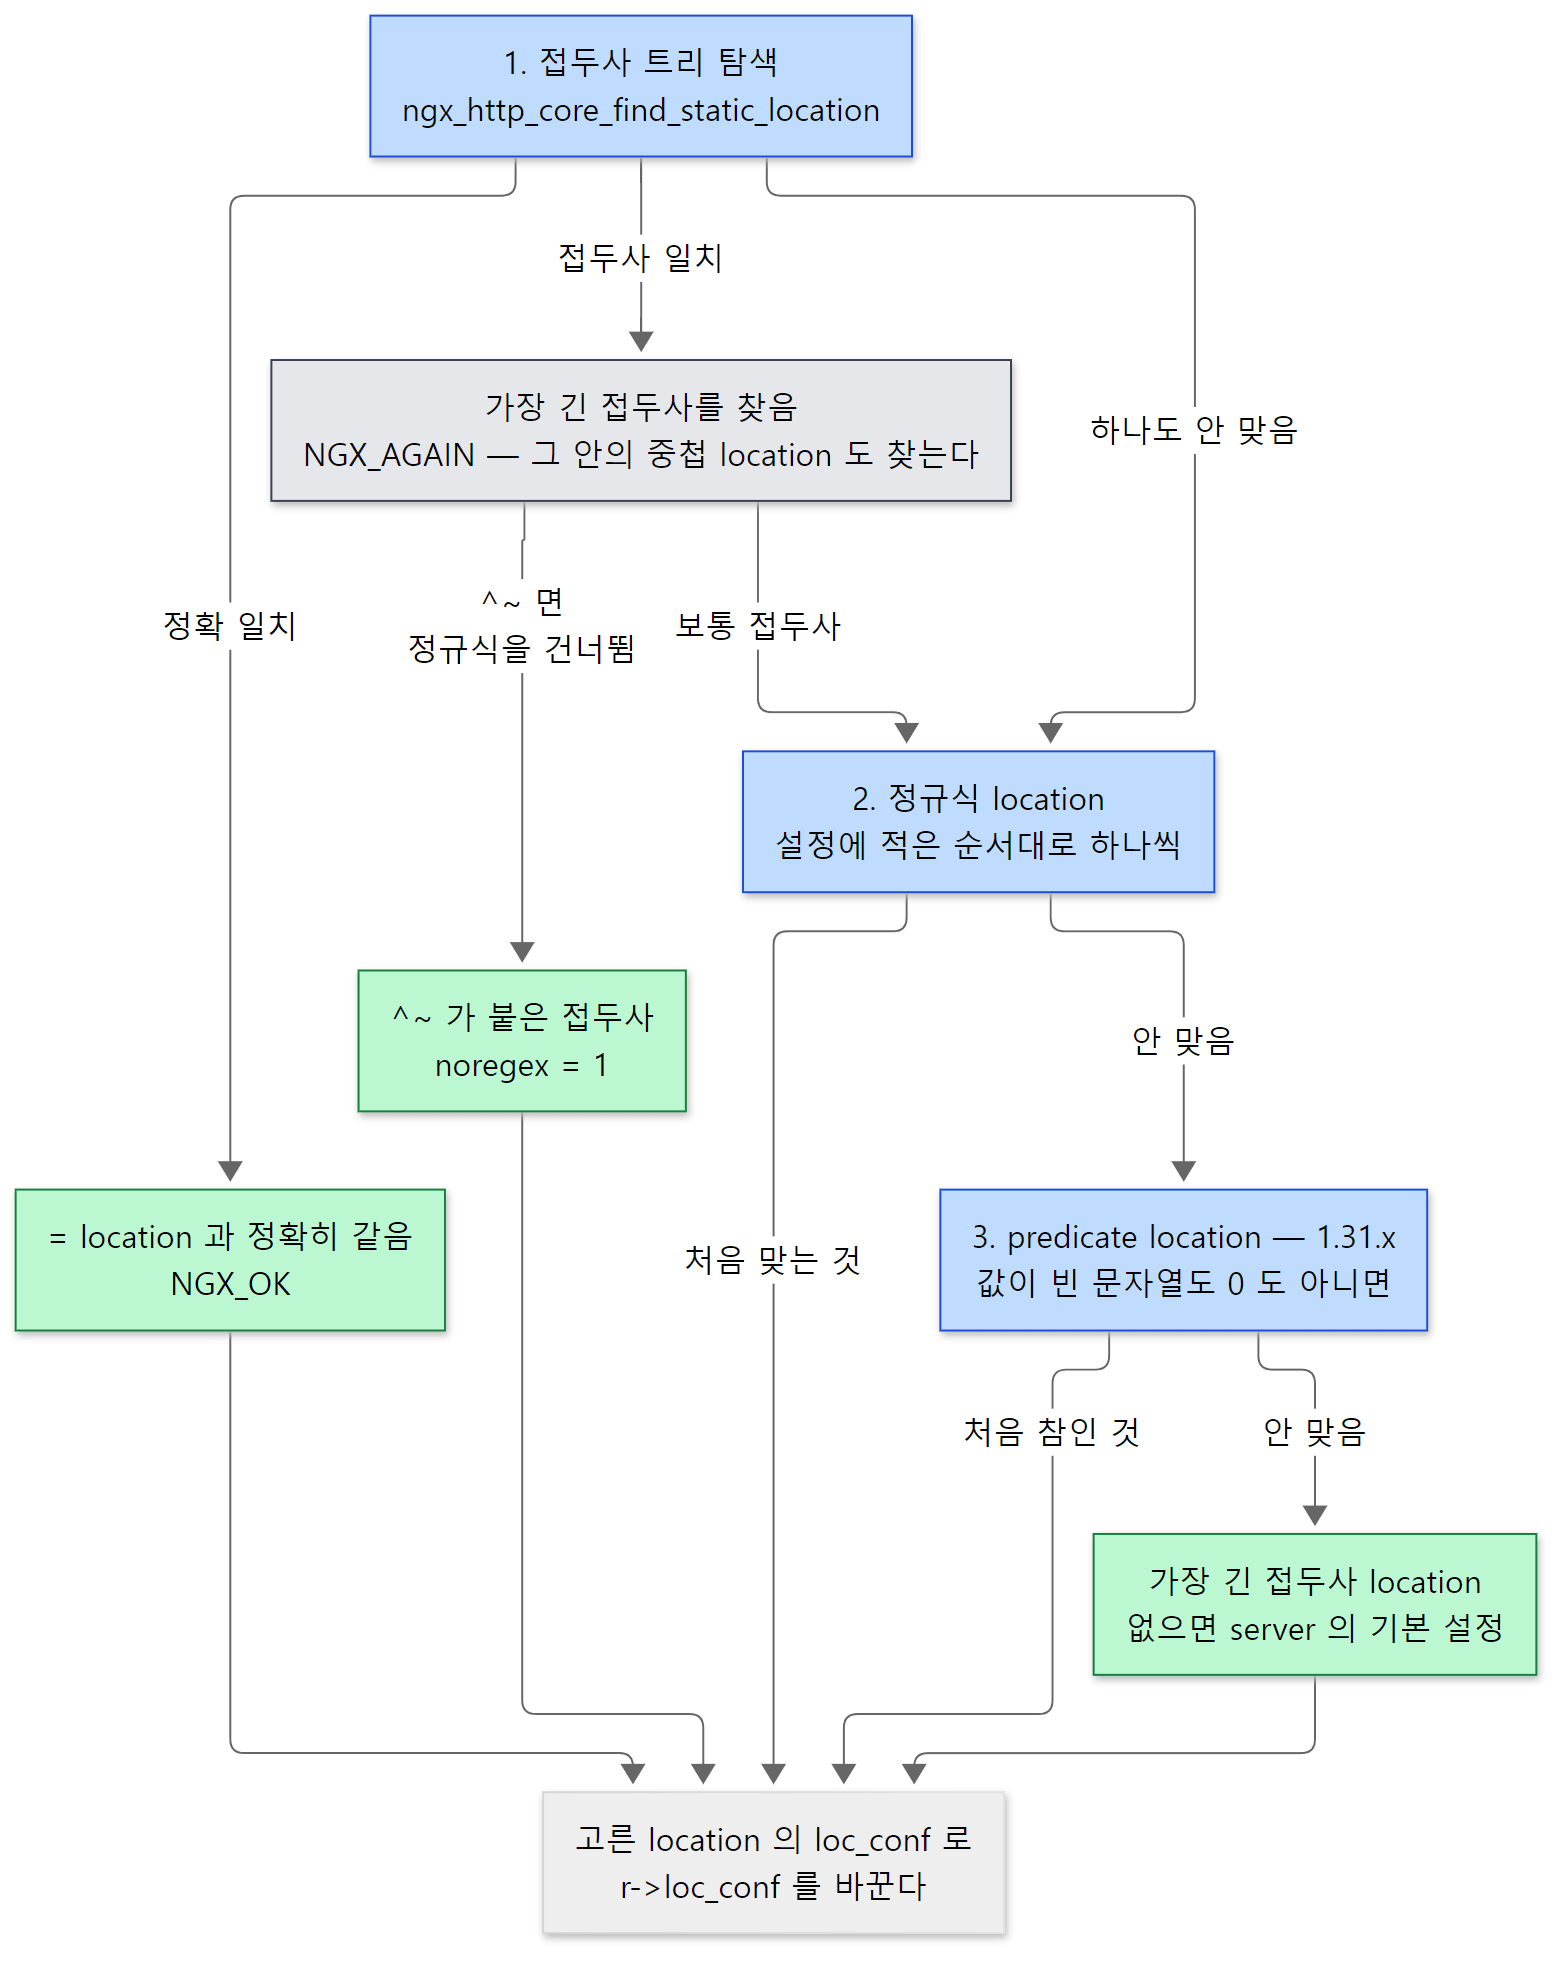 초록 상자가 "여기서 정해진다"입니다. 정규식과 predicate는 설정에 적은 순서가 곧 우선순위입니다.
예제 2: 겹치는 location에서 누가 이기나
예제 폴더 ex/u09-location-match의 설정 가운데 http {} 안쪽입니다. 응답 본문으로 어느 location이 골라졌는지 알 수 있게 했습니다.
    # ?beta=1 이면 $is_beta 가 "1", 아니면 "0"
    map $arg_beta $is_beta {
        default 0;
        1       1;
    }

    server {
        listen 8080;

        location = /img             { return 200 "= /img\n"; }
        location /img/              { return 200 "/img/\n"; }
        location /img/icons/        { return 200 "/img/icons/\n"; }
        location ^~ /img/static/    { return 200 "^~ /img/static/\n"; }
        location ~ \.png$           { return 200 "~ regex (png)\n"; }

        # 1.31.x 에서 새로 생긴 predicate location (1.30.x 에는 없다)
        location $is_beta           { return 200 "predicate (is_beta=$is_beta)\n"; }

        location /                  { return 200 "/\n"; }
    }
run.sh는 URI 열 개를 curl로 보내고, 세 요청의 디버그 로그에서 test location·using configuration 줄만 골랐습니다.
=== 1. which location wins ===
/img                   -> = /img
/img/a.jpg             -> /img/
/img/a.png             -> ~ regex (png)
/img/icons/a.gif       -> /img/icons/
/img/icons/a.png       -> ~ regex (png)
/img/static/a.png      -> ^~ /img/static/
/other                 -> /
/other?beta=1          -> predicate (is_beta=1)
/img/a.png?beta=1      -> ~ regex (png)
/img/a.jpg?beta=1      -> predicate (is_beta=1)
=== 2. debug log: GET /img/icons/a.png ===
*12 test location: "/"
*12 test location: "img/"
*12 test location: "static/"
*12 test location: "icons/"
*12 test location: ~ "\.png$"
*12 using configuration "\.png$"
=== 3. debug log: GET /img/static/a.png ===
*13 test location: "/"
*13 test location: "img/"
*13 test location: "static/"
*13 using configuration "/img/static/"
=== 4. debug log: GET /other?beta=1 ===
*14 test location: "/"
*14 test location: "img/"
*14 test location: ~ "\.png$"
*14 test location: "$is_beta"
*14 using configuration "$is_beta"
/img/icons/a.png: 트리에서 가장 긴 접두사/img/icons/까지 내려갔지만^~가 아니라서 정규식을 시험했고 정규식이 이겼습니다. "가장 긴 접두사가 이긴다"는 정규식이 하나도 안 맞을 때만 맞는 말입니다./img/static/a.png: 똑같이.png인데^~ /img/static/이 이겼고, 로그에test location: ~가 아예 없습니다.noregex가 정규식 루프를 건너뛰게 했습니다.- 로그의 노드 이름
"/","img/","static/","icons/"는 4-2절대로 앞부분을 뗀 이름입니다.img/밑에서static/을 먼저 본 것은 그것이 작은 트리의 뿌리이기 때문입니다(두 개짜리 목록에서ngx_queue_middle()은 두 번째 것을 고릅니다,ngx_queue.c21–49행). - predicate는 정규식 다음입니다.
/img/a.png?beta=1은 정규식이 먼저 맞아 predicate를 보지 않았고,/img/a.jpg?beta=1은 정규식이 안 맞자 predicate가 접두사/img/를 이겼습니다. 커밋 메시지, 소스, 실행 결과가 같습니다.
헷갈리기 쉬운 곳: 설정 순서가 의미 있는 것과 없는 것
접두사 location은 정렬해서 트리로 만드므로 적은 순서가 아무 의미가 없습니다. 예제 2에서 location /을 맨 아래에 적었어도 결과는 같습니다. 반대로 정규식과 predicate location은 적은 순서가 곧 우선순위입니다. location ~ \.png$ 위에 location ~ /img/를 적으면 /img/a.png는 위의 것으로 갑니다.
5. rewrite 모듈과 변수 — phase에 끼어드는 작은 인터프리터
rewrite 모듈은 rewrite, return, set, if, break를 모두 맡습니다. 이 디렉티브들은 설정을 읽을 때 "코드 배열"로 컴파일되고, 요청 때는 그 배열을 처음부터 실행합니다.
    e->ip = rlcf->codes->elts;
    e->request = r;
    e->quote = 1;
    e->log = rlcf->log;
    e->status = NGX_DECLINED;

    while (*(uintptr_t *) e->ip) {
        code = *(ngx_http_script_code_pt *) e->ip;
        code(e);
    }

    return e->status;
}
src/http/modules/ngx_http_rewrite_module.c 172–184행
e->ip는 "지금 실행할 코드"를 가리킵니다(CPU의 명령 포인터에서 따온 이름). 배열의 각 항목은 맨 앞에 함수 포인터가 있는 구조체이고, 루프는 그 함수를 부르기만 하며 각 코드 함수가 자기 크기만큼 e->ip를 옮깁니다. 0(NULL)인 칸을 만나면 멈춥니다. e->status가 초깃값 NGX_DECLINED로 남으면 rewrite checker가 다음 칸으로 넘깁니다.
rewrite ^/a/(.*)$ /b/$1 last; 한 줄은 정규식 시작 코드, 바꿀 문자열을 만드는 복사 코드들, 정규식 끝 코드가 됩니다. 네 번째 인자가 last면 last = 1, break면 regex->break_cycle = 1과 last = 1입니다(363–386행). last = 1이면 끝 코드 뒤에 NULL 코드를 하나 더 붙이므로(425–432행), 정규식이 맞으면 그 location의 나머지 rewrite 디렉티브는 돌지 않습니다. 여기까지는 둘이 같고, 차이는 요청 때 세우는 플래그 하나입니다.
    if (code->uri) {
        r->internal = 1;
        r->valid_unparsed_uri = 0;

        if (code->break_cycle) {
            r->valid_location = 0;
            r->uri_changed = 0;

        } else {
            r->uri_changed = 1;
        }
    }
src/http/ngx_http_script.c 1179–1190행
last:r->uri_changed = 1. 다음 칸의 POST_REWRITE checker가 이것을 보고 FIND_CONFIG로 되돌려 보냅니다. location을 새 URI로 다시 찾습니다.break:r->uri_changed = 0. POST_REWRITE를 그냥 지나 URI만 바뀐 채 지금 location에 머뭅니다.
POST_REWRITE checker는 되돌려 보내기 전에 횟수를 셉니다.
    r->uri_changes--;

    if (r->uri_changes == 0) {
        ngx_log_error(NGX_LOG_ERR, r->connection->log, 0,
                      "rewrite or internal redirection cycle "
                      "while processing \"%V\"", &r->uri);

        ngx_http_finalize_request(r, NGX_HTTP_INTERNAL_SERVER_ERROR);
        return NGX_OK;
    }

    r->phase_handler = ph->next;

    cscf = ngx_http_get_module_srv_conf(r, ngx_http_core_module);
    r->loc_conf = cscf->ctx->loc_conf;

    return NGX_AGAIN;
}
src/http/ngx_http_core_module.c 1098–1115행
r->uri_changes는 요청을 만들 때 NGX_HTTP_MAX_URI_CHANGES + 1, 즉 11에서 시작합니다(ngx_http_request.c 661행, 상수 10은 ngx_http_request.h 12행). 0이 되면 500입니다. 되돌아가기 전에 r->loc_conf를 server 기본 설정으로 되돌리는 것은 location을 처음부터 다시 찾아야 하기 때문입니다.
예제 3: last, break, named location, 끝없는 rewrite
예제 폴더 ex/u09-rewrite-redirect의 server {} 블록입니다. root에는 /b/x.txt 파일 하나("static file /b/x.txt")만 있습니다.
    server {
        listen 8080;

        # server 단계의 rewrite (SERVER_REWRITE phase 에서 돈다)
        rewrite ^/old/(.*)$ /b/$1 last;

        location /a/ {
            # last: URI 를 바꾸고 location 을 다시 찾는다
            rewrite ^/a/(.*)$ /b/$1 last;
        }

        location /brk/ {
            # break: URI 만 바꾸고 이 location 에 머문다 (아래 return 은 돌지 않는다)
            rewrite ^/brk/(.*)$ /b/$1 break;
            return 200 "never reached\n";
        }

        location /b/ {
            return 200 "location /b/: uri=$uri request_uri=$request_uri\n";
        }

        location /loop/ {
            # 자기 자신으로 계속 rewrite → 10번 뒤 500
            rewrite ^/loop/(.*)$ /loop/$1 last;
        }

        location /try/ {
            try_files $uri @fallback;
        }

        location @fallback {
            return 200 "named @fallback: uri=$uri\n";
        }
    }
=== 1. responses ===
/a/x.txt       -> location /b/: uri=/b/x.txt request_uri=/a/x.txt  [200]
/brk/x.txt     -> static file /b/x.txt  [200]
/old/x.txt     -> location /b/: uri=/b/x.txt request_uri=/old/x.txt  [200]
/try/none.txt  -> named @fallback: uri=/try/none.txt  [200]
/loop/x        -> (error page) [500]
/a/x.txt(last)는location /b/가 답했습니다.$uri는 바뀐/b/x.txt,$request_uri는 클라이언트가 보낸 그대로입니다./brk/x.txt(break)는location /brk/에 머물렀습니다. 아래return은 돌지 않았고(코드 배열이NULL에서 멈춤), CONTENT phase의 static 모듈이 바뀐 URI의 파일을 보냈습니다./old/x.txt는 server 단계에서 바뀌었습니다. SERVER_REWRITE는 FIND_CONFIG보다 앞이라 되돌아갈 필요가 없습니다.
디버그 로그에서 last와 break를 나란히 놓으면 차이가 분명합니다.
=== 2. debug log: GET /a/x.txt (rewrite ... last) ===
*7 generic phase: 0
*7 rewrite phase: 1
*7 http script regex: "^/old/(.*)$"
*7 test location: "/brk/"
*7 test location: "/b/"
*7 test location: "/a/"
*7 using configuration "/a/"
*7 rewrite phase: 3
*7 http script regex: "^/a/(.*)$"
*7 http script regex end
*7 rewritten data: "/b/x.txt", args: ""
*7 post rewrite phase: 4
*7 uri changes: 11
*7 test location: "/brk/"
*7 test location: "/b/"
*7 using configuration "/b/"
*7 rewrite phase: 3
*7 http finalize request: 0, "/b/x.txt?" a:1, c:1
=== 3. debug log: GET /brk/x.txt (rewrite ... break) ===
...
*8 using configuration "/brk/"
*8 rewrite phase: 3
*8 http script regex: "^/brk/(.*)$"
*8 http script regex end
*8 rewritten data: "/b/x.txt", args: ""
*8 post rewrite phase: 4
*8 generic phase: 5
...
*8 content phase: 17
*8 http finalize request: 0, "/b/x.txt?" a:1, c:1
last는post rewrite phase: 4뒤에uri changes: 11을 찍고test location부터 다시 했습니다. 새 location/b/에서rewrite phase: 3이 또 돌고return이 요청을 끝냈습니다.break는post rewrite phase: 4에서 그냥 지나generic phase: 5로 갔고,using configuration은 처음 한 번뿐입니다.- 둘 다
rewrite phase: 1에서 server 단계의^/old/를 먼저 시험했습니다(맞지 않음).
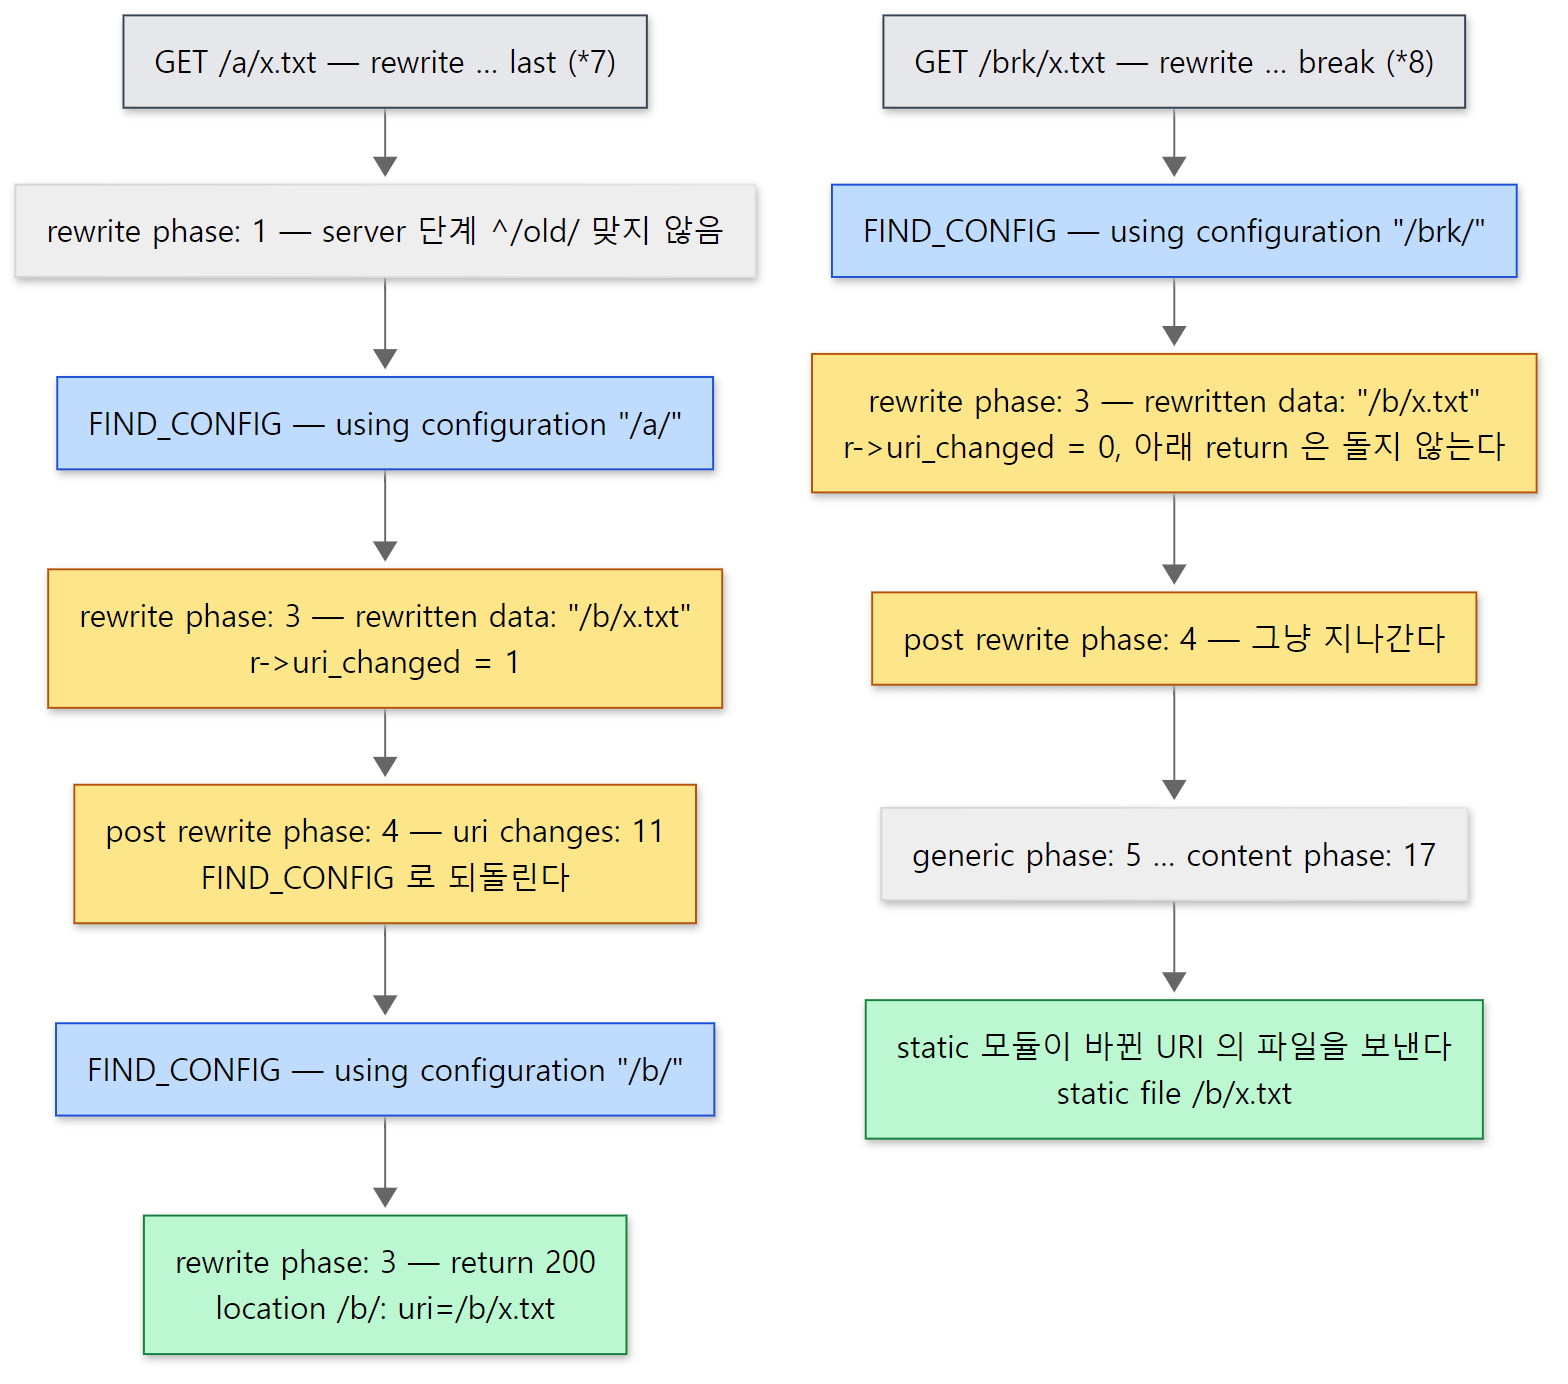 위 두 디버그 로그를 나란히 놓은 것. 차이는 post rewrite phase 에서 되돌아가느냐 하나입니다.
끝없는 rewrite(/loop/x)는 uri changes: 11부터 uri changes: 1까지 열한 줄을 찍은 뒤 이렇게 끝납니다.
*10 uri changes: 2
*10 uri changes: 1
*10 rewrite or internal redirection cycle while processing "/loop/x"
로그는 줄이기 전의 값을 찍습니다. 11에서 2까지 열 번은 되돌아갔고, 1을 찍은 열한 번째에 0이 되어 500이 났습니다. URI를 바꿔 다시 처리하는 일은 한 요청에 열 번까지이고, 이 횟수는 6절의 내부 리다이렉트·named location과 함께 셉니다.
변수 — 이름은 설정 때 번호로, 값은 요청 때 한 번
return 200 "... uri=$uri ..."도 설정 때 컴파일됩니다. 이때 $uri라는 이름은 ngx_http_get_variable_index()로 정수 인덱스가 됩니다. 변수의 정의는 이름과 "값을 계산하는 함수"의 표입니다.
    { ngx_string("uri"), NULL, ngx_http_variable_request,
      offsetof(ngx_http_request_t, uri),
      NGX_HTTP_VAR_NOCACHEABLE, 0 },
src/http/ngx_http_variables.c 247–249행
ngx_http_core_variables[](168행부터)의 한 줄입니다. ngx_http_variable_request는 data로 받은 오프셋에 있는 ngx_str_t(여기서는 r->uri)를 값으로 돌려줍니다. 요청 때 값을 꺼내는 ngx_http_get_indexed_variable()(618–665행)을 보면, 요청마다 r->variables[] 배열이 있고 처음 물을 때만 get_handler로 계산해 그 칸에 저장합니다. 다음부터는 valid 비트를 보고 바로 돌려줍니다 — 늦은 계산(lazy evaluation)과 캐시입니다. 그런데 $uri에는 NGX_HTTP_VAR_NOCACHEABLE이 붙어 있습니다. 소스에 이유가 적혀 있지는 않지만, rewrite와 내부 리다이렉트가 요청 중간에 r->uri를 바꾸므로 한 번 계산한 값을 계속 쓰면 틀릴 수 있습니다. ngx_http_get_flushed_variable()(668–685행)은 이런 칸을 비우고 다시 계산하며, 4-4절의 predicate location도 이 함수로 값을 꺼냈습니다.
6. 다른 URI로 다시 — 내부 리다이렉트와 named location
rewrite ... last 말고도 "다른 URI로 다시" 가는 길이 둘 더 있고, 셋은 ph[]의 서로 다른 칸으로 되돌아갑니다.
ngx_http_internal_redirect() 는 uri_changes를 줄여 검사한 뒤(2625–2635행) URI를 바꾸고 다시 처음부터 돕니다.
    /* clear the modules contexts */
    ngx_memzero(r->ctx, sizeof(void *) * ngx_http_max_module);

    cscf = ngx_http_get_module_srv_conf(r, ngx_http_core_module);
    r->loc_conf = cscf->ctx->loc_conf;

    ngx_http_update_location_config(r);

    /* ... */

    r->internal = 1;
    r->valid_unparsed_uri = 0;
    r->add_uri_to_alias = 0;
    r->main->count++;

    ngx_http_handler(r);

    return NGX_DONE;
}
src/http/ngx_http_core_module.c 2651–2671행
모듈들이 이 요청에 붙여 둔 상태(r->ctx)를 지우고, r->loc_conf를 server 기본값으로 되돌린 뒤 r->internal = 1로 ngx_http_handler()를 다시 부릅니다. 3절에서 본 대로 internal인 요청은 server_rewrite_index부터 돕니다. POST_READ는 다시 하지 않습니다. 새 ngx_http_request_t를 만들지 않고 같은 구조체를 다시 쓰는 것도 눈여겨볼 만합니다. httpd는 내부 리다이렉트마다 새 request_rec를 만들어 r->prev로 이었습니다(httpd 10편 6절). 이 함수를 부르는 곳은 index 모듈, URI로 끝나는 try_files, URI를 대상으로 한 error_page(ngx_http_special_response.c 631행), upstream의 X-Accel-Redirect(ngx_http_upstream.c 3163행) 등입니다.
예제 1의 서버에 /를 요청하면 index 모듈이 /index.html로 내부 리다이렉트합니다.
=== 4. debug log: GET / (index -> internal redirect) ===
status=200
...
*4 generic phase: 13
*4 content phase: 14
*4 internal redirect: "/index.html?"
*4 rewrite phase: 1
*4 test location: "/"
*4 test location: "admin/"
*4 using configuration "/"
*4 rewrite phase: 3
...
*4 content phase: 17
*4 http finalize request: 0, "/index.html?" a:1, c:2
*4 http finalize request: -4, "/index.html?" a:1, c:1
content phase: 14(index)에서 internal redirect가 일어나고 다음 줄이 rewrite phase: 1 입니다. generic phase: 0은 다시 나오지 않습니다. 첫 바퀴의 /는 test location: "/" 한 번으로 끝났는데(URI 길이가 노드 이름과 같아 NGX_AGAIN), 두 번째 바퀴의 /index.html은 더 길어서 tree로 내려가 admin/과 비교한 뒤 /에 남았습니다. 끝의 c:2 → c:1은 리다이렉트가 올린 r->main->count(참조 수)가 내려가는 모습입니다.
ngx_http_named_location() 은 이름으로 찾으므로 FIND_CONFIG를 거치지 않습니다. 4-2절에서 떼어 둔 cscf->named_locations를 이름으로 훑어 찾으면 r->loc_conf를 그 location으로 바로 바꾸고 r->phase_handler = cmcf->phase_engine.location_rewrite_index(예제 1에서 3)로 돌립니다(2720–2735행). URI는 바꾸지 않습니다. 예제 3의 /try/none.txt 로그에서 PRECONTENT의 try_files(generic phase: 12) 다음이 이렇습니다.
*9 generic phase: 12
*9 test location: "@fallback"
*9 using location: @fallback "/try/none.txt?"
*9 rewrite phase: 3
*9 http finalize request: 0, "/try/none.txt?" a:1, c:2
using configuration(FIND_CONFIG의 로그) 없이 곧바로 rewrite phase: 3이고, 응답의 $uri도 원래의 /try/none.txt 그대로였습니다.
 칸 번호는 예제 1의 배열 기준입니다. 되돌아가는 세 길은 모두
r->uri_changes를 하나씩 줄이고, 0이 되면 500으로 끝납니다.
헷갈리기 쉬운 곳: 내부 리다이렉트는 접근 검사를 다시 한다
새 칸으로 돌아가면 그 뒤의 phase를 모두 다시 지납니다. / → /index.html에서도 ACCESS 칸을 다시 지났습니다. httpd는 설정 객체가 같으면 접근 검사를 건너뛰었지만, nginx의 access checker가 건너뛰는 것은 서브요청(r != r->main)일 때뿐입니다(1125–1128행). 내부 리다이렉트는 같은 구조체(r == r->main)를 다시 쓰므로 검사를 다시 합니다.
이 글에서 뺀 것
location /dir/에/dir이 왔을 때의 301 자동 리다이렉트(auto_redirect):ngx_http_core_module.c1031–1067행, 1612–1617행client_max_body_size검사(FIND_CONFIG 안): 1016–1029행limit_except블록(메서드별loc_conf):ngx_http_update_location_config()1361–1364행auth_delay:ngx_http_core_auth_delay()1229–1271행- rewrite 모듈의
if(이름 없는 location,noname)와set:ngx_http_rewrite_if(),ngx_http_rewrite_set() - 스크립트 엔진의 길이 계산 코드와 복사 코드:
ngx_http_script.c의ngx_http_script_compile()(468행부터) - 서브요청(
ngx_http_subrequest())과 postpone 필터: 10편에서 post_action:ngx_http_request.c3921–3940행
정리
| 개념 | 한 줄 요약 |
|---|---|
| phase | 요청 처리 순서를 나눈 11칸. 순서는 코어가 정하고 모듈은 cmcf->phases[i].handlers에 함수를 넣는다 |
| ph[] 배열 | 설정 때 phase별 배열을 한 줄로 편 것. 칸마다 checker·handler·next, 끝은 checker == NULL |
| 거꾸로 복사 | 같은 phase에서는 모듈 목록 뒤쪽 모듈이 먼저 불린다(index가 static보다 먼저) |
ngx_http_core_run_phases() |
r->phase_handler 칸의 checker를 NGX_OK가 나올 때까지 부르는 루프. 멈추면 같은 칸에서 이어 간다 |
| checker | 핸들러 반환값을 phase마다 다르게 해석한다(rewrite는 OK도 끝, access는 satisfy에 따라) |
| LOG phase | ph[] 밖. 요청을 해제할 때 ngx_http_log_request()가 부른다 |
| location 트리 | 접두사는 정렬해 이진 트리로, 앞부분이 같은 것은 tree 자식으로. 노드 이름은 앞부분을 뗀 나머지 |
| 우선순위 | = → 가장 긴 접두사(중첩 먼저) → ^~면 끝 → 정규식(설정 순서) → predicate(설정 순서, 1.31.x) → 가장 긴 접두사 |
| 콘텐츠 핸들러 | proxy_pass 등이 clcf->handler에 박아 두고, FIND_CONFIG 뒤 r->content_handler가 된다 |
| rewrite 모듈 | 설정 때 코드 배열로 컴파일, 요청 때 함수 포인터 루프로 실행. last는 FIND_CONFIG로, break는 머문다 |
| 변수 | 이름은 설정 때 인덱스로. 값은 처음 물을 때 계산해 캐시, $uri처럼 바뀌는 것은 다시 계산 |
| 내부 리다이렉트 | 같은 구조체로 server_rewrite_index부터. named location은 location_rewrite_index부터. 합쳐서 10번까지 |
다음에 볼 것
CONTENT phase에서 핸들러가 정해졌으면 이제 응답이 만들어져 흘러 나갑니다. static 모듈은 파일을 열어 ngx_buf_t에 담고 ngx_http_send_header()와 ngx_http_output_filter()로 넘기며, 그 뒤로 헤더 필터·gzip·chunked·write 필터가 함수 포인터 사슬로 이어집니다. 이 글의 예제에서 content phase: 17과 http finalize request 사이에 있던 일입니다. 10편: 필터와 정적 파일 — 응답은 어떻게 흘러 나가나에서 이어집니다. proxy_pass가 콘텐츠 핸들러가 된 뒤의 일은 11편에서 봅니다.
같은 문제를 다른 서버는 이렇게 풉니다. httpd는 이름 붙은 훅과 RUN_FIRST·RUN_ALL 규칙으로 단계를 밟고, URL을 디스크 경로와 <Directory> 설정으로 바꾸는 "걷기"를 요청마다 합니다(httpd 10편: 요청 처리 단계). Tomcat의 Mapper도 이름을 정렬해 두고 이진 탐색으로 가장 긴 경로를 찾는데, nginx의 접두사 트리와 같은 발상이고 다른 점은 URI 끝을 한 조각씩 잘라 가며 다시 찾는다는 것입니다(Tomcat 7편: CoyoteAdapter와 Mapper). 요청이 차례로 지나는 처리 사슬은 Tomcat 8편의 파이프라인과 밸브와, URL을 자바 메서드로 바꾸는 일은 Spring 22편: 핸들러 매핑과 어댑터와 견줘 볼 만합니다.