What we are building
I started the day never having used Unity, and by the end of it I had built this:
- Four boxes sit on a floor.
- A bat follows the mouse, and swings when you press the left button.
- A box hit by the bat flies off and falls over the edge of the floor.
- The whole thing is exported as an
.exethat runs on Windows.
It is too small to call a game, but nearly all of Unity's basics are in it: put objects on screen (GameObject), attach features to them (Component), drive them with code (Script), and export an executable (Build).
Unity is new to me too, so I have written down the places where I was confused and the places where I actually got stuck. The aim is for someone starting out to be able to follow along from the top.
 The finished scene. Boxes on a white floor, and the thin bar floating beside them is the bat. (Click to enlarge)
Here is the setup I used.
| Item | Details |
|---|---|
| Engine | Unity 6 (editor 6000.6.3f1) |
| Operating system | Windows |
| Language | C# |
| Practice project | Unity tutorial sample (3D, scene named GetStarted_Scene) |
I worked on top of the tutorial sample project that Unity provides. It was handy because the floor and the boxes were already there, but you can follow along just the same in an empty 3D project with one floor (Plane) and a few boxes (Cube).
Four words to know first
The same few words keep coming up in anything you read about Unity. Get these four straight and the rest reads much more easily.
A Scene is one scene of the game. Think of it as a single stage. We only use one scene here.
A GameObject is any object placed in a scene. Boxes, the floor, cameras and lights are all GameObjects. At first I was not sure whether to call these "entities", but in Unity an entity belongs to DOTS (ECS), which is an entirely different way of building games. Searching for "Unity entity" will turn up the wrong material, so remember: an object in the scene is a GameObject.
A Component is a piece of functionality you attach to a GameObject. A GameObject on its own is an empty shell, and what you attach to it decides what it is. Attach a component that draws a shape and it becomes visible; attach a physics component and it falls and collides. Unity does not think "inherit from a Box class to make a heavy box". It thinks "assemble the features you need onto an empty object".
A Script is a component you write yourself in C#. A script that drives an object, like BatController, is commonly called a Controller. That is a convention, not an official term.
So the title of this post, "Getting to Know GameObjects and Controllers", unpacks to this: place objects in a scene, attach components to them, and move them with a script.
Installing Unity and creating a project
Unity is two programs. Unity Hub is a launcher that manages editor versions and your list of projects, and the actual work happens inside the Unity Editor that you open from the Hub.
- Install Unity Hub and sign in with a Unity account. For individuals, the free Personal license is activated automatically.
- Under Installs → Install Editor, choose a Unity 6 version. If you plan a series of games, a long-term support (LTS) version is the stable choice. The editor used in this practice is 6000.6.3f1.
- Choose the modules to install. If you plan to export to phones later, add Android Build Support (with OpenJDK and Android SDK & NDK Tools) and iOS Build Support. Modules can be added later, so you can skip this for now. An iOS build needs a Mac and Xcode.
- Under Projects → New project, pick a template. I used the 3D tutorial sample for this practice.
- Set the project name and location and press Create project. The first open takes a while.
- Once the editor is open, set your code editor (Rider or VS Code) under Edit → Preferences → External Tools. This is the program that opens when you double-click a script. If you are used to Android Studio, Rider comes from the same company and feels familiar.
Reading the editor
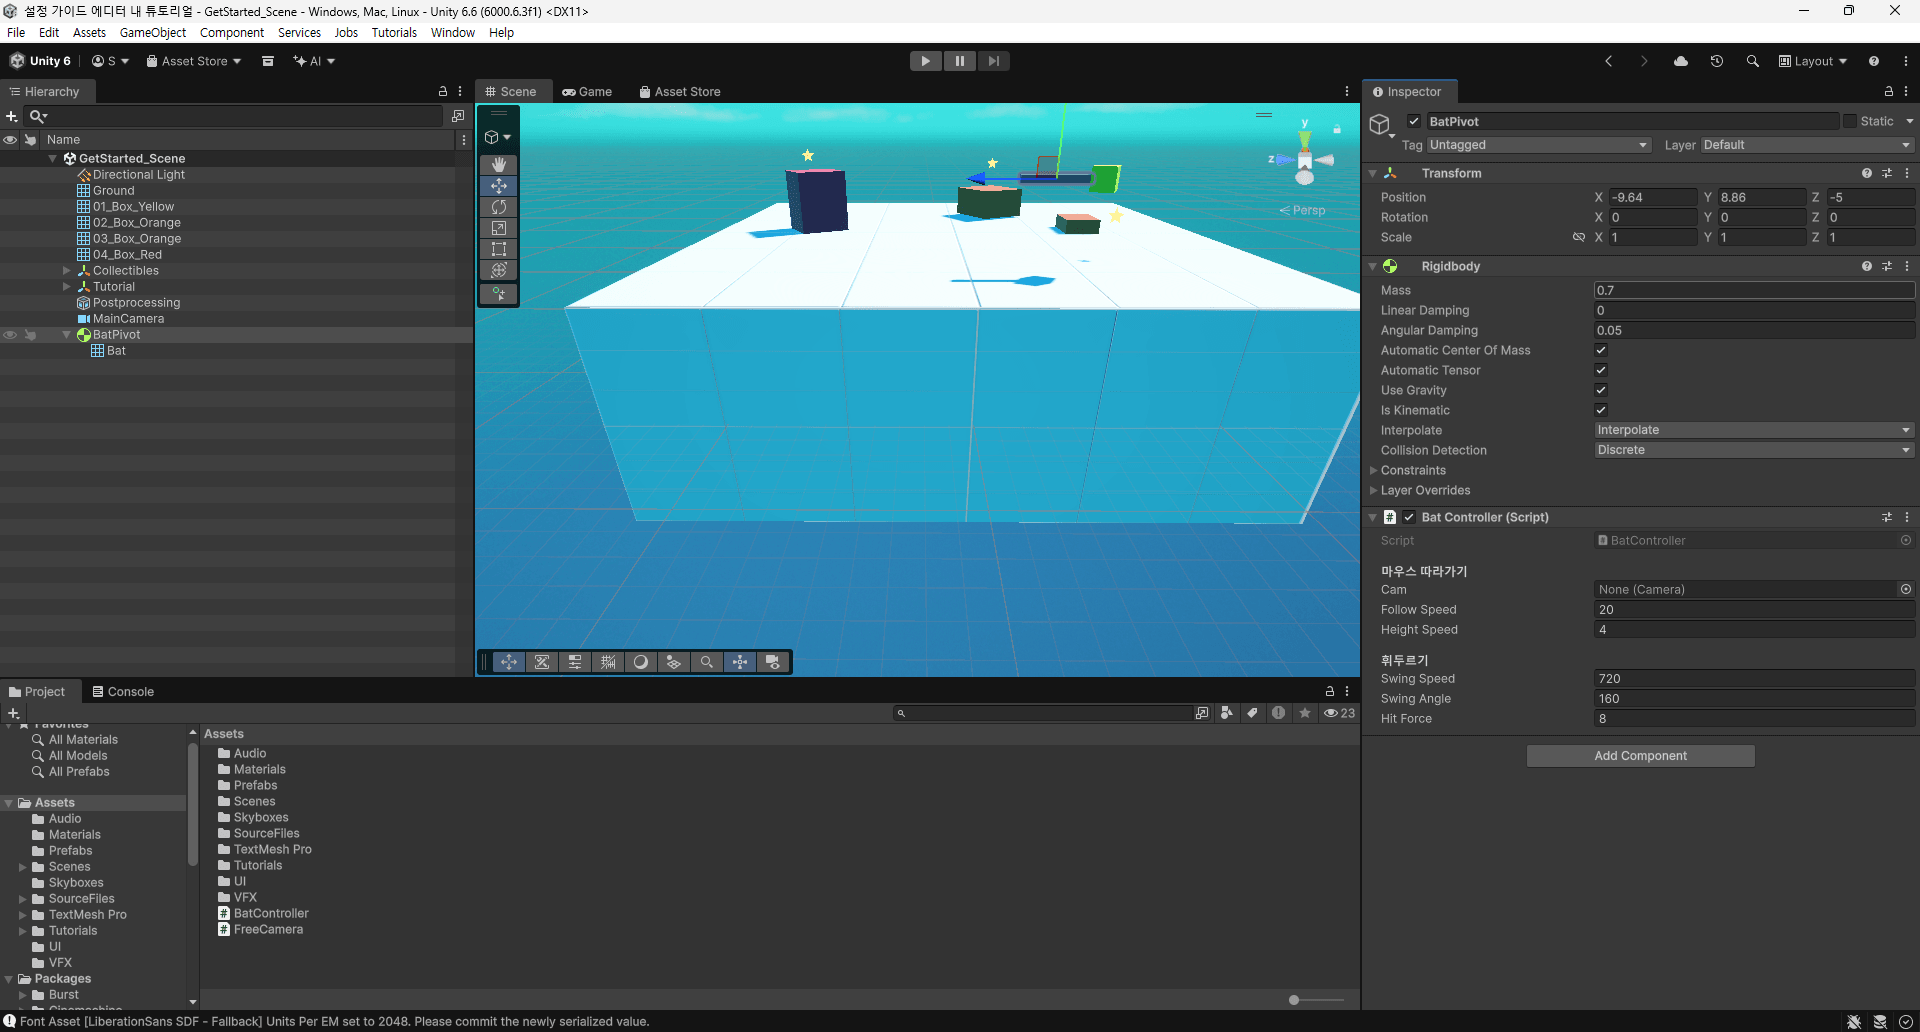
The first time the editor opens there are so many windows that you do not know where to look. Keep the full-screen capture above next to you and go through them one at a time. There are six windows, and at first the first four are enough.
| Window | Where it is | What it is for |
|---|---|---|
| Hierarchy | Left | The list of GameObjects in the current scene. You select objects here |
| Scene | Middle | The workbench where you place objects. Look around freely and edit |
| Inspector | Right | The components on the object selected in the Hierarchy, and their values |
| Project | Bottom | Every file in the project folder. Scripts are created here too |
| Game | Middle (tab next to Scene) | The actual play screen. What the in-game camera sees |
| Console | Bottom (tab next to Project) | Logs and error messages |
There is one basic move. Click an object in the Hierarchy and its details appear in the Inspector. Most of working in Unity is a repetition of "pick on the left, change on the right".
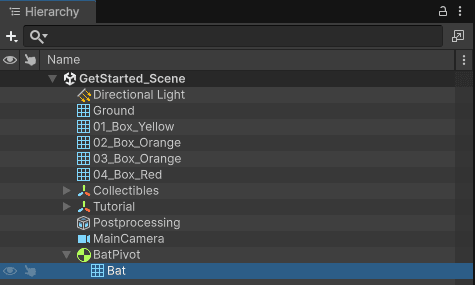 The Hierarchy window. Every line is a GameObject. MainCamera and BatPivot (with Bat inside it) are the ones I added; the rest came with the tutorial sample.
If you have built apps before, this mapping will get you comfortable quickly: the Hierarchy is the view tree, the Inspector is the attributes panel, Scene is the layout editor, Game is the emulator, and the Console is Logcat.
Shortcuts you will use all the time
You will be repeating edit → save → play constantly, so it pays to learn these few.
| Shortcut | What it does |
|---|---|
| Ctrl + S | Save the scene |
| Ctrl + P | Start / stop play |
| Ctrl + Shift + P | Pause |
| Ctrl + Alt + P | Step one frame |
| Ctrl + B | Build And Run (build, then run straight away) |
| Ctrl + Shift + B | Open the Build Profiles window |
| Ctrl + R | Refresh assets |
| Ctrl + Shift + F | Move the selected object to the current Scene view (Align With View) |
The trap everyone falls into first: values changed during play are lost
Press the ▶ button at the top centre (Ctrl + P) and the game runs inside the editor. This is called play mode. You can still change values in the Inspector during play mode, so you start tweaking things — and when you stop playing, every value you changed goes back to what it was.
To avoid losing values you spent a while tuning, set Playmode tint to a loud colour under Edit → Preferences → Colors. During play the whole editor is tinted that colour, so you can see at a glance that "what I change now will not be saved".
Adding physics to the boxes
Now we make the boxes fly when they are hit. Right now a box only has a shape: it has no weight and is not affected by gravity. To make it obey the laws of physics you attach a component called a Rigidbody. An object with a Rigidbody falls under gravity and is pushed away when something hits it.
- Click a box (01_Box_Yellow) in the Hierarchy.
- Press the Add Component button at the bottom of the Inspector.
- Type Rigidbody into the search field, or choose Physics → Rigidbody from the list.
- Untick Static at the top right of the Inspector. Static means "this object never moves", so while it is on the box will not fly.
- Lower the Rigidbody's Mass from the default 1 to 0.7. The lighter it is, the further it flies.
- Do the same for the other three boxes.
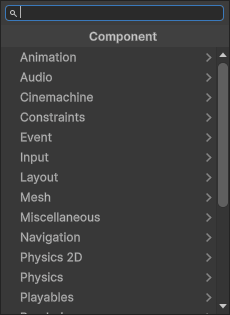 The Add Component menu. Physics and Physics 2D sit next to each other. For a 3D object use the Rigidbody inside Physics. The Rigidbody 2D inside Physics 2D is a different component with a similar name.
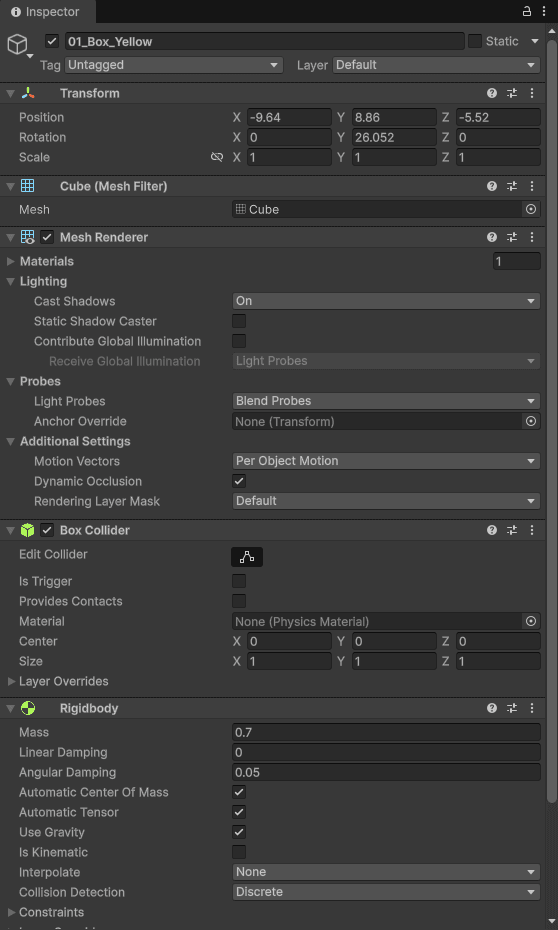 The box's Inspector after adding the Rigidbody. The components are stacked from top to bottom.
This screen shows exactly what "a GameObject is an assembly of components" means. Reading down what is attached to one box:
| Component | What it does |
|---|---|
| Transform | Position, rotation and scale. Every GameObject has one |
| Cube (Mesh Filter) | What shape it is (a cube) |
| Mesh Renderer | Draws that shape on screen |
| Box Collider | An invisible box used to detect collisions. Without it nothing hits |
| Rigidbody | Moves under gravity and forces (the one we just added) |
The difference between a Collider and a Rigidbody is confusing at first. A Collider is "the shape that things bump into", and a Rigidbody is "a body moved by physics". With only a Collider, an object blocks things in place like a wall; it needs a Rigidbody as well to be pushed and sent flying.
Press Ctrl + P at this point and any box that was floating in the air drops to the floor. That means physics is working.
Building the bat
Next, a bat to hit the boxes with. The bat is made of two objects, one inside the other. Why it is not a single object comes in a moment.
- Right-click an empty area of the Hierarchy → Create Empty. This makes an empty GameObject with no shape. Rename it BatPivot.
- Right-click BatPivot → 3D Object → Cube. A Cube appears inside BatPivot. Rename it Bat.
- Select Bat and set its Transform in the Inspector to Position 0, 0, 1.5 / Scale 0.3, 0.3, 3. The cube becomes a long thin bar.
- Select BatPivot and set the Y of its Position to the same height as the boxes (8.86 in my scene).
- Add Component → Physics → Rigidbody on BatPivot, and tick Is Kinematic. Setting Interpolate to Interpolate as well makes the movement look smoother.
Putting one object inside another like this is called a parent-child relationship. BatPivot is the parent and Bat is the child. Move or rotate the parent and the child goes with it.
| Object | Role | What is attached | Settings |
|---|---|---|---|
| BatPivot (parent, empty object) | The hand holding the bat. Handles movement and rotation | Rigidbody, BatController script | Is Kinematic ticked, Interpolate |
| Bat (child, Cube) | The bat itself. Handles shape and collision | Mesh Renderer, Box Collider | Position 0, 0, 1.5 / Scale 0.3, 0.3, 3 |
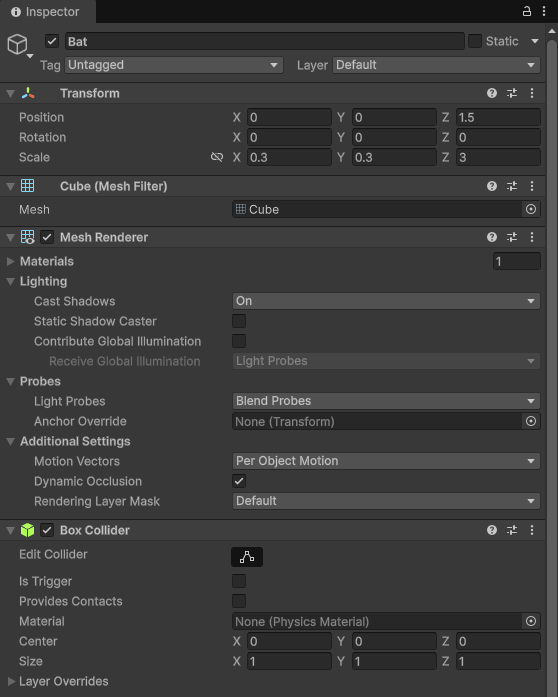 The Inspector of the child, Bat. A child's Position is relative to its parent. A Z of 1.5 means "1.5 in front of the parent".
Why split it in two? The pivot
An object rotates around its own centre. Make a single bar and rotate it, and it spins around its middle like a propeller. But a bat should be held at the end of the handle and swung.
So I pushed the bar (Bat), which is 3 long, forward by 1.5. That puts one end of the bar exactly at the position of the parent (BatPivot). Now when the parent rotates, the bar turns around that end. The empty object BatPivot is invisible, but it plays the part of the hand that holds the bat. Creating an empty parent when you want to move a pivot is a very common trick in Unity.
What is Is Kinematic?
The Rigidbody on a box falls under gravity and is pushed when hit. That would be a problem for the bat. The bat is something held in a hand: it must not fall, and it must not bounce away just because it hit a box.
Turn on Is Kinematic and that Rigidbody is no longer moved by gravity or by collisions; it moves only as a script tells it to. It still pushes other objects properly. Use it when you need an object that "pushes others but is never pushed itself".
A mistake I made: putting the Rigidbody on the child
At first I put the Rigidbody on Bat, the part you can see. The moment I pressed play, Bat alone fell under gravity and the handle (BatPivot) was left hanging in mid-air.
Put exactly one Rigidbody on the outermost parent of a group that moves together. The child's Collider automatically belongs to the parent's Rigidbody without any extra work. If a child has its own Rigidbody, that child becomes a physically independent object, and collision notifications no longer reach a script attached to the parent.
Moving the bat with a script
The bat exists, but it just sits there. To make it follow the mouse and swing on a click, we need to write a script and attach it.
Creating and attaching a script
- In the Project window, right-click the Assets folder → in the Create menu choose MonoBehaviour Script (in Unity 6 it is under Scripting).
- Name it BatController. The file name and the class name inside the code must be the same. If they differ, the script cannot be attached to an object.
- Double-click the new file to open it in your code editor. Paste in the code below and save.
- Go back to the editor and wait a moment while Unity re-reads the code (compiles).
- Drag BatController from the Project window onto BatPivot in the Hierarchy. Selecting BatPivot and searching for the name in Add Component does the same thing.
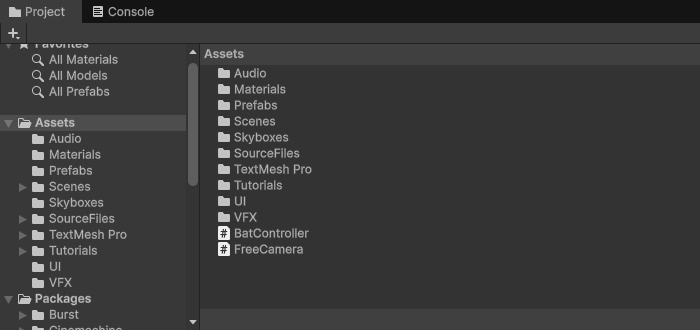 The Assets folder in the Project window. The BatController and FreeCamera scripts I wrote are at the bottom.
Attaching a script to an object is exactly the same act as attaching a Rigidbody, because a script is a component too.
BatController: the full code
The comments and the [Header] labels are in Korean in my project, which is why the screenshots show Korean section titles. I have translated them here.
using UnityEngine;
using UnityEngine.InputSystem;

[RequireComponent(typeof(Rigidbody))]
public class BatController : MonoBehaviour
{
    [Header("Follow the mouse")]
    public Camera cam;                 // leave empty to use the Main Camera
    public float followSpeed = 20f;    // maximum speed when following the pointer
    public float heightSpeed = 4f;     // speed of the Q/E height adjustment

    [Header("Swing")]
    public float swingSpeed = 720f;    // swing speed (degrees per second)
    public float swingAngle = 160f;    // how far the swing goes
    public float hitForce = 8f;        // extra force applied on a hit

    Rigidbody rb;
    float startAngle;
    float currentAngle;
    bool swinging;
    bool returning;

    float height;          // height of the bat
    Vector3 targetPos;     // position to move towards

    void Awake()
    {
        rb = GetComponent<Rigidbody>();
        rb.isKinematic = true;
        rb.useGravity = false;

        startAngle = transform.eulerAngles.y;
        height = transform.position.y;
        targetPos = transform.position;

        if (cam == null) cam = Camera.main;
    }

    void Update()
    {
        var mouse = Mouse.current;
        var kb = Keyboard.current;
        if (mouse == null) return;

        // Left click: swing
        if (mouse.leftButton.wasPressedThisFrame && !swinging && !returning)
            swinging = true;

        // Q / E: adjust height
        if (kb != null)
        {
            if (kb.eKey.isPressed) height += heightSpeed * Time.deltaTime;
            if (kb.qKey.isPressed) height -= heightSpeed * Time.deltaTime;
        }

        // Mouse position → a point on the plane at the bat's height
        if (cam != null)
        {
            Ray ray = cam.ScreenPointToRay(mouse.position.ReadValue());
            Plane plane = new Plane(Vector3.up, new Vector3(0, height, 0));
            if (plane.Raycast(ray, out float distance))
                targetPos = ray.GetPoint(distance);
        }
        targetPos.y = height;
    }

    void FixedUpdate()
    {
        // Follow the pointer smoothly
        Vector3 next = Vector3.MoveTowards(rb.position, targetPos, followSpeed * Time.fixedDeltaTime);
        rb.MovePosition(next);

        // Swing → return
        if (swinging)
        {
            currentAngle += swingSpeed * Time.fixedDeltaTime;
            if (currentAngle >= swingAngle)
            {
                currentAngle = swingAngle;
                swinging = false;
                returning = true;
            }
        }
        else if (returning)
        {
            currentAngle -= swingSpeed * 0.5f * Time.fixedDeltaTime;
            if (currentAngle <= 0)
            {
                currentAngle = 0;
                returning = false;
            }
        }
        rb.MoveRotation(Quaternion.Euler(0, startAngle + currentAngle, 0));
    }

    void OnCollisionEnter(Collision collision)
    {
        if (!swinging) return;

        Rigidbody target = collision.rigidbody;
        if (target == null || target.isKinematic) return;

        // Send it flying away from the bat, lifted slightly
        Vector3 dir = target.position - transform.position;
        dir.y = 0;
        dir.Normalize();
        target.AddForce((dir + Vector3.up * 0.3f) * hitForce, ForceMode.Impulse);
    }
}
With the script attached, selecting BatPivot shows this in the Inspector.
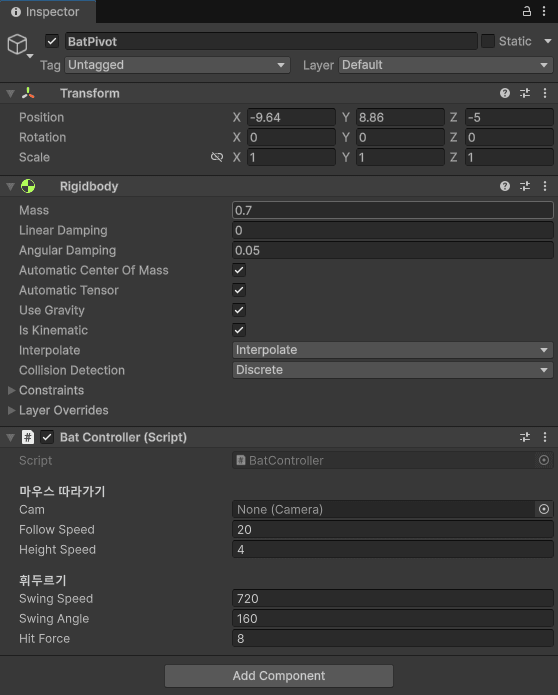 BatPivot's Inspector. Bat Controller at the bottom is the script we just attached. The variables declared
public in the code show up as fields you can fill in.
How to read the code
The code looks long, but once you know the frame Unity sets out it reads quickly.
Functions Unity calls for you. Awake, Update, FixedUpdate and OnCollisionEnter are not names I made up. Write a function with one of these names and Unity calls it at the appointed time.
| Function | When it is called | What it does in this script |
|---|---|---|
| Awake | Once, at the start | Finds the Rigidbody and remembers the starting position and angle |
| Update | Every time the screen is drawn (every frame) | Reads mouse and keyboard input |
| FixedUpdate | On every physics step (at a fixed interval) | Actually moves and rotates the bat |
| OnCollisionEnter | The moment it hits something | Adds force to the box that was hit |
An app only runs code when there is an event, such as a button press. A game keeps running Update dozens of times a second even when nothing is happening. This is called the game loop, and it was the biggest difference from app development for me.
public variables become fields in the Inspector. Write public float followSpeed = 20f; and a Follow Speed field containing 20 appears in the Inspector. You can tune the feel by changing numbers in the editor without touching the code. [Header("…")] puts a small title above a group of fields.
The Cam field can be left empty. The single line public Camera cam; creates the Cam field in the Inspector. It is the one showing None (Camera) in the capture above. When it is empty, Camera.main finds a camera for you. But Camera.main does not look at an object's name: it looks for the camera whose Tag is MainCamera. This comes up again in the camera section below.
Why multiply by Time.deltaTime? Different computers draw a different number of frames per second. Write "move 0.1 every frame" and it moves faster on a fast computer. Time.deltaTime is the time the previous frame took, so multiplying by it turns the value into "this much per second" and the speed is the same on any computer. Inside FixedUpdate, use Time.fixedDeltaTime.
Turning the mouse position into a 3D position (Ray and Plane). The mouse is a flat coordinate on the screen and the bat lives in 3D space. So we shoot a ray from the camera in the direction the mouse is pointing, lay an imaginary plane at the height of the bat, and find where the ray meets the plane. That point is the target the bat moves towards.
Following instead of teleporting. If you move the bat straight to the target, a quick mouse movement makes the bat jump a long way in an instant, and a box it merely brushes is shoved hard. So Vector3.MoveTowards moves it at most followSpeed closer each step.
MovePosition and MoveRotation. A kinematic Rigidbody is moved with these two functions, not by setting transform.position directly. That way the physics engine knows the path the bat travelled and pushes the boxes correctly.
[RequireComponent(typeof(Rigidbody))]. Attaching this script adds a Rigidbody automatically if there is none. But a Rigidbody added that way has default settings: it is not kinematic and it does feel gravity. So Awake sets isKinematic = true and useGravity = false once more in code. That is why the bat does not fall when you run it, even though Use Gravity is still ticked in the capture above.
Adding a camera
This is where I got properly stuck once. I built the game, ran it, and the screen was simply black.
The cause was that there was no camera in the scene. The editor's Scene window shows the scene through a camera of its own, so everything looks fine while editing even with no camera in the scene. But the real game screen (the Game window and the built game) shows what a camera GameObject placed in the scene is filming. With no camera there is nobody filming, so the screen is black.
- From the menu choose GameObject → Camera to add a camera.
- Select the camera and change its Tag at the top of the Inspector to MainCamera.
- Find a view you like in the Scene window, then with the camera selected press Ctrl + Shift + F (Align With View). The camera moves to the view you are looking at.
- Click the Game tab and check that the view you just set up is showing.
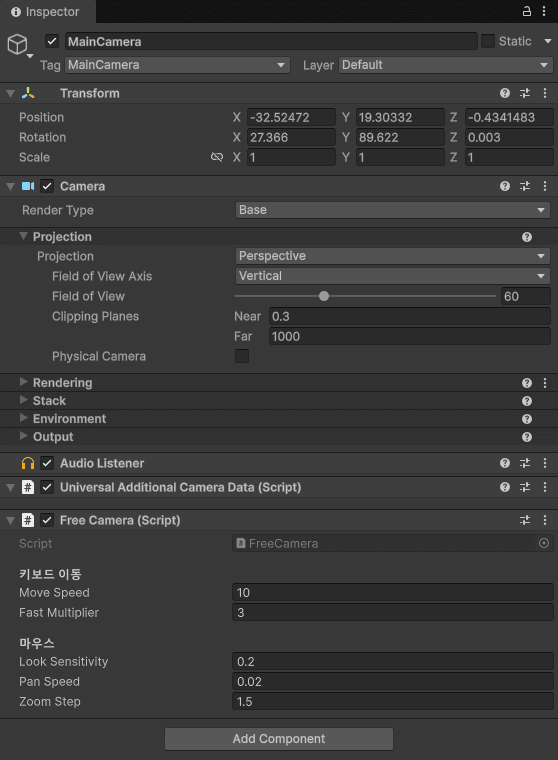 The camera's Inspector. The Tag just under the name is set to MainCamera. Free Camera at the bottom is the script we attach next.
A name and a Tag are different things
The text you see in the Hierarchy is the name, and you can call an object anything. A Tag is a label chosen at the top of the Inspector. Camera.main in the code ignores the name and looks for the camera tagged MainCamera. Even if you name your camera Main Camera, when its Tag is Untagged Camera.main finds nothing and the bat will not follow the mouse.
If you would rather not rely on the Tag, drag the camera from the Hierarchy straight into the Cam field of BatController. Then that camera is used whatever its Tag.
FreeCamera: moving the view while playing
With a fixed camera you cannot see where a box flew off to, so I wrote a script that moves the view with mouse and keyboard, like the editor's Scene window, and attached it to the camera. It is created the same way as BatController; only the object it is attached to differs.
using UnityEngine;
using UnityEngine.InputSystem;

public class FreeCamera : MonoBehaviour
{
    [Header("Keyboard movement")]
    public float moveSpeed = 10f;       // arrow-key movement speed
    public float fastMultiplier = 3f;   // multiplier while Shift is held

    [Header("Mouse")]
    public float lookSensitivity = 0.2f; // right-drag rotation sensitivity
    public float panSpeed = 0.02f;       // middle-drag pan sensitivity
    public float zoomStep = 1.5f;        // distance moved per wheel notch

    float yaw;
    float pitch;

    void Start()
    {
        // Start from the camera's current angle
        Vector3 e = transform.eulerAngles;
        yaw = e.y;
        pitch = e.x > 180f ? e.x - 360f : e.x;
    }

    void Update()
    {
        var kb = Keyboard.current;
        var mouse = Mouse.current;
        if (kb == null || mouse == null) return;

        float speed = moveSpeed * (kb.leftShiftKey.isPressed ? fastMultiplier : 1f);

        // Arrow keys: forward/back and sideways relative to where we are looking (height stays the same)
        Vector3 forward = transform.forward; forward.y = 0; forward.Normalize();
        Vector3 right = transform.right;     right.y = 0;   right.Normalize();

        Vector3 move = Vector3.zero;
        if (kb.upArrowKey.isPressed)    move += forward;
        if (kb.downArrowKey.isPressed)  move -= forward;
        if (kb.rightArrowKey.isPressed) move += right;
        if (kb.leftArrowKey.isPressed)  move -= right;
        // Page Up / Page Down: up and down
        if (kb.pageUpKey.isPressed)     move += Vector3.up;
        if (kb.pageDownKey.isPressed)   move -= Vector3.up;
        transform.position += move.normalized * speed * Time.deltaTime;

        // Mouse wheel: zoom in/out along the view direction
        float scroll = mouse.scroll.ReadValue().y;
        if (Mathf.Abs(scroll) > 0.01f)
            transform.position += transform.forward * Mathf.Sign(scroll) * zoomStep;

        Vector2 delta = mouse.delta.ReadValue();

        // Right-drag: rotate the view
        if (mouse.rightButton.isPressed)
        {
            yaw += delta.x * lookSensitivity;
            pitch -= delta.y * lookSensitivity;
            pitch = Mathf.Clamp(pitch, -89f, 89f);   // keep it from flipping over
            transform.rotation = Quaternion.Euler(pitch, yaw, 0f);
        }

        // Middle-drag: pan
        if (mouse.middleButton.isPressed)
        {
            transform.position -= (transform.right * delta.x + transform.up * delta.y) * panSpeed;
        }
    }
}
One thing is worth pointing out in this code. The arrow-key movement is multiplied by Time.deltaTime, but the mouse rotation is not. Movement while a key is held is "this much per second", so it needs the frame time. mouse.delta, on the other hand, is already "how far the mouse moved this frame". Multiply that again and rotation gets slower the higher the frame rate.
Both scripts start with using UnityEngine.InputSystem;. That means they read the keyboard and mouse the new way (the Input System), through Keyboard.current and Mouse.current. Input.GetKeyDown(...), which you will see in many older examples online, is the old way, and it can throw errors in a project set up for the new one. The tutorial sample already included the Input System. If you get an error saying InputSystem cannot be found, install the Input System package from the Package Manager.
Running it
Save with Ctrl + S and play with Ctrl + P. You have to click the Game window once before keyboard and mouse input goes to the game.
The bat uses the left mouse button and Q/E, and the camera uses the right and middle mouse buttons and the arrow keys, so the two do not clash.
| Target | Control | What it does |
|---|---|---|
| Bat | Move the mouse | Position of the bat (the pointer is the handle) |
| Bat | Left click | Swing |
| Bat | Q / E | Down / up |
| Camera | Arrow keys | Move relative to where you are looking |
| Camera | Page Up / Page Down | Up / down |
| Camera | Shift + move | Faster |
| Camera | Mouse wheel | Zoom in / out |
| Camera | Right-drag | Rotate the view |
| Camera | Middle-drag | Pan the view |
If the bat is higher or lower than the boxes and you keep missing, adjust the height with Q/E. If the swing does not feel right, stop play and change Swing Speed, Swing Angle and Hit Force in BatPivot's Inspector. And remember: values changed during play are lost.
Making a file that runs on Windows
Once it works in the editor, the next step is exporting a program that runs without the editor. This is called a build.
- Save the scene with Ctrl + S. Unsaved changes do not go into the build.
- Open File → Build Profiles. This is the window older material calls Build Settings; it was renamed in Unity 6.
- Choose Windows under Platforms on the left. If another platform is Active, press Switch Platform.
- Check that the current scene is in the Scene List. If not, add it with Add Open Scenes. The scene at the top of the list is the first one shown when the game starts.
- Press Build and choose a folder to save to. Creating a new folder such as
Builds/Windowsinside the project folder works well. Do not put it inside the Assets folder. - When the build finishes, run the
.exein that folder.
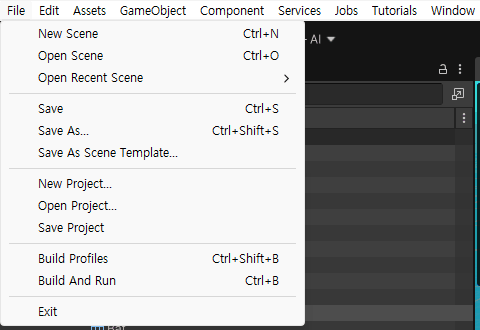 Build Profiles and Build And Run are near the bottom of the File menu.
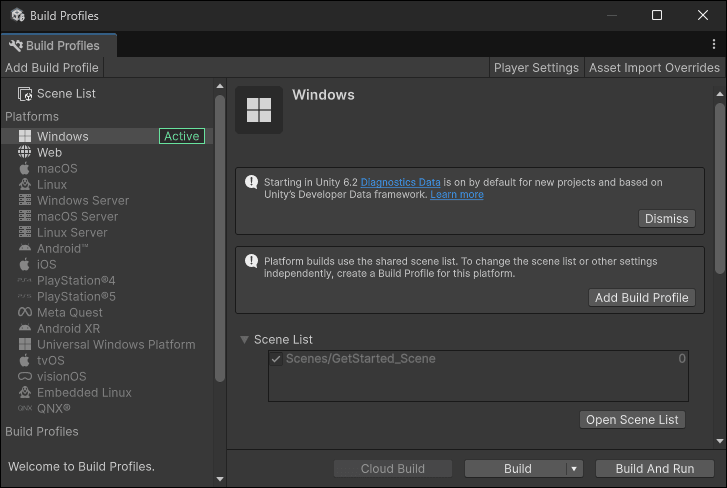 The Build Profiles window. Windows is Active on the left, and GetStarted_Scene is in the Scene List on the right. The Build button is at the bottom right.
The build folder does not contain just one .exe. Folders such as <game name>_Data are created alongside it, and the .exe and those folders must always stay together for the game to run. When you move it to another computer, move the whole folder. The ..._BackUpThisFolder_ButDontShipItWithYourGame folder that also appears is, as the name says, one to leave out when you give the game to someone else.
Where I got stuck while building
The top two are problems I actually hit; the rest are things I looked up out of curiosity while building.
| Symptom / what you want | Cause | Fix |
|---|---|---|
| A black screen that crackles and flickers | A clash between DirectX 12 and the graphics driver | In Player → Other Settings, untick Auto Graphics API for Windows and move Direct3D11 to the top |
| A plain black screen with no flicker | There is no camera in the scene | Add a camera as in "Adding a camera" above and set its Tag to MainCamera |
| Can I build into the same folder again? | It overwrites, though files from the old build may be left behind | Close the running exe first. For a clean result, empty the folder before building |
| I want to remove the Made with Unity screen at startup | Since Unity 6 the Personal license can turn it off too | Player → Splash Image → untick Show Splash Screen |
| The window has no X close button | It is starting in full screen | In Player → Resolution and Presentation, set Fullscreen Mode to Windowed and tick Resizable Window |
| I want a quit button inside the game | You have to make it yourself | Connect the QuitGame script below to the button's On Click() |
"Player" in the table is the Edit → Project Settings → Player screen. Settings about the exported game, such as its name, icon, window mode and graphics, are gathered here.
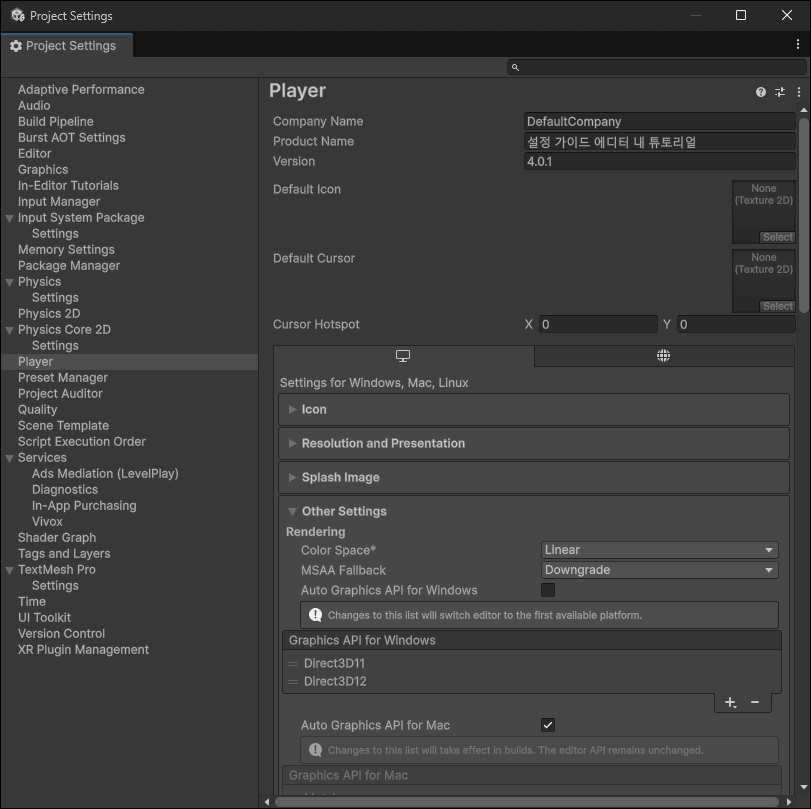 Player → Other Settings. Untick Auto Graphics API for Windows and a list appears below it. I dragged Direct3D11 to the top.
The flickering black screen took the longest to track down. There is a quick way to confirm this is the cause before changing any settings: run the built exe with the -force-d3d11 option. If it displays properly that way, DirectX 12 is the problem.
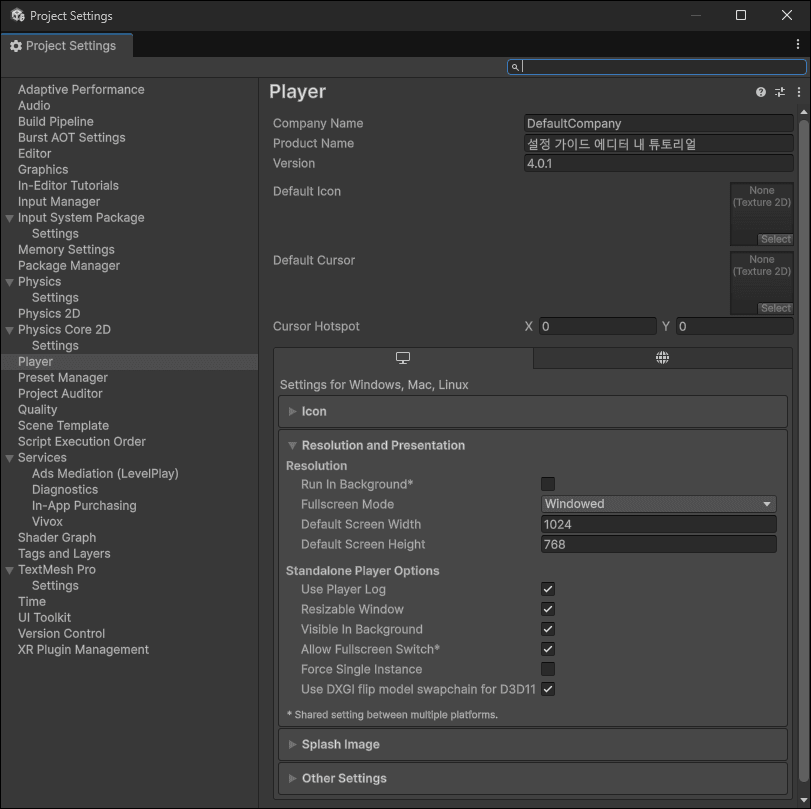 Player → Resolution and Presentation. Set Fullscreen Mode to Windowed and the game opens in a window with a close button, like any ordinary program.
If the built game misbehaves and nothing on screen gives you a clue, look at the log file. It is at %USERPROFILE%\AppData\LocalLow\<company name>\<game name>\Player.log. The company name and game name are the Company Name and Product Name at the top of the Player screen.
Two small scripts that are nice to have
Neither is required, but they show how short a script can be, so I am including them.
QuitGame: a quit button
Create a button on screen (UI → Button - TextMeshPro) and connect this script's Quit() to the button's On Click(). In the editor it stops play; in the built game it closes the program. #if UNITY_EDITOR means "use this line only when running in the editor".
using UnityEngine;

public class QuitGame : MonoBehaviour
{
    public void Quit()
    {
#if UNITY_EDITOR
        UnityEditor.EditorApplication.isPlaying = false;
#else
        Application.Quit();
#endif
    }
}
To quit with the Esc key as well, check Keyboard.current.escapeKey.wasPressedThisFrame in Update and call Quit(). Note that on iOS, Apple's guidelines say an app should not have a quit button.
FallRemover: deleting boxes that have fallen
A box knocked off the floor keeps falling forever, and keeps being calculated. This removes it once it drops below a certain height. Attach it to each box.
using UnityEngine;

public class FallRemover : MonoBehaviour
{
    public float killY = -20f;

    void Update()
    {
        if (transform.position.y < killY)
            Destroy(gameObject);
    }
}
What I learned today
| Concept | In one line |
|---|---|
| GameObject | Any object placed in a scene. On its own it is an empty shell |
| Component | A piece of functionality attached to a GameObject. A script is a component too |
| Hierarchy and Inspector | Pick on the left, change on the right |
| Collider | The shape that things bump into |
| Rigidbody | A body moved by physics. Exactly one, on the outermost parent of a group |
| Is Kinematic | Not moved by gravity or collisions, only by script. Move it with MovePosition and MoveRotation |
| Parent and child | Move the parent and the child follows. An empty parent lets you move the pivot |
| Lifecycle functions | Awake (at the start) → Update (every frame) / FixedUpdate (every physics step) |
| deltaTime | Multiply by it for the same speed on any computer. Do not multiply values that are already "this frame's amount", such as mouse movement |
| public variables | Appear as fields in the Inspector so you can tune values in the editor |
| Name and Tag | Camera.main finds the camera by Tag (MainCamera), not by name |
| Camera | With no camera in the scene the game screen is black. Do not be fooled by what the Scene window shows |
| Ray and Plane | How to turn the mouse position on screen into a position in 3D space |
| Play mode | Values changed while playing are lost when you stop |
What comes next
This practice was a warm-up before making Survival Trail, a series of 2D survival games (grassland, mountain, island, desert, jungle). The next practice will pick up one of these.
- Switch to 2D: create a new Universal 2D project and test 2D lights, normal maps and shadows
- Gathering basics: move a character → pick up fruit → put it in an inventory → restore hunger
- Score and UI: show the number of boxes knocked off, and make boxes respawn
- Android build: follow the same steps to make an .apk and run it on a phone
- Prefabs: turn the box into a prefab and place several
- Connecting Claude Code: run Claude Code in the Unity project folder and check the Unity MCP connection
- Git setup: a .gitignore for Unity, Git LFS, Force Text, Visible Meta Files